Prepare yourself for a culinary journey into the decadent world of cheesecake! This isn’t just any dessert; it’s a timeless classic with a rich and fascinating history. While the exact origins are debated, the earliest known cheesecake recipe dates back to ancient Greece, around the 5th century BC. These early versions were far cry from the creamy, baked cheesecakes we know today, consisting more of a mixture of cheese, honey, and grains, baked in a crust. They were often served at celebratory events, highlighting their early association with festivals and special occasions.
The cheesecake’s evolution is a testament to culinary adaptation across cultures. Its journey took it through the Roman Empire, where variations incorporating different cheeses and spices emerged. However, the dessert as we recognize it today didn’t truly take shape until the Middle Ages, in Europe. The addition of eggs and sugar, crucial components of the modern recipe, significantly altered the texture and taste profile, paving the way for the creamy, indulgent dessert we enjoy today. Interestingly, the popularity of the cheesecake surged again during the industrial revolution, as mass production of key ingredients like cream cheese made it more accessible to the average consumer.
The cheesecake’s cultural significance is undeniable. It’s a staple dessert in countless countries, each boasting its unique regional twist. For instance, New York-style cheesecake, with its dense, rich texture and tangy flavor, has become synonymous with American cuisine. Meanwhile, Japanese cheesecake is known for its light and airy texture, often featuring a delicate sponge-like consistency. The global appeal of cheesecake is reflected in its widespread consumption; estimates suggest the annual cheesecake market is worth billions of dollars globally, indicating its enduring popularity and the continued innovation in its production and consumption.
Today, the cheesecake remains a culinary icon, a symbol of celebration and indulgence. From classic plain cheesecakes to adventurous flavor combinations like chocolate swirl, strawberry swirl, and even savory variations, its versatility is unparalleled. This recipe aims to guide you through the creation of a delicious and satisfying cheesecake, drawing on the best traditions while encouraging your own creative exploration. Get ready to bake a piece of history, one creamy slice at a time!
Ingredients and Measurements
This section details the ingredients required for our delectable cheesecake recipe, along with precise measurements to ensure perfect results. Accuracy is key when baking, particularly with cheesecakes, so please take the time to measure carefully using a kitchen scale for the best consistency.
For the Crust:
We’ll start with a classic graham cracker crust. The quantities listed below create a crust perfectly sized for a 9-inch springform pan. If using a different sized pan, adjust the ingredient quantities proportionally. Avoid using overly fine graham cracker crumbs, as they can result in a crumbly crust that doesn’t hold its shape well.
- 1 ½ cups (150g) graham cracker crumbs. Recommendation: Use a food processor to grind the crackers for a consistent texture. Alternatively, you can purchase pre-made graham cracker crumbs.
- ¼ cup (50g) granulated sugar. Don’t substitute with powdered sugar, as it will affect the crust’s texture.
- 6 tablespoons (85g) unsalted butter, melted. Ensure the butter is completely melted and slightly cooled before mixing to prevent the crumbs from becoming soggy.
For the Cheesecake Filling:
The filling is the heart of the cheesecake, and precision in measuring is paramount for a smooth, creamy texture. Use room temperature ingredients whenever possible, as this ensures proper emulsification and prevents lumps.
- 32 ounces (900g) cream cheese, softened to room temperature. This is crucial for a smooth filling; be sure to take the cream cheese out of the refrigerator at least 2 hours before beginning. Don’t over-soften; it should be spreadable but not runny.
- 1 ¾ cups (350g) granulated sugar. Again, accuracy is key. Using a kitchen scale is highly recommended for precise measurements.
- ¼ cup (60ml) sour cream, at room temperature. Sour cream adds richness and tanginess; don’t substitute with plain yogurt as it will alter the final flavor and texture.
- 2 teaspoons pure vanilla extract. Use a high-quality vanilla extract for the best flavor. Avoid using imitation vanilla.
- 4 large eggs, at room temperature. Room temperature eggs incorporate better into the batter and help prevent cracking during baking. Bring them to room temperature gradually to avoid rapid temperature changes.
- Optional: 2 tablespoons lemon juice (for a tangier cheesecake)
Important Note: All measurements are approximate. Slight variations may occur, but striving for accuracy ensures the best possible results. Using a kitchen scale for weight measurements is strongly recommended for professional-quality results.
Crust Preparation
The crust is the foundation of a truly delicious cheesecake, providing a delightful textural contrast and enhancing the overall flavor profile. A perfectly prepared crust shouldn’t be overly sweet or overpowering, but rather a subtle complement to the creamy filling. This recipe uses a classic graham cracker crust, but feel free to experiment with different cookies or even nuts for variations.
Ingredients:
- 1 ½ cups (150g) graham cracker crumbs (about 12 full graham crackers, finely crushed)
- ¼ cup (50g) granulated sugar
- 6 tablespoons (3 ounces/85g) unsalted butter, melted
Equipment:
- 9-inch springform pan
- Food processor (recommended for even crumbs)
- Measuring cups and spoons
- Mixing bowl
- Fork or pastry blender
- Parchment paper (optional, for easy removal)
Instructions:
Step 1: Crushing the Graham Crackers: For the most consistent texture, we recommend using a food processor. Add the graham crackers and pulse until they are finely ground into crumbs. Avoid over-processing, as this can create a powdery consistency. If you don’t have a food processor, place the graham crackers in a zip-top bag and crush them using a rolling pin. Be sure to get them as finely crushed as possible for a smooth crust.
Step 2: Combining the Ingredients: In a medium mixing bowl, combine the graham cracker crumbs and granulated sugar. Pour in the melted unsalted butter and use a fork or a pastry blender to thoroughly mix the ingredients until they are evenly moistened. Ensure all the crumbs are coated with butter; this is crucial for the crust’s texture and binding.
Step 3: Pressing into the Pan: This step requires some effort to ensure a firm and even crust. Remove the bottom of the springform pan. Line the bottom with parchment paper (this makes removal easier later). Press the graham cracker mixture firmly and evenly into the bottom of the prepared pan. Use the bottom of a measuring cup or your fingers to create an even layer. Don’t be afraid to pack it down tightly; a dense crust is less likely to crumble.
Step 4: Baking (Optional): While not strictly necessary for all recipes, pre-baking the crust helps to prevent a soggy bottom and adds a slightly crispier texture. Bake the crust at 350°F (175°C) for 8-10 minutes, or until lightly golden. Keep a close eye on it to prevent burning. Let the crust cool completely before adding the cheesecake filling.
Professional Tip: For a richer flavor, consider using browned butter instead of regular melted butter. Simply melt the butter and cook it over medium heat until it turns a light brown color and has a nutty aroma. Be careful not to burn it.
Professional Tip: If you prefer a sweeter crust, feel free to add up to 2 tablespoons more sugar. Conversely, if you prefer a less sweet crust, reduce the sugar by 1 tablespoon.
Cheesecake Filling Preparation
Creating the perfect cheesecake filling requires precision and attention to detail. This section will guide you through each step, ensuring a smooth, creamy, and utterly delicious result. We’ll be making a classic New York-style cheesecake filling, but feel free to adapt it to your preferences with extracts or different types of cream cheese.
Ingredients:
- 3 (8-ounce) packages cream cheese, softened to room temperature – This is crucial! Room temperature cream cheese will incorporate smoothly and prevent lumps. Let it sit out for at least 2 hours before starting.
- 1 ¾ cups granulated sugar
- ⅓ cup sour cream
- 2 teaspoons pure vanilla extract
- ¼ teaspoon salt
- 4 large eggs, at room temperature – Room temperature eggs will also blend more easily and create a smoother batter.
Instructions:
Step 1: Creaming the Cream Cheese and Sugar: In a large mixing bowl, beat the softened cream cheese with an electric mixer on medium speed until completely smooth and creamy. Gradually add the granulated sugar, beating until well combined and the mixture is light and fluffy. Scrape down the sides of the bowl frequently to ensure all ingredients are incorporated. This process takes about 3-5 minutes.
Step 2: Incorporating Wet Ingredients: Reduce the mixer speed to low. Add the sour cream and vanilla extract, mixing until just combined. Then, add the salt and mix briefly. Avoid overmixing at this stage to prevent incorporating too much air.
Step 3: Adding the Eggs: One at a time, add the eggs, beating on low speed after each addition just until incorporated. Do not overmix! Overmixing will incorporate too much air, leading to cracks in your cheesecake during baking. Mix only until the egg is just blended in before adding the next one.
Step 4: Strain (Optional but Recommended): For an exceptionally smooth and silky cheesecake, strain the batter through a fine-mesh sieve. This removes any lumps or unmixed ingredients, resulting in a perfectly flawless texture. This step is optional but highly recommended for a professional-looking and tasting cheesecake.
Step 5: Rest the Batter: Once the batter is prepared, let it rest for at least 15 minutes. This allows the ingredients to fully combine and settle, resulting in a more stable and evenly baked cheesecake. This resting period is essential for preventing cracks.
Professional Tip: For an even richer flavor, consider using full-fat cream cheese and sour cream. The higher fat content will contribute to a creamier, more decadent cheesecake.
Now that your cheesecake filling is prepared, you’re ready to pour it into your prepared crust and bake! Follow the baking instructions carefully for a perfectly baked cheesecake.
Baking Instructions
Preheat your oven to 350°F (175°C). This is crucial for even baking and preventing cracks. Ensure your oven rack is positioned in the center of the oven for consistent heat distribution.
Prepare the water bath: This step is essential for achieving a creamy, crack-free cheesecake. Place a roasting pan or larger baking dish in your sink. Carefully place your springform pan inside the roasting pan. Pour enough hot water into the roasting pan to come halfway up the sides of the springform pan. This creates a humid environment, preventing the cheesecake from drying out and cracking during baking.
Bake the cheesecake: Gently place the springform pan into the preheated oven. Bake for 50-60 minutes, or until the cheesecake is almost set around the edges but still slightly jiggly in the center. Do not overbake! Overbaking will result in a dry and cracked cheesecake. A slight jiggle in the center is perfectly normal and will settle as it cools.
Check for doneness: After 50 minutes, gently insert a toothpick or knife into the center of the cheesecake. If it comes out with a few moist crumbs attached, it’s ready. If it comes out completely clean, it may be slightly overbaked. Trust your judgment and err on the side of underbaking. Remember, the cheesecake will continue to set as it cools.
Cool the cheesecake gradually: Once baked, carefully remove the springform pan from the water bath. Let it cool completely on a wire rack at room temperature for at least 2 hours. This slow cooling process prevents sudden temperature changes that can cause cracking. Avoid placing the cheesecake in the refrigerator immediately after baking; this can lead to shrinkage and cracking.
Chill the cheesecake: After the cheesecake has cooled to room temperature, cover it tightly with plastic wrap and refrigerate for at least 4 hours, or preferably overnight. This chilling period allows the cheesecake to fully set and develop its rich, creamy texture. The longer it chills, the better it tastes!
Remove from springform pan: Once chilled, carefully run a thin knife or offset spatula around the edges of the cheesecake to loosen it from the springform pan. Slowly release the sides of the springform pan. If the cheesecake is sticking, gently warm the bottom of the pan with a hairdryer for a few seconds to help release it. Be patient and gentle to avoid damaging the cheesecake.
Serve and enjoy: Once removed from the springform pan, you can garnish your cheesecake with your favorite toppings – fresh berries, chocolate shavings, or a fruit compote. Serve chilled and enjoy this delicious homemade treat! Remember to store any leftover cheesecake in the refrigerator, tightly covered, for up to 3 days.
Important Note: Oven temperatures can vary, so it’s always best to keep a close eye on your cheesecake during the baking process. Adjust baking time as needed based on your oven’s performance. If the edges are browning too quickly, you can loosely tent the top with aluminum foil to prevent over-browning.
Cooling and Chilling: The Key to a Perfect Cheesecake
Cooling and chilling your cheesecake properly is just as crucial as the baking process itself. Rushing this stage can lead to cracks, a soggy crust, or a texture that’s less than perfect. Take your time, follow these steps carefully, and you’ll be rewarded with a flawlessly smooth and delicious cheesecake.
The Initial Cool Down: Once your cheesecake is out of the oven, the first step is a gentle cool down. Don’t immediately plunge it into the refrigerator! The drastic temperature change can cause the cheesecake to crack. Instead, leave the cheesecake in the oven with the door slightly ajar for about an hour. This allows for a gradual decrease in temperature, preventing thermal shock.
The Water Bath Release: After the hour in the slightly open oven, carefully remove the cheesecake from its water bath. This is best done by gently running a thin, flexible spatula around the edges of the springform pan to loosen the cheesecake. Then, carefully lift the pan out of the water bath. Be cautious – the water will be hot!
Continued Cooling on the Counter: Once removed from the water bath, let the cheesecake continue to cool completely at room temperature for another 2-3 hours. This allows the internal temperature to equalize further, reducing the risk of cracking during refrigeration. You should be able to touch the top of the cheesecake without it feeling excessively warm.
Refrigeration: Once the cheesecake has reached room temperature, carefully remove the outer ring of the springform pan. Do not remove the bottom of the pan yet. Cover the cheesecake loosely with plastic wrap, ensuring it doesn’t touch the surface of the cheesecake. This prevents a skin from forming. Refrigerate for at least 6-8 hours, or preferably overnight. This chilling period allows the cheesecake to fully set and develop its creamy texture.
Removing from the Pan: After at least 6-8 hours in the refrigerator, you can carefully remove the cheesecake from the bottom of the springform pan. Run a thin knife or spatula around the edges to loosen it, if necessary. Place a serving plate on top of the pan and carefully invert the cheesecake onto the plate. This is the most delicate part of the process. If you encounter resistance, gently run the knife around the edges again. Do not force it!
Final Thoughts: Patience is key to a perfectly chilled cheesecake. Allowing ample time for each cooling stage will significantly reduce the chances of cracking and ensure a beautifully smooth, creamy texture. Remember, a slightly warmer cheesecake is easier to remove from the pan, so don’t be afraid to let it sit at room temperature for a few additional minutes if needed after refrigeration.
Professional Tip: For an even more stable cheesecake, consider using a smaller springform pan than your recipe calls for. This creates a thicker cheesecake, which is less prone to cracking and easier to handle.
Topping and Decoration
The topping and decoration of your cheesecake are crucial for elevating it from a delicious dessert to a culinary masterpiece. While a simple dusting of powdered sugar can be perfectly lovely, a little creativity can transform your cheesecake into a showstopper. Here are some ideas and techniques to help you achieve stunning results.
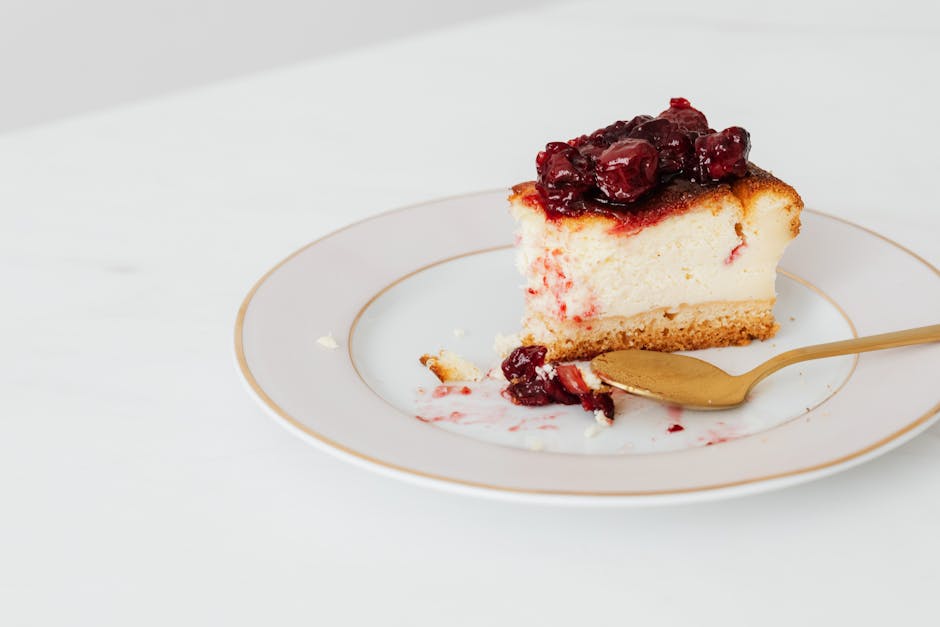
Classic Toppings: A simple yet elegant approach involves using fresh fruit. Consider 1-2 cups of berries (strawberries, raspberries, blueberries) arranged artfully on top. For a more sophisticated look, macerate the berries beforehand with 2 tablespoons of sugar and 1 tablespoon of lemon juice for about 30 minutes. This releases their juices and intensifies their flavor. Alternatively, you can use sliced peaches (about 1 large peach, sliced) or kiwi (2 kiwi, thinly sliced) for a vibrant color contrast.
Chocolate Delights: Chocolate is a timeless pairing with cheesecake. A rich ganache is a luxurious option. For a simple ganache, melt 4 ounces of good quality dark chocolate with 2 tablespoons of heavy cream. Let it cool slightly before drizzling it over the cooled cheesecake. Ensure the cheesecake is completely cool before adding the ganache to prevent melting. You can also use shaved chocolate, chocolate curls, or even a chocolate sauce made with cocoa powder, sugar, and milk.
Nutty Indulgence: Toasted nuts add a wonderful textural element and a delightful nutty flavor. Use about ½ cup of your favorite nuts – pecans, walnuts, or almonds – coarsely chopped and toasted lightly in a dry pan until fragrant. Avoid over-toasting, as this can make the nuts bitter. Sprinkle them evenly over the cheesecake for a rustic charm. Alternatively, you can create a crunchy pecan crumble topping by combining ½ cup of pecans, ¼ cup of all-purpose flour, 2 tablespoons of brown sugar, and 2 tablespoons of melted butter. Bake this crumble separately until golden brown and sprinkle it over the cooled cheesecake.
Whipped Cream Perfection: A dollop of freshly whipped cream is a classic and always welcome addition. Using a heavy cream with a high fat content will result in a fluffier, more stable whipped cream. Whip about 1 cup of heavy cream with 2 tablespoons of powdered sugar and a teaspoon of vanilla extract until soft peaks form. Avoid over-whipping, as this can make the cream grainy. Pipe or spoon the whipped cream onto the cheesecake for a refined presentation.
Creative Garnishes: Don’t be afraid to experiment! Consider adding a sprinkle of cocoa powder, a dusting of cinnamon, or a drizzle of caramel sauce. Fresh mint leaves, edible flowers, or even candied fruit can add a touch of elegance and visual appeal. Remember to choose garnishes that complement the flavor profile of your cheesecake. A simple yet effective presentation can often be more impactful than an overly complicated one. Arrange your chosen toppings thoughtfully, considering both color and texture to create a visually stunning and delicious cheesecake.
Important Note: Always ensure your cheesecake is completely chilled before adding any toppings or decorations to prevent them from melting or becoming soggy. Allow at least 4 hours of chilling time, preferably overnight.
Recommendations for Your Tasty Cheesecake
This section offers recommendations to enhance your enjoyment of this delicious cheesecake recipe. We’ll cover serving suggestions, storage, complementary dishes, and nutritional information to help you make the most of your culinary creation.
Serving Suggestions: For the ultimate indulgence, serve your cheesecake chilled. Allow it to sit in the refrigerator for at least 4 hours, or preferably overnight, to allow the flavors to meld and the texture to firm up. Individual slices are perfect for elegant presentation. Garnish each slice with fresh berries (strawberries, raspberries, blueberries), a dollop of whipped cream, a drizzle of chocolate sauce, or a sprinkle of toasted nuts for added visual appeal and textural contrast. Consider using a decorative piping bag for a professional touch to your whipped cream or sauce.
Storage: Properly storing your cheesecake is crucial for maintaining its quality and preventing spoilage. Store leftover cheesecake tightly covered in the refrigerator for up to 5 days. To prevent the top from drying out, you can cover the entire cheesecake with plastic wrap, followed by an additional layer of aluminum foil. For longer storage (up to 2 weeks), consider freezing individual slices wrapped tightly in plastic wrap and then placed in a freezer-safe container or bag. Remember to thaw frozen slices in the refrigerator overnight before serving.
Complementary Dishes: This rich and creamy cheesecake pairs beautifully with a variety of complementary dishes. A light and refreshing fruit salad provides a lovely counterpoint to the richness of the cheesecake. A simple green salad with a light vinaigrette can cut through the sweetness. For a more decadent pairing, consider serving it alongside a scoop of vanilla ice cream or a cup of strong, dark coffee. For a more sophisticated pairing, a fruit coulis (puree) made from berries or passion fruit can be drizzled over the cheesecake for an extra layer of flavor and visual interest.
Nutritional Information (Approximate per slice, based on a 12-slice cheesecake): These values are estimates and may vary depending on the specific ingredients used. Please note that this is an approximation and may vary depending on the specific recipe and ingredient measurements. For accurate nutritional information, use a nutrition calculator with your exact ingredient quantities.
Calories: Approximately 350-400 calories
Fat: Approximately 20-25 grams
Saturated Fat: Approximately 12-15 grams
Cholesterol: Approximately 80-100 mg
Sodium: Approximately 150-200 mg
Carbohydrates: Approximately 40-45 grams
Sugar: Approximately 25-30 grams
Protein: Approximately 6-8 grams
Important Note: These recommendations are intended to guide you. Feel free to experiment with different garnishes, pairings, and storage methods to find what best suits your palate and preferences. Enjoy your delicious cheesecake!