Chicken thighs, a culinary staple across the globe, boast a rich history interwoven with human civilization. While pinpointing the exact origin of roasting chicken is impossible, archaeological evidence suggests poultry domestication began thousands of years ago in Southeast Asia, with chickens eventually spreading across the world through trade and migration. The practice of roasting, a simple yet effective cooking method utilizing dry heat, emerged independently in various cultures, each developing unique techniques and flavor profiles. The versatility of the chicken thigh, with its higher fat content compared to the breast, made it a particularly desirable cut for roasting, ensuring juicy and flavorful results even with less precise cooking methods.
The cultural significance of roasted chicken is undeniable. In many cultures, it represents a celebratory dish, often served during festivals and special occasions. From the traditional Sunday roast in Britain, to the flavorful preparations found in various cuisines across the world, roasted chicken transcends geographical boundaries. Statistics show that chicken is one of the most consumed meats globally, with annual consumption exceeding 90 billion birds. This widespread popularity is a testament to its affordability, nutritional value, and culinary adaptability. The simplicity of roasting chicken thighs, requiring minimal ingredients and equipment, makes it accessible to home cooks of all skill levels.
This recipe focuses on achieving perfectly roasted chicken thighs – achieving that ideal balance of crispy skin and succulent, tender meat. We’ll explore techniques to maximize flavor and texture, focusing on achieving even browning and ensuring the internal temperature reaches a safe level. Unlike the often-dry breast, chicken thighs benefit from longer cooking times, allowing collagen to break down and resulting in exceptional tenderness. This recipe will guide you through the process, from preparation and seasoning to achieving that perfect golden-brown crust, making it a dish that’s both delicious and impressive. Get ready to experience the timeless appeal of perfectly roasted chicken thighs, a dish that has nourished and delighted people for centuries.
Ingredients and Measurements
This recipe for Perfectly Roasted Chicken Thighs yields approximately 4 servings. The ingredient quantities can be easily adjusted to suit your needs; simply multiply or divide accordingly. Accuracy in measuring is crucial for achieving optimal results. Use a kitchen scale whenever possible for the most precise measurements, especially for the chicken thighs.
Chicken Thighs: 2 pounds bone-in, skin-on chicken thighs. Choose thighs that are relatively uniform in size for even cooking. Avoid thighs that are excessively bruised or have discoloration. Approximately 8-10 large chicken thighs will equal 2 pounds. If using smaller thighs, you may need to adjust the cooking time slightly.
Olive Oil: 2 tablespoons extra virgin olive oil. Use a high-quality olive oil for the best flavor. Avoid using flavored oils, as they may overpower the delicate taste of the chicken.
Salt: 1 ½ teaspoons kosher salt. Kosher salt is preferred due to its larger grain size and lower sodium content than table salt. If using table salt, reduce the quantity to about ¾ teaspoon. Seasoning generously is key to flavorful chicken.
Black Pepper: ½ teaspoon freshly ground black pepper. Freshly ground pepper offers a superior taste compared to pre-ground pepper. Grind the pepper just before using to maximize its aroma and flavor.
Garlic Powder: ½ teaspoon garlic powder. Using garlic powder allows for even distribution of garlic flavor throughout the chicken. Alternatively, you can use 2-3 cloves of fresh garlic, minced.
Paprika: ½ teaspoon sweet paprika. Paprika adds a subtle sweetness and beautiful color to the roasted chicken. For a smokier flavor, consider using smoked paprika.
Onion Powder: ¼ teaspoon onion powder. Onion powder complements the other spices and adds depth of flavor. Freshly chopped onion can be substituted, but remember to adjust cooking time accordingly.
Optional Herbs: Consider adding 1 teaspoon of dried herbs such as rosemary, thyme, or oregano for an extra layer of flavor. Fresh herbs can also be used, but use approximately double the amount of fresh herbs compared to dried.
Note: These measurements are guidelines. Feel free to adjust the seasoning to your personal preference. Remember to always taste and adjust as needed.
Equipment List
Roasting perfectly juicy and flavorful chicken thighs requires the right tools. While you might be able to improvise with some items, having the correct equipment makes the process significantly easier and yields better results. This list details the essential and recommended equipment for achieving truly exceptional roasted chicken thighs.
Essential Equipment:
1. Roasting Pan: A 9×13 inch roasting pan, or a similarly sized baking dish, is ideal. Avoid using a pan that’s too small, as this will overcrowd the chicken and prevent proper browning and even cooking. A larger pan is acceptable, but ensure the chicken thighs are arranged in a single layer for optimal results. A dark-colored roasting pan will absorb and radiate heat more efficiently, contributing to better browning. A good quality, heavy-duty roasting pan will distribute heat evenly and prevent hot spots.
2. Meat Thermometer: This is absolutely crucial for ensuring your chicken thighs are cooked to a safe internal temperature. A digital instant-read thermometer is highly recommended for its accuracy and speed. A reliable thermometer will eliminate the guesswork and ensure your chicken is cooked through to 165°F (74°C) in the thickest part of the thigh, without overcooking the rest.
3. Baking Sheet (Optional, but Recommended): If your roasting pan doesn’t have a rack, using a wire rack inside the pan will allow for better air circulation around the chicken thighs, resulting in crispier skin and more even cooking. Alternatively, a baking sheet can be used to create a makeshift rack by placing the chicken thighs directly on the sheet.
4. Basting Brush (Optional): While not strictly necessary, a basting brush is helpful for applying any extra oil or marinade during the roasting process. A silicone basting brush is easy to clean and durable.
Recommended Equipment:
1. Kitchen Tongs: Useful for safely handling the hot chicken thighs while basting, checking for doneness, and transferring them to a serving dish. Choose long-handled tongs for extra safety.
2. Small Bowl: A small bowl is handy for mixing any herbs, spices, or marinade before applying them to the chicken.
3. Measuring Cups and Spoons: Accurate measurements are important for consistent results. Use standard measuring cups and spoons to ensure you add the correct amounts of ingredients.
Important Note: Always ensure your equipment is clean before use to avoid cross-contamination. Properly cleaned and maintained equipment will contribute to a safer and more enjoyable cooking experience.
Preparation of Chicken Thighs
Before you begin roasting, proper preparation of your chicken thighs is crucial for achieving juicy, flavorful results. Start with 4 bone-in, skin-on chicken thighs, weighing approximately 1.5 to 2 pounds total. This quantity is perfect for serving 2-3 people, but you can easily scale up the recipe as needed.
Begin by thoroughly rinsing the chicken thighs under cold, running water. Ensure you remove any excess fat or visible impurities from the surface of the skin. Pat the thighs completely dry with paper towels. This step is vital; excess moisture will hinder proper browning and crisping during the roasting process.
Next, you’ll want to season the chicken generously. In a small bowl, combine 1 teaspoon of salt, 1/2 teaspoon of black pepper, and 1/2 teaspoon of paprika. Feel free to experiment with other spices such as garlic powder, onion powder, or even a pinch of cayenne pepper for a little heat. Don’t be shy with the seasoning! The chicken skin will absorb the flavors beautifully.
Evenly distribute the spice mixture over both sides of each chicken thigh, ensuring that the seasoning penetrates into any crevices. Use your fingers to gently rub the spices into the skin and meat, ensuring complete coverage. For extra flavor, you can also add a little olive oil (about 1 tablespoon) to the spice mixture and rub it in; this helps the spices adhere better and contributes to a richer, more flavorful roast.
Once seasoned, you can choose to let the chicken rest at room temperature for about 30 minutes. This allows the chicken to come to a more uniform temperature, promoting even cooking and potentially reducing cooking time. However, if you’re short on time, you can skip this step. Just make sure to adjust your cooking time accordingly, possibly adding 5-10 minutes.
Finally, ensure your roasting pan is adequately prepared. A lightly oiled pan will prevent sticking and make cleanup easier. Now you’re ready to move on to the roasting stage!
Seasoning and Marinating (optional)
While perfectly roasted chicken thighs are delicious with just salt and pepper, experimenting with seasonings and marinades can elevate the flavor profile to exciting new heights. This section outlines several options, from simple to more complex, allowing you to customize your dish to your preference.
Basic Seasoning: For a classic approach, generously season your chicken thighs with 1 teaspoon of kosher salt and ½ teaspoon of freshly ground black pepper per pound of chicken. Ensure the seasoning is evenly distributed, rubbing it into the skin and flesh. This simple technique allows the natural chicken flavor to shine.
Herby Seasoning Blend: Create a vibrant flavor profile by combining 2 tablespoons of chopped fresh rosemary, 1 tablespoon of chopped fresh thyme, 1 teaspoon of garlic powder, ½ teaspoon of onion powder, and ½ teaspoon of paprika. Rub this mixture liberally over the chicken thighs, ensuring complete coverage. This blend complements the chicken beautifully and adds a lovely aroma during roasting.
Lemon Herb Marinade: For a zestier and more tender result, consider marinating your chicken thighs. A simple lemon herb marinade can be made by whisking together ¼ cup of olive oil, 2 tablespoons of lemon juice, 1 tablespoon of Dijon mustard, 1 clove of minced garlic, 1 teaspoon of dried oregano, and ½ teaspoon of salt. Place the chicken thighs in a resealable bag or shallow dish, pour the marinade over, ensuring all pieces are coated. Marinate in the refrigerator for at least 30 minutes, or preferably 2-4 hours for optimal flavor penetration. Remember to remove the chicken from the marinade before roasting and discard the used marinade.
Spicy Marinade: For those who enjoy a kick, try a spicy marinade. Combine ¼ cup of olive oil, 2 tablespoons of lime juice, 1 tablespoon of chili powder, 1 teaspoon of cumin, ½ teaspoon of smoked paprika, ½ teaspoon of cayenne pepper (adjust to your spice preference), and 1 clove of minced garlic. Follow the same marinating instructions as above. Start with less cayenne pepper and add more to taste if desired, as cayenne can be quite potent.
Important Note: When marinating, always ensure the chicken is fully submerged in the marinade. For best results, marinate in the refrigerator to prevent bacterial growth. Do not reuse leftover marinade.
No matter which seasoning or marinade you choose, remember that taste is subjective. Feel free to experiment with different herbs, spices, and flavor combinations to create your perfect roasted chicken thighs.
Roasting Technique
Achieving perfectly roasted chicken thighs requires a thoughtful approach to roasting technique. This section details the steps to ensure juicy, flavorful, and beautifully browned results. We’ll be roasting approximately 1.5 lbs (680g) of bone-in, skin-on chicken thighs, but adjust cooking time accordingly for larger or smaller quantities.
Preheat your oven to 400°F (200°C). This is crucial for achieving a good sear on the skin and ensuring even cooking throughout. A cold oven will result in dry, rubbery chicken.
Pat the chicken thighs dry. Using paper towels, thoroughly pat the skin of each thigh to remove excess moisture. This is vital for achieving crispy skin. Damp skin will steam instead of crisp.
Season generously. Season the chicken thighs liberally with salt and freshly ground black pepper. Don’t be shy! About 1 teaspoon of salt and ½ teaspoon of pepper per pound of chicken is a good starting point. You can also add other seasonings like paprika, garlic powder, onion powder, or herbs like rosemary or thyme at this stage. Seasoning the chicken well in advance allows the flavors to penetrate deeply.
Arrange the chicken in a single layer. Place the seasoned chicken thighs skin-side up in a roasting pan or on a baking sheet. Avoid overcrowding the pan; this will hinder proper browning and even cooking. If necessary, use two pans.
Roast for 40-45 minutes, or until the internal temperature reaches 165°F (74°C). Use a meat thermometer inserted into the thickest part of the thigh to ensure it’s cooked through. Do not rely solely on visual cues; the internal temperature is the most accurate indicator of doneness.
Basting (optional but recommended). For extra crispy skin and juicy meat, baste the chicken with pan juices halfway through the cooking time. Use a spoon or baster to carefully pour the rendered fat over the thighs.
Rest the chicken. Once cooked, remove the chicken from the oven and let it rest for 10-15 minutes before carving. This allows the juices to redistribute throughout the meat, resulting in more tender and flavorful chicken. Resting is a crucial step often overlooked.
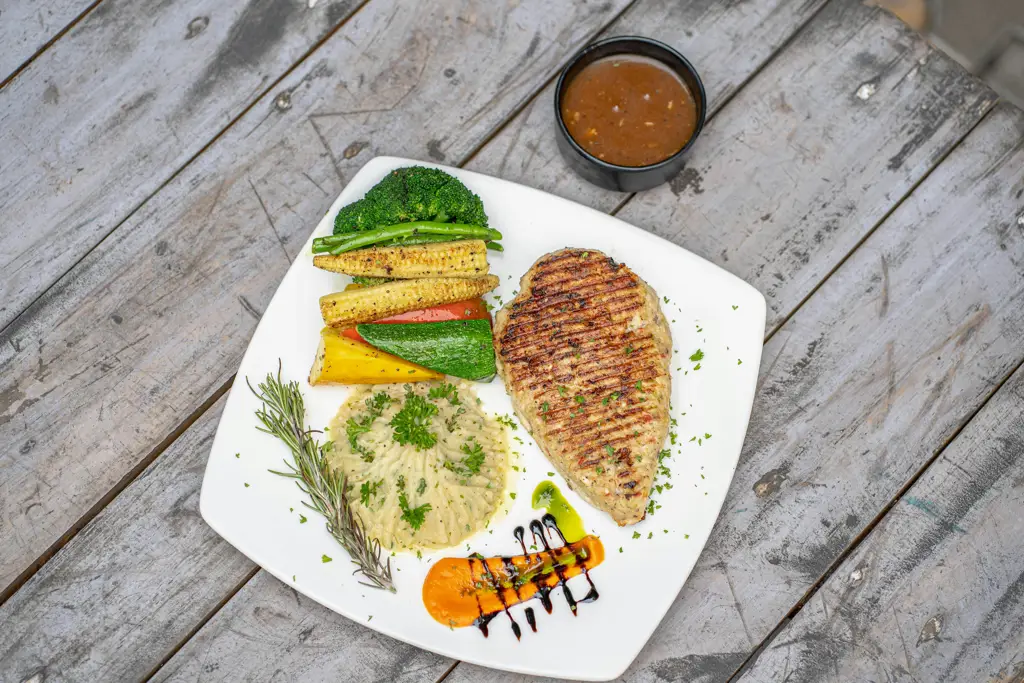
Serving suggestion: Serve your perfectly roasted chicken thighs immediately with your favorite sides such as roasted vegetables, mashed potatoes, or a fresh salad.
Checking for Doneness
Perfectly roasted chicken thighs require a delicate balance – cooked through to a safe internal temperature, yet still juicy and tender. Overcooking results in dry, tough meat, while undercooking poses a food safety risk. Therefore, accurate doneness testing is crucial.
The most reliable method is using a meat thermometer. Insert the thermometer into the thickest part of the thigh, avoiding the bone. The internal temperature should reach 165°F (74°C). This ensures the chicken is thoroughly cooked and safe for consumption. Don’t rely on visual cues alone, as chicken can appear cooked on the outside but remain undercooked inside.
While a thermometer provides the most accurate reading, you can also use other indicators, but always confirm with a thermometer. The juices should run clear when pierced with a fork or knife. Cloudy or pink juices indicate the chicken needs more time in the oven. Additionally, the chicken should be firm to the touch. Gently press on the thickest part of the thigh; it should feel springy and not jiggly.
If you’re unsure, it’s always better to err on the side of caution. Slightly undercooked chicken can be easily finished in the oven, but overcooked chicken is difficult to salvage. If the internal temperature is a few degrees below 165°F (74°C), return the chicken to the oven for another 5-10 minutes, checking the temperature again. Remember to always use a clean thermometer to avoid cross-contamination.
For larger batches of chicken thighs, ensure you check multiple thighs in different sections of the pan. Temperature variations can occur within a large roasting pan, particularly if the thighs are unevenly spaced or some are thicker than others. This guarantees consistent doneness throughout. Once all thighs reach 165°F (74°C), remove them from the oven and let them rest for 5-10 minutes before serving. This allows the juices to redistribute, resulting in more tender and flavorful chicken.
Remember: Food safety is paramount. Always use a reliable meat thermometer to ensure your chicken thighs are cooked to a safe internal temperature. Don’t compromise on food safety for the sake of speed or convenience.
Recommendations for Perfectly Roasted Chicken Thighs
For optimal flavor and texture, we recommend using bone-in, skin-on chicken thighs. These retain moisture better during roasting, resulting in juicy, tender meat. Ensure your chicken thighs reach an internal temperature of 165°F (74°C) before serving to guarantee safety. Using a meat thermometer is highly recommended to avoid undercooking.
Serving Suggestions: These roasted chicken thighs are incredibly versatile. They are delicious on their own, but can also be served with a variety of sides. Consider pairing them with classic roasted vegetables like potatoes, carrots, and Brussels sprouts for a complete and satisfying meal. A simple green salad with a light vinaigrette cuts through the richness of the chicken beautifully. For a more elegant presentation, serve the thighs over creamy polenta or mashed sweet potatoes.
Complementary Dishes: To enhance your dining experience, consider serving these chicken thighs with flavorful sauces. A pan sauce made from the chicken drippings, deglazed with white wine or chicken broth, adds a depth of flavor. Alternatively, a vibrant chimichurri sauce, a zesty lemon-herb sauce, or a creamy mushroom sauce would also be excellent pairings. Don’t forget about the sides; a crusty bread to soak up the delicious pan juices is a must!
Storage: Leftover roasted chicken thighs can be stored in an airtight container in the refrigerator for up to 3-4 days. To reheat, you can use the oven, microwave, or stovetop. For optimal taste and texture, we recommend reheating gently in the oven to avoid drying out the chicken. You can also freeze leftover chicken thighs for up to 3 months. Make sure to wrap them tightly in freezer-safe wrap or bags.
Nutritional Information (per thigh, approximate): The exact nutritional information will vary depending on the size of the thigh and any added seasonings. However, a typical serving will contain approximately 250-300 calories, 15-20g of protein, 15-20g of fat, and a small amount of carbohydrates. This is a rough estimate; for precise nutritional values, use a nutrition calculator based on your specific recipe and ingredients.