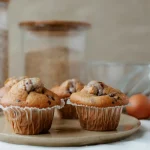
The perfectly baked apple tart, a seemingly simple dessert, boasts a rich and surprisingly complex history, interwoven with the cultural landscapes of Europe and beyond. While pinpointing its exact origin is difficult, evidence suggests variations of apple tarts existed as early as the medieval period, with recipes evolving alongside advancements in baking techniques and the availability of ingredients. The humble apple, readily cultivated across various regions, became a staple in many sweet treats, its versatility lending itself beautifully to both simple and elaborate preparations. Early versions likely involved a less refined pastry crust and a simpler filling, relying on the natural sweetness of the apples and perhaps a touch of spice. The evolution of the tart saw significant changes over centuries, reflecting changing tastes and culinary innovations.
The 18th and 19th centuries witnessed a surge in popularity for the apple tart, particularly in France, where it became a beloved dessert, often enjoyed alongside afternoon tea or as a celebratory treat. France’s influence on global pastry traditions is undeniable, and the apple tart benefited greatly from this, with its recipes refined and elevated. The development of more sophisticated pastry techniques, including the use of richer butters and more refined flour, contributed to the creation of the flakier, more delicate crusts we associate with modern apple tarts. Interestingly, statistics show that apple tarts remain among the top-selling desserts in many European bakeries today, a testament to their enduring appeal.
Beyond its culinary significance, the apple tart holds a powerful place in cultural symbolism. In many cultures, apples represent love, health, and abundance. The act of sharing an apple tart, therefore, can be seen as a gesture of sharing these positive attributes. The visual appeal of the tart—a golden-brown crust cradling a sweet, caramelized apple filling—further enhances its symbolic power. From rustic farmhouse kitchens to elegant Parisian patisseries, the apple tart transcends social boundaries, uniting people in the shared enjoyment of a timeless classic. Its enduring presence in countless cookbooks, family recipes, and popular bakeries demonstrates its continued relevance and its ability to evoke feelings of nostalgia, comfort, and celebration.
Ingredients and Measurements
For achieving perfectly baked apple tarts, the quality and precision of your ingredients are paramount. We’ll be using both metric and imperial measurements for your convenience. Ensure all ingredients are at room temperature unless otherwise specified. This helps with even mixing and baking.
For the Pastry (makes enough for 6 individual tarts or one large tart):
- 225g (2 cups) all-purpose flour – Use a high-protein flour for a flakier crust.
- 125g (1 cup) cold unsalted butter, cubed – Cold butter is crucial for a tender crust. Cut it into small cubes for even distribution.
- 60g (1/4 cup + 2 tbsp) ice water – Add the ice water gradually. You may not need all of it. The dough should come together but remain slightly crumbly.
- Pinch of salt – Enhances the flavors of the other ingredients.
- 1 tbsp granulated sugar – Adds sweetness and helps with browning.
For the Apple Filling:
- 6 medium apples (about 1kg or 2.2 lbs), peeled, cored, and thinly sliced – Granny Smith, Honeycrisp, or Braeburn apples work well. A mix of tart and sweet apples is ideal.
- 100g (1/2 cup) granulated sugar – Adjust the sugar quantity based on the sweetness of your apples.
- 2 tbsp all-purpose flour – Helps thicken the filling and prevent it from becoming watery.
- 1 tsp ground cinnamon – A classic pairing with apples. Feel free to experiment with other spices like nutmeg or allspice.
- 1/4 tsp ground nutmeg (optional) – Adds warmth and complexity to the filling.
- 2 tbsp lemon juice – Prevents the apples from browning and adds brightness.
- 1 tbsp unsalted butter, cut into small pieces – Adds richness and helps with browning.
For the Egg Wash (optional, for a glossy finish):
- 1 large egg, lightly beaten – Use a fork to whisk the egg until it’s slightly frothy.
- 1 tsp water – Adds shine and helps the egg wash spread evenly.
Important Note: Precise measurements are key to successful baking. Use a kitchen scale for the most accurate results, especially for the flour and butter. Adjust the amount of sugar in the filling according to your preference and the sweetness of the apples. Enjoy your baking!
Pastry Preparation
Creating the perfect pastry is paramount to a delicious apple tart. This recipe utilizes a classic all-butter shortcrust pastry, known for its delicate flakiness and rich flavor. We’ll be making enough pastry for a 9-inch tart pan, with a little extra for potential patching or decoration.
Ingredients:
- 225g (2 cups) all-purpose flour, plus extra for dusting
- 1/2 tsp salt
- 115g (1/2 cup) cold unsalted butter, cut into small cubes
- 6-8 tbsp ice water
Instructions:
1. Begin with cold ingredients: This is crucial for a tender pastry. Ensure your flour, butter, and water are all thoroughly chilled. Using a food processor (or your hands) combine the flour and salt.
2. Cut in the butter: Add the cold butter cubes to the flour mixture. Pulse (or rub in with your fingertips) until the mixture resembles coarse breadcrumbs. Avoid over-mixing, as this will develop the gluten and result in a tough pastry. Aim for pea-sized butter pieces remaining.
3. Incorporate the water: Gradually add the ice water, a tablespoon at a time, pulsing (or mixing gently) until the dough just comes together. Do not add more water than necessary; the dough should be slightly shaggy but hold its shape.
4. Form the dough: Turn the dough out onto a lightly floured surface and gently form it into a disc. Wrap it tightly in plastic wrap and refrigerate for at least 30 minutes. This allows the gluten to relax and the flavors to meld, resulting in a more flavorful and manageable pastry.
5. Roll and bake: Once chilled, roll out the dough on a lightly floured surface to a circle approximately 12 inches in diameter. Carefully transfer the dough to your 9-inch tart pan, pressing it gently into the bottom and up the sides. Trim any excess dough. Prick the bottom of the pastry with a fork to prevent air bubbles from forming during baking. You can optionally line the pastry with baking parchment and fill with pie weights or dried beans to prevent shrinkage during blind baking. Bake according to the instructions in the Apple Filling section.
Professional Tip: For an extra flaky crust, you can freeze the dough for 30 minutes after the initial mixing, before adding the water. This allows the butter to become even more solidified, further contributing to flakiness.
Apple Preparation
The success of your apple tarts hinges significantly on proper apple preparation. Using the right apples and preparing them correctly will ensure a perfectly textured and flavorful filling. We recommend using a blend of tart and sweet apples for the best results. A good combination might be Granny Smith (for tartness) and Honeycrisp (for sweetness), or Braeburn and Fuji. Feel free to experiment with your favorites!
Begin by selecting approximately 1.5 pounds (680g) of apples. This quantity is perfect for a standard 9-inch tart. Wash the apples thoroughly and then peel them using a vegetable peeler. Avoid using a paring knife as it can lead to uneven peeling and wasted apple flesh.
Once peeled, core the apples using an apple corer or a sharp paring knife. Ensure you remove the core completely, including the seeds, as they can impart a bitter taste. After coring, slice the apples thinly; aim for slices that are about 1/8 inch (3mm) thick. Consistent thickness ensures even baking and prevents some slices from becoming mushy while others remain firm.
To prevent the apples from browning, immediately toss them in a bowl with 2 tablespoons of lemon juice. The lemon juice helps to maintain the apples’ bright color and prevent oxidation. Gently toss to ensure all the slices are coated. Avoid over-mixing, which can damage the apple slices.
Now, you can choose to add some spices to enhance the apple flavor. We suggest a combination of 1 teaspoon of ground cinnamon, 1/2 teaspoon of ground nutmeg, and a pinch of ground cloves. Add these spices to the lemon-coated apples and gently toss again to distribute them evenly. You can adjust the amount of spices to your personal preference.
Finally, set aside the prepared apples. You can prepare them up to a few hours in advance, but it’s best to add them to the tart crust just before baking to prevent them from releasing too much moisture.
Pro Tip: For a more intense apple flavor, you can sauté the apples lightly in butter before adding them to the tart. This will caramelize the apples slightly and enhance their sweetness.
Filling Assembly
The success of your perfectly baked apple tart hinges significantly on the proper assembly of the filling. A well-structured filling ensures even baking and prevents a soggy bottom. This section details the precise steps for creating a delicious and visually appealing apple filling.
Begin by peeling, coring, and thinly slicing six medium-sized apples (Granny Smith, Honeycrisp, or a mix are excellent choices). Aim for slices approximately 1/8 inch thick for even cooking. Immediately toss the sliced apples with 2 tablespoons of lemon juice to prevent browning. This step is crucial in maintaining the vibrant color and preventing oxidation.
In a medium bowl, gently combine the sliced apples with 1/2 cup of granulated sugar, 1/4 cup of packed light brown sugar, and 1 teaspoon of ground cinnamon. The combination of granulated and brown sugar provides both sweetness and a rich caramel-like depth of flavor. Feel free to adjust the sugar quantity based on the sweetness of your apples and personal preference. Add a pinch of ground nutmeg (approximately 1/4 teaspoon) for an extra layer of warmth and complexity. Don’t overmix; gentle tossing is sufficient to coat the apples evenly.
Next, incorporate 2 tablespoons of all-purpose flour into the apple mixture. This acts as a thickening agent, preventing excessive moisture and ensuring a beautifully textured filling. Ensure the flour is evenly distributed among the apple slices to avoid pockets of dryness or excessive moisture in the final tart.
Finally, stir in 1 tablespoon of unsalted butter, cut into small pieces. The butter will melt during baking, adding richness and moisture to the filling. Avoid overmixing at this stage, as it can break down the apple slices. Gently fold the butter into the apple mixture until just combined.
Important Note: Allow the assembled filling to rest for at least 15 minutes before transferring it to your prepared tart shell. This allows the flour to absorb excess moisture, resulting in a firmer filling that holds its shape during baking. This resting period is essential for achieving the perfect texture and preventing a soggy bottom.
Once rested, carefully spoon the apple filling into your pre-baked tart shell, ensuring even distribution. Leave a small border (about 1/2 inch) to prevent overflow during baking. You can arrange the apple slices in a visually appealing pattern for a more elegant presentation. Your perfectly prepared filling is now ready for baking!
Tart Assembly and Baking
With your perfectly chilled pastry and your luscious apple filling prepared, it’s time to assemble and bake your apple tarts! This stage requires precision and care to ensure a beautifully golden-brown crust and a tender, juicy filling.
Begin by gently rolling out your chilled pastry dough on a lightly floured surface to approximately 1/8 inch thickness. Avoid overworking the dough, as this can lead to a tough crust. Use a 9-inch tart pan with a removable bottom for best results. Carefully transfer the rolled-out dough into the tart pan, gently pressing it into the bottom and up the sides. Trim any excess dough overhanging the edge, leaving about a ½-inch overhang. Crimp the edges decoratively using your fingers or a fork for a rustic finish.
Next, prepare your apple filling. Ensure it’s well-mixed and evenly distributed. Avoid overfilling the tart shell; leave about ½ inch of space from the top. This prevents overflow during baking and ensures even cooking. Gently spoon the apple filling into the prepared tart shell, spreading it evenly to the edges.
For an extra touch of elegance, you can brush the edges of the pastry with a beaten egg wash (1 large egg beaten with 1 tablespoon of water) before baking. This will create a lovely golden-brown crust. Alternatively, you can sprinkle a little coarse sugar over the top of the filling for added sweetness and texture.
Preheat your oven to 375°F (190°C). Place the assembled tart on a baking sheet to catch any spills. Bake for 40-45 minutes, or until the crust is golden brown and the filling is bubbly and tender. To check for doneness, insert a toothpick into the center of the tart; it should come out clean or with only a few moist crumbs attached.
Once baked, carefully remove the tart from the oven and let it cool completely on a wire rack before serving. This allows the filling to set and prevents a soggy bottom. Allow at least 1-2 hours for complete cooling. Enjoy your perfectly baked apple tart!
Professional Tip: For a crispier crust, blind bake the tart shell for 10-12 minutes before adding the filling and continuing with the baking process. This involves lining the shell with parchment paper and pie weights before baking to prevent shrinkage and ensure a crisp base.
Cooling and Setting
Once your apple tarts emerge from the oven, golden brown and fragrant, the cooling and setting process is crucial for achieving the perfect texture and preventing a soggy bottom. Resist the urge to immediately remove them from the tart tins; the sudden temperature change can cause cracking. Instead, let them cool in the tins for at least 15-20 minutes. This allows the filling to set slightly and the pastry to firm up.
After the initial cooling period, carefully run a thin, flexible knife or spatula around the edges of each tart to loosen them from the tin. This prevents sticking and ensures a clean release. Avoid forcing the tarts out; gentle persuasion is key. If they’re still sticking slightly, let them cool for another 5 minutes.
Transfer the cooled apple tarts to a wire rack. A wire rack is essential for even cooling and prevents moisture build-up, which can lead to a soggy bottom. Allow the tarts to cool completely at room temperature, which will take approximately 1-2 hours depending on the size and thickness of the filling. During this time, the filling will continue to set and the pastry will become crisp.
For optimal setting, avoid placing the warm tarts on a cold surface like a marble countertop or metal tray. The rapid temperature change can cause the pastry to become brittle and potentially crack. A wire rack at room temperature provides a stable and even cooling environment.
Once completely cool, you can carefully transfer the apple tarts to a serving plate or airtight container for storage. Store leftover tarts at room temperature for up to 2 days or in the refrigerator for up to 4 days. If storing in the refrigerator, allow them to come to room temperature before serving to fully appreciate their flavor and texture. Reheating is not recommended as it can make the pastry soggy.
Proper cooling is essential for a beautifully presented and delicious apple tart. By following these steps, you’ll ensure your tarts are not only visually appealing but also possess the perfect balance of crisp pastry and set filling.
Recommendations for Perfectly Baked Apple Tarts
To fully enjoy your Perfectly Baked Apple Tarts, we recommend serving them slightly warm, straight from the oven or after a brief warming in a low temperature oven. This will enhance the flavors and create a delightful contrast between the warm, spiced apples and the crisp pastry. A scoop of vanilla bean ice cream or a dollop of lightly sweetened whipped cream provides a heavenly complement, balancing the tartness of the apples with a touch of sweetness and creaminess.
For a truly sophisticated presentation, dust your tarts with powdered sugar before serving. Alternatively, a drizzle of caramel sauce or a sprinkle of cinnamon adds a beautiful finish and enhances the overall taste experience. Consider pairing your apple tarts with a strong cup of coffee or a refreshing glass of apple cider for a complete dessert experience.
Storage is crucial to maintaining the quality of your tarts. Store leftover tarts in an airtight container at room temperature for up to 2 days. For longer storage (up to 5 days), refrigerate the tarts. However, note that refrigeration may slightly soften the pastry. Reheating briefly in a low oven before serving is recommended if storing in the refrigerator.
Perfectly Baked Apple Tarts also pair wonderfully with savory dishes. The sweetness of the apples provides a delightful contrast to the richness of roasted meats, particularly pork or duck. They can also complement a creamy cheese plate or a light salad with a vinaigrette dressing. Experiment and find your favorite pairings!
Nutritional Information (per tart, approximate): Calories: 350-400; Fat: 18-22g; Saturated Fat: 8-10g; Cholesterol: 30-40mg; Sodium: 150-200mg; Carbohydrates: 45-55g; Fiber: 3-4g; Sugar: 25-30g; Protein: 4-6g. Note: Nutritional information may vary slightly depending on specific ingredients and portion sizes.
Enjoy your Perfectly Baked Apple Tarts!