The seemingly simple waffle, a gridded breakfast staple, boasts a surprisingly rich and complex history. While pinpointing the exact origin is difficult, evidence suggests waffle-like baked goods existed centuries ago. Ancient Greeks are credited with creating a primitive version using a simple iron grid over a fire, likely baking a flatbread rather than the fluffy squares we know today. These early iterations, far from the light and airy textures we associate with modern waffles, were likely more akin to a crisp cracker.
The waffle’s evolution continued through the Middle Ages, spreading across Europe. Medieval recipes often involved a batter poured onto a heated iron, resulting in a thicker, denser product. The design of the irons themselves evolved, becoming more intricate and decorative. By the 17th century, waffles had become a popular treat in the Netherlands, and from there, they made their way to the New World with European settlers. The invention of the waffle iron, allowing for consistent cooking and even crisping, significantly impacted the waffle’s trajectory and its rise in popularity.
Today, waffles are a global phenomenon, enjoying immense popularity in various cultures. Belgian waffles, known for their deep pockets and lighter texture, are often considered the pinnacle of waffle-making, particularly in the United States. In fact, according to a recent survey, over 70% of American households consume waffles at least once a month. However, variations exist across the globe, with ingredients and preparation methods differing significantly. Some cultures utilize yeast in their batter for a more airy result, while others prefer a simple buttermilk recipe. The waffle’s adaptability is a testament to its enduring appeal.
Beyond the breakfast table, waffles have taken on significant cultural importance. Waffle houses are a quintessential part of American diner culture, often serving as community gathering spots. The waffle’s versatility extends beyond its traditional role, with sweet and savory variations appearing on menus worldwide. From classic pairings with maple syrup and berries to more adventurous combinations with savory meats and cheeses, the waffle’s adaptability ensures its continued relevance in contemporary cuisine. This recipe aims to capture the essence of the perfect fluffy waffle, a balance of crisp exterior and melt-in-your-mouth interior – a testament to this beloved breakfast treat’s enduring legacy.
Ingredients and Measurements
Crafting perfect fluffy waffles hinges on precise ingredient measurements and their quality. Using a kitchen scale is highly recommended for accuracy, especially when dealing with dry ingredients like flour. However, if you’re using volume measurements, ensure you use the correct techniques to avoid discrepancies.
For this recipe, we’ll be using both weight and volume measurements, providing you with flexibility based on your preferred method. Always remember to bring your ingredients to room temperature before mixing, unless otherwise specified. This ensures even mixing and a better rise.
Dry Ingredients:
- All-Purpose Flour: 2 cups (250g). Using cake flour will result in a more delicate waffle, while bread flour will create a chewier texture. Avoid using self-rising flour; the leavening agents in this type of flour will interfere with the baking powder in the recipe, resulting in unpredictable results.
- Granulated Sugar: 2 tablespoons (25g). This provides a subtle sweetness; adjust to your preference. Using brown sugar will add a richer flavor and slightly more moisture.
- Baking Powder: 2 teaspoons (10g). Ensure your baking powder is fresh; expired baking powder will not provide sufficient lift, resulting in flat waffles. Check the expiration date before starting.
- Salt: 1/2 teaspoon (3g). Salt enhances the flavors of the other ingredients and balances the sweetness.
Wet Ingredients:
- Milk: 1 1/2 cups (355ml). Whole milk is recommended for the richest flavor and fluffiest texture. You can substitute with 2% milk, but the waffles might be slightly less rich. Using buttermilk will add tanginess and create a more tender waffle.
- Eggs: 2 large. Large eggs are crucial for proper volume and binding. Using smaller eggs may affect the final texture. Make sure your eggs are at room temperature for optimal emulsification.
- Melted Butter: 1/4 cup (57g). Use unsalted butter to control the salt content. Let the butter cool slightly before adding it to the batter to prevent the eggs from cooking prematurely.
- Vanilla Extract: 1 teaspoon (5ml). This adds a touch of flavor and aroma. Feel free to experiment with other extracts like almond or lemon for variations.
Optional Additions:
For added flavor and texture, consider incorporating the following: 1/2 cup of blueberries, chocolate chips, or chopped nuts. Remember that adding these ingredients may slightly alter the cooking time.
Important Note: Accurate measurements are key for consistent results. Use measuring cups and spoons designed for dry and liquid ingredients separately. Level off dry ingredients with a straight edge to prevent over-measuring.
Equipment List: Perfect Fluffy Waffles
Making perfect fluffy waffles requires the right tools. While you can adapt, having the correct equipment significantly improves the consistency and overall quality of your waffles. This list details the essential items, along with some optional additions for a truly professional result.
1. Waffle Iron: This is, of course, the star of the show. The size and type of waffle iron will influence the size and shape of your waffles. A Belgian waffle iron is recommended for its deep pockets and ability to create extra-fluffy waffles. Look for a waffle iron with non-stick surfaces to prevent sticking and ensure easy cleaning. Consider the wattage; higher wattage irons heat up faster and cook more evenly. A good range is 1000-1500 watts. Before purchasing, check reviews to ensure even heat distribution across the cooking plates to prevent burnt edges or undercooked centers.
2. Measuring Cups and Spoons: Accurate measurements are crucial for consistent waffle results. Invest in a set of both liquid and dry measuring cups and spoons, preferably made of stainless steel or durable plastic. Avoid using mismatched or worn-out measuring tools, as this can significantly impact the final product’s texture and consistency. For example, using a slightly smaller cup for a liquid ingredient dramatically alters the batter’s consistency. Accurate measurements are vital for the perfect waffle texture.
3. Mixing Bowls: You’ll need at least two mixing bowls. One large bowl for mixing the wet ingredients and a separate smaller bowl for the dry ingredients. Choose bowls that are large enough to comfortably accommodate the batter without overflowing. Stainless steel bowls are ideal for their durability and ease of cleaning; however, glass or heat-resistant plastic bowls also work well.
4. Whisk: A whisk is essential for thoroughly combining the wet and dry ingredients, ensuring a smooth and lump-free batter. Choose a balloon whisk for its efficiency in incorporating air into the batter, contributing to lighter and fluffier waffles. A sturdy whisk is recommended to withstand vigorous mixing.
5. Spatula: A sturdy spatula, preferably a flexible silicone spatula, is needed for gently spreading the batter evenly in the waffle iron and for removing the cooked waffles. A thin, flexible spatula allows for easy removal of waffles without tearing or breaking them. Avoid using metal spatulas that might scratch the non-stick surface of your waffle iron.
6. Optional Equipment: While not essential, some additional equipment can enhance your waffle-making experience. A kitchen scale provides precise measurements, especially helpful for baking. A timer helps ensure perfectly cooked waffles every time. Finally, a cooling rack allows the waffles to cool evenly and prevents them from becoming soggy.
7. Cleaning Supplies: Always clean your waffle iron according to the manufacturer’s instructions. Avoid abrasive cleaners or scouring pads that could damage the non-stick coating. A soft sponge or cloth and warm, soapy water are usually sufficient.
By gathering these essential tools and following the recipe carefully, you’ll be well on your way to creating perfect, fluffy waffles every time.
Preparation Phase: Dry Ingredients
The success of perfectly fluffy waffles hinges significantly on the proper handling of your dry ingredients. This phase requires precision and attention to detail to ensure even mixing and optimal leavening. We’ll be focusing on achieving a light and airy batter, avoiding lumps, and ensuring consistent distribution of flavor.
Begin by gathering your dry ingredients: 2 cups (250g) all-purpose flour, 2 tablespoons (20g) granulated sugar, 4 teaspoons (20g) baking powder, and 1 teaspoon (5g) baking soda. Using a kitchen scale for accurate measurements is highly recommended, particularly for baking, as volume measurements can vary depending on how tightly the flour is packed. Accurate measurements are crucial for achieving the desired texture and rise.
Sifting the flour is a critical step often overlooked but highly impactful. This process aerates the flour, removing any lumps and ensuring a smoother batter. While some recipes omit this step, for perfectly fluffy waffles, it’s essential. Use a fine-mesh sieve and sift the flour directly into a large mixing bowl. Sifting also helps distribute the baking powder and baking soda evenly throughout the flour, preventing pockets of uneven leavening which can result in unevenly cooked waffles.
Next, add the granulated sugar to the sifted flour. Gentle whisking is all that’s needed here; no need for vigorous mixing at this stage. Simply incorporate the sugar into the flour. Avoid over-mixing the dry ingredients as this can lead to tough waffles. A few gentle strokes with a whisk are sufficient to combine.
Now, add the baking powder and baking soda. Ensure these leavening agents are fresh. Expired baking powder and baking soda will significantly impact the rise of your waffles, resulting in flat and dense results. Check the expiration dates on your containers before starting. Again, gently whisk the leavening agents into the flour and sugar mixture. Avoid over-mixing, which can prematurely activate the baking powder and soda, leading to a flat waffle.
Once all dry ingredients are combined, give the mixture one final gentle whisk to ensure everything is evenly distributed. The mixture should be light and fluffy with no visible lumps. Set the bowl aside and proceed to prepare your wet ingredients. Remember, the key to perfectly fluffy waffles lies in the balance between the wet and dry ingredients, and a gentle hand throughout the mixing process.
Properly preparing your dry ingredients is half the battle in creating light and airy waffles. Following these steps carefully will significantly contribute to the final result, yielding the perfect fluffy texture you’re aiming for. Enjoy!
Preparation Phase: Wet Ingredients
The success of perfectly fluffy waffles hinges significantly on the proper handling of your wet ingredients. This phase requires precision and attention to detail, ensuring a balanced batter that yields light and airy waffles. We’ll be focusing on achieving the ideal consistency and temperature for optimal results.
Begin by gathering your wet ingredients: 1 cup (240ml) whole milk, 1 large egg, and 2 tablespoons (30ml) unsalted melted butter. The type of milk you use impacts the final texture. Whole milk, with its higher fat content, contributes significantly to the tenderness and richness of the waffles. Skim milk or milk alternatives can be used, but may result in a slightly drier waffle. Avoid using ultra-pasteurized milk, as it can sometimes lead to a less fluffy outcome.
Next, we’ll address the egg. Use a large, fresh egg at room temperature. Room temperature eggs emulsify more readily with the other ingredients, resulting in a smoother batter and better overall texture. If you’ve forgotten to take your eggs out of the refrigerator, you can quickly bring them to room temperature by placing them in a bowl of warm water for about 10-15 minutes. Don’t rush this step; cold eggs can cause the batter to become lumpy.
The melted butter adds richness and flavor, contributing to the overall deliciousness of your waffles. Ensure the butter is completely melted but not hot; avoid scorching the butter, as this can impart a burnt flavor to your waffles. Allow the melted butter to cool slightly before incorporating it into the batter. This prevents the heat from cooking the egg prematurely.
Measuring your wet ingredients accurately is crucial. Use a liquid measuring cup for the milk, ensuring you measure at eye level to obtain the correct amount. For the melted butter, use a liquid measuring cup or a tablespoon measure. Precise measurements are key to achieving consistent results; slight variations can impact the final texture and consistency of your waffles.
Once you have measured all your wet ingredients, gently whisk them together in a medium-sized bowl. Do not over-whisk. The goal is to combine the ingredients, ensuring there are no streaks of egg or lumps of butter, but avoid incorporating excess air. Over-whisking can lead to tough waffles. A gentle, swirling motion is sufficient.
Finally, before combining the wet ingredients with the dry ingredients (covered in the next section), give your mixture a final visual check. Ensure everything is well combined and there are no visible lumps or unmixed ingredients. This smooth, homogenous mixture will integrate seamlessly with the dry ingredients, resulting in a perfectly balanced waffle batter ready for cooking.
Mixing the Batter (Important: Avoid Overmixing)
This section details the crucial batter-mixing stage for achieving perfectly fluffy waffles. The key here is gentle handling; overmixing develops gluten, resulting in tough, chewy waffles instead of the light and airy texture we desire. We’ll be working with a standard recipe yielding approximately 8-10 four-inch waffles, but you can easily scale this up or down as needed.
Begin by ensuring all your ingredients are at room temperature. This helps them blend seamlessly and prevents lumps from forming. We’ll be using: 2 cups all-purpose flour, 2 tablespoons granulated sugar, 2 teaspoons baking powder, 1/2 teaspoon baking soda, 1/4 teaspoon salt, 1 3/4 cups milk (whole milk is recommended for richer flavor and texture), 1/4 cup melted unsalted butter (cooled slightly), and 1 large egg.
In a large bowl, whisk together the dry ingredients: 2 cups all-purpose flour, 2 tablespoons granulated sugar, 2 teaspoons baking powder, 1/2 teaspoon baking soda, and 1/4 teaspoon salt. Whisk vigorously for about 15 seconds to ensure everything is evenly distributed and no clumps remain. This initial whisking aerates the flour slightly, contributing to the final texture.
In a separate bowl, gently whisk together the wet ingredients: 1 3/4 cups milk, 1/4 cup melted (but slightly cooled) unsalted butter, and 1 large egg. Avoid vigorous whisking here; a gentle blend is sufficient. Overmixing the wet ingredients can incorporate too much air, leading to a batter that’s too airy and prone to collapsing.
Now, gradually add the wet ingredients to the dry ingredients. Do this in stages, adding about 1/3 of the wet ingredients at a time and gently folding them into the dry ingredients using a rubber spatula or a large spoon. The folding motion is crucial; it incorporates the wet ingredients without kneading the flour and developing gluten. Avoid stirring in a circular motion.
Once all the wet ingredients are incorporated, stop mixing immediately. The batter should be just combined; a few small lumps are perfectly acceptable. Do not overmix. Overmixing leads to tough waffles. The batter should be slightly lumpy, not completely smooth. If you see the batter becoming noticeably elastic or stringy, you’ve overmixed.
Let the batter rest for about 5-10 minutes. This allows the gluten to relax and the baking powder to activate, resulting in even fluffier waffles. After resting, gently stir the batter once or twice before pouring it into your preheated waffle iron. Avoid vigorous stirring during this final step.
Following these steps carefully will ensure you achieve light, fluffy, and perfectly delicious waffles every time. Remember, the key is gentle handling and avoiding overmixing. Happy Waffling!
Cooking the Waffles (Temperature and Time)
Achieving perfectly fluffy waffles hinges on mastering the art of cooking them at the right temperature for the optimal amount of time. This seemingly simple step is crucial for achieving that light and airy interior with a delightfully crisp exterior. Don’t rush this process; patience is key to waffle perfection!
Preheat your waffle iron thoroughly. This is arguably the most important step. A cold waffle iron will result in soggy, undercooked waffles. Most waffle irons have indicator lights; allow the iron to preheat completely until the light indicates it’s ready. This usually takes 3-5 minutes, but always refer to your waffle iron’s specific instructions.
Don’t overcrowd the waffle iron. Pouring too much batter into the iron will result in uneven cooking and a gummy center. The ideal amount of batter depends on the size of your waffle iron. As a general guideline, fill the iron about ¾ full. If you’re unsure, start with a smaller amount and adjust accordingly for subsequent waffles.
Cooking Time: The Golden Rule. The cooking time varies depending on your waffle iron, the thickness of your batter, and your desired level of crispness. A good starting point is 3-5 minutes. Begin checking for doneness around the 3-minute mark. Look for golden-brown edges and a steamy aroma. If the steam has subsided and the waffle looks pale, it needs more time. If it’s browning too quickly, reduce the heat setting (if your iron allows) or slightly decrease the cooking time.
Testing for Doneness: The best way to ensure your waffles are perfectly cooked is to use the visual and tactile cues. Look for a deep golden-brown color on the outside. The waffle should be firm to the touch and spring back slightly when pressed gently. You can also carefully open the waffle iron (using oven mitts!) to peek inside. If the batter still appears wet or uncooked in the center, continue cooking in 30-second intervals.
Adjusting for Different Waffle Irons: Some waffle irons cook faster than others. If your waffles are consistently burning, try reducing the heat setting or shortening the cooking time. Conversely, if your waffles are always undercooked, increase the heat or slightly extend the cooking time. Keep a food thermometer handy to monitor the internal temperature of your waffle iron. Ideally, it should reach around 350-400°F (175-200°C) for optimal results.
Experimentation is Key: Don’t be afraid to experiment with different cooking times and temperatures to find what works best with your specific waffle iron and batter recipe. Keep a detailed log of your results (batter amount, cooking time, temperature, and outcome) to help you refine your technique and achieve consistently perfect waffles.
Important Note: Always unplug your waffle iron before cleaning or storing it. Allow it to cool completely before wiping it down with a damp cloth. Never immerse the waffle iron in water.
Recommendations for Perfect Fluffy Waffles
To achieve truly perfect fluffy waffles, meticulous attention to detail is key. Ensure your batter is properly mixed – avoid overmixing, which can lead to tough waffles – and allow it to rest for at least 5 minutes before cooking. This allows the gluten to relax, resulting in a lighter texture. Cook your waffles on a preheated waffle iron, following the manufacturer’s instructions for optimal browning and crispiness. Don’t overcrowd the waffle iron; cook in batches to ensure even cooking and fluffy results.
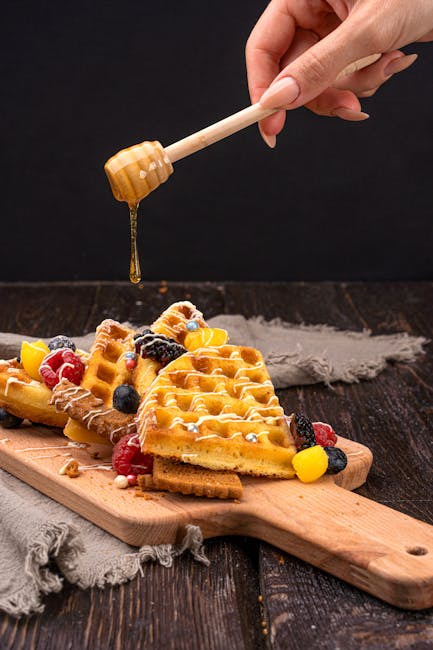
Serving Suggestions: The versatility of waffles allows for endless creative possibilities! A classic approach involves a simple dusting of powdered sugar, a drizzle of maple syrup, and a pat of butter. For a more decadent experience, consider topping your waffles with fresh berries, whipped cream, chocolate sauce, or a scoop of your favorite ice cream. Savory options are equally delicious. Try topping your waffles with fried chicken, bacon, and a drizzle of hot sauce for a truly unique breakfast experience. Alternatively, a sprinkle of parmesan cheese and a poached egg makes for a satisfying brunch option. Experiment with different toppings to discover your perfect combination.
Storage: For optimal freshness, consume your waffles immediately after cooking. However, leftover waffles can be stored for up to 3 days in an airtight container at room temperature. For longer storage, consider freezing your waffles. Place cooled waffles in a freezer-safe bag or container and freeze for up to 3 months. To reheat, simply toast them in a toaster or microwave until warmed through. Avoid freezing waffles that have already been topped with wet ingredients like fruit or whipped cream.
Complementary Dishes: Perfect fluffy waffles pair beautifully with a range of side dishes. A simple fruit salad provides a refreshing contrast to the richness of the waffles. Sausage patties or links offer a savory counterpoint, while a side of crispy bacon adds smoky saltiness. Consider serving alongside a light and fluffy scramble or a hearty bowl of oatmeal for a complete and balanced breakfast or brunch. For a more sophisticated meal, pair your waffles with a side of roasted vegetables or a fresh green salad.
Nutritional Information (per waffle, approximate values may vary based on recipe and ingredients): These values are estimates and may vary depending on the specific recipe and ingredients used. It’s important to note that nutritional information can change significantly based on the types of flour, sweeteners, and other additions used in your waffle recipe. Always consult a nutrition calculator with your precise ingredients for the most accurate data.
Approximate Calorie Count: 150-250 calories
Approximate Fat: 5-10 grams
Approximate Carbohydrates: 25-35 grams
Approximate Protein: 3-5 grams
Disclaimer: The nutritional information provided is an estimate and may not be entirely accurate. For precise nutritional information, please use a nutrition calculator with your specific recipe ingredients.