The seemingly simple pancake, a flat cake of batter cooked on a hot surface, boasts a surprisingly rich and complex history, far exceeding its reputation as a breakfast staple. While pinpointing the exact origin is impossible, evidence suggests variations existed in ancient cultures across the globe. Ancient Greeks, for example, made a type of flatbread called tagenites, cooked on a hot griddle and often served with honey and fruit – a clear ancestor to the modern pancake. Similarly, the Romans enjoyed alita dolcia, a thin pancake often flavored with herbs and spices. These early iterations were likely more akin to crepes than the fluffy pancakes we know today, lacking the leavening agents that create that signature light and airy texture.
The evolution towards the fluffy pancake we enjoy today is largely attributed to advancements in culinary techniques and ingredients. The rise of baking powder and baking soda in the 19th century revolutionized pancake-making, enabling the creation of significantly lighter and thicker pancakes. This coincided with the increasing popularity of wheat flour and the standardization of recipe development, leading to the widespread dissemination of pancake recipes across Europe and eventually, North America. Interestingly, the United States, with its diverse population and culinary traditions, embraced the pancake wholeheartedly, developing regional variations and incorporating them into iconic breakfast menus. Pancake Day (Shrove Tuesday), a Christian holiday celebrated in many countries, further solidified the pancake’s place in cultural traditions, representing a final opportunity to use up rich ingredients before Lent.
Today, pancakes are a global phenomenon. The sheer volume of pancake consumption is staggering, though precise global figures are difficult to obtain. However, in the United States alone, millions of pounds of pancake mix are sold annually, highlighting the enduring appeal of this breakfast favorite. Beyond the simple breakfast option, pancakes have become a canvas for culinary creativity, with endless variations incorporating chocolate chips, fruits, nuts, and even savory ingredients. From classic buttermilk pancakes to Japanese souffle pancakes with their impossibly light and airy texture, the pancake continues to evolve, reflecting the ever-changing tastes and culinary innovations of societies worldwide. This enduring popularity speaks to the simple pleasure of a perfectly cooked, fluffy pancake – a testament to its timeless appeal.
Ingredients and Measurements
The key to perfectly fluffy pancakes lies not only in the recipe itself, but also in the precision of your ingredients and measurements. Using a kitchen scale is highly recommended for the most consistent results, especially when it comes to flour and sugar. However, if you’re using measuring cups and spoons, ensure you use the correct techniques to avoid inaccuracies.
For this recipe, we’ll be using standard US cup and tablespoon measurements. However, you can easily convert these to metric measurements using an online converter. Remember to always level off dry ingredients like flour and baking powder using a straight edge, such as a butter knife or the back of a spoon. Packing down your flour will result in denser pancakes.
Here’s a detailed breakdown of the ingredients and their precise measurements:
- All-Purpose Flour: 2 cups (250g) – Using all-purpose flour provides the perfect balance of structure and tenderness. Do not substitute with cake flour or bread flour as this will alter the texture significantly. If you are using a different type of flour, you may need to adjust the liquid accordingly.
- Granulated Sugar: 2 tablespoons (25g) – This adds a touch of sweetness and helps to tenderize the pancakes. Do not over-measure the sugar, as this can lead to overly sweet and potentially burnt pancakes. You can adjust this to your preference, but start with the recommended amount.
- Baking Powder: 2 teaspoons (10g) – This is the leavening agent responsible for the fluffy texture. Ensure your baking powder is fresh. Old baking powder will lose its potency, resulting in flat pancakes. Check the expiration date on the packaging.
- Salt: 1/2 teaspoon (3g) – Salt enhances the flavors and balances the sweetness. Don’t skip the salt! It’s a crucial ingredient for achieving the best taste.
- Eggs: 2 large – The eggs bind the ingredients together and add richness. Use large eggs for consistent results. If your eggs are smaller, you may need to slightly adjust the amount of liquid.
- Milk: 1 1/4 cups (300ml) – We recommend using whole milk for the richest flavor and fluffiest texture. You can substitute with buttermilk for a tangier flavor, but you might need to slightly reduce the amount of other liquid ingredients. Ensure your milk is at room temperature for optimal mixing.
- Melted Butter: 2 tablespoons (30g) – Melted butter adds flavor and moisture to the pancakes. Let the butter cool slightly before adding it to the batter to avoid cooking the eggs prematurely.
- Vanilla Extract (Optional): 1 teaspoon (5ml) – A touch of vanilla extract enhances the overall flavor of the pancakes. This is optional, but highly recommended.
Precise measurement is crucial for achieving consistently fluffy pancakes. Take your time, carefully measure your ingredients, and watch your perfect pancakes rise!
Equipment List: Perfect Fluffy Pancakes
Making perfect fluffy pancakes requires the right tools. While you might be able to improvise with some items, having the correct equipment will significantly enhance your pancake-making experience and ensure consistent results. This list details the essential equipment, along with recommendations for optimal performance.
Large Mixing Bowls (2): You’ll need at least two mixing bowls of varying sizes. One, ideally a 3-quart to 4-quart bowl, will be used for combining the wet ingredients. The second, a smaller bowl (approximately 1.5-quart), is perfect for whisking together the dry ingredients. Using separate bowls prevents lumps and ensures even distribution of ingredients. Stainless steel bowls are preferred as they are durable, easy to clean, and won’t react with the ingredients.
Whisk (2): Having two whisks is highly recommended. A larger whisk (around 10-12 inches) is ideal for efficiently combining the wet ingredients in the larger bowl, ensuring a smooth and lump-free batter. A smaller whisk (around 8 inches) is perfect for whisking the dry ingredients together in the smaller bowl. Choose balloon whisks for their superior blending capabilities. They incorporate air effectively, contributing to the fluffiness of your pancakes.
Measuring Cups and Spoons: Accurate measurements are crucial for consistent pancake results. Invest in a set of both liquid and dry measuring cups (preferably glass or stainless steel for accuracy) and a set of measuring spoons. Ensure your measuring cups and spoons are properly calibrated. Inaccurate measurements can lead to pancakes that are too dense or too thin.
Spatula (2): You’ll need two spatulas: one for flipping the pancakes and another for scraping the batter from the bowl. A flexible, thin spatula (like a silicone spatula) is perfect for scraping the bowl clean, ensuring no batter is wasted. A wider, metal spatula is best for flipping the pancakes without tearing them. A non-stick spatula is ideal to prevent sticking and ensure easy flipping.
Non-Stick Pan (8-10 inch): A good quality non-stick pan, ideally 8 to 10 inches in diameter, is essential for even cooking and easy removal of pancakes. A heavy-bottomed pan is preferred as it distributes heat evenly, preventing hot spots that can burn the pancakes. Avoid using a pan that is too small, which can overcrowd the pancakes and hinder even cooking.
Griddle (Optional but Recommended): A griddle provides more cooking surface area, allowing you to cook multiple pancakes simultaneously. This significantly reduces cooking time, especially if you’re making pancakes for a crowd. Electric griddles with adjustable temperature settings are particularly useful for maintaining consistent cooking temperatures.
Butter or Oil: Using a little butter or oil to grease the pan or griddle prevents sticking and adds flavor. Use a neutral-flavored oil with a high smoke point, such as canola or vegetable oil, if you prefer not to use butter.
Serving Utensils: Finally, you’ll need serving utensils such as a spatula or tongs to carefully remove the cooked pancakes from the pan or griddle and serve them. Consider using a heat-resistant spatula to avoid burning your hands.
Preparation Phase: Dry Ingredients
The success of perfectly fluffy pancakes hinges significantly on the proper handling of your dry ingredients. This phase requires precision and attention to detail to ensure even mixing and optimal leavening. We’ll be using a classic recipe, but feel free to adapt it to your preferences later.
First, gather your dry ingredients: 2 cups (250g) all-purpose flour, 4 teaspoons (20g) baking powder, and 1 teaspoon (5g) baking soda. Using a kitchen scale for measuring your flour is highly recommended for accuracy. Spooning flour directly from the bag can pack it down, leading to denser pancakes. Always sift the flour before measuring. This removes any lumps and aerates the flour, contributing to a lighter texture in your final product.
The type of flour matters. All-purpose flour is the standard, but you can experiment with cake flour for an even more tender pancake, understanding that it will require minor adjustments to the liquid ingredients. Avoid using whole wheat flour in this particular recipe without significant modifications, as its higher density can result in heavy pancakes.
Next, we have the leavening agents: baking powder and baking soda. These are crucial for achieving that airy fluffiness. Ensure your baking powder is fresh. Old baking powder loses its potency, resulting in flat pancakes. Check the expiration date on the container. If you’re unsure, it’s always best to replace it with a new one. Improper measurement of these ingredients can significantly impact the outcome. Use measuring spoons to accurately measure your baking powder and baking soda. Don’t pack them down; level them off for precise results.
Now, let’s talk about the often-overlooked ingredient: salt. We’ll add 1 teaspoon (5g) of salt. Don’t be tempted to skip this! Salt enhances the flavors of the other ingredients and balances the sweetness. It also helps to control the yeast activity of the baking powder and soda, preventing overly bitter or alkaline-tasting pancakes.
Once you’ve accurately measured all your dry ingredients, sift them together in a large bowl. This is an essential step. Sifting combines the flour, baking powder, baking soda, and salt thoroughly, ensuring even distribution throughout the batter. This prevents pockets of baking powder or soda from creating unevenly cooked or overly dense areas in your pancakes.
After sifting, gently whisk the dry ingredients together for about 15-20 seconds. This further ensures everything is well incorporated. Avoid over-mixing at this stage; simply combine the ingredients until they are evenly distributed. Your dry ingredients are now ready for the next phase: incorporating the wet ingredients. Remember consistency is key; follow these steps for consistently perfect, fluffy pancakes.
Preparation Phase: Wet Ingredients
The success of perfectly fluffy pancakes hinges significantly on the proper handling of your wet ingredients. This phase requires precision and attention to detail to ensure optimal batter consistency. We’ll be focusing on achieving a smooth, lump-free mixture that will yield light and airy pancakes.
Begin by gathering your wet ingredients: 1 ½ cups (355ml) whole milk, 1 large egg, and 2 tablespoons (30ml) unsalted butter, melted. The type of milk you choose impacts the final texture. Whole milk contributes richness and a tender crumb, but you can experiment with 2% or skim milk if you prefer a slightly lighter pancake. However, avoid using ultra-pasteurized milk, as it can sometimes result in slightly tougher pancakes.
Temperature matters. Room temperature ingredients are crucial for proper emulsification. Cold ingredients can lead to a lumpy batter and uneven cooking. Allow your milk and egg to sit at room temperature for at least 30 minutes before starting. This is particularly important for the egg, as its yolk and white will blend more smoothly at room temperature. The melted butter should also be slightly cooled but not cold. Ideally, it should be lukewarm to avoid cooking the egg prematurely.
Crack the egg into a medium-sized bowl. Ensure no shell fragments fall in; these can create unsightly blemishes in your finished pancakes. Whisk the egg lightly with a fork until the yolk and white are just combined. Don’t over-whisk at this stage; we want a slightly broken-yolk consistency rather than a frothy mixture. This gentler approach prevents the formation of excessive air bubbles that can lead to tough pancakes.
Next, add the room temperature milk to the bowl with the egg. Whisk gently but thoroughly to combine. Avoid vigorous whisking, which will incorporate too much air. We aim for a smooth, homogenous mixture without excessive aeration. A few small bubbles are acceptable, but a frothy mixture indicates over-whisking.
Finally, pour in the melted, slightly cooled butter. Whisk again until everything is fully incorporated. You should now have a smooth, slightly viscous liquid. The mixture should be free of lumps and have a uniform consistency. If you notice any lumps, gently whisk them out, but avoid vigorous whisking.
Professional Tip: For an extra touch of richness and flavour, consider adding a teaspoon of vanilla extract to your wet ingredients. This will enhance the overall taste of your pancakes and provide a lovely aroma during cooking.
Once your wet ingredients are perfectly blended, set the bowl aside and proceed to prepare your dry ingredients. Remember, a well-prepared wet ingredient mixture is the foundation for perfectly fluffy and delicious pancakes.
Mixing Techniques for Perfect Fluffy Pancakes
Achieving perfectly fluffy pancakes hinges not just on the ingredients, but also on the finesse of your mixing technique. Overmixing leads to tough pancakes, while undermixing results in uneven cooking and a less-than-ideal texture. The key is to gently combine the wet and dry ingredients just until they are moistened, leaving a few lumps is perfectly acceptable.
We’ll explore two primary methods: the whisking method and the blender method. Both can produce excellent results, but each has its nuances.
The Whisking Method (Recommended for Best Results)
This method allows for greater control and ensures you don’t overmix the batter. It’s ideal for achieving that light and airy texture.
Step 1: Whisk the Wet Ingredients: In a large bowl, whisk together 1 ½ cups of all-purpose flour, 2 tablespoons of granulated sugar, 2 teaspoons of baking powder, ½ teaspoon of baking soda, and ½ teaspoon of salt. Ensure all dry ingredients are thoroughly combined before proceeding. This prevents pockets of baking powder or soda from creating uneven rising.
Step 2: Combine the Wet Ingredients Separately: In a separate bowl, whisk together 1 ¼ cups of milk (whole milk is recommended for the richest flavor and fluffiest texture), 1 large egg, and 2 tablespoons of unsalted melted butter. Don’t over-whisk the wet ingredients; a simple whisk until combined is sufficient.
Step 3: Gently Combine Wet and Dry: Gradually add the wet ingredients to the dry ingredients, whisking gently until just combined. Resist the urge to overmix! A few lumps are perfectly fine; in fact, they’re desirable. Overmixing develops the gluten in the flour, leading to tough pancakes. The batter should be slightly lumpy and not completely smooth.
The Blender Method (For a Smoother Batter)
This method is quicker and results in a smoother batter, ideal if you prefer a less rustic pancake. However, it’s crucial to avoid over-blending.
Step 1: Combine all Ingredients: Add all ingredients – 1 ½ cups of all-purpose flour, 2 tablespoons of granulated sugar, 2 teaspoons of baking powder, ½ teaspoon of baking soda, ½ teaspoon of salt, 1 ¼ cups of milk, 1 large egg, and 2 tablespoons of unsalted melted butter – to a blender.
Step 2: Blend on Low Speed: Pulse the blender on low speed for approximately 10-15 seconds, or until the batter is just combined. Do not over-blend! The goal is to moisten the dry ingredients, not to create a completely smooth batter. Over-blending will develop the gluten and lead to tough pancakes. Stop blending as soon as the batter is mostly smooth with only a few small lumps remaining.
Professional Recommendations
Let the batter rest for 5-10 minutes before cooking. This allows the gluten to relax and the baking powder to activate, resulting in lighter and fluffier pancakes. Use a non-stick pan or griddle and cook over medium heat. This prevents burning and ensures even cooking. Finally, don’t flip the pancakes too early! Wait until bubbles start to form on the surface and the edges look set before flipping.
Griddle/Pan Preparation: The Key to Perfect Pancakes
Proper griddle or pan preparation is paramount to achieving perfectly fluffy pancakes. A poorly prepared surface can lead to sticking, uneven browning, and ultimately, disappointing pancakes. This section details the steps to ensure your cooking surface is ready for pancake perfection.
Choosing the Right Cookware: While you can use a non-stick skillet, a dedicated griddle or a large, flat-bottomed pan offers superior results. A cast iron griddle, for instance, provides excellent heat retention and distribution, leading to consistent cooking. If using a non-stick pan, ensure it’s in good condition; avoid scratched or damaged surfaces.
Heating the Griddle/Pan: Before adding any batter, it’s crucial to properly heat the griddle or pan. Medium-low heat is ideal for most pancake recipes. High heat will cook the outside of the pancake too quickly, leaving the inside raw. Low heat will result in slow cooking and soggy pancakes. The goal is to achieve a gentle, even heat distribution across the entire surface.
Testing for Readiness: To determine if your griddle or pan is at the right temperature, sprinkle a few drops of water onto the surface. If the water beads up and sizzles gently, evaporating within a second or two, your surface is ready. If the water sits and evaporates slowly, the temperature is too low. If the water immediately boils and steams vigorously, the surface is too hot and needs to be reduced in temperature.
Oiling or Greasing the Surface: Properly greasing the cooking surface prevents sticking and ensures easy flipping. Use a neutral-flavored oil with a high smoke point, such as vegetable oil, canola oil, or grapeseed oil. Avoid using butter or strongly flavored oils at this stage as they can burn easily at the required cooking temperature. Apply a thin, even layer of oil using a paper towel or a pastry brush. About 1-2 teaspoons should be sufficient for a 10-12 inch griddle or pan. Avoid over-oiling, as this can lead to greasy pancakes.
Professional Tip: For extra-even cooking, especially with cast iron, consider preheating your griddle in the oven at a low temperature (around 200°F/93°C) for 15-20 minutes before transferring it to the stovetop. This ensures consistent heat throughout the cooking process.
Maintaining the Heat: Throughout the cooking process, maintain a consistent medium-low heat. You might need to make minor adjustments based on your stovetop and the thickness of your pancakes. Avoid drastic changes in heat, as this can lead to unevenly cooked pancakes. If you notice browning happening too quickly, reduce the heat slightly. If the pancakes are cooking too slowly, increase the heat slightly.
By following these steps diligently, you’ll ensure your griddle or pan is perfectly prepared for creating light, fluffy, and delicious pancakes every time. Remember, practice makes perfect! Don’t be discouraged if your first batch isn’t flawless – with a little experience, you’ll master the art of pancake preparation.
Perfect Fluffy Pancakes: Recommendations
To achieve truly perfect fluffy pancakes, several key recommendations should be followed. Firstly, ensure your ingredients are at room temperature. Cold ingredients will result in denser pancakes. Allow your eggs, milk, and butter to sit out for at least 30 minutes before mixing. This allows for better emulsification and a lighter batter. Secondly, don’t overmix the batter. Overmixing develops gluten, leading to tough pancakes. Mix only until just combined; a few lumps are okay. Finally, let the batter rest for 5-10 minutes before cooking. This allows the gluten to relax further, resulting in a more tender texture.
For optimal cooking, use a lightly oiled griddle or non-stick pan over medium heat. Cook the pancakes for 2-3 minutes per side, or until golden brown and cooked through. Avoid pressing down on the pancakes while they cook, as this will flatten them. Flip them only once they have formed bubbles on the surface and the edges appear set.
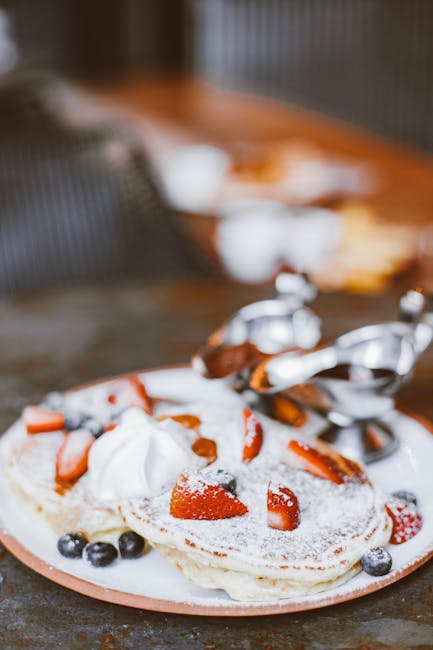
Serving Suggestions: The possibilities are endless! Classic pairings include butter and maple syrup, but you can also explore more adventurous options. Try topping your pancakes with fresh berries and whipped cream, a dollop of Greek yogurt and a drizzle of honey, or even a savory combination of avocado, bacon, and a fried egg. Get creative and experiment with different toppings to find your favorite combination.
Storage: Leftover pancakes can be stored in an airtight container in the refrigerator for up to 3 days. To reheat, simply place them in a toaster or microwave until warmed through. For the best results, reheat gently to avoid drying them out. You can also freeze pancakes for longer storage. Place them in a freezer-safe bag or container and freeze for up to 3 months. Thaw overnight in the refrigerator before reheating.
Complementary Dishes: Pancakes are a versatile breakfast or brunch item that pairs well with a variety of dishes. Consider serving them alongside crispy bacon or sausage, fluffy scrambled eggs, fresh fruit salad, or a side of breakfast potatoes. A mimosa or a cup of strong coffee complements the sweetness of the pancakes perfectly.
Nutritional Information (per pancake, approximate values may vary based on ingredients and portion size): Calories: Approximately 150-200 calories. Protein: 4-6 grams. Fat: 6-10 grams. Carbohydrates: 20-30 grams. Fiber: 1-2 grams. Sugar: The sugar content will vary significantly depending on the type and amount of added sweeteners (maple syrup, honey, etc.). These are approximate values and can change based on the specific recipe and ingredients used.
Important Note: This nutritional information is an estimate. Actual values may vary depending on the specific ingredients used and the size of the pancakes. For precise nutritional information, use a nutrition calculator with your exact recipe.