The Lemon Drizzle Cake, a beloved staple of British baking, boasts a history as vibrant and zesty as its flavor profile. While pinpointing its exact origin is difficult, its popularity surged in the mid-20th century, coinciding with the increased availability of readily accessible ingredients like eggs, butter, and lemons post-World War II. This period saw a blossoming of home baking in Britain, with simpler, yet satisfying recipes like the Lemon Drizzle Cake taking center stage. It’s not a cake with a grand, documented history like some French pastries, but its widespread appeal and enduring presence in British culture speak volumes.
The cake’s simple yet effective recipe relies on a foundational sponge cake, typically made with a combination of butter, sugar, eggs, and flour. The magic, however, lies in the generous addition of lemon zest and juice, which infuse the cake with a bright, citrusy aroma and flavor. The signature drizzle, a luscious coating of lemon icing, typically made with powdered sugar, lemon juice, and sometimes butter, adds a delightful layer of sweetness and tang. This combination of moist sponge and tangy glaze is what makes the Lemon Drizzle Cake so irresistibly appealing. Many variations exist, with some including poppy seeds or even a subtle hint of almond extract.
The Lemon Drizzle Cake’s cultural significance is undeniable. It’s a quintessential example of British comfort food, often associated with tea parties, bake sales, and family gatherings. Surveys consistently rank it among the nation’s favorite cakes, often competing with Victoria sponge and carrot cake for top spots. Its simplicity makes it accessible to bakers of all skill levels, contributing to its enduring popularity across generations. Furthermore, the cake’s bright yellow color and cheerful presentation make it a perfect choice for celebrations and everyday treats alike. The Lemon Drizzle Cake isn’t just a cake; it’s a symbol of simple pleasures and shared moments.
Interestingly, the Lemon Drizzle Cake’s popularity has extended beyond British shores. While it doesn’t hold the same cultural weight internationally, its straightforward recipe and delicious taste have made it a favorite in many other countries. Numerous online recipe databases and cooking blogs feature countless variations and adaptations, reflecting its adaptability and global appeal. Its enduring presence in cookbooks, magazines, and television baking shows further cements its status as a classic dessert, a testament to its simple yet irresistible charm.
Ingredients and Measurements
This recipe yields a classic, moist Lemon Drizzle Cake, perfect for afternoon tea or a celebratory occasion. Accurate measurements are crucial for achieving the optimal texture and flavor. We’ll be using both weight and volume measurements, as weight provides greater accuracy, especially when dealing with ingredients like flour.
For the Cake:
- 225g (2 cups) self-raising flour: Using self-raising flour simplifies the process by eliminating the need for added baking powder. Ensure your flour is fresh; old flour can affect the rise of your cake. If using plain flour, add 2 ½ teaspoons of baking powder.
- 225g (1 ¾ cups + 2 tbsp) caster sugar: Caster sugar dissolves easily, contributing to a tender crumb. Granulated sugar can be substituted, but may result in a slightly coarser texture. Do not pack the sugar when measuring by volume; use a light spoon to gently scoop it into the measuring cup.
- 225g (1 ¾ sticks) unsalted butter, softened: Softened butter is key for a light and airy cake. Bring the butter to room temperature; this allows for proper creaming with the sugar. Avoid melting the butter, as this will change the cake’s consistency.
- 4 large eggs: Large eggs are vital for the correct binding and structure of the cake. Use eggs at room temperature for optimal emulsification with the other ingredients. Cold eggs can lead to a curdled batter.
- 100ml (½ cup) milk: Milk adds moisture and helps create a tender crumb. Use full-fat milk for the richest flavor and texture. Skimmed milk can result in a slightly drier cake.
- Zest of 2 lemons: Freshly zested lemon brings a vibrant citrus aroma and flavor to the cake. Avoid using the white pith of the lemon, as it can impart a bitter taste. Use a fine grater to obtain the best results.
- 2 tablespoons lemon juice: Freshly squeezed lemon juice enhances the lemon flavor and balances the sweetness. Avoid using bottled lemon juice, as it may contain preservatives that can affect the taste.
For the Lemon Drizzle:
- Juice of 2 lemons: This provides the tangy drizzle that complements the cake beautifully. Ensure you use freshly squeezed juice for the best flavor.
- 100g (¾ cup) caster sugar: The sugar creates a delicious, sticky glaze. Use caster sugar for its easy dissolution and smooth consistency.
Important Note: Always weigh your ingredients using a kitchen scale for the most accurate results, especially for the flour and butter. Volume measurements can be less precise, leading to variations in the final product. Using a scale ensures consistency and helps you replicate this recipe successfully every time.
Professional Tip: Before adding the wet ingredients to the dry ingredients, ensure the butter and sugar are fully creamed together until light and fluffy. This process incorporates air into the batter, leading to a lighter and more tender cake.
Equipment List
Baking a perfect lemon drizzle cake requires the right tools. While you might be able to improvise with some items, having the correct equipment will ensure a smoother, more efficient, and ultimately more successful baking experience. This list details the essential equipment, along with recommendations for optimal results.
Mixing Bowls: You’ll need at least three mixing bowls of varying sizes. A large bowl (approximately 8-10 quart capacity) is crucial for creaming together the butter and sugar. A medium bowl (approximately 4-6 quart capacity) is ideal for whisking together the dry ingredients. A small bowl (approximately 2-3 quart capacity) will be perfect for preparing the lemon drizzle. Choose bowls made of stainless steel or glass for their durability and ease of cleaning. Avoid using plastic bowls, especially when working with acidic ingredients like lemon juice, as they can retain odors and potentially leach chemicals.
Measuring Cups and Spoons: Accurate measurements are paramount in baking. Invest in a good set of both liquid and dry measuring cups. Use separate sets for dry and liquid ingredients to avoid cross-contamination and ensure accuracy. For dry ingredients, use a level measuring spoon or cup, scraping off any excess with a straight edge. For liquid ingredients, place the measuring cup on a flat surface and read the measurement at eye level.
Electric Mixer: A stand mixer or a hand-held electric mixer is highly recommended for this recipe. The creaming process, where you beat butter and sugar together until light and fluffy, is significantly easier and more efficient with an electric mixer. A stand mixer offers superior performance for larger batches, while a hand-held mixer is a great option for smaller kitchens. Ensure your mixer is in good working order before you begin.
Baking Pans: A standard 9×13 inch baking pan is perfect for this recipe. Use a non-stick baking pan or line the pan with parchment paper to prevent sticking and make for easier removal of the cake. If you don’t have a 9×13 inch pan, a similar sized square pan will also work, however the baking time might need slight adjustment.
Rubber Spatula or Wooden Spoon: A rubber spatula or a sturdy wooden spoon is essential for scraping down the sides of the bowl and ensuring all ingredients are thoroughly combined. A rubber spatula is particularly useful for folding in delicate ingredients, preventing overmixing.
Whisk: A whisk is necessary for whisking together the dry ingredients and for making the lemon drizzle. Choose a whisk with sturdy wires to ensure effective mixing.
Baking Sheet: A baking sheet is useful for placing the cake pan on, providing even heat distribution and preventing burnt edges.
Cooling Rack: Once the cake is baked, it needs to cool completely before drizzling. A cooling rack allows for proper air circulation, preventing condensation and ensuring the cake cools evenly. Avoid placing the hot cake directly on a countertop, as this can cause uneven cooling and potential sticking.
Sifter (Optional but Recommended): Sifting the dry ingredients before adding them to the batter helps to aerate the flour and ensure a lighter, fluffier cake. While not strictly necessary, a sifter is highly recommended for optimal results.
Preparation of Ingredients (Zesting, Juicing, etc.)
Before you begin baking your Lemon Drizzle Cake, meticulous preparation of the lemons is key to achieving a vibrant lemon flavor and aroma. We’ll be using both the zest and the juice, so let’s ensure we extract the maximum flavor from these citrus gems.
For this recipe, we’ll need the zest of two unwaxed lemons. Unwaxed lemons are crucial as the wax can prevent the oils from being properly extracted, diminishing the intensity of the lemon flavor in your final cake. If you can only find waxed lemons, thoroughly wash them with warm, soapy water and scrub with a vegetable brush to remove as much wax as possible before proceeding.
To zest the lemons, use a fine microplane grater or a zester. Avoid using a box grater as this can introduce bitter pith into the zest, which will negatively affect the taste of your cake. Grate only the outermost colored layer of the lemon peel, avoiding the white pith underneath. The pith is intensely bitter and will ruin the delicate lemon flavor you’re aiming for. Aim for approximately 2 tablespoons of lemon zest in total.
Once you’ve zested your lemons, it’s time to juice them. The easiest way to juice lemons is by using a hand-held citrus juicer. These juicers efficiently extract the juice while leaving behind the pulp and seeds. Alternatively, you can cut the lemons in half and juice them manually by rolling them firmly on a countertop to break down the cells before squeezing. If you choose this method, strain the juice through a fine-mesh sieve to remove any seeds or pulp.
Accurate measurement of lemon juice is critical for balancing the sweetness and tartness of the cake. For this recipe, you’ll need 100ml (approximately ¾ cup) of freshly squeezed lemon juice. It’s important to use freshly squeezed juice, as bottled lemon juice often has preservatives that can alter the flavor and texture of your cake. Furthermore, the acidity of bottled juice may vary, potentially affecting the rise of your cake.
Once you have collected your zest and juice, store them separately in small bowls until you are ready to incorporate them into the batter. Avoid leaving the zest in contact with metallic bowls for extended periods as this can cause oxidation and dull the vibrant color and aroma of the lemon zest. A glass or ceramic bowl is recommended.
Proper preparation of your lemons is the foundation of a delicious Lemon Drizzle Cake. Taking the time to carefully zest and juice your lemons, paying attention to detail, will significantly impact the final flavor and quality of your bake. Enjoy the process and the rewarding results!
Cake Batter Mixing Instructions
Making a light and fluffy lemon drizzle cake requires careful attention to the mixing process. Following these instructions will ensure a delicious and evenly textured cake every time. We’ll be using the creaming method, which is ideal for this recipe.
Begin by preheating your oven to 180°C (160°C fan/Gas Mark 4). Grease and flour two 20cm (8-inch) round cake tins. This prevents sticking and ensures easy removal once the cakes are baked. You can also line the bases with baking parchment for extra security.
Cream together the butter and sugar: In a large mixing bowl, add 225g (8oz) of softened unsalted butter and 225g (8oz) of caster sugar. Using an electric mixer, beat these together until the mixture is light, fluffy, and pale in color. This process incorporates air into the batter, leading to a lighter texture. Don’t rush this step; it’s crucial for a successful cake. Aim for at least 5-7 minutes of beating.
Add the eggs gradually: Crack in 4 large eggs one at a time, ensuring each egg is fully incorporated before adding the next. Beat well after each addition. If the mixture starts to curdle, add a tablespoon of the flour mixture (see next step) to help stabilize it. Adding the eggs slowly prevents the mixture from separating.
Combine the dry ingredients: In a separate bowl, sift together 225g (8oz) of self-raising flour, 1 teaspoon of baking powder, and a pinch of salt. Sifting removes lumps and aerates the flour, resulting in a lighter cake. Gradually add the dry ingredients to the wet ingredients, folding gently with a spatula until just combined. Overmixing will develop the gluten in the flour, resulting in a tough cake. Mix until no streaks of flour remain.
Incorporate the lemon zest and juice: Add the finely grated zest of 2 lemons and the juice of 1 lemon to the batter. Fold these ingredients gently into the batter, ensuring they are evenly distributed. The lemon zest adds a bright citrus flavor and aroma, while the lemon juice adds moisture and tang.
Divide the batter evenly: Divide the batter equally between the two prepared cake tins. Use a spatula to spread the batter evenly in each tin. This ensures even baking and consistent rise.
Bake for 25-30 minutes: Bake in the preheated oven for 25-30 minutes, or until a skewer inserted into the center comes out clean. Keep an eye on the cakes during the last 5-10 minutes of baking, as ovens can vary. If the cakes start to brown too quickly, cover them loosely with foil.
Cool and drizzle: Once baked, leave the cakes to cool in the tins for 10 minutes before inverting them onto a wire rack to cool completely. Once cooled, prepare the lemon drizzle (recipe provided separately) and drizzle generously over the cakes. Allow the drizzle to soak in before serving.
Baking the Cake
Preheat your oven to 180°C (160°C fan/Gas Mark 4). This ensures even baking and prevents a dense, undercooked center. Don’t skip preheating! It’s crucial for a successful cake.
Grease and flour two 20cm (8-inch) round cake tins. This prevents sticking and ensures easy removal of the baked cake. You can use baking spray, or alternatively, rub softened butter generously into the tins and then dust with flour, tapping out any excess. Lining the bases with baking parchment is also recommended for extra security, particularly if your tins are older.
In a large bowl, cream together 225g (8oz) softened unsalted butter and 225g (8oz) caster sugar until light and fluffy. This is best achieved using an electric mixer. Creaming the butter and sugar adequately is key to a light and airy cake. It incorporates air into the mixture, resulting in a tender crumb.
Gradually beat in 4 large eggs one at a time, ensuring each egg is fully incorporated before adding the next. Add a tablespoon of the flour mixture to the batter with each egg. This helps to prevent the eggs from curdling and creating a lumpy batter. If the mixture starts to look curdled, don’t worry; just keep mixing and it will come together.
In a separate bowl, sift together 225g (8oz) self-raising flour and 1 ½ tsp baking powder. Sifting removes lumps and aerates the flour, leading to a lighter cake. Ensure your baking powder is fresh; old baking powder can result in a flat cake. Gently fold the dry ingredients into the wet ingredients using a large metal spoon or spatula. Avoid overmixing; a few gentle folds are all that’s needed to combine the ingredients. Overmixing develops the gluten in the flour, resulting in a tough cake.
Gently fold in the zest of 2 lemons. Use a fine grater to avoid getting any bitter white pith into the batter, which can affect the flavor of the cake. Divide the batter evenly between the prepared cake tins. Use a kitchen scale for accuracy to ensure even baking.
Bake for 25-30 minutes, or until a skewer inserted into the center comes out clean. Start checking for doneness around the 25-minute mark. Oven temperatures can vary, so keep a close eye on your cakes. If the cakes start to brown too quickly, tent them loosely with foil.
Once baked, leave the cakes to cool in the tins for 10 minutes before turning them out onto a wire rack to cool completely. Cooling completely is important before adding the lemon drizzle; a warm cake will absorb the syrup unevenly.
While the cakes are cooling, prepare the lemon drizzle (see next section). Once the cakes are completely cool, you can drizzle the lemon syrup over the top, allowing it to soak into the cake for a deliciously moist and flavorful treat.
Lemon Drizzle Preparation
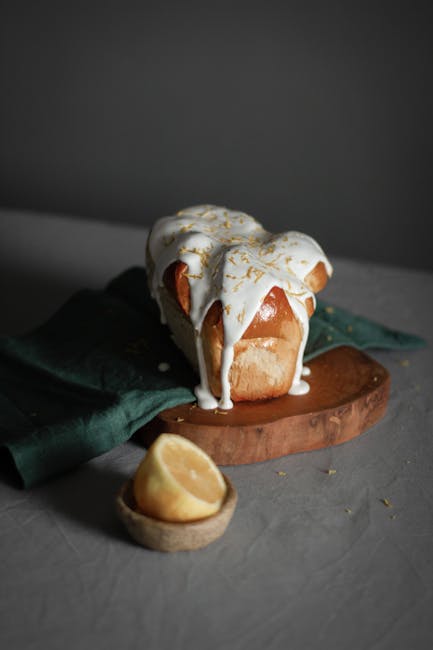
The lemon drizzle is the star of this show, adding a vibrant zing and delightful moisture to the cake. Getting it right is crucial for a truly exceptional bake. This section details the meticulous process of creating the perfect lemon drizzle.
Begin by zesting and juicing your lemons. Use at least two medium-sized lemons for a robust lemon flavor. Ensure you zest only the outer yellow layer, avoiding the bitter white pith underneath. Grate the zest finely using a microplane or fine grater. Juice the lemons thoroughly, straining it through a fine-mesh sieve to remove any seeds or pulp. You should aim for approximately 1/4 cup (60ml) of fresh lemon juice. Using fresh lemons is strongly recommended; bottled juice lacks the intensity and aromatic complexity of freshly squeezed juice.
In a medium-sized saucepan, combine 1/2 cup (100g) granulated sugar with 1/4 cup (60ml) of the freshly squeezed lemon juice. Stir gently to ensure the sugar is evenly distributed. Place the saucepan over medium-low heat. Do not rush this step! Cook the mixture, stirring constantly, until the sugar is completely dissolved and the mixture becomes slightly syrupy. This should take approximately 5-7 minutes. Continuous stirring prevents scorching and ensures even consistency.
Once the sugar is fully dissolved, remove the saucepan from the heat and gradually whisk in 1/4 cup (60ml) of unsalted butter, cut into small cubes. Whisk vigorously until the butter is fully incorporated and the mixture is smooth and glossy. This emulsification is key to a beautifully smooth drizzle. If the mixture appears grainy, continue whisking until it becomes smooth. This might take a few extra minutes.
Now, stir in the finely grated lemon zest. The zest adds a bright, aromatic dimension that complements the tartness of the lemon juice. Taste the drizzle and adjust the sweetness or tartness as needed. You can add a pinch more sugar for extra sweetness or a squeeze of extra lemon juice for increased tartness. Remember to taste before adding, as the drizzle will intensify in flavor as it cools.
Once the lemon drizzle is prepared, set it aside to cool slightly before drizzling over the warm cake. Allowing the drizzle to cool a little prevents it from sinking into the cake too quickly, ensuring a beautiful, even coating. The drizzle will thicken slightly as it cools, resulting in a richer, more flavorful glaze.
Important Note: The success of your lemon drizzle relies heavily on the quality of your ingredients. Use fresh, high-quality lemons for the best flavor and aroma. Don’t be tempted to substitute with bottled juice; the difference is significant.
Recommendations for Lemon Drizzle Cake
Our Lemon Drizzle Cake is best enjoyed at room temperature, allowing the delicate lemon flavor to fully develop and the moist texture to shine. For optimal taste, we recommend taking the cake out of the refrigerator at least 30 minutes before serving. This will prevent a chilled, dense texture and allow you to fully appreciate the subtle nuances of the citrus glaze.
Serving Suggestions: This cake is incredibly versatile and pairs well with a variety of accompaniments. A classic pairing is a dollop of lightly sweetened whipped cream or a scoop of vanilla bean ice cream. The creamy coolness cuts through the zesty lemon flavor, creating a delightful balance. Alternatively, a simple dusting of powdered sugar adds a touch of elegance and sweetness without overpowering the delicate lemon notes. For a more sophisticated touch, consider serving a small spoonful of lemon curd alongside each slice, enhancing the citrus intensity. A cup of strong, freshly brewed tea or a light, fruity coffee complements the cake beautifully.
Storage Conditions: To maintain the freshness and prevent the cake from drying out, store it in an airtight container at room temperature for up to 3 days. For longer storage, wrap the cake tightly in plastic wrap and then foil, and refrigerate for up to 5 days. While refrigeration will extend the shelf life, it may slightly alter the texture, making it slightly denser. We strongly advise against freezing this cake, as the glaze may become grainy and the texture compromised upon thawing.
Complementary Dishes: The Lemon Drizzle Cake’s bright citrus notes make it a wonderful dessert to serve alongside lighter, savory dishes. A simple green salad with a light vinaigrette would be a refreshing counterpoint to the cake’s richness. Dishes featuring grilled chicken or fish also pair well, providing a savory contrast to the sweet dessert. If you’re planning a more substantial meal, consider serving it after a creamy soup or a light pasta dish.
Nutritional Information (per slice, approximate values): These values are estimates and may vary slightly depending on the specific ingredients used and the size of the slice. Calories: Approximately 350-400 calories. Fat: 18-22g. Saturated Fat: 10-12g. Carbohydrates: 45-50g. Sugar: 25-30g. Protein: 4-5g. Please note: This information is for guidance only and should not be considered medical advice. For precise nutritional information, please consult a registered dietitian or use a nutritional analysis tool with the specific recipe details.
Important Note: While ingredients can be adjusted to cater to dietary needs, such as using alternative flours or sweeteners, it is important to note that these substitutions may significantly alter the taste and texture of the cake. We recommend following the original recipe for optimal results. Enjoy!