The humble wrap, a culinary chameleon adapting to countless fillings and flavors, boasts a surprisingly rich and varied history. While pinpointing a single origin is difficult, the concept of using flatbreads to encase savory ingredients dates back millennia. Ancient civilizations across the Middle East and Mediterranean, from Egypt to Greece, utilized flatbreads as a fundamental part of their diets, often using them to scoop up stews, dips, and other components of their meals. The precursor to the modern wrap can be traced to these early forms of flatbread sandwiches, showcasing the enduring appeal of convenient and portable food.
The evolution of the wrap into the popular lunchtime staple we know today is a more recent phenomenon, gaining significant traction in the latter half of the 20th century. The rise of fast-casual dining and the increasing demand for healthier, on-the-go meal options played a significant role in its surge in popularity. The introduction of the tortilla, a thin unleavened flatbread originating in Mexico, proved particularly transformative. Its versatility and ability to hold a wide array of fillings helped catapult the wrap into mainstream culinary consciousness. Interestingly, the popularity of wraps has surged alongside the growing awareness of health-conscious eating habits. According to a recent study by the NPD Group, wrap consumption has increased by over 15% in the last decade, driven largely by the preference for lighter, more nutritious lunch options.
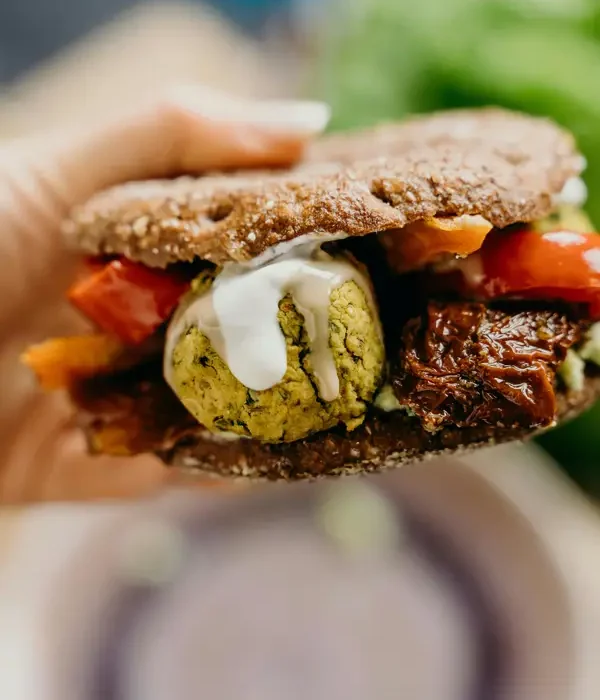
Culturally, the wrap embodies adaptability and fusion. Its simple structure allows for endless variations, reflecting the diverse culinary landscapes of the world. From the classic Mediterranean falafel wrap to the vibrant Vietnamese banh mi, the wrap transcends geographical boundaries, acting as a canvas for regional flavors and ingredients. The veggie and hummus wrap, in particular, highlights this adaptability. It seamlessly blends Middle Eastern flavors—the creamy hummus, a staple in Levantine cuisine—with a wide array of fresh vegetables, creating a healthy and satisfying meal that resonates with modern dietary preferences. The growing popularity of vegetarian and vegan diets has further contributed to the rise of veggie wraps, reflecting a broader societal shift towards plant-based eating. This recipe, therefore, not only offers a delicious and easy meal but also represents a significant trend in contemporary food culture.
Ingredients and Measurements
This recipe yields approximately 6 large veggie and hummus wraps. Feel free to adjust the quantities based on your needs and the size of your tortillas.
For the Hummus: (If making your own, otherwise use store-bought)
- 1 (15-ounce) can chickpeas, rinsed and drained thoroughly. Thorough rinsing is crucial for a smooth hummus texture.
- 1/4 cup tahini. Use good quality tahini for the best flavor.
- 1/4 cup lemon juice (about 1 large lemon). Freshly squeezed lemon juice is always preferred.
- 2 cloves garlic, minced. Adjust to your preference; some prefer more garlic!
- 1/2 teaspoon ground cumin. Cumin adds a warm, earthy flavor that complements chickpeas beautifully.
- 1/4 teaspoon salt, or to taste. Start with less salt and adjust to your preference as you taste the hummus.
- 1/4 cup ice water, plus more as needed to reach desired consistency. Adding ice water gradually helps to create a smooth and creamy texture.
- 2 tablespoons olive oil, plus extra for drizzling (optional). A good quality olive oil will enhance the flavor of your hummus.
For the Vegetable Filling:
- 1 large red bell pepper, thinly sliced. Choose brightly colored bell peppers for maximum visual appeal and flavor.
- 1 large cucumber, thinly sliced. English cucumbers are a good choice as they have fewer seeds and less water.
- 1 cup shredded carrots. Use a grater or food processor for even shredding.
- 1/2 cup cherry tomatoes, halved. Halving the tomatoes prevents them from being too bulky in the wrap.
- 1/2 cup shredded romaine lettuce. Romaine lettuce holds up well in wraps without wilting too quickly.
- 1/4 cup red onion, thinly sliced. If you’re sensitive to strong onion flavor, use less or soak the slices in cold water for 10 minutes to mellow the taste.
- 6 large flour tortillas (10-12 inches). Choose your preferred type of tortilla—whole wheat, spinach, or even gluten-free options work well.
Optional additions: You can add other vegetables like spinach, sprouts, avocado slices, or even grilled vegetables to customize your wraps. Consider adding feta cheese or a sprinkle of everything bagel seasoning for extra flavor.
Important Note: Prepare all your vegetables before you start assembling the wraps. This will make the process much smoother and faster. Ensure all ingredients are thoroughly washed before use.
Preparation of Vegetables (Washing, Chopping, etc.)
Proper vegetable preparation is crucial for achieving the best flavor and texture in your veggie and hummus wraps. Begin by selecting fresh, high-quality vegetables. Aim for vibrant colors and firm textures, avoiding any bruised or damaged produce. The quantities below are suggestions; adjust based on your preference and the number of wraps you’re making.
Washing is the first and most important step. Thoroughly wash all vegetables under cold running water. For leafy greens like spinach or lettuce, consider soaking them in a bowl of cold water with a splash of white vinegar (about 1 tablespoon per quart of water) for 10-15 minutes. This helps remove any lingering dirt or pesticides. Gently agitate the leaves in the water and then rinse thoroughly again under running water. Pat them dry with paper towels or a clean salad spinner to remove excess moisture.
Next, prepare your chopping board and knives. Use separate cutting boards for raw vegetables and cooked meats or poultry to prevent cross-contamination. Sharp knives are essential for efficient and safe chopping. A dull knife requires more force, increasing the risk of accidents. If your knives are dull, sharpen them before you begin.
Let’s assume we’re using the following vegetables for our wraps: 1 large carrot, 1 cucumber, 1 red bell pepper, and 5 oz (140g) of baby spinach. First, peel the carrot using a vegetable peeler. Then, wash and chop the carrot into thin matchsticks, approximately 2-3 inches long. You can use a mandoline slicer for even, thin slices, but a sharp knife will also work well. Aim for approximately 1 cup of chopped carrots.
Wash the cucumber thoroughly and slice it lengthwise into halves. Then, slice each half into thin half-moons, about 1/4 inch thick. Remove the seeds if desired. You should have approximately 1 cup of sliced cucumber.
Wash the red bell pepper and remove the stem, seeds, and membranes. Chop the pepper into thin strips, about 1/4 inch wide and 2-3 inches long. For a more even chop, cut the pepper in half lengthwise, then slice into strips, and finally chop across the strips. Aim for approximately 1 cup of chopped bell pepper.
Finally, prepare the baby spinach. Since it’s already washed, simply pick through it to remove any wilted or damaged leaves. No need to chop the spinach; the smaller leaves are perfect for adding to the wraps. Five ounces should provide a generous amount for your wraps.
Remember to store any leftover chopped vegetables properly in airtight containers in the refrigerator. They should remain fresh for a day or two. Proper preparation ensures your veggie and hummus wraps are not only delicious but also safe to eat.
Hummus Preparation (if homemade)
Making your own hummus allows for complete control over ingredients and flavor, resulting in a far superior wrap experience. This recipe yields approximately 2 cups of hummus, enough for several wraps. Start with high-quality ingredients; the flavor of your hummus will directly reflect their quality.
Ingredients:
- 1 (15-ounce) can chickpeas, rinsed and drained very well. Thoroughly draining the chickpeas is crucial for achieving a creamy texture.
- 1/2 cup tahini (sesame seed paste). Ensure it’s well-stirred before measuring, as the oil often separates.
- 1/4 cup fresh lemon juice (about 1 large lemon).
- 2 cloves garlic, minced or pressed. Adjust to your preference; more garlic will result in a stronger flavor.
- 1/2 teaspoon ground cumin.
- 1/4 teaspoon salt (or to taste).
- 1/4 cup ice water (or more, as needed). Adding ice water gradually helps achieve the desired consistency.
- 2 tablespoons extra virgin olive oil, for drizzling (optional, but recommended).
- Paprika, for garnish (optional).
Instructions:
1. Combine the chickpeas, tahini, lemon juice, garlic, cumin, and salt in a food processor. Process until completely smooth, scraping down the sides as needed. This initial processing might take a few minutes. Don’t rush this step; a well-processed base is essential for a creamy hummus.
2. With the food processor running, slowly drizzle in the ice water, one tablespoon at a time. This will gradually create a smooth, creamy consistency. Add more ice water, if necessary, to reach your desired texture. Avoid adding too much water at once, as this can make the hummus too thin.
3. Once the hummus is smooth and creamy, taste and adjust seasoning as needed. You might want to add more lemon juice for acidity, salt for saltiness, or garlic for a stronger flavor profile.
4. With the motor running, drizzle in the olive oil. This adds richness and a beautiful sheen to the finished hummus.
5. Transfer the hummus to a serving bowl. Drizzle with extra olive oil and sprinkle with paprika for a visually appealing presentation. Cover and refrigerate for at least 30 minutes before serving. This allows the flavors to meld and the hummus to chill, enhancing its taste and texture.
Tips for Success:
- Use a high-quality food processor for best results.
- Taste and adjust seasonings throughout the process.
- Don’t be afraid to experiment with different spices and herbs.
- Leftover hummus can be stored in an airtight container in the refrigerator for up to 5 days.
Wrap Assembly
Now that your veggies are prepped and your hummus is ready, it’s time for the fun part: assembling your delicious veggie and hummus wraps! This section will guide you through the process, ensuring you create perfectly packed and visually appealing wraps every time.
Layering is Key: The success of a great wrap lies in the strategic layering of ingredients. Begin by laying out your tortillas on a clean, flat surface. We recommend using large flour tortillas (approximately 10-12 inches in diameter), but you can adapt to your preferred size. If your tortillas are dry, lightly warm them for a few seconds in a microwave or dry skillet to make them more pliable and prevent tearing.
Hummus Base: Start with a generous, yet manageable, amount of hummus. Aim for about 2-3 tablespoons per wrap. Spread the hummus evenly across the center of the tortilla, leaving about a 1-inch border on all sides. This border will act as a seal to prevent spillage and keep your wrap intact. Don’t overload! Too much hummus will make the wrap soggy and difficult to roll.
Veggie Arrangement: Next, arrange your prepared vegetables on top of the hummus layer. Consider both visual appeal and structural integrity. For example, placing longer, sturdy vegetables like bell peppers or cucumbers along the length of the tortilla will provide a stronger spine for your wrap. Smaller, softer vegetables like shredded carrots or spinach can be placed in the center. Aim for a balanced distribution of colors and textures for a more visually appealing and flavorful wrap.
Quantity Considerations: The amount of vegetables you use will depend on your personal preference and the size of your tortillas. A good starting point is to use about 1 cup of chopped vegetables per wrap. Remember, you want a flavorful wrap that’s satisfying but not overly stuffed. Overfilling can lead to messy spills and a difficult-to-roll wrap.
The Rolling Technique: Gently lift one side of the tortilla, folding it over the filling. Then, fold in the sides, tucking them in tightly to create a neat package. Finally, continue rolling the tortilla tightly from one end to the other, creating a firm, cylindrical wrap. Tight rolling is crucial to prevent the filling from spilling out.
Optional additions: To elevate your wraps, consider adding other ingredients such as crumbled feta cheese, a sprinkle of chopped fresh herbs (like cilantro or parsley), or a drizzle of olive oil. These additions can enhance the flavor and visual appeal of your creation. Experiment with different combinations to find your favorite flavor profiles.
Serving Suggestions: Once your wraps are assembled, you can serve them immediately or refrigerate them for later. If refrigerating, it’s best to wrap them individually in plastic wrap or store them in an airtight container to maintain freshness. Cut the wraps into halves or thirds before serving for easier handling and portioning.
Troubleshooting: If your wrap starts to unravel, it might be due to insufficient rolling or too much filling. Try using smaller amounts of filling or rolling the wrap more tightly. If the tortilla tears, try warming it slightly to make it more pliable. With a little practice, you’ll master the art of perfect veggie and hummus wrap assembly!
Serving Suggestions
Your delicious veggie and hummus wraps are ready! But how you present them can elevate the experience from a simple snack to a satisfying meal. Here are some serving suggestions to inspire you, catering to different occasions and preferences.
For a Casual Lunch or Snack: Simply slice your wraps in half or thirds, depending on their size. Arrange them on a platter lined with parchment paper or a cloth napkin for an attractive presentation. A small bowl of extra hummus on the side allows for individual customization. Consider adding a sprinkle of fresh herbs like chopped parsley or cilantro for a vibrant touch and added flavor. Aim for about 2-3 wraps per person for a satisfying light lunch.
For a More Formal Setting: Elevate the presentation by using a larger platter or individual serving plates. Instead of slicing the wraps, consider carefully arranging whole wraps artfully on the platter. You can create a visually appealing design by alternating the wraps with small bowls of other dips, like baba ghanoush or tzatziki. A drizzle of high-quality olive oil adds a touch of elegance and richness. Consider garnishing with pomegranate seeds, toasted pine nuts, or a sprinkle of za’atar for a sophisticated flair. For a buffet setting, ensure you have at least 4-5 wraps per person to accommodate varying appetites.
For a Picnic or Potluck: Prepare the wraps ahead of time and transport them in a sturdy container lined with parchment paper to prevent sticking. Cut them into manageable portions before leaving. Pack them in a cooler bag with ice packs to maintain freshness. To avoid sogginess, wrap the cut portions individually in plastic wrap or foil before placing them in the container. This will also prevent the filling from drying out. Consider providing small individual containers of hummus and any other dips separately to avoid spills and ensure easy serving.
For Kids: Cut the wraps into fun shapes using cookie cutters. Make small, bite-sized pinwheels by spreading hummus on a tortilla, adding fillings, rolling it up tightly, and then slicing into 1-inch rounds. Use colorful vegetables like bell peppers and carrots to make them more appealing. Serve with a side of fruit for a healthy and balanced meal. Smaller portions (about 1-1.5 wraps) are sufficient for children.
Adding Extra Touches: Regardless of the occasion, consider these additions to enhance your veggie and hummus wraps: A squeeze of lemon juice adds brightness. A sprinkle of sea salt enhances the flavors. Roasted vegetables (like red peppers or sweet potatoes) add a smoky sweetness. Adding a sprinkle of feta cheese or crumbled goat cheese offers a salty, tangy contrast. Remember to always consider dietary restrictions and allergies when choosing your additions and garnishes.
Presentation is Key: No matter how you choose to serve your veggie and hummus wraps, remember that a visually appealing presentation enhances the dining experience. Take the time to arrange the wraps carefully, use attractive serving dishes, and add a few thoughtful garnishes. Your delicious creations will be even more enjoyable when they look as good as they taste!
Storage Instructions
Proper storage is crucial for maintaining the freshness and safety of your delicious veggie and hummus wraps. Following these guidelines will ensure you can enjoy your creations for several days after preparation.
For optimal freshness, consume your wraps within 24 hours of making them. The vegetables, especially leafy greens, will begin to wilt and lose their crispness after this time. However, with careful storage, you can extend their shelf life slightly.
Separate Components for Longer Storage: For the best results, store the wraps’ components separately. This prevents the bread from becoming soggy and the vegetables from wilting prematurely. Wrap the prepared hummus tightly in cling film or place it in an airtight container. Refrigerate it separately from the other ingredients. Store your prepared vegetables (such as shredded carrots, chopped bell peppers, and lettuce) in separate airtight containers. Aim for containers that are appropriately sized to minimize air exposure, reducing oxidation and wilting.
Storing Assembled Wraps: If you’ve already assembled your wraps, it’s essential to store them correctly to prevent them from becoming soggy or drying out. The best method involves wrapping each individual wrap tightly in plastic cling film, ensuring there’s no air trapped inside. This helps to maintain moisture and prevent the vegetables from wilting. Avoid using aluminum foil, as it can sometimes react with certain vegetables, affecting their taste and color. Then, place the wrapped wraps in an airtight container or a resealable plastic bag to further protect them from drying out or absorbing odors from the refrigerator.
Refrigeration is Key: Always store your wraps and their components in the refrigerator at a temperature below 40°F (4°C). This significantly slows down the growth of bacteria and extends the shelf life of the ingredients. Never leave assembled wraps or individual components at room temperature for more than two hours. This is especially crucial in warmer climates or during summer months.
Freezing for Extended Storage: While not recommended for optimal flavor and texture, you can freeze assembled wraps for longer storage. Wrap each individual wrap tightly in plastic cling film, then place them in a freezer-safe bag, removing as much air as possible. Frozen wraps can be stored for up to 3 months. Remember to thaw them completely in the refrigerator overnight before consuming. Reheating leftover wraps might alter their texture, making them less appealing. Therefore, consuming them cold is usually the preferred method after thawing.
Important Note: Always check the freshness of your ingredients before assembling your wraps or after thawing. Discard any ingredients that show signs of spoilage, such as discoloration, unusual odor, or slimy texture. Food safety should always be your top priority.
Recommendations for Veggie and Hummus Wraps
To enhance your veggie and hummus wrap experience, consider these recommendations. Experiment with different vegetables to find your perfect combination. Roasting vegetables like bell peppers and zucchini beforehand brings out their sweetness and adds a lovely char. Consider adding grilled or sautéed mushrooms, caramelized onions, or even some spicy pickled vegetables for extra flavor and texture. Don’t be afraid to get creative!
The quality of your hummus significantly impacts the overall taste of the wrap. Opt for a high-quality hummus with a vibrant flavor profile. You can even make your own hummus for a truly customized experience. Consider adding roasted red peppers or sun-dried tomatoes to your homemade hummus for an extra layer of complexity. Experiment with different herbs and spices too – cumin, paprika, and garlic are all excellent choices.
Regarding the wrap itself, consider the type of bread you use. Whole wheat tortillas offer a heartier option with added fiber, while spinach tortillas add a nutritional boost and vibrant green color. Larger tortillas allow for more fillings, while smaller ones are perfect for individual portions or lighter meals. Ensure your tortillas are at room temperature for easier wrapping.
Serving suggestions are plentiful. These wraps are perfectly suited for lunchboxes, picnics, or a quick and healthy dinner. They’re a fantastic option for meal prepping, as they hold up well and can be easily transported. Cut them into smaller pinwheels for a more manageable and visually appealing presentation.
Storage: Leftover wraps should be stored in an airtight container in the refrigerator for up to 3 days. To prevent the tortillas from drying out, wrap them tightly in plastic wrap before placing them in the container. Reheating is easy; you can microwave them briefly or enjoy them cold.
Complementary dishes: These wraps pair well with a variety of side dishes. A simple side salad with a light vinaigrette adds freshness and a contrasting texture. A side of soup, such as lentil soup or tomato soup, complements the savory flavors of the wrap. For a heartier meal, serve the wraps with a side of roasted sweet potatoes or a small portion of quinoa.
Nutritional Information (Approximate per wrap, variations will occur based on ingredients): The nutritional information below is an estimate and will vary depending on the specific ingredients and quantities used. This is not a substitute for professional nutritional advice.
Calories: 350-450 calories
Protein: 10-15 grams
Fat: 15-20 grams
Carbohydrates: 40-50 grams
Fiber: 5-8 grams
Enjoy your delicious and healthy veggie and hummus wraps! Remember to adjust the recipe to your liking and enjoy the process of creating a personalized and flavorful meal.