The humble panini, a seemingly simple pressed sandwich, boasts a surprisingly rich history and cultural significance. While the precise origins are debated, the concept of grilling or pressing flatbreads filled with various ingredients dates back centuries. Ancient civilizations across the Mediterranean likely enjoyed variations of this technique, using flatbreads and fillings readily available in their respective regions. However, the panini as we know it – a pressed sandwich often featuring Italian ingredients – emerged primarily in Italy, evolving from its rustic predecessors into a popular street food and cafe staple.
The term panini, the plural of panino (meaning little bread in Italian), gained significant traction in the 20th century, coinciding with the rise of Italian-American culture in the United States. While Italy itself may not have a single definitive invention story for the panini, its widespread adoption and variations – from the classic mortadella and provolto to regional specialties incorporating local cheeses and cured meats – solidified its place in Italian culinary tradition. The panini’s popularity exploded globally, fuelled by its portability, satisfying flavour profiles, and adaptability to diverse taste preferences. Interestingly, over 70% of quick-service restaurants in major US cities now offer panini variations on their menus, highlighting its widespread appeal.
Today, the turkey and cheese panini stands as a testament to the panini’s versatility. It’s a delicious fusion of Italian culinary technique and readily available ingredients found worldwide. The combination of lean turkey breast, offering a healthy protein source, and a variety of melty cheeses like provolone, cheddar, or mozzarella, creates a satisfyingly savory and comforting experience. This specific iteration reflects a globalized food culture, where traditional methods are adapted using readily available ingredients, resulting in a universally appreciated dish. Furthermore, the ease of preparation makes it a perfect quick lunch or snack, appealing to busy individuals and families alike. The average preparation time for a turkey and cheese panini is under 15 minutes, contributing to its popularity as a convenient meal option.
The cultural impact of the panini extends beyond simple sustenance. It represents a fusion of cultures, a blend of Italian tradition and global adaptation. From its humble beginnings as a simple pressed sandwich to its current status as a widely popular food item, the panini’s journey reflects the interconnectedness of global culinary trends. The turkey and cheese panini, in particular, is a modern example of this evolution, a delicious and accessible dish that embodies both practicality and culinary delight. Its continued popularity speaks volumes about its ability to satisfy both our hunger and our desire for something quick, tasty, and satisfyingly familiar.
Ingredients and Measurements
Crafting the perfect Turkey and Cheese Panini hinges on using high-quality ingredients and precise measurements. Don’t skimp on the details – the flavor payoff is well worth the effort!
For this recipe, we’ll be making two generous Panini. You can easily double or halve the recipe depending on your needs. Let’s start with the bread: You’ll need four slices of your favorite panini bread. Ciabatta, sourdough, or a crusty Italian roll all work wonderfully. Aim for slices that are about ½ inch thick to ensure a satisfyingly chewy texture without being overly dense. If your bread is particularly dry, consider lightly brushing it with olive oil before assembling the panini to enhance its softness and prevent it from becoming overly crisp.
Next, we’ll focus on the turkey. Approximately 4-6 ounces of thinly sliced deli turkey breast is ideal. Avoid using overly thick slices as they won’t cook evenly. If your slices are thick, consider slicing them in half horizontally before adding them to the panini. The type of turkey is up to personal preference; however, a leaner breast provides a better balance of flavor and texture without overwhelming the other ingredients. A good quality, flavorful turkey will elevate the whole sandwich.
Now for the cheese! We recommend using approximately 2-3 ounces of your preferred melting cheese. Provolone, mozzarella, or a blend of Swiss and cheddar all create a delicious and gooey interior. Shredded cheese is easier to distribute evenly, but thinly sliced cheese will also work well. Remember, the cheese is a key element in binding the ingredients and creating that satisfyingly melted texture, so don’t be shy with the amount.
Let’s not forget the condiments! For this recipe, we’ll use a combination of flavors to enhance the turkey and cheese. About 1 tablespoon of mayonnaise adds creaminess and richness. You can substitute with pesto, hummus, or another spread of your choice. Additionally, 1-2 teaspoons of Dijon mustard adds a tangy kick that complements the other flavors. Experiment with different condiments to personalize your panini. A thin spread of pesto or a spicy spread could add a unique twist.
Finally, we’ll need some optional additions to give your panini a little extra something. Consider adding a few slices of tomato (about ¼ of a medium tomato) and/or a few leaves of fresh spinach (approximately 1 cup of baby spinach). These additions add freshness and a burst of flavor and texture. Remember to use fresh, high-quality ingredients for the best results. Overly ripe tomatoes or wilted spinach can negatively impact the overall taste and texture of your panini.
By following these precise measurements and recommendations, you’ll be well on your way to creating a delectable Turkey and Cheese Panini that is both satisfying and delicious. Enjoy!
Equipment List
Creating the perfect turkey and cheese panini requires the right tools. While you might be able to improvise with some items, having the correct equipment will significantly enhance both the ease and quality of your sandwich-making experience. This list details the essential and recommended equipment, with explanations to guide you.
1. Panini Press: This is the cornerstone of a good panini. A panini press, whether electric or stovetop, is designed to apply even pressure and consistent heat to the sandwich, resulting in perfectly toasted bread and melted cheese. Choose a press with good temperature control for optimal results. If using a stovetop press, ensure it’s heavy-duty to distribute heat evenly. Electric presses often have non-stick plates, which are very convenient for easy cleaning.
2. Non-Stick Pan (Alternative): If you don’t own a panini press, a large, heavy-bottomed non-stick skillet can serve as a suitable alternative. A 10-12 inch skillet is ideal for a standard panini. You’ll need a heavy lid (at least 8 inches in diameter) to apply pressure, potentially weighting it down with heavy cans or a cast iron skillet on top. This method requires more attention to prevent burning.
3. Cutting Board: A sturdy cutting board, preferably made of wood or plastic, is essential for preparing the ingredients. Choose a size that’s comfortable for you to work on – a 12×16 inch board is a good general size. Ensure it’s clean and sanitized before use to maintain food safety.
4. Sharp Knife: A sharp knife is crucial for efficiently slicing the turkey and any other ingredients. A serrated knife is recommended for slicing bread evenly, preventing it from tearing. A chef’s knife (8-10 inches) is versatile for slicing the turkey. Remember to always handle knives safely and keep your fingers away from the blade.
5. Spatula: A flexible spatula, ideally made of silicone or nylon, is essential for maneuvering the panini in the press or skillet. A wide spatula (at least 4 inches) will be easier to use, especially with a larger sandwich. Avoid metal spatulas in non-stick surfaces to prevent scratching.
6. Measuring Spoons and Cups: While not directly involved in panini assembly, accurate measurements are important if you’re adding spreads or condiments. A standard set of measuring spoons and cups is recommended for consistent results if you’re adding things like mayonnaise or pesto.
7. Paper Towels: These are useful for cleaning up spills and wiping down the panini press or skillet before and after use. Keep a roll handy for easy cleanup and to dry excess moisture from the turkey or bread if needed.
8. Serving Platter: Once your panini is cooked to perfection, you’ll want a nice platter to present it on. Choose a platter that complements your presentation style.
Having all these tools at your disposal will ensure a smooth and efficient panini-making process, resulting in a delicious and satisfying meal.
Preparation of Ingredients (Turkey Slicing & Cheese Shredding)
Before you begin assembling your delicious turkey and cheese panini, proper preparation of the ingredients is key to achieving the perfect texture and flavor. This section will guide you through efficiently slicing your turkey and shredding your cheese.
Slicing the Turkey: The thickness of your turkey slices will significantly impact the final panini experience. Too thick, and your panini might not cook evenly; too thin, and the turkey may dry out. For optimal results, aim for slices approximately 1/8 inch (3mm) thick. This thickness provides a good balance between texture and cooking time. Begin by removing the turkey breast from its packaging. If using leftover roasted turkey, ensure it’s completely cooled before slicing. A sharp knife is crucial here – a dull knife will tear the turkey, resulting in uneven slices and a less appealing presentation.
Recommended Tools: A good quality electric slicer is ideal for perfectly even slices, especially if you’re making multiple paninis. However, a very sharp carving knife will work perfectly well for smaller quantities. If using a knife, lay the turkey breast flat on a cutting board. Use a slicing motion, keeping the knife at a consistent angle to produce uniform slices. Avoid pressing down too hard, as this can compress the turkey and make it difficult to slice neatly. For even easier slicing, consider partially freezing the turkey for about 30 minutes before slicing. This will firm it up, making it easier to handle and resulting in cleaner cuts.
Quantity: The amount of turkey you’ll need depends on the size of your panini and your personal preference. As a general guideline, plan for approximately 3-4 ounces (85-115 grams) of sliced turkey per panini. This will provide a generous amount of filling without making the panini overly bulky. Remember to adjust the quantity based on the number of paninis you are making.
Shredding the Cheese: The choice of cheese significantly influences the flavor profile of your panini. Popular choices include cheddar, mozzarella, provolone, or a blend. The method you use for shredding the cheese will impact its melting properties. For optimal melting, use a box grater with a medium-sized hole. This creates consistently sized shreds which melt evenly, ensuring a gooey and delicious center to your panini. Avoid using pre-shredded cheese from bags, as it often contains cellulose which prevents it from melting smoothly.
Quantity and Type: A good starting point is 1-1.5 ounces (28-42 grams) of shredded cheese per panini. However, feel free to adjust this amount based on your cheese preference and the intensity of flavor you desire. Consider using a combination of cheeses for a more complex flavor profile. For instance, a blend of cheddar and mozzarella provides a creamy texture and a sharp, savory flavor. Remember to shred the cheese just before assembling your panini to prevent it from becoming too dry or clumping together.
Storage: Once you’ve sliced your turkey and shredded your cheese, store any leftovers in airtight containers in the refrigerator. Sliced turkey is best used within 2-3 days, while shredded cheese can last for up to a week. Remember to always prioritize food safety and consume ingredients within their recommended shelf life.
Panini Assembly
With your ingredients prepped and ready, it’s time to assemble your delicious turkey and cheese panini. The key to a perfect panini is even distribution of fillings and careful layering to prevent spillage and ensure even cooking. We’ll be using two slices of your favorite bread for this recipe. Choose bread that’s sturdy enough to hold its shape on the panini press; sourdough, ciabatta, or a good quality Italian bread work particularly well.
Lay one slice of bread flat on your work surface. This will be the bottom slice of your panini. Spread approximately 1-2 tablespoons of your chosen spread (mayonnaise, pesto, or butter) evenly over the surface of the bread. Don’t overload it; you want a thin, even layer to provide moisture and prevent the bread from drying out during cooking. Avoid spreading it all the way to the edges as this can cause excess spillage during cooking.
Next, add your turkey slices. Aim for 3-4 thin slices of turkey breast per panini; more will make it too bulky and difficult to cook evenly. Arrange them neatly across the bread, leaving a small border around the edges. This helps prevent overflowing filling.
Now it’s time for the cheese. We recommend using approximately 1-2 ounces of your chosen cheese, sliced or shredded. Cheddar, provolone, and Swiss are all excellent choices for turkey paninis. If using sliced cheese, overlap the slices slightly to cover the turkey evenly. If using shredded cheese, sprinkle it evenly over the turkey. The cheese will melt beautifully and bind everything together.
For added flavor and texture, consider adding some complementary ingredients. Thinly sliced tomatoes, crisp lettuce, or even a few caramelized onions can elevate your panini. Remember to keep the additions relatively thin to avoid making the panini too thick. Too much filling can result in uneven cooking and a messy outcome.
Once you’ve layered your cheese and any additional ingredients, carefully place the second slice of bread on top. Gently press down to ensure all the ingredients are nestled together. Avoid pressing too hard at this stage, as you don’t want to squish the filling or break the bread. You’ll be applying more pressure later in the panini press.
Before placing your assembled panini on the panini press, you can take this opportunity to lightly brush the outside of the bread with some extra olive oil or melted butter. This will contribute to a beautifully golden-brown crust. Use a pastry brush for even application. Now your panini is ready for the panini press! Remember to follow the manufacturer’s instructions for cooking time and temperature.
Proper assembly is crucial for a delicious panini. By following these steps and paying attention to the quantities and layering techniques, you’ll create a perfectly balanced and flavorful panini every time.
Cooking the Panini (Grilling, Pressing)
Now that your panini is assembled, it’s time to get cooking! There are two primary methods for achieving that perfect panini crunch and melty cheese: grilling and pressing. Both methods require a little finesse to achieve optimal results, so let’s explore each in detail.
Grilling Method: This method offers a beautifully browned exterior and is ideal for achieving grill marks for a visually appealing panini. You’ll need a grill pan or a regular skillet suitable for high heat. Preheat your grill pan over medium-high heat. Ensure the pan is adequately hot before adding the panini; otherwise, your bread will stick and potentially burn before the cheese melts. Lightly oil the grill pan with about 1 teaspoon of olive oil or butter to prevent sticking. Carefully place the assembled panini onto the hot surface.
Cooking Time and Technique: Cook for approximately 3-4 minutes per side, or until the bread is golden brown and crispy, and the cheese is completely melted and gooey. Use a spatula to gently check for doneness. Avoid pressing down on the panini during the initial cooking stages, as this can cause the filling to squish out. Once the bottom is golden brown, carefully flip the panini using a spatula and cook the other side. For even cooking, you can use tongs to gently rotate the panini halfway through cooking each side to ensure all areas are evenly browned.
Pressing Method: For a more uniformly cooked and compressed panini, a panini press is the ideal tool. Preheat your panini press according to the manufacturer’s instructions. This is crucial, as a cold press won’t melt the cheese effectively. Once preheated, carefully place the assembled panini into the press, closing it firmly and evenly. Cook for approximately 4-6 minutes, or until the bread is golden brown and crispy, and the cheese is melted and bubbly. The exact cooking time will depend on the thickness of your panini and the power of your press. Check for doneness after 4 minutes, and adjust cooking time as needed.
Combining Methods: For an extra crispy exterior and perfectly melted interior, you can combine both methods. Start by grilling the panini for about 2 minutes per side in a lightly oiled skillet to get a nice sear. Then, transfer the panini to a preheated panini press for the remaining cooking time to ensure the cheese is fully melted and the bread is perfectly toasted and compressed. This method gives you the best of both worlds!
Important Considerations: Regardless of the method chosen, monitor your panini closely to prevent burning. The cooking time may vary depending on your stovetop’s heat, the thickness of your bread, and the amount of filling. If your panini is browning too quickly, reduce the heat. If the cheese isn’t melting quickly enough, increase the heat slightly. Always use oven mitts or heat-resistant gloves when handling hot panini presses and grill pans to prevent burns.
Once cooked, remove the panini from the heat and let it rest for a minute or two before slicing and serving. This allows the cheese to set slightly, making it easier to cut and eat. Enjoy your delicious homemade turkey and cheese panini!
Serving Suggestions
Your perfectly grilled Turkey and Cheese Panini is ready, but how you serve it can elevate the experience from good to unforgettable. Here are a few serving suggestions to consider, catering to different tastes and occasions:
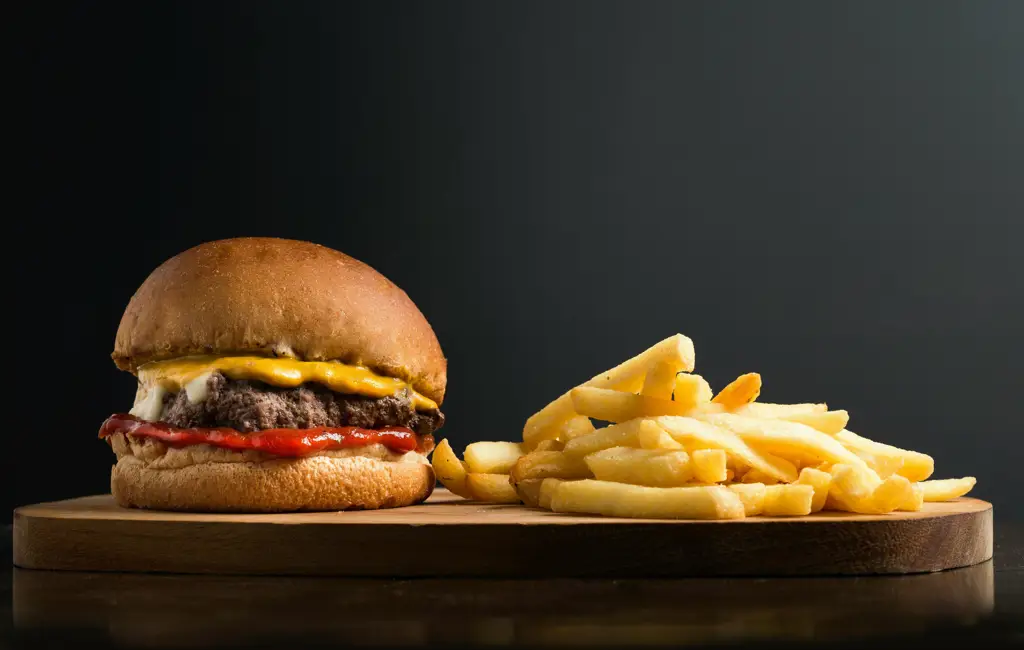
Classic Simplicity: For a straightforward approach, serve your panini as is. The warm, melty cheese and savory turkey are stars in their own right. A simple side of crisp potato chips (about 1 cup per serving) or a light salad (4-6 oz) with a vinaigrette dressing complements the richness of the panini without overpowering the flavors. Consider a small side of dill pickle spears (2-3 spears) for a tangy counterpoint.
Soup Pairing: A warm bowl of soup is a perfect companion to a panini. A classic tomato soup (8-10 oz) is a timeless choice, offering a vibrant acidity that cuts through the richness of the cheese and turkey. Alternatively, a creamy mushroom soup (8-10 oz) or a lighter French onion soup (6-8 oz) provides a comforting and flavorful contrast. Ensure the soup’s temperature is appropriate – not too hot to burn the palate, and not too cold to disrupt the warmth of the panini.
Elevated Presentation: For a more sophisticated presentation, consider slicing the panini in half diagonally. This not only makes it easier to eat but also showcases the beautiful layers of melted cheese and tender turkey. Arrange the panini halves on a small plate, garnished with a sprig of fresh basil or rosemary (approximately 1-2 sprigs). A small side of mixed greens (3-4 oz) with a balsamic glaze adds a touch of elegance. Consider using a decorative toothpick or small skewer to hold the panini together if serving it whole.
Side Salad Enhancements: If you’re serving a side salad, don’t underestimate its power. A simple green salad can be elevated by adding elements that complement the panini. Consider adding some crumbled bacon (1-2 tablespoons), chopped tomatoes (1/4 cup), or roasted red peppers (1/4 cup) for extra texture and flavor. A light vinaigrette dressing (2-3 tablespoons) is preferable to a creamy dressing, which can be too heavy with the rich panini. Experiment with different greens – arugula adds peppery bite, while spinach offers a more earthy flavor.
Dessert Pairing: While a panini is a satisfying meal on its own, a light dessert can complete the dining experience. A small scoop of fruit sorbet (2-3 ounces) or a simple fruit salad (4-5 ounces) provides a refreshing contrast to the savory flavors of the panini. Avoid overly rich desserts that might be too heavy after the substantial panini.
Beverage Suggestions: Pair your panini with a refreshing beverage. Iced tea, lemonade, or a light-bodied beer (12 oz) are all excellent choices. For a more sophisticated touch, consider a crisp white wine like Sauvignon Blanc or Pinot Grigio (6 oz). Avoid overly sweet or heavy beverages that might clash with the flavors of the panini.
Recommendations for the Perfect Turkey and Cheese Panini
To elevate your Turkey and Cheese Panini experience, consider these recommendations. Firstly, bread choice significantly impacts the final product. A crusty sourdough or ciabatta provides excellent texture and flavor contrast to the soft turkey and cheese. Alternatively, a focaccia offers a slightly sweeter and more herby option. Experiment with different breads to find your favorite combination.
Cheese selection is key to achieving the ideal melt and flavor profile. Sharp cheddar, provolone, or a blend of Gruyère and Swiss offer excellent melting properties and distinct tastes. Consider adding a thin layer of pesto or a smear of Dijon mustard to enhance the flavor complexity. For a spicier kick, incorporate a few slices of pepper jack or jalapeño cheese.
Turkey quality directly affects the overall taste. Opt for high-quality sliced turkey breast, preferably with minimal added sodium. Avoid overly processed turkey products as they may be dry and lack flavor. You can also add other ingredients like crisp bacon, caramelized onions, or roasted red peppers for added texture and flavor. Experiment with different combinations to find your perfect panini.
Grilling technique is crucial for achieving that perfectly golden-brown crust and melted cheese. Use medium heat to ensure even cooking and prevent burning. A panini press is ideal, but a heavy skillet or griddle works just as well. Ensure the panini is pressed firmly throughout the cooking process to promote even browning and melting of the cheese.
Serving suggestions extend beyond simply enjoying the panini on its own. A side of crisp salad with a light vinaigrette offers a refreshing counterpoint to the richness of the panini. Alternatively, a bowl of creamy tomato soup or a simple green salad with a balsamic vinaigrette provides a delicious and balanced meal. For a heartier option, serve with French fries or sweet potato wedges.
Storage is essential for maintaining the quality of your panini. Leftover paninis should be stored in an airtight container in the refrigerator for up to 2 days. To reheat, simply place the panini in a skillet or toaster oven until warmed through. Avoid microwaving, as this can make the bread soggy.
Nutritional Information (per serving, approximate values): This will vary depending on the specific ingredients and quantities used. However, a typical Turkey and Cheese Panini may contain approximately 400-500 calories, 20-30g of protein, 25-35g of carbohydrates, and 15-25g of fat. The exact values will depend on the ingredients used. This is an estimate and should not be considered medical advice. Consult a nutritionist for personalized dietary information.
Complementary Dishes: Consider serving your Turkey and Cheese Panini with a side of roasted vegetables (such as broccoli, carrots, or zucchini), a fresh fruit salad, or a light pasta salad. These additions provide a balance of nutrients and flavors, creating a more complete and satisfying meal.
Important Note: Always ensure your ingredients are fresh and handled safely. Properly wash and sanitize all surfaces and utensils before preparing your panini.