Few breakfast foods are as universally beloved as the pancake. A simple disc of batter cooked on a hot surface, its seemingly humble origins belie a rich and fascinating history. While pinpointing the exact birthplace is impossible, evidence suggests flatbreads cooked on hot stones date back thousands of years, with ancient cultures from Greece to Egypt enjoying variations of what we might consider a pancake ancestor. These early versions likely lacked the leavening agents—baking powder or baking soda—that give modern pancakes their light and fluffy texture, instead relying on the natural fermentation of grains or the addition of other ingredients for lift.
The pancake’s journey to its current form is a testament to culinary evolution. The first documented recipes resembling our contemporary pancakes appear in early medieval cookbooks, often featuring ingredients like milk, eggs, and flour, though variations existed across different regions and cultures. The arrival of readily available leavening agents in the 18th and 19th centuries significantly altered pancake preparation, leading to the lighter, airier textures we associate with pancakes today. The rise of commercial baking powder significantly contributed to the pancake’s popularity, making it accessible to a wider range of cooks.
Pancakes hold significant cultural importance worldwide. In the United States, Pancake Day, often celebrated on Shrove Tuesday, is a cherished tradition, marking the last day of indulgence before the Lenten season. This highlights the pancake’s role not just as a breakfast food, but as a symbol of community and shared celebration. Globally, variations on the pancake theme abound, from the delicate crêpes of France to the thick, fluffy Dutch Baby pancake. The sheer diversity of pancake recipes reflects the food’s adaptability and its enduring appeal across cultures and generations. In fact, according to a recent survey, pancakes rank among the top five most popular breakfast foods in many Western countries, with a staggering 85% of respondents reporting eating pancakes at least once a month.
This enduring popularity speaks to the pancake’s versatility. It’s a blank canvas for culinary creativity, easily customizable with an array of toppings and flavor combinations. From classic butter and syrup to fruit compotes, chocolate chips, and savory additions, the possibilities are endless. This guide will delve into the techniques and secrets to making the perfect pancake—light, fluffy, and delicious—allowing you to master this culinary classic and impress your family and friends with your pancake-making expertise.
Ingredients and Measurements
Making the perfect pancake hinges on precise measurements and high-quality ingredients. Don’t skimp on the details; the effort will be rewarded with fluffy, delicious pancakes every time.
For this recipe, we’ll be making enough batter for approximately 8-10 medium-sized pancakes. You can easily double or halve the recipe depending on your needs. Always use a kitchen scale for the most accurate measurements, especially for flour and sugar. Volume measurements can be inconsistent.
All-Purpose Flour (150g): This provides the structure for your pancakes. Using a good quality all-purpose flour is key. Avoid using self-rising flour unless you adjust the leavening agents accordingly. Sifting the flour before measuring ensures there are no lumps and promotes even cooking. A fine mesh sieve is recommended.
Granulated Sugar (25g): This adds sweetness and helps with browning. Don’t overdo the sugar; too much will result in overly sweet and potentially burnt pancakes. Caster sugar or superfine sugar can be substituted, but granulated is preferred for its consistent texture.
Baking Powder (4g): This is the primary leavening agent, responsible for the fluffy texture. Ensure your baking powder is fresh; old baking powder loses its effectiveness. Check the expiration date before you begin. We’re using a small amount here because we’ll also be using baking soda.
Baking Soda (1g): This acts as a secondary leavening agent and reacts with the acidic ingredients (buttermilk in this instance) to create extra lift. Baking soda is more potent than baking powder, so use only the specified amount.
Salt (2g): A pinch of salt enhances the flavors and balances the sweetness. Don’t underestimate the importance of salt in baking; it truly makes a difference. Fine sea salt or table salt works well.
Buttermilk (250ml): Buttermilk adds a tangy flavor and contributes to the tender texture. If you don’t have buttermilk, you can make a substitute by adding 1 tablespoon of white vinegar or lemon juice to 1 cup of milk. Let it sit for 5 minutes before using.
Large Eggs (2): Eggs bind the ingredients together and add richness. Use large eggs; smaller eggs will alter the consistency of the batter. Room temperature eggs incorporate better into the batter.
Unsalted Butter (50g, melted): Melted butter adds flavor and contributes to a tender crumb. Use unsalted butter so you can control the salt content in the recipe. Let the butter cool slightly before adding it to the batter to avoid cooking the eggs.
Milk (50ml): Adding a splash of milk helps to adjust the consistency of the batter if needed. This is a useful addition if your batter is too thick. Use whole milk for the richest flavour.
Optional additions: Consider adding vanilla extract (1 teaspoon) for extra flavor, or blueberries, chocolate chips, or other mix-ins to customize your pancakes.
Equipment Preparation
Making perfect pancakes involves more than just the right recipe; it’s about having the right tools at the ready, properly prepared. This section details the essential equipment and how to prepare it for a seamless pancake-making experience.
Mixing Bowls: You’ll need at least two mixing bowls. One large bowl (approximately 8-10 cup capacity) is crucial for mixing the batter. A smaller bowl (approximately 2-3 cup capacity) will be handy for separating the wet and dry ingredients, or for whisking egg whites separately if your recipe calls for it. Ensure your bowls are clean and completely dry before beginning. Any residual water will affect the consistency of your batter.
Measuring Cups and Spoons: Accurate measurements are key to consistent results. Invest in a good set of measuring cups and spoons. Use dry measuring cups for dry ingredients (flour, sugar, baking powder) and liquid measuring cups for wet ingredients (milk, oil, eggs). Level off dry ingredients with a straight edge to avoid excess. For smaller quantities, accurate measuring spoons are essential.
Whisk: A balloon whisk is ideal for thoroughly incorporating ingredients and preventing lumps in your batter. A fork can be used in a pinch, but a whisk provides a much smoother, lump-free batter. Ensure your whisk is clean and free from any food residue. A clean whisk will help ensure a properly mixed batter.
Spatula: You’ll need two spatulas: one for mixing and one for flipping pancakes. A rubber spatula is best for scraping down the sides of the bowl to ensure all ingredients are combined. For flipping, a wide, thin metal spatula is recommended for its heat resistance and ability to easily slide under the pancakes. Choose a spatula that is sturdy enough to handle flipping without bending or breaking.
Griddle or Frying Pan: A non-stick griddle or frying pan (8-12 inches in diameter) is essential. Preheating is crucial. Heat the griddle or pan over medium heat. A lightly oiled surface will prevent sticking. Use a neutral-flavored oil with a high smoke point, such as vegetable oil or canola oil. Apply a thin layer of oil using a paper towel or pastry brush; avoid excess oil, which can make the pancakes greasy.
Serving Utensils: Have serving plates and utensils ready before you start cooking. This will streamline the process and prevent your freshly cooked pancakes from getting cold while you search for plates. Consider a pancake turner or spatula specifically designed for serving to minimize damage to the pancakes.
Optional Equipment: While not strictly necessary, a kitchen scale can provide even more precise measurements, leading to more consistent results. A pastry bag or piping bag can be used for creating decorative pancakes. Finally, having a clean workspace will make the entire process more efficient and enjoyable.
Cleaning Up: Prepare for cleanup by lining your workspace with paper towels or having a sink full of soapy water ready to go. Cleaning up immediately after cooking prevents batter from hardening and makes the task much easier.
Mixing the Batter (emphasizing proper mixing technique)
The key to light and fluffy pancakes lies not just in the ingredients, but in how you combine them. Overmixing develops gluten, resulting in tough, rubbery pancakes. Undermixing, on the other hand, leaves ingredients unincorporated, leading to uneven texture and possibly a less flavorful pancake. The goal is to gently blend everything until just combined, no more.
Let’s assume we’re working with a classic pancake recipe that calls for: 1 ½ cups all-purpose flour, 2 tablespoons granulated sugar, 2 teaspoons baking powder, ½ teaspoon baking soda, ½ teaspoon salt, 1 ¼ cups milk, 1 large egg, and 2 tablespoons unsalted butter, melted. These measurements are crucial for achieving the perfect consistency.
Begin by whisking the dry ingredients together. In a large bowl, whisk together the 1 ½ cups of flour, 2 tablespoons of sugar, 2 teaspoons of baking powder, ½ teaspoon of baking soda, and ½ teaspoon of salt. This step is vital because it ensures even distribution of the leavening agents, preventing pockets of uneven rise in your pancakes. Whisk vigorously for about 30 seconds to break up any lumps and ensure a smooth, homogenous mixture. Don’t be shy with the whisk; get those dry ingredients really aerated.
Next, combine the wet ingredients. In a separate bowl, whisk together the 1 ¼ cups of milk, 1 large egg, and 2 tablespoons of melted (but not hot) unsalted butter. Ensure the butter is completely melted and cooled slightly to prevent cooking the egg prematurely. Whisk until everything is well combined and slightly frothy. This step also incorporates air into the batter, contributing to fluffier pancakes.
Now, gently combine the wet and dry ingredients. Pour the wet ingredients into the dry ingredients all at once. Resist the urge to overmix! Use a rubber spatula or a large spoon and gently fold the wet ingredients into the dry ingredients, making just a few, broad strokes to incorporate everything. Do not stir in a circular motion, as this will develop gluten. Aim for a slightly lumpy batter; a few small lumps are perfectly acceptable and even desirable. Overmixing will result in tough pancakes, while undermixing will lead to uneven cooking and a less appealing texture.
The ideal batter consistency should be slightly lumpy but pourable. It should coat the back of your spoon, but not be completely smooth. If the batter seems too thick, add a tablespoon or two of milk at a time until it reaches the desired consistency. If it’s too thin, add a tablespoon or two of flour, mixing gently until combined. Once the batter is ready, don’t let it sit for too long. The baking powder starts working immediately, so cook your pancakes as soon as possible for the best results.
By following these steps and paying close attention to the mixing technique, you’ll be well on your way to making the best, lightest, and fluffiest pancakes you’ve ever tasted. Remember, gentle folding is key!
Cooking the Pancakes (including heat control and flipping techniques)
Now that your batter is ready, it’s time to cook those delicious pancakes! The key to perfectly cooked pancakes lies in mastering heat control and flipping technique. We’ll walk you through the process step-by-step.
Heat Control is Crucial: Begin by heating a lightly oiled griddle or large non-stick frying pan over medium-low heat. Avoid high heat, as this will burn the outside before the inside is cooked through. A good indicator is to sprinkle a few drops of water onto the hot surface; if they sizzle gently and evaporate quickly, your heat is perfect. If they evaporate instantly, the heat is too high. If they sit there, the heat is too low. Adjust accordingly.
Pouring the Batter: Using a 1/4 cup measuring cup (or a ladle), pour the batter onto the hot surface, leaving about 2 inches between each pancake. This allows for even cooking and prevents them from sticking together. Don’t overcrowd the pan; cook in batches if necessary.
Knowing When to Flip: This is where experience comes in, but there are telltale signs. Look for small bubbles to start forming on the surface of the pancake. Once the bubbles begin to pop and the edges look slightly set (about 2-3 minutes), it’s time to flip. Do not press down on the pancake while it’s cooking; this will make it flat and tough. Use a thin spatula to gently lift an edge; if it easily releases from the pan and looks lightly golden brown underneath, it’s ready to turn.
Flipping Techniques: Use a thin, wide spatula for easy flipping. Gently slide the spatula under the pancake, close to the edge, and quickly but smoothly flip it over. Avoid tearing the pancake by using a firm, confident motion. Cook the other side for another 1-2 minutes, or until golden brown and cooked through. You should see fewer bubbles forming on the second side.
Checking for Doneness: The best way to ensure your pancakes are cooked through is to gently press the center with your finger. If it feels soft and springs back slightly, it’s ready. If it feels doughy, it needs more cooking time. Overcooked pancakes will be dry and crumbly, while undercooked pancakes will be gummy and raw in the center.
Serving and Storage: Once cooked, transfer the pancakes to a plate or wire rack to keep them warm. Serve immediately with your favorite toppings. If you have leftovers, store them in an airtight container in the refrigerator for up to 3 days. You can reheat them in a pan or toaster oven.
Professional Tip: For extra fluffy pancakes, let the batter rest for at least 15 minutes before cooking. This allows the gluten to relax and the leavening agents to activate, resulting in lighter, fluffier pancakes.
Troubleshooting: If your pancakes are sticking to the pan, ensure your pan is properly oiled and the heat isn’t too high. If they are burning, lower the heat. If they are falling apart, your batter might be too thin, or you may be flipping them too early. Experiment and adjust based on your results!
Stacking and Serving (Mentioning Ideal Serving Temperature)
Stacking your pancakes correctly is crucial for maintaining their warmth and texture. Avoid simply piling them haphazardly, as this can lead to the bottom pancakes becoming soggy and the top ones drying out. The ideal stack size depends on the number of servings, but generally, aim for stacks of no more than 6-8 pancakes. Any more than that, and the heat from the lower pancakes won’t be evenly distributed.
To create a perfectly stacked masterpiece, start with a large, flat serving plate or platter. Place a piece of parchment paper or a clean kitchen towel on the plate. This will prevent sticking and absorb any excess moisture, keeping your pancakes fluffy and dry. Gently place the first pancake onto the prepared surface. Avoid pressing down too hard, as this can flatten them.
Subsequent pancakes should be added carefully, arranging them slightly offset from the previous one. This is an important technique that allows for better heat distribution and prevents the pancakes from sticking together. Imagine you’re creating a small, slightly staggered tower – not a solid, flat column. This method prevents the pancakes from becoming compressed and losing their airy texture.
Once your stack is complete, consider how you’ll keep them warm until serving. If serving immediately, proceed to the next step. If there’s a delay, you can keep the stacked pancakes warm in a low oven (around 200°F or 93°C) for up to 15 minutes. Never use high heat, as this will dry them out. Alternatively, you can cover the stack loosely with aluminum foil to retain heat. However, avoid covering them too tightly, as this can cause condensation and make the pancakes soggy.
The ideal serving temperature for pancakes is between 100°F and 110°F (38°C and 43°C). This ensures they are warm and enjoyable without being scorching hot. Serving them at this temperature allows the flavors to fully develop and provides the perfect balance of warmth and delicate texture. If your pancakes are too hot, they’ll be difficult to handle and may burn your mouth. If they’re too cool, they’ll lose their appeal and may taste slightly bland.
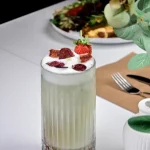
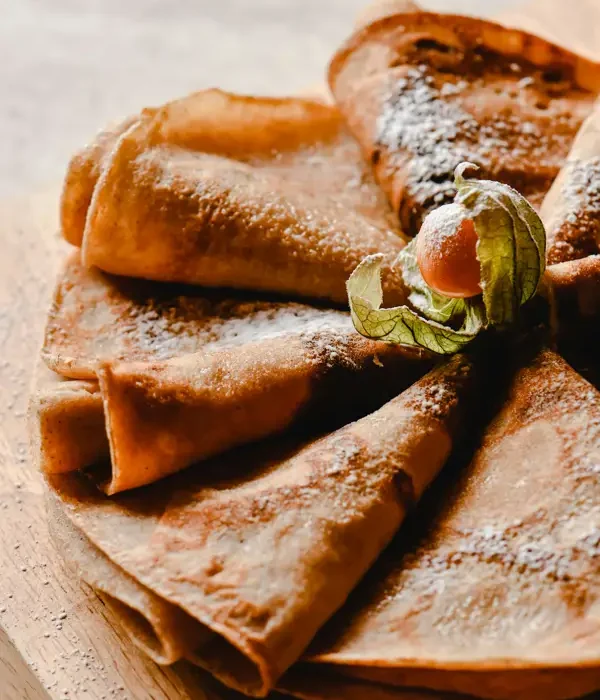
Finally, presentation matters! Dust the stack lightly with powdered sugar, drizzle with maple syrup, or garnish with fresh berries and whipped cream before serving. Arrange the garnish attractively to enhance the visual appeal of your pancake stack. Remember, a beautifully presented stack of warm, fluffy pancakes is a feast for the eyes as well as the palate.
By following these simple stacking and serving techniques, you can ensure that your homemade pancakes are not only delicious but also visually appealing and served at the perfect temperature. Happy cooking!
Optional Toppings and Variations
While the basic pancake recipe is delicious on its own, the true magic lies in the endless possibilities for customization. Let your creativity flow with these optional toppings and variations, designed to elevate your pancake experience from good to unforgettable.
Classic Toppings: No pancake breakfast is complete without a selection of classic toppings. A pat of unsalted butter (1-2 tablespoons per pancake), melting gently into the warm stack, adds richness and a delightful creamy texture. Pair this with a generous drizzle of maple syrup (2-4 tablespoons per pancake, depending on sweetness preference). Consider a high-quality grade A maple syrup for a truly superior flavor.
Fruit Fiesta: Fresh fruit is a fantastic way to add vibrant color, juicy sweetness, and natural vitamins to your pancakes. Berries (1/2 cup – 1 cup per serving), such as blueberries, raspberries, and strawberries, are classic choices. Slices of banana (1/2 – 1 banana per serving) offer a creamy texture and subtle sweetness. For a more exotic touch, try chopped mango (1/2 cup per serving), kiwi (1/2 cup per serving), or peaches (1/2 cup per serving). Remember to gently fold the fruit into the batter for inside-out deliciousness, or arrange them on top for a visually appealing presentation.
Nutty Delights: Adding nuts provides a satisfying crunch and healthy fats. Chopped walnuts or pecans (1-2 tablespoons per pancake) can be mixed into the batter or sprinkled on top before serving. A sprinkle of toasted slivered almonds (1 tablespoon per pancake) offers a delicate, elegant touch. For those with nut allergies, consider substituting sunflower seeds or pumpkin seeds (1-2 tablespoons per pancake) for a similar textural experience.
Chocolate Indulgence: For a decadent treat, incorporate chocolate into your pancakes. Chocolate chips (1/4 – 1/2 cup per batch of pancakes) melted into the batter create pockets of molten chocolate in every bite. Alternatively, dust your pancakes with cocoa powder (1-2 tablespoons per batch) for a richer chocolate flavor. A drizzle of chocolate syrup (1-2 tablespoons per pancake) adds a glossy finish and intense chocolate flavor. Consider using high-quality dark chocolate for a more sophisticated taste.
Savory Sensations: Pancakes aren’t just for sweet breakfasts! Experiment with savory variations. Add shredded cheese (1/4 cup per pancake) and chopped chives to the batter for a savory pancake. Serve these with a side of sour cream or salsa for a unique twist. Consider adding cooked bacon or sausage crumbles (1/4 cup per pancake) for a hearty, protein-packed breakfast.
Professional Recommendation: Don’t be afraid to experiment! The beauty of pancakes lies in their versatility. Try combining different toppings and variations to create your own signature pancake masterpiece. Balance flavors and textures carefully – a crunchy topping with a soft pancake, a sweet topping with a slightly savory pancake. And most importantly, have fun!
Recommendations for the Best Pancakes
To achieve truly exceptional pancakes, meticulous attention to detail is crucial throughout the process. Begin with high-quality ingredients. Using fresh, good quality flour, eggs, and milk will significantly impact the final texture and taste. Don’t skimp on the butter; it adds richness and flavor. Experiment with different types of flour (whole wheat, oat, etc.) to find your preferred texture and nutritional profile. Consider adding a pinch of salt to enhance the sweetness and balance the flavors.
Mastering the batter consistency is key. The batter shouldn’t be too thick (leading to dense pancakes) or too thin (resulting in flimsy ones). Aim for a smooth, pourable batter that coats the back of a spoon lightly. Let the batter rest for at least 5-10 minutes after mixing. This allows the gluten to relax, resulting in lighter, fluffier pancakes. Don’t overmix the batter, as this can lead to tough pancakes.
Cooking the pancakes requires careful attention to heat. Use medium heat to prevent burning. Cook each pancake for 2-3 minutes per side, or until golden brown and cooked through. Don’t overcrowd the pan; this will lower the temperature and result in uneven cooking. Flip the pancakes only once, when bubbles start to form on the surface and the edges look set.
Serving suggestions are endless! Classic toppings include butter and syrup (maple syrup is a favorite!), but feel free to explore a world of possibilities. Fresh fruit (berries, bananas, sliced apples), whipped cream, chocolate chips, nuts, and even a drizzle of honey or fruit preserves add delightful variations. For a savory twist, consider serving pancakes with a dollop of sour cream or yogurt, a sprinkle of chives, and smoked salmon.
Storage and reheating are important for preserving quality. Leftover pancakes can be stored in an airtight container in the refrigerator for up to 3 days. To reheat, simply warm them in a skillet or toaster oven until heated through. Avoid microwaving, as this can make them soggy. You can also freeze pancakes for longer storage; simply place them in a freezer-safe bag or container and freeze for up to 3 months. Reheat frozen pancakes from frozen in a toaster oven or skillet for best results.
Complementary dishes enhance the pancake experience. Consider serving your pancakes alongside a side of bacon, sausage, or crispy potatoes for a hearty breakfast. A fresh fruit salad adds a refreshing counterpoint to the richness of the pancakes. A simple side of scrambled eggs or a light green salad provides balance to a richer pancake meal.
Nutritional Information (per average-sized pancake, approximate values may vary based on ingredients):
Calories: Approximately 200-250
Protein: Approximately 4-6 grams
Fat: Approximately 8-12 grams
Carbohydrates: Approximately 25-30 grams
Note: Nutritional information can vary significantly depending on the specific ingredients used, portion sizes, and added toppings. These are estimates and should be considered approximate.
Enjoy your delicious, homemade pancakes! Remember to experiment with different flavors and toppings to find your perfect combination. Making pancakes is a fun and rewarding experience, and with these recommendations, you’ll be well on your way to creating the best pancakes you’ve ever tasted.