The Margherita pizza, a seemingly simple dish of tomato, mozzarella, and basil, holds a surprisingly rich history and cultural significance. Far from being a recent culinary invention, its roots trace back to Naples, Italy, in the late 19th century. While pizza itself had existed in various forms for centuries, the Margherita as we know it emerged during a period of burgeoning national identity in Italy. The story goes that it was created in honor of Queen Margherita of Savoy, the first Queen of a unified Italy, in 1889. A Neapolitan pizza maker, Raffaele Esposito, reportedly crafted three different pizzas for her to sample: one representing the colors of the Italian flag – red tomatoes, white mozzarella, and green basil – thus cementing this iconic combination in culinary history.
The impact of this seemingly simple act of culinary homage was profound. The Margherita pizza became a symbol of Italian national pride and a testament to the country’s culinary heritage. Its popularity quickly spread beyond Naples, eventually becoming synonymous with Italian cuisine worldwide. Today, it’s arguably the most recognized type of pizza globally, a testament to its enduring appeal and simplicity. Statistics show that pizza, in its various forms, is one of the most consumed foods globally, with billions of pizzas sold annually. While precise figures for Margherita pizza specifically are unavailable, its widespread popularity ensures it contributes significantly to these impressive numbers.
Beyond its nationalistic origins, the Margherita’s enduring appeal lies in its inherent elegance. The quality of the ingredients is paramount; the sweetness of ripe San Marzano tomatoes, the creamy texture of fresh mozzarella di bufala (ideally), and the fragrant peppery bite of basil all contribute to a symphony of flavors. This focus on high-quality, simple ingredients is a key aspect of Neapolitan pizza-making tradition, a tradition that emphasizes the natural flavors of the ingredients over complex sauces or toppings. The simplicity of the Margherita also makes it surprisingly versatile; slight variations in ingredients and cooking techniques allow for regional and personal interpretations, adding to its enduring charm. Learning to make the perfect Margherita pizza allows you to connect with this rich history and appreciate the subtle artistry behind this culinary icon.
Ingredients and Measurements
Creating the perfect Margherita pizza hinges on using high-quality ingredients and precise measurements. Don’t skimp on the quality; it will significantly impact the final taste and texture. This recipe yields two 12-inch pizzas.
For the Dough:
We’ll be making a simple yet delicious Neapolitan-style pizza dough. Using a kitchen scale is highly recommended for accurate measurements, especially for the flour. Slight variations in flour hydration can significantly affect the dough’s consistency.
- 400g (3 cups + 2 tablespoons) strong bread flour (00 flour is ideal): This type of flour has a high protein content, crucial for developing gluten and creating a chewy crust.
- 270g (1 cup + 2 tablespoons) lukewarm water (around 25°C/77°F): The water temperature is important; too hot will kill the yeast, too cold will slow down fermentation.
- 10g (2 teaspoons) active dry yeast: Ensure your yeast is fresh for optimal rising. If using instant yeast, you can add it directly to the flour.
- 10g (2 teaspoons) fine sea salt: Salt controls yeast activity and adds flavor. Avoid using iodized salt as it can affect the dough’s color.
- 2 tablespoons extra virgin olive oil: This adds flavor and helps with dough elasticity.
For the Tomato Sauce:
A simple, flavorful sauce is key to a great Margherita. Avoid overly processed sauces; homemade is best, but a high-quality canned San Marzano tomato purée is a good alternative.
- 400g (1 (28 ounce) can) San Marzano tomatoes (or 400g of good quality canned tomato purée): San Marzano tomatoes are known for their sweetness and low acidity, perfect for pizza sauce.
- 2 cloves garlic, minced: Adds a subtle savory note. Don’t overdo it; you want the tomato flavor to shine.
- 1 teaspoon dried oregano: Adds a classic Italian touch. Fresh oregano can be substituted (use about 1 tablespoon).
- 1/2 teaspoon sea salt: Adjust to your taste preferences.
- 1/4 teaspoon black pepper: Freshly ground is always best.
- 1 tablespoon extra virgin olive oil: For richness and depth of flavor.
For the Toppings:
Keep it simple and classic for a true Margherita. Use high-quality ingredients here as well.
- 250g fresh mozzarella cheese, drained: Use a good quality mozzarella, preferably a fior di latte type. Draining the cheese is important to prevent a soggy crust.
- Fresh basil leaves: For garnish and that essential burst of freshness. Use about 10-12 large leaves.
- Extra virgin olive oil, for drizzling: A final drizzle of high-quality olive oil enhances the flavor.
Important Note: These measurements are guidelines; feel free to adjust slightly based on your preferences. Remember to always taste and adjust seasoning as you go.
Dough Preparation (including kneading and proofing)
Creating the perfect pizza dough is the foundation of a truly exceptional Margherita. This section details the process of making a delicious, Neapolitan-style dough, emphasizing proper kneading and proofing techniques for optimal texture and flavor.
Ingredients:
- 500g strong bread flour (00 flour is ideal, but strong bread flour works well too)
- 320g lukewarm water (around 25-28°C)
- 10g salt
- 2g active dry yeast (or 10g fresh yeast)
- 2 tablespoons olive oil (extra virgin)
Instructions:
1. Combining Ingredients: In a large mixing bowl, combine the lukewarm water and yeast. Let it sit for about 5-10 minutes until the yeast becomes frothy. This indicates that the yeast is active and ready to work its magic. If the yeast doesn’t foam, it’s likely dead and needs replacing.
2. Initial Mixing: Add the flour and salt to the yeast mixture. Using a wooden spoon or your hands, mix everything together until a shaggy dough forms. This initial mixing incorporates the ingredients and starts the gluten development process. Don’t worry about a perfectly smooth dough at this stage.
3. Kneading: This is where the magic happens. Turn the dough out onto a lightly floured surface. Knead for at least 8-10 minutes, or until the dough becomes smooth, elastic, and slightly tacky. Proper kneading develops the gluten, creating a strong, chewy crust. The dough should pass the windowpane test : stretch a small piece of dough thinly; if you can see light through it without tearing, your gluten development is sufficient.
4. First Rise (Bulk Fermentation): Lightly oil a large bowl. Place the kneaded dough in the bowl, turning to coat it with oil. Cover the bowl with plastic wrap or a damp cloth and let it rise in a warm place (around 25-28°C) for approximately 2-3 hours, or until doubled in size. The warmer the environment, the faster the rise. However, excessively high temperatures can kill the yeast.
5. Shaping and Second Rise (Proofing): Once the dough has doubled, gently punch it down to release the air. Divide the dough into 2 equal portions (for two 12-inch pizzas). Shape each portion into a ball. Lightly oil two separate bowls or baking sheets. Place the shaped dough balls in the bowls, cover, and let them proof for another 1-2 hours, or until almost doubled in size. This second rise allows the dough to develop its final flavor and texture, resulting in a lighter and airier crust.
6. Pre-Baking (Optional): For a crispier crust, you can optionally pre-bake the dough for a few minutes before adding toppings. This helps prevent a soggy bottom.
Professional Tip: The success of your pizza dough relies heavily on the quality of your ingredients and the accuracy of your measurements. Use a kitchen scale for precise measurements to ensure consistent results.
Troubleshooting: If your dough is too sticky, add a tablespoon of flour at a time until it becomes manageable. If your dough is too dry, add a teaspoon of water at a time.
Sauce Preparation (Tomato Selection and Simmering Technique)
The foundation of a great Margherita pizza lies in its simple yet flavorful tomato sauce. Choosing the right tomatoes and simmering them properly is crucial for achieving that perfect balance of sweetness, acidity, and depth of flavor. Don’t skimp on this step; it’s where the magic truly begins.
For the best results, start with high-quality canned San Marzano tomatoes. These plum-shaped tomatoes, grown in the volcanic soil of the San Marzano valley in Italy, possess a naturally sweet and less acidic flavor profile compared to other varieties. Look for whole, peeled San Marzano tomatoes packed in their own juice, avoiding those with added salt or sugar. For a 28-ounce can, you’ll need approximately 28 ounces (794 grams) of canned San Marzano tomatoes.
Once you’ve selected your tomatoes, it’s time to prepare them for simmering. Open the can carefully and gently pour the tomatoes into a medium-sized saucepan. Using your hands, squeeze and crush the tomatoes to break them down, ensuring a relatively smooth consistency. You don’t want a completely pureed sauce; leaving some texture adds character to the final product. Avoid using a blender or food processor, as this can lead to a overly smooth and potentially watery sauce.
Now, for the simmering process. Add 2 tablespoons (30ml) of extra virgin olive oil to the saucepan and place it over medium heat. Stir in a generous pinch of sea salt (approximately 1 teaspoon), 1 teaspoon of dried oregano, and 2 cloves of minced garlic. Let the garlic gently infuse in the olive oil for about 1 minute until fragrant, being careful not to burn it.
Once fragrant, bring the tomatoes to a gentle simmer, stirring occasionally to prevent sticking. Reduce the heat to low, partially cover the saucepan, and let the sauce simmer for at least 30 minutes, and preferably up to an hour. The longer it simmers, the more the flavors will meld and deepen. During this time, occasionally skim off any foam that rises to the surface. This helps to achieve a clearer and more refined sauce.
After simmering, remove the saucepan from the heat and let the sauce cool slightly. Taste and adjust the seasoning as needed, adding more salt, oregano, or a pinch of freshly ground black pepper to your liking. For a richer flavor, you can also add a teaspoon of sugar to balance out the acidity, but this is optional. Once seasoned to perfection, your delicious homemade tomato sauce is ready to be used as the base for your Margherita pizza.
Remember: Patience is key when making a great tomato sauce. The slow simmering process allows the flavors to develop fully, resulting in a superior sauce that will elevate your pizza to the next level.
Cheese Preparation (Shredding and Quality Considerations)
The cheese is arguably the star of a Margherita pizza, so choosing and preparing it correctly is paramount. For the most authentic experience, opt for fresh mozzarella di bufala. However, if unavailable, high-quality low-moisture part-skim mozzarella is an excellent substitute. Avoid pre-shredded mozzarella, as it often contains cellulose which can prevent proper melting and create a gummy texture.
The quantity of cheese you’ll need depends on your pizza size and personal preference, but a good starting point is approximately 8 ounces (225g) of fresh mozzarella or its equivalent in low-moisture part-skim mozzarella for a 12-inch pizza. For larger or smaller pizzas, adjust the amount proportionally. Remember, you want a generous layer of cheese, but not so much that it overwhelms the other ingredients.
Shredding the cheese correctly is crucial for optimal melting and distribution. Using a box grater with the large holes is recommended for a consistent shred. Avoid using a food processor, as this can over-process the cheese, resulting in a gummy or oily texture. Work in small batches, ensuring the cheese doesn’t clump together. Keep the shredded cheese cold until ready to use; this will help prevent it from sticking and will contribute to a cleaner melt on the pizza.
Quality considerations are vital. When selecting your mozzarella, look for firm, white cheese with minimal whey. The best mozzarella will have a slightly elastic texture and a fresh, milky aroma. Avoid cheese that appears dry, crumbly, or has an off-putting odor. If using fresh mozzarella, gently pat it dry with paper towels before shredding to remove excess moisture. This will prevent a soggy crust and promote even browning.
For those using low-moisture part-skim mozzarella, consider the brand carefully. Some brands produce a higher-quality product than others. Read reviews and try different brands to find one that melts well and has a pleasing flavor. Proper storage is also important. Keep your cheese refrigerated in its original packaging until ready to use. Once opened, wrap it tightly to prevent it from drying out.
Another important tip is to distribute the cheese evenly across the pizza after adding the tomato sauce. Don’t pile it all in one area. A uniform layer will ensure even melting and a more aesthetically pleasing final product. A little extra care in the cheese preparation phase will make a significant difference in the overall quality and enjoyment of your homemade Margherita pizza.
Finally, consider adding a small amount of grated Parmesan cheese (about 1 tablespoon per pizza) after the mozzarella. This will add a subtle salty and umami note and enhance the overall flavor profile. Sprinkle it lightly over the mozzarella just before baking for a delicious finishing touch.
Topping Preparation (Basil Washing and Drying)
Fresh basil is crucial for an authentic Margherita pizza, lending its vibrant green color and bright, peppery flavor. However, properly preparing the basil is just as important as selecting high-quality leaves. Ignoring this step can result in a soggy pizza and a compromised flavor profile. For a large 12-inch pizza, you’ll need approximately 1 large bunch (about 1 cup packed) of fresh basil leaves.
Begin by carefully inspecting the basil leaves. Discard any leaves that show signs of wilting, discoloration, or damage. Remove any stems; while some recipes might call for using them, for a classic Margherita, only the leaves provide the desired flavor and texture. A clean, sharp knife or kitchen shears works best for this task.
Next, gently rinse the basil leaves under cool, running water. Avoid using hot water, as it can wilt the delicate leaves and diminish their flavor. A gentle stream of water is sufficient to remove any dirt or debris that may be clinging to the leaves. Avoid soaking the basil, as excess water will make drying more difficult.
Once rinsed, the crucial next step is thorough drying. Thoroughly dried basil is paramount to prevent a soggy pizza. Simply shaking the leaves to remove excess water is insufficient. The best method is to use a salad spinner. Place the rinsed leaves in the spinner and spin vigorously until almost all the water is removed. This method is efficient and ensures even drying. Alternatively, you can gently pat the leaves dry with clean paper towels, but this method is more time-consuming and requires more care to avoid tearing the delicate leaves.
If using the paper towel method, lay the leaves in a single layer on several clean paper towels. Gently blot each leaf to absorb excess moisture. Avoid rubbing, as this can bruise the leaves and release their juices, impacting their flavor and texture. Continue blotting until the leaves feel dry to the touch, but still retain their vibrant color.
Once the basil is completely dry, you’re ready to use it. Do not chop the basil until just before you add it to the pizza. Pre-chopping will cause the leaves to oxidize and lose their bright green color and fresh flavor. Instead, reserve the dried basil leaves until the pizza is almost finished baking. This ensures maximum freshness and vibrant color in your final creation. For a 12-inch Margherita, you’ll want to roughly tear the leaves into bite-sized pieces before adding them to the finished pizza. This allows for a more visually appealing distribution and prevents large clumps of basil from overwhelming the other ingredients.
Following these steps will guarantee that your basil is not only clean but also perfectly dry, ensuring a delicious and visually stunning Margherita pizza. Remember, attention to detail in preparing your toppings is crucial to achieving a truly exceptional final product.
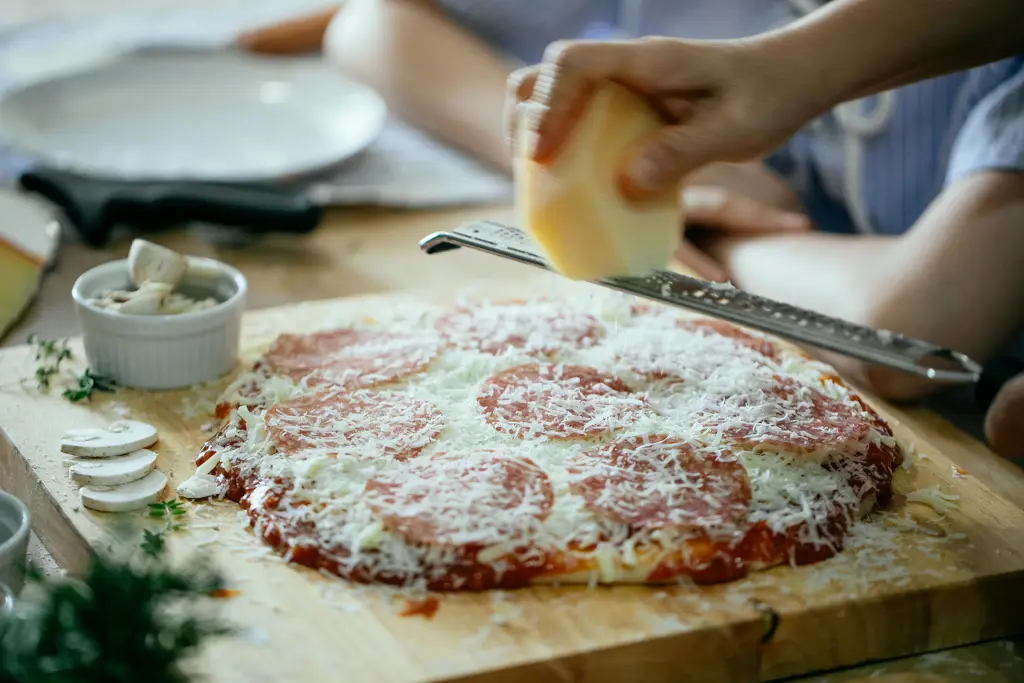
Pizza Assembly (Even Distribution of Ingredients)
Achieving an even distribution of ingredients is crucial for a perfectly balanced Margherita pizza. Uneven toppings lead to inconsistent flavor and texture, with some bites being overly rich and others bland. This section will guide you through the process of ensuring your pizza is a masterpiece of evenness.
Start with the Sauce: Begin by evenly spreading your homemade or store-bought tomato sauce across the pizza dough. Using the back of a spoon, create a thin, even layer, leaving approximately a ½-inch border for the crust. Aim for a consistent thickness of about 1/8 inch. Too much sauce will make the crust soggy, while too little will leave areas dry and flavorless. Approximately 1/2 cup of sauce should be sufficient for a 12-inch pizza.
The Art of Cheese Distribution: Next comes the mozzarella. For a classic Margherita, you’ll want about 8 ounces of fresh mozzarella, ideally low-moisture. Shred the mozzarella using a box grater for even distribution and melting. Avoid pre-shredded cheese, as it often contains cellulose which can prevent proper melting. Sprinkle half of the shredded mozzarella evenly over the sauce. Use a light, even sprinkling rather than clumps. A good technique is to start from the center and work your way outwards, ensuring coverage across the entire surface.
Strategic Basil Placement: Fresh basil is an essential component of a Margherita pizza. Use about 10-12 large basil leaves for a 12-inch pizza. Avoid chopping the basil; instead, tear the leaves into smaller pieces. This helps retain their aroma and prevents them from becoming mushy during baking. Distribute the basil leaves evenly across the cheese, slightly overlapping them to ensure full coverage. Avoid concentrating them in one area.
Second Layer of Cheese: Now, sprinkle the remaining 4 ounces of shredded mozzarella evenly over the basil. This creates a beautiful visual effect and ensures that the basil is partially encased in cheese, preventing it from burning. This double layer of cheese also contributes to a richer, more flavorful pizza.
Final Touches and Baking: Before placing the pizza in the oven, take a moment to visually inspect the distribution of sauce, cheese, and basil. Make any necessary adjustments to ensure even coverage. A well-assembled pizza is half the battle towards achieving perfection. Remember that a slight unevenness is acceptable, but significant discrepancies should be addressed before baking.
Professional Tip: For ultimate evenness, consider using a pizza peel. This allows for easier transfer of the pizza to and from the oven, minimizing the risk of disturbing the carefully arranged toppings. It also allows for better control during the baking process.
By following these steps, you’ll be well on your way to creating a Margherita pizza with perfectly even distribution of its key ingredients, resulting in a truly exceptional culinary experience.
Recommendations for the Best Margherita Pizza
To achieve the perfect Margherita pizza, careful attention to detail is crucial throughout the entire process. Start with high-quality ingredients; the flavor of your pizza will directly reflect the quality of your tomatoes, mozzarella, and basil. Using San Marzano tomatoes for their sweetness and low acidity is highly recommended. Look for fresh, creamy mozzarella di bufala for an authentic taste, or a good quality fresh mozzarella if bufala is unavailable. Ensure your basil is fragrant and vibrant green.
Don’t overload the pizza with toppings. The beauty of a Margherita lies in its simplicity. Too much cheese or sauce will overwhelm the delicate flavors of the ingredients. Aim for a thin, even layer of sauce and a generous but not excessive amount of cheese. Properly stretching the dough to achieve an even thin crust is also essential for a crisp base.
Master the baking technique. Achieving the perfect crisp crust with a slightly charred base requires attention to oven temperature and baking time. A very hot oven (around 500°F or 260°C) is key. A pizza stone or steel will help to achieve a crisp crust. Keep a close eye on it during baking, adjusting the time as needed to prevent burning. The cheese should be melted and bubbly, and the crust should have a nice golden-brown color.
Serving suggestions are equally important. Serve your Margherita pizza immediately after baking to enjoy the optimal texture and flavor. A simple sprinkle of extra virgin olive oil and freshly cracked black pepper just before serving can elevate the dish. Consider offering a selection of fresh herbs, such as oregano or thyme, as optional additions for guests.
Storage: Leftover pizza should be stored in an airtight container in the refrigerator. It’s best enjoyed within 1-2 days. To reheat, avoid the microwave, as it can make the crust soggy. Instead, reheat it in a skillet over medium heat or in a preheated oven until warmed through.
Complementary Dishes: A light salad with a simple vinaigrette is a perfect accompaniment to your Margherita pizza. A Caprese salad, with fresh mozzarella, tomatoes, and basil, would complement the flavors beautifully. A glass of chilled white wine, such as Pinot Grigio or Sauvignon Blanc, would also pair well. For a more substantial meal, consider serving it alongside a simple minestrone soup.
Nutritional Information (per serving, approximate): The nutritional content will vary depending on the specific ingredients and portion size. However, a typical serving of a Margherita pizza (approximately 1/8 of a 12-inch pizza) might contain approximately 300-400 calories. This includes carbohydrates from the dough, fats from the cheese and oil, and some protein from the cheese. The nutritional breakdown will be largely dependent on the type of cheese, flour, and added oils.
Important Note: This is an estimate. For precise nutritional information, it’s recommended to use a nutrition calculator and input the exact ingredients and quantities used in your recipe.