The fluffy, golden-brown perfection of a pancake stack, generously drizzled with maple syrup, is a breakfast (and sometimes dessert!) staple across the globe. But this seemingly simple dish boasts a surprisingly rich and varied history. While pinpointing the exact origin is difficult, pancakes in various forms have existed for millennia. Evidence suggests that flatbreads cooked on hot stones date back to ancient civilizations, with recipes evolving across cultures and continents. The Romans, for example, enjoyed a type of pancake called alita, while similar flatbreads appeared in medieval Europe, often made with simple ingredients like flour, water, and milk.
The pancake as we know it—a thicker, leavened version—emerged more recently. The arrival of readily available baking powder and other leavening agents in the 19th century significantly impacted pancake making, allowing for the lighter, fluffier texture we associate with modern pancakes. This coincided with the rise of mass-produced ingredients and the standardization of recipes, leading to pancakes becoming a more accessible and widespread breakfast option. Interestingly, the pancake’s popularity in North America is deeply intertwined with the widespread availability of maple syrup, a uniquely North American sweetener. The production of maple syrup, primarily in Canada and the northeastern United States, has a fascinating history of its own, with Indigenous peoples having a long tradition of harvesting maple sap and making syrup.
Today, pancakes are a global phenomenon. Statistics show that the pancake market is a multi-billion dollar industry, with an ever-expanding range of flavors and variations. From the classic buttermilk pancake to variations incorporating chocolate chips, blueberries, bananas, and a multitude of other ingredients, the possibilities seem endless. Beyond the individual enjoyment, pancakes hold significant cultural weight. They are often associated with special occasions, such as weekend brunches, celebratory meals, and even pancake festivals held annually in various locations. Pancake Day (Shrove Tuesday), a Christian holiday, involves the consumption of pancakes and serves as a testament to the pancake’s enduring cultural relevance. The simple act of making and sharing a stack of pancakes often represents comfort, family, and togetherness.
In this guide, we’ll explore the art of crafting the perfect pancake stack, focusing on achieving that ideal fluffy texture and golden-brown crust. We’ll delve into the specifics of different batter techniques, cooking methods, and, of course, the perfect way to drizzle that sweet, golden maple syrup. Get ready to embark on a delicious journey into the world of pancake perfection!
Ingredients and Measurements
Creating the perfect pancake stack requires precise measurements and high-quality ingredients. Don’t be tempted to substitute without understanding the impact on the final product. The following recipe yields approximately 8-10 medium-sized pancakes, enough for a generous serving or sharing.
Flour: We’ll be using 2 cups (250g) of all-purpose flour. All-purpose flour is crucial for achieving the right balance of texture and structure in your pancakes. Using cake flour will result in a less sturdy pancake, while using bread flour can make them too dense. Ensure your flour is fresh and properly stored in an airtight container to prevent clumping and maintain its baking capabilities.
Sugar: Add 2 tablespoons (25g) of granulated white sugar. This provides a subtle sweetness that complements the maple syrup without overpowering the pancake flavor. Avoid using brown sugar here, as it can lead to a slightly bitter taste and darker color that might not be desirable for a classic pancake stack.
Baking Powder: 2 teaspoons (10g) of baking powder is essential for achieving that light and fluffy texture we all love in pancakes. Make sure your baking powder is fresh; its effectiveness diminishes over time. Check the expiration date on the packaging.
Salt: A pinch of salt (1/2 teaspoon, 3g) enhances the overall flavor profile. Salt balances the sweetness and brings out the other ingredients’ flavors. Don’t skip this even if you’re not a fan of salty pancakes; it’s a crucial component of a well-balanced recipe.
Eggs: Two large eggs act as a binder, holding the batter together and contributing to the pancakes’ richness. Use large eggs for consistency; smaller eggs may alter the final texture. Room temperature eggs will emulsify better with the other wet ingredients, leading to a smoother batter.
Milk: 1 ½ cups (355ml) of milk provides moisture and helps create a tender crumb. You can use whole milk, 2% milk, or even buttermilk for a tangy twist, but be mindful that different milk types will slightly affect the final texture and flavor. Whole milk will generally yield the richest and most tender pancakes.
Melted Butter: ¼ cup (57g) of melted unsalted butter adds richness and flavor. Use unsalted butter so you can control the salt level in the recipe. Let the butter cool slightly before adding it to the batter to prevent the eggs from cooking prematurely.
Maple Syrup (for serving): Keep a generous amount of pure maple syrup on hand for drizzling over your finished pancake stack. The quality of maple syrup significantly impacts the overall taste experience. Choose a grade that suits your preference – from delicate Grade A to robust Grade B.
Optional additions: Feel free to add a teaspoon of vanilla extract for enhanced flavor or a handful of blueberries, chocolate chips, or other mix-ins to customize your pancakes. Remember that adding mix-ins will slightly increase the cooking time.
Precise measurements are key to achieving consistent results. Use a kitchen scale for the dry ingredients for the most accurate measurements. Enjoy your pancake stack!
Equipment Preparation
Before you even think about mixing your batter, ensuring you have the right equipment ready is crucial for a smooth and efficient pancake-making process. Proper preparation minimizes frustration and maximizes your chances of creating perfectly golden-brown, fluffy pancakes.
First, let’s address the star of the show: the frying pan. A good non-stick 8-10 inch skillet is ideal. Larger pans might result in thinner pancakes, while smaller ones will require more batches. Avoid using a pan with a scratched or damaged non-stick surface, as this can affect the cooking process and potentially lead to sticking. Before you begin, lightly grease the pan with 1-2 teaspoons of butter or oil. I recommend using unsalted butter for its rich flavor that complements the pancakes beautifully. Alternatively, a neutral-flavored oil like canola or vegetable oil works well.
Next up is the measuring equipment. Accuracy is key in baking, so having precise measuring tools is non-negotiable. You’ll need measuring cups (both dry and liquid) and measuring spoons. Invest in a good quality set – cheap, flimsy measuring cups and spoons can lead to inaccurate measurements, resulting in a less-than-perfect pancake batter consistency.
For mixing, a medium-sized bowl will suffice. Choose a bowl that’s large enough to comfortably accommodate your ingredients and allow for easy whisking. A sturdy whisk is essential for creating a smooth batter free of lumps. Avoid using a hand blender for pancake batter; it can over-mix the batter and result in tough pancakes.
To ensure your pancakes cook evenly and don’t stick, a spatula is absolutely necessary. A wide, thin spatula is best for flipping pancakes without tearing them. A silicone spatula is a great option as it’s gentle on non-stick surfaces and heat-resistant. Having two spatulas is even better: one for flipping and one for serving. This prevents cross-contamination of flavors and ensures a clean presentation.
Finally, don’t forget the serving plates and utensils. Have a stack of plates ready for your pancake masterpiece. You’ll also need a serving spoon or spatula to neatly stack your pancakes. Consider having a small bowl or pitcher for your maple syrup, ready to be poured generously over your delicious creations. Pre-warming your plates slightly can help keep the pancakes warm for longer, enhancing the overall dining experience.
In summary: Before you start, gather the following: an 8-10 inch non-stick skillet, 1-2 teaspoons of butter or oil, accurate measuring cups and spoons, a medium-sized bowl, a whisk, a wide spatula (preferably two), serving plates, and a serving utensil. With your equipment meticulously prepared, you’re ready to embark on your pancake-making adventure!
Pancake Batter Mixing
Creating the perfect pancake batter is the foundation for a delicious stack. This section details the process, ensuring you achieve a light, fluffy, and flavorful result every time.
Begin with the dry ingredients: In a large bowl, whisk together 2 cups of all-purpose flour, 2 tablespoons of granulated sugar, 2 teaspoons of baking powder, and ½ teaspoon of baking soda. Ensure the baking powder and soda are fresh for optimal leavening. Lumps of baking powder are a common cause of flat pancakes, so whisk thoroughly until no clumps remain. Adding a pinch of salt (about ¼ teaspoon) enhances the overall flavor profile.
Prepare the wet ingredients: In a separate bowl, whisk together 1 ¼ cups of milk (whole milk is recommended for the richest flavor and texture, but you can substitute with 2% or skim milk), 1 large egg, and 2 tablespoons of unsalted butter, melted and slightly cooled. Don’t over-mix the wet ingredients; a gentle whisk is sufficient. The melted butter adds richness and helps create a tender crumb.
Combining wet and dry ingredients: Gradually add the wet ingredients to the dry ingredients, mixing gently with a whisk or a spatula. Avoid over-mixing. Over-mixing develops the gluten in the flour, resulting in tough pancakes. Mix only until just combined – a few small lumps are perfectly acceptable. The batter should be slightly lumpy but not dry. If the batter seems too thick, add a tablespoon or two of milk at a time until you reach the desired consistency.
Professional Tip: For extra fluffy pancakes, let the batter rest for 5-10 minutes before cooking. This allows the gluten to relax and the baking powder to activate fully, contributing to a lighter texture. Cover the bowl loosely with plastic wrap during this resting period.
Adjusting for different flours: If using whole wheat flour, you might need to add a little extra milk, as whole wheat flour absorbs more liquid. Start with the recipe’s specified amount and add milk one tablespoon at a time until you reach a pourable consistency. Similarly, if using gluten-free flour blends, you may need to adjust the liquid based on the specific brand and type of blend. Always consult the instructions on the gluten-free flour package for best results.
Optional additions: For added flavor, consider incorporating ingredients like vanilla extract (1 teaspoon), lemon zest (1 tablespoon), or a pinch of cinnamon into the batter. Remember to adjust the sweetness accordingly if adding flavored extracts or spices. Incorporate these additions along with the wet ingredients for even distribution.
Consistency check: The finished batter should be smooth enough to pour easily from a ladle or measuring cup, but thick enough to hold its shape for a few seconds. If it’s too thin, add a little more flour; if it’s too thick, add a little more milk.
Important: Once the batter is mixed, don’t let it sit for too long before cooking. The longer it sits, the more the baking powder will react, potentially leading to less fluffy pancakes.
Cooking the Pancakes
Now that your batter is ready, it’s time to cook those delicious pancakes! The key to perfectly cooked pancakes is a hot griddle or frying pan and the right amount of batter per pancake. We’ll be aiming for fluffy, golden-brown pancakes with a tender interior.
Heat your griddle or large non-stick frying pan over medium-high heat. A good way to test the temperature is to sprinkle a few drops of water onto the surface. If the water beads up and evaporates quickly, your pan is ready. If it sits and sizzles, it’s too hot; reduce the heat slightly. If it just sits, your pan needs more time to heat up.
Lightly grease the cooking surface. Use a small amount of cooking oil, butter, or non-stick spray. Too much grease will make your pancakes greasy, while too little may cause them to stick. A light coating is all you need. You can use a paper towel to spread the oil evenly across the surface.
Pour 1/4 cup of batter onto the hot griddle for each pancake. This amount will create pancakes of a nice size, around 4 inches in diameter. Don’t overcrowd the pan; leave some space between each pancake to allow for even cooking. If you overcrowd, the pancakes will steam instead of frying, resulting in flat, soggy pancakes.
Cook for 2-3 minutes per side, or until golden brown and cooked through. You’ll know the pancakes are ready to flip when bubbles start to form on the surface and the edges look set. Use a spatula to gently flip the pancakes. Avoid pressing down on the pancakes while they cook, as this can make them flat and tough. Let them cook undisturbed until nicely browned on the second side.
Professional Tip: For perfectly round pancakes, pour the batter into the center of the pan and let it spread naturally. Don’t try to manipulate the batter with the spatula to shape it. If you prefer thicker pancakes, use a little more batter per pancake (up to 1/3 cup), and adjust cooking time accordingly.
Adjust the heat as needed throughout the cooking process. If the pancakes are browning too quickly, reduce the heat slightly. If they’re cooking too slowly, increase the heat a bit. Remember that every stovetop is different, so you may need to adjust the heat throughout the cooking process to achieve perfectly cooked pancakes.
Keep cooked pancakes warm. While you’re cooking the remaining pancakes, keep the cooked ones warm on a wire rack placed over a baking sheet in a low oven (around 200°F/93°C). This prevents them from getting cold and soggy while you finish cooking the batch.
Once all the pancakes are cooked, serve them immediately with your favorite toppings, such as maple syrup, butter, fresh fruit, or whipped cream. Enjoy your delicious, fluffy pancake stack!
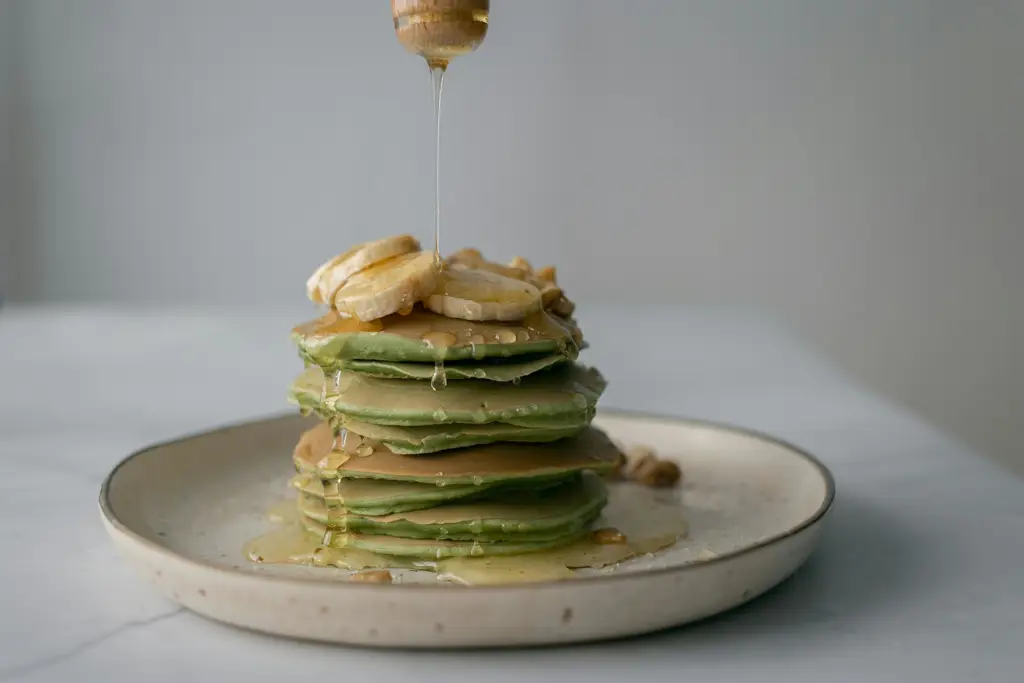
Stacking the Pancakes: Building Your Perfect Pancake Tower
The art of pancake-making isn’t complete without the satisfying construction of the final stack. A well-stacked pancake tower is visually appealing and enhances the overall dining experience. This section will guide you through the process, ensuring your pancakes are not only delicious but also beautifully presented.
Start with a cooling rack: Before you even think about stacking, allow your freshly cooked pancakes to cool slightly on a wire rack. This prevents them from becoming soggy from trapped steam and allows them to firm up enough for easy handling. Aim for a temperature where they are still warm but not so hot that they burn your hands.
Choose your plate wisely: The size and type of plate significantly impact the presentation. A large, flat plate provides ample space for a substantial stack, while a smaller plate might be better suited for a more modest serving. Consider the visual appeal; a slightly wider plate than the diameter of your pancakes creates a nice aesthetic.
The layering technique: Begin by placing the largest pancake at the bottom of your plate. This provides a stable foundation for your stack. Subsequent pancakes should be slightly smaller than the one below, creating a visually pleasing, slightly tapered effect. If your pancakes vary significantly in size, simply select the largest for the base and work your way down from there. Don’t worry about precise sizing; a natural, slightly irregular stack often looks more appealing than a perfectly uniform one.
Avoid over-stacking: While a towering stack is impressive, avoid making it so tall that it becomes unstable or risks collapsing. A stack of 4-6 pancakes is usually ideal, depending on the size of your pancakes and your plate. If you’re making a larger stack for sharing, consider using a sturdy cake stand for added support.
Gentle handling is key: Use a wide spatula to gently lift and transfer each pancake to the plate. Avoid pressing down too hard, as this can damage the delicate texture and make the pancakes uneven. A light touch is paramount for maintaining the integrity of each pancake.
Presentation matters: Once you’ve built your stack, take a moment to assess its appearance. If any pancakes are slightly askew, you can gently nudge them into place with the spatula. Consider adding a dusting of powdered sugar or a sprinkle of fresh berries for an elegant finishing touch. A sprig of mint or a few chocolate shavings can also add a sophisticated flair.
Serve immediately: For the best taste and texture, serve your pancake stack immediately after assembling it. The warmth of the pancakes will enhance the flavor of the maple syrup, creating a truly delightful culinary experience. Enjoy the fruits of your labor!
Maple Syrup Preparation (if homemade)
Making your own maple syrup is a rewarding, albeit time-consuming, process that elevates your pancake experience. It requires access to maple trees and a significant time commitment, but the resulting syrup is unparalleled in flavor and quality. This section outlines the basic process; for more detailed instructions, consult specialized resources on maple syrup production.
Choosing the Right Sap: The process begins in late winter or early spring when the nights are freezing and the days are thawing. This temperature fluctuation is crucial for sap flow. You’ll need mature maple trees, ideally sugar maples (Acer saccharum), but red maples and amur maples can also be tapped. Avoid tapping trees smaller than 10 inches in diameter to protect their health.
Tapping the Trees: Use a 7/16-inch drill bit to create a shallow hole at a slight upward angle, approximately 2 inches deep. Insert a tap (spile) and hang a bucket or tubing system to collect the sap. Sterilize your taps and buckets to prevent bacterial contamination. Multiple taps can be placed on larger trees, but ensure they are spaced appropriately to avoid harming the tree.
Collecting and Filtering the Sap: The sap will drip slowly. Collect it regularly, ideally daily. The sap is about 98% water and 2% sugar, so you’ll need a significant amount to produce syrup. Expect to collect 40 gallons of sap to produce one gallon of syrup. Once collected, strain the sap through cheesecloth or a fine-mesh sieve to remove debris such as leaves, twigs, and insects.
Boiling the Sap: This is a crucial step and requires patience. The goal is to reduce the water content to approximately 66% Brix (a measure of sugar concentration), which indicates the ideal syrup consistency. Use a large, stainless-steel evaporator pan or a series of pots, ensuring the sap never boils over. Maintain a low, steady simmer. The boiling process can take many hours, even days, depending on the amount of sap and your equipment. Skim off any foam or impurities that rise to the surface.
Testing for Doneness: Use a hydrometer or a candy thermometer to accurately monitor the sugar concentration. A hydrometer is preferred for precise measurements. The ideal syrup should reach a temperature of 219°F (104°C) or a Brix reading of 66%. You can also perform a cold plate test —place a small amount of syrup on a cold plate; when it forms a sheet that wrinkles slightly when you push it with your finger, it’s ready.
Filtering and Bottling: Once the syrup reaches the desired consistency, carefully filter it through a fine-mesh sieve or cheesecloth lined funnel. This removes any remaining sediment. Pour the hot syrup into sterilized bottles and seal tightly. Store the syrup in a cool, dark place. Homemade maple syrup will have a richer, more complex flavor than commercially available varieties, making your pancakes truly exceptional.
Important Note: Making maple syrup requires significant time, equipment, and knowledge. Improper handling can lead to spoilage or a subpar product. Always prioritize safety and refer to comprehensive resources for detailed instructions and safety precautions.
Recommendations for Your Delicious Pancake Stack
To elevate your pancake stack experience, consider these recommendations for preparation, serving, and storage. Proper technique and attention to detail will ensure a truly memorable breakfast or brunch.
Serving Suggestions: Don’t just pile the pancakes! For a visually appealing and delicious presentation, consider arranging your pancakes slightly overlapping on a plate. A generous drizzle of pure maple syrup is essential, but you can also get creative. A dusting of powdered sugar adds a touch of elegance. Fresh berries (strawberries, blueberries, raspberries) provide a vibrant color contrast and burst of freshness. A dollop of whipped cream adds richness and texture. For a more sophisticated touch, consider a sprinkle of chopped nuts (pecans, walnuts) or a drizzle of melted butter infused with vanilla extract. You can also incorporate fruit directly into the batter for a unique twist.
Storage Conditions: Leftover pancakes can be stored, but their texture will change. For optimal freshness, store them in an airtight container at room temperature for up to 2 days. While they might not be as fluffy as freshly made pancakes, they can still be enjoyed. For longer storage, consider freezing them. Wrap individual pancakes tightly in plastic wrap and then place them in a freezer-safe bag or container. Frozen pancakes can last for up to 3 months. When ready to reheat, simply microwave for 30-60 seconds or toast in a pan until heated through.
Complementary Dishes: Pancakes are incredibly versatile and pair well with a variety of dishes. A classic pairing is crispy bacon or sausage, offering a savory contrast to the sweetness of the pancakes. Scrambled eggs provide a protein boost and a satisfying complement. A side of fresh fruit salad offers a refreshing counterpoint to the richness of the pancakes and syrup. Consider serving a side of yogurt or cottage cheese for added protein and probiotics. For a more indulgent experience, serve your pancake stack alongside a side of maple-glazed ham or a fruit compote.
Nutritional Information (per serving, approximate values will vary based on recipe and ingredients): A typical pancake (4 inches in diameter) might contain approximately 200-250 calories. The nutritional breakdown will vary widely depending on the recipe, but generally includes carbohydrates as the main source of energy, along with some protein and fat. Adding toppings such as syrup, butter, and fruit will significantly increase the calorie and sugar content. It’s always advisable to adjust portion sizes and toppings to meet your individual dietary needs.
Important Note: The calorie and nutritional information provided is an estimation. The actual values will depend on the specific ingredients used and the size of the pancakes. For precise nutritional information, use a nutrition calculator and input the exact ingredients and quantities used in your recipe. Always consult a healthcare professional or registered dietitian for personalized dietary advice.