Prepare yourself for a journey into the tangy, sweet, and utterly irresistible world of Key lime pie! This iconic dessert, a true taste of the Florida Keys, boasts a history as rich and complex as its flavor profile. While the exact origins remain shrouded in some mystery, most culinary historians agree that the pie’s development is closely tied to the arrival of Key limes in the Florida Keys during the early 19th century. These small, intensely flavorful limes, significantly more acidic than their Persian counterparts, proved perfect for creating a unique and refreshing pie unlike anything else.
The Key lime pie’s popularity exploded in the early 20th century, fueled by the burgeoning tourism industry in the Florida Keys. Restaurants and resorts began featuring the pie on their menus, quickly establishing it as a regional specialty, and eventually a national treasure. Its bright yellow color, contrasting with the creamy white filling and often a graham cracker crust, became instantly recognizable. While precise sales figures are difficult to obtain for a dessert so widely made at home, it’s safe to say that millions of Key lime pies are consumed annually, making it a significant contributor to Florida’s culinary economy.
Beyond its deliciousness, the Key lime pie holds cultural significance. It’s deeply associated with the laid-back, tropical lifestyle of the Florida Keys, often appearing in local celebrations and events. It’s a symbol of sunshine, relaxation, and simple pleasures. Moreover, the pie has inspired countless variations and interpretations, from mini pies to cheesecakes, demonstrating its enduring appeal and adaptability. The enduring popularity of Key lime pie, with its balance of tartness and sweetness, is a testament to its unique and unforgettable flavor, a true reflection of the region’s vibrant culture and history.
Ingredients and Measurements
This recipe yields one 9-inch key lime pie. Accurate measurements are crucial for achieving the perfect balance of tartness and sweetness. Use a kitchen scale for the most precise results, especially when measuring the condensed milk and key lime juice.
For the Graham Cracker Crust:
- 1 ½ cups (150g) graham cracker crumbs – Use good quality graham crackers for the best flavor. You can pulse them in a food processor until finely ground.
- ¼ cup (50g) granulated sugar – Don’t skimp on the sugar; it enhances the graham cracker flavor and provides a nice contrast to the tart filling.
- 6 tablespoons (3 ounces) unsalted butter, melted – Ensure the butter is completely melted and slightly cooled before combining with the crumbs. This helps it bind properly.
For the Key Lime Filling:
- 1 (14-ounce) can sweetened condensed milk – Using sweetened condensed milk is key to the pie’s creamy texture and sweetness. Do not substitute with evaporated milk.
- ¾ cup (177ml) fresh key lime juice – This is non-negotiable! Bottled lime juice will not provide the same authentic flavor. You’ll need approximately 8-10 key limes, depending on their size. Strain the juice to remove any pulp or seeds.
- 4 large egg yolks – Use large, fresh eggs for a richer, more stable filling. Room temperature eggs incorporate better into the mixture.
- 1 tablespoon lime zest (from about 2 limes) – Adding lime zest enhances the aroma and flavor of the filling. Be sure to only zest the outer layer, avoiding the bitter white pith.
- Optional: Pinch of salt – A pinch of salt balances the sweetness and enhances the overall flavor profile.
For the Topping (optional):
- Whipped cream – A dollop of freshly whipped cream adds a lovely lightness and contrast to the tart filling.
- Key lime slices – Garnish with thin slices of key lime for an elegant and visually appealing finish.
Important Note: Always ensure your ingredients are at room temperature before combining them, especially for the filling. This prevents curdling and ensures a smoother texture.
Crust Preparation
Creating the perfect crust is paramount for a truly exceptional Key Lime Pie. We’ll be making a classic graham cracker crust, but feel free to experiment with other crusts like a shortbread or even a pecan crust if you’re feeling adventurous. This recipe yields enough crust for a 9-inch pie.
Ingredients:
- 1 ½ cups (150g) graham cracker crumbs (about 10 full graham crackers, finely crushed)
- ¼ cup (50g) granulated sugar
- 6 tablespoons (85g) unsalted butter, melted
Instructions:
First, ensure your graham crackers are finely crushed. You can achieve this using a food processor for a consistent texture, or by placing the crackers in a zip-top bag and crushing them with a rolling pin. The finer the crumbs, the smoother and more cohesive your crust will be. Aim for a consistency resembling coarse sand.
Next, in a medium bowl, combine the graham cracker crumbs and granulated sugar. Mix thoroughly to ensure the sugar is evenly distributed throughout the crumbs. This will add a touch of sweetness and prevent the crust from being overly bland.
Gradually add the melted butter to the crumb mixture, mixing gently with a fork or your hands until the crumbs are evenly moistened. Be careful not to overmix, as this can result in a tough crust. The mixture should hold together when squeezed gently.
Transfer the crumb mixture to your 9-inch pie plate. Using the bottom of a measuring cup or your fingers, firmly press the mixture into the bottom and up the sides of the pie plate, creating an even layer. Make sure the crust is evenly compacted; this prevents it from becoming soggy. For a neat edge, use a small offset spatula to trim any excess crumbs.
Pre-bake the crust for 10-12 minutes in a preheated oven at 350°F (175°C). This step helps to prevent a soggy bottom and creates a slightly firmer, more flavorful crust. Keep a close eye on it to avoid burning. The crust should be lightly golden brown around the edges.
Allow the crust to cool completely before adding the Key lime filling. This is crucial; adding the filling to a hot crust will cause it to become soft and potentially fall apart.
Professional Tip: For an extra-flaky crust, chill the prepared crust in the refrigerator for at least 30 minutes before pre-baking. This allows the butter to solidify, resulting in a more tender and less crumbly crust.
Lime Filling Preparation
The key to a truly exceptional Key Lime Pie lies in the vibrant and tangy lime filling. This section details how to create a smooth, creamy, and intensely flavorful filling that will perfectly complement your graham cracker crust.
Begin by gathering your ingredients: 1 1/2 cups of freshly squeezed Key lime juice (approximately 8-10 limes), 1 1/4 cups of granulated sugar, 1/2 cup of heavy cream, 4 large egg yolks, and a pinch of salt. Using freshly squeezed lime juice is crucial; bottled lime juice lacks the complex flavor profile of fresh juice. Avoid using lemons or other citrus fruits as substitutes, as they will alter the distinct taste of a Key Lime Pie.
In a medium-sized stainless steel bowl, whisk together the sugar and salt until well combined. This ensures even distribution of sweetness and prevents the sugar from clumping in the final product. Then, carefully whisk in the egg yolks one at a time, ensuring each yolk is fully incorporated before adding the next. Over-whisking can introduce air bubbles, leading to a less smooth texture. A gentle, steady hand is key here.
Slowly pour in the freshly squeezed Key lime juice, whisking constantly to prevent the yolks from scrambling. The mixture will slightly thicken as you incorporate the juice. Finally, gently whisk in the heavy cream. The heavy cream adds richness and a beautiful creaminess to the filling, balancing the tartness of the lime juice. Ensure the mixture is completely smooth and free of any lumps before proceeding.
Once the filling is prepared, strain it through a fine-mesh sieve into a separate bowl. This simple step removes any stray bits of pulp or seeds, resulting in a flawlessly smooth and elegant filling. Discard any pulp or seeds remaining in the sieve. The strained filling should be a bright, vibrant green color, indicative of the fresh lime juice used.
After straining, you can proceed to bake your Key Lime Pie. Remember to use a water bath for even baking and to prevent cracking.
Chilling and Setting
Chilling your key lime pie is crucial for achieving the perfect texture and flavor. A properly chilled pie will have a firm, creamy filling that’s not watery or icy, and the flavors will meld beautifully. This process typically takes at least 4 hours, but ideally, you should chill your pie for 6-8 hours, or even overnight, for optimal results.
Before chilling, ensure your pie is completely assembled. This means the key lime filling is evenly spread over the graham cracker crust and the top is smooth. Any unevenness will be more pronounced once the pie sets, so take your time with this step. Gently tap the pie pan on the counter to release any trapped air bubbles.
Once assembled, cover the pie completely. This prevents the filling from absorbing odors from the refrigerator and helps maintain its freshness. You can use plastic wrap, pressed directly onto the surface of the filling to prevent a skin from forming, or a pie cover. Avoid using aluminum foil directly on the filling, as it can sometimes react with the acidic lime juice.
Place the pie in the refrigerator on a level shelf. Avoid placing it near strong-smelling foods, such as strong cheeses or onions, to prevent flavor contamination. Allow for ample space around the pie to ensure even chilling. Cramming the pie amongst other items can hinder the cooling process and lead to uneven setting.
After the initial chilling period (at least 4 hours), gently test the firmness of the filling by inserting a thin knife or toothpick into the center. If it comes out clean, or with only a few clinging strands of filling, your pie is likely set. If the filling still seems too soft, continue chilling for another 1-2 hours. Over-chilling is better than under-chilling when it comes to key lime pie, as a slightly firmer pie is generally preferred.
Once the pie is fully chilled and set, carefully remove it from the refrigerator. Let it sit at room temperature for about 10-15 minutes before serving to allow the filling to slightly soften and become easier to slice. This will also enhance the flavor profile. Serve chilled and enjoy your perfectly set, delicious key lime pie!
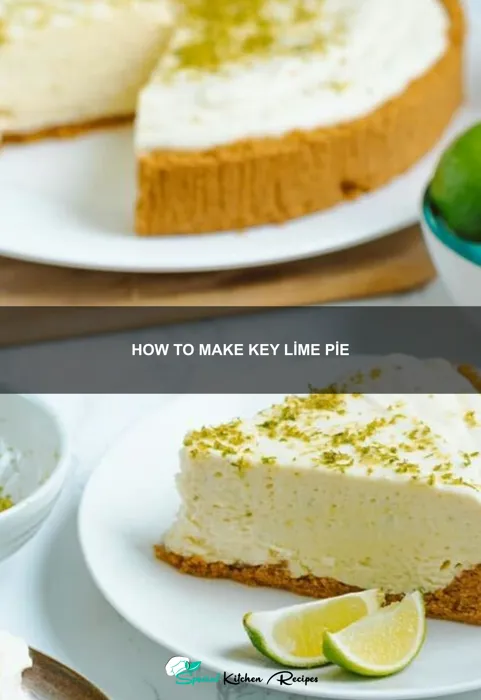
Decorating and Garnishing Your Key Lime Pie
The final touch on your exquisite Key Lime Pie is the decorating and garnishing. This step elevates your pie from simply delicious to truly stunning, showcasing your culinary artistry. While a simple dusting of powdered sugar is perfectly acceptable, a few extra touches can create a showstopper.
Whipped Cream: A classic and always appreciated garnish, whipped cream provides a lovely textural contrast to the tart filling. For the best results, use heavy whipping cream (at least 36% milkfat) and chill it thoroughly before whipping. Add 2 tablespoons of powdered sugar and 1 teaspoon of vanilla extract to 1 cup of chilled heavy cream. Whip until soft peaks form, being careful not to overwhip. Pipe or spoon the whipped cream onto the pie, creating a neat border or a more rustic swirl. Avoid using overly sweet whipped cream, as it can overpower the delicate lime flavor.
Lime Zest: A simple yet elegant garnish, lime zest adds both visual appeal and a burst of fresh lime flavor. Using a microplane or fine grater, zest the outer layer of 1-2 limes, avoiding the white pith (which is bitter). Sprinkle the zest evenly over the whipped cream or directly onto the pie filling. Ensure the zest is finely grated for a more aesthetically pleasing result.
Candied Lime Slices: For a more sophisticated look, consider candied lime slices. Thinly slice limes, and simmer them in a sugar syrup (equal parts sugar and water) until translucent. Allow them to cool and dry completely before arranging them artfully around the edge of the pie. This requires some advance preparation but is well worth the effort.
Fresh Berries: A scattering of fresh berries, such as raspberries, blueberries, or strawberries, provides a vibrant pop of color and a delightful sweetness that complements the tartness of the key lime filling. Use a small quantity to avoid overpowering the pie’s flavor. Arrange the berries in a pleasing pattern for a more polished look.
Chocolate Shavings: For a unique twist, consider adding dark chocolate shavings. The bitterness of the chocolate contrasts beautifully with the tartness of the key lime, creating a complex flavor profile. Use a vegetable peeler to create thin shavings from high-quality dark chocolate. Use sparingly to avoid overpowering the lime flavor.
Garnish Placement: Regardless of your chosen garnish, pay attention to its placement. A symmetrical arrangement creates a polished look, while a more casual scattering works well for a rustic aesthetic. Always ensure the garnish complements, rather than competes with, the overall presentation of the pie.
Remember, the key to successful decorating is to keep it simple yet elegant. Let the beautiful key lime filling be the star of the show, and use your garnishes to enhance, not overshadow, its natural beauty.
Serving Suggestions
Your perfectly crafted Key Lime Pie deserves a presentation as delightful as its taste! Here are some serving suggestions to elevate your dessert experience.
Classic Simplicity: For a truly elegant presentation, slice your Key Lime Pie into 8 even wedges using a sharp knife dipped in hot water (this prevents sticking and ensures clean cuts). Arrange the slices on chilled dessert plates. A simple dusting of powdered sugar adds a touch of visual appeal, or a delicate sprig of fresh mint adds a refreshing herbal note. Serve immediately for optimal texture and flavor.
Elevated Presentation: For a more sophisticated gathering, consider individual servings. Use small, elegant dessert dishes and top each slice with a dollop of whipped cream (approximately 1-2 tablespoons per serving). A few fresh raspberries or a thin slice of lime zest adds a vibrant pop of color and complements the tartness of the pie. You could also create a decorative border around the plate using a small amount of whipped cream piped in a decorative pattern.
Garnish Ideas: Don’t underestimate the power of garnishes! A few carefully chosen additions can transform your Key Lime Pie from good to unforgettable. Consider these options: candied lime peel (thinly sliced and carefully candied for a sweet and tangy contrast), toasted coconut flakes (for a textural element and subtle sweetness), or even a sprinkle of finely grated lime zest (for an intense burst of lime flavor). Remember, less is often more; a few carefully placed garnishes will make a bigger impact than a cluttered plate.
Accompaniments: While the pie stands beautifully on its own, pairing it with the right accompaniments can enhance the experience. A scoop of vanilla bean ice cream (approximately 1/2 cup per serving) provides a delightful cool contrast to the tangy filling. Alternatively, a dollop of lightly sweetened coconut whipped cream offers a tropical twist. For a more sophisticated pairing, consider a glass of chilled Sauvignon Blanc or a crisp rosé wine.
Storage and Serving Temperature: Key Lime Pie is best served chilled. Store leftover pie in the refrigerator, tightly covered with plastic wrap or in an airtight container, for up to 3 days. Before serving, allow the pie to sit at room temperature for about 15-20 minutes to soften slightly, making it easier to slice and enhancing the flavor profile.
Portion Control: Key Lime Pie is rich and decadent. Consider offering smaller portions (e.g., 1/12th of a pie instead of 1/8th) if you’re serving it alongside other desserts or a substantial meal. This allows guests to sample the pie without feeling overly full.
Recommendations
For the best Key Lime Pie experience, we highly recommend using freshly squeezed key lime juice. The vibrant, tart flavor is unparalleled and makes a significant difference in the final product. Avoid using bottled lime juice as it often lacks the necessary acidity and intense flavor profile.
Once your pie is assembled and chilled, allow it to sit for at least 4 hours, preferably overnight, to allow the filling to properly set. This ensures a creamy, stable texture and prevents a runny pie. The longer it chills, the better the flavors meld.
Serving suggestions abound! A classic pairing is a dollop of whipped cream, lightly sweetened. Alternatively, a scoop of vanilla bean ice cream or a sprinkle of toasted coconut adds a delicious textural and flavor contrast. For a more sophisticated touch, consider a raspberry coulis or a drizzle of white chocolate ganache.
Store leftover pie in the refrigerator, tightly covered with plastic wrap or in an airtight container. It should remain fresh for up to 3-4 days. However, we highly doubt it will last that long!
Key Lime Pie complements a variety of dishes. It pairs beautifully with lighter fare, such as grilled fish or chicken salads. It’s also a fantastic dessert following a meal of Cuban or Caribbean cuisine. A refreshing palate cleanser after a rich meal, it’s a versatile dessert option.
Nutritional Information (per serving, approximate): Calories: 350-400, Fat: 25-30g, Saturated Fat: 15-20g, Cholesterol: 80-100mg, Sodium: 100-150mg, Carbohydrates: 30-40g, Sugar: 25-35g, Protein: 3-5g. Note: Nutritional information will vary depending on the specific ingredients and quantities used.
Important Note: These are estimates. For precise nutritional information, use a nutrition calculator and input your specific recipe details.