Grilled fish, a culinary cornerstone across numerous cultures, boasts a history as rich and varied as the oceans themselves. While pinpointing an exact origin is impossible, evidence suggests that grilling fish dates back to prehistoric times, with early humans utilizing rudimentary methods to cook their catches over open flames. The simplicity of the technique, requiring only a heat source and readily available ingredients, made it a universally adopted practice. Archaeological findings frequently uncover remnants of fish bones alongside charcoal, hinting at the widespread prevalence of this cooking method throughout history.
The Mediterranean region, in particular, has a long and celebrated tradition of grilled fish. Greece, Italy, and the countries of the Levant all feature variations on this dish, each reflecting unique regional flavors and preferences. The combination of lemon and dill, so commonly associated with grilled fish today, likely emerged from these regions. Lemon, a citrus fruit indigenous to Southeast Asia but widely cultivated throughout the Mediterranean, provides a bright, acidic counterpoint to the richness of the fish. Dill, a herb with origins in the Middle East and Europe, adds a subtle, aromatic complexity. The use of these two ingredients, though seemingly simple, elevates the dish from a mere meal to a culinary experience.
Today, grilled fish remains incredibly popular worldwide. Global seafood consumption statistics reveal that fish is a significant source of protein for billions of people, with grilling consistently ranking among the most popular cooking methods. The health benefits further contribute to its appeal; fish is a lean protein source, rich in omega-3 fatty acids, which are essential for cardiovascular health. In addition to its nutritional value and widespread accessibility, the versatility of grilled fish allows for endless variations. Different types of fish, marinades, and accompanying herbs and spices can create an almost infinite number of delicious combinations, ensuring that this ancient cooking method continues to thrive in modern kitchens.
Ingredients and Measurements
This recipe yields approximately 2 servings of delicious grilled fish. The quantities can be easily adjusted to accommodate more guests; simply multiply the ingredient amounts proportionally.
For the freshest flavor, choose your fish wisely. Look for firm, moist fillets with bright, clear eyes (if purchasing whole fish). White fish like cod, snapper, or halibut work exceptionally well, but firmer fleshed fish like sea bass or swordfish also grill beautifully. Aim for fillets that are about 1-inch thick for even cooking.
Fish: 2 (6-ounce) fish fillets (cod, snapper, halibut, sea bass, or swordfish), skin on or off, your preference. Note: If using thicker fillets, increase grilling time accordingly. Thinner fillets will cook much quicker.
Lemon: 1 large lemon. We’ll use the juice and zest for a bright, citrusy flavor. Recommendation: Use organic lemons whenever possible to avoid potentially harsh chemical treatments that can affect the flavor.
Fresh Dill: 1/4 cup fresh dill, finely chopped. Fresh dill is crucial for this recipe; dried dill lacks the vibrant flavor and aroma. If you can’t find fresh dill, consider substituting with a teaspoon of dried dill, but the flavor will be noticeably different.
Olive Oil: 2 tablespoons extra virgin olive oil. Use high-quality olive oil for the best flavor. A good quality olive oil will add depth to the dish.
Garlic: 1 clove garlic, minced. Freshly minced garlic provides a much more potent flavor than pre-minced garlic from a jar. If using pre-minced, reduce the amount slightly.
Salt: 1 teaspoon sea salt. Adjust salt to your taste. The saltiness will depend on the saltiness of the fish and your personal preference.
Black Pepper: 1/2 teaspoon freshly ground black pepper. Freshly ground black pepper offers a more intense flavor compared to pre-ground pepper. Adjust to your liking.
Optional additions: Consider adding a pinch of red pepper flakes for a touch of heat or a sprinkle of paprika for a smoky flavor. Experiment and find your perfect combination!
Equipment and Utensils
Grilling fish successfully hinges on having the right equipment and utensils. The quality of your tools will directly impact the final result, ensuring even cooking and preventing sticking or tearing of the delicate fish flesh. Let’s go through the essentials.
Grill: You’ll need a grill, of course! This could be a charcoal grill, a gas grill, or even a grill pan for indoor use. For charcoal grills, ensure you have enough charcoal briquettes to achieve a medium-high heat. For gas grills, you’ll need to preheat to medium-high heat (around 375-400°F or 190-200°C). Grill pans require medium-high heat on your stovetop. Regardless of your grill type, ensure it’s thoroughly cleaned before use to avoid any unwanted flavors transferring to your fish.
Grill Accessories: Invest in a good quality grill brush to clean your grill grates before and after cooking. A long-handled spatula is essential for flipping the fish without breaking it. Consider using a grill basket or fish grilling basket for smaller or more delicate fish fillets to prevent them from falling through the grates. A meat thermometer is highly recommended for ensuring the fish is cooked through to a safe internal temperature of 145°F (63°C).
Measuring Utensils: Accuracy is key in cooking. You’ll need measuring spoons (1 teaspoon, 1 tablespoon) for the lemon juice, dill, and any other seasonings. A liquid measuring cup (at least 1 cup capacity) will be helpful for measuring oil or marinade if you choose to use one. A set of kitchen scales would be beneficial for accurately measuring the fish fillets, particularly if you’re working with a specific recipe that calls for a precise weight.
Other Utensils: A small bowl is needed for mixing the lemon juice and dill. A cutting board and a sharp knife are essential for preparing the fish and herbs. Tongs can be helpful for maneuvering the fish on the grill, especially when using a grill basket. Paper towels are useful for patting the fish dry before grilling. Finally, a serving platter will be needed to beautifully present your finished grilled fish.
Professional Recommendation: Invest in high-quality grilling tools. A sturdy spatula and a reliable grill brush will last for years and make your grilling experience much more enjoyable and efficient. Don’t skimp on the quality of your grill accessories; they’re an investment in better-tasting food.
Fish Preparation (Cleaning, Scaling, etc.)
Before you begin grilling, proper fish preparation is crucial for both flavor and safety. This section will guide you through cleaning and scaling your fish, ensuring a delicious and enjoyable grilling experience. We’ll assume you’re working with a whole fish, approximately 1-1.5 lbs, but the principles apply to smaller or larger fish with minor adjustments.
Scaling: Begin by rinsing the fish under cold running water. Using a fish scaler (available at most kitchen supply stores), scrape the scales from the fish’s skin, working from tail to head. Hold the fish firmly but gently to avoid injury. If you don’t have a scaler, a blunt knife can work, but it requires more effort and precision. Once scaled, thoroughly rinse the fish again to remove any loose scales.
Gutting: This is best done with a sharp, filleting knife. With the fish lying on its side, make a shallow incision along the belly from the vent (anus) to just below the gills, being careful not to cut too deeply and puncture the gall bladder (a small, green sac). If you puncture it, the bitter bile will ruin the fish’s flavor. Use a spoon or your finger to gently remove the internal organs, taking care to avoid puncturing the gall bladder. Rinse the cavity thoroughly with cold water.
Gilling: Locate the gills, which are located just behind the head. Using your fingers or a small knife, carefully remove the gill rakers and gills themselves. These contain a lot of blood and can impart a slightly unpleasant taste if left in. Thoroughly rinse the gill cavity to remove any remaining blood and debris.
Head and Fins (Optional): Whether or not you remove the head and fins is a matter of personal preference. Leaving them on adds to the visual appeal and can help the fish cook evenly, retaining moisture. However, removing them simplifies eating. If removing the head, cut just behind the gills. If removing the fins, use sharp scissors or a knife to carefully cut them off at their base.
Patting Dry: Once cleaned, thoroughly pat the fish dry with paper towels. This is essential for achieving a good sear on the grill. Excess moisture will prevent proper browning and can lead to sticking.
Important Note: Always handle fish with clean hands and utensils to prevent bacterial contamination. If you are unsure about any step, you can always ask your local fishmonger for assistance. They are usually happy to clean and prepare fish for you.
Marinade Preparation
Creating the perfect marinade for your grilled fish is crucial for achieving succulent, flavorful results. This recipe utilizes a bright and herbaceous lemon-dill marinade that will tenderize the fish while infusing it with delightful Mediterranean flavors. We’ll be making enough marinade for approximately 1.5 lbs of fish fillets, but you can easily adjust the quantities based on your needs.
Begin by zesting and juicing two large lemons. Ensure you zest only the outer yellow layer, avoiding the bitter white pith. This will yield approximately 2 tablespoons of lemon zest and ¼ cup of fresh lemon juice. Reserve the zest and juice separately.
Next, finely chop ½ cup of fresh dill. Fresh dill is highly recommended for its vibrant flavor and aroma; dried dill can be substituted, but use approximately 1 tablespoon and adjust to taste. The freshness of the dill will significantly impact the final flavor profile of the fish.
In a medium-sized bowl, whisk together the lemon juice, lemon zest, and chopped dill. Now, we’ll add the remaining marinade ingredients: 2 cloves of minced garlic (or 1 teaspoon of garlic powder), 2 tablespoons of extra virgin olive oil, and 1 teaspoon of salt and ½ teaspoon of freshly ground black pepper. The olive oil will help to keep the fish moist during grilling and contribute to its overall richness.
Taste the marinade and adjust the seasoning as needed. You might want to add a pinch more salt, pepper, or even a touch of sugar to balance the acidity of the lemon. Remember, the marinade should be flavorful but not overpowering. The goal is to complement and enhance the natural taste of the fish, not mask it.
Once you’re satisfied with the flavor, gently pour the marinade over your fish fillets, ensuring they are evenly coated. For optimal flavor penetration, marinate the fish for at least 30 minutes, but ideally for 1-2 hours in the refrigerator. Marinating for longer periods is perfectly fine, but avoid marinating overnight as this can make the fish overly soft and prone to falling apart during grilling.
Important Note: If using a metal bowl, avoid using aluminum as it can react with acidic ingredients in the marinade. Glass or stainless steel bowls are ideal.
Grilling Preparation (Prepping the Grill)
Proper grill preparation is crucial for achieving perfectly grilled fish. Before you even think about placing your fish on the grates, ensure your grill is clean and properly heated. A dirty grill will impart unpleasant flavors to your fish, and uneven heating will lead to inconsistent cooking.
Cleaning the Grill: Begin by thoroughly cleaning your grill grates. If you have a gas grill, turn it on to medium heat for about 10-15 minutes to burn off any food residue. Use a grill brush with stiff bristles to scrub the grates vigorously. Pay special attention to the areas where food tends to stick, such as the edges and corners. For charcoal grills, let the coals burn down to medium-hot embers before cleaning. After brushing, wipe the grates clean with a damp cloth or paper towels. This removes any loose debris and ensures a cleaner grilling surface.
Oiling the Grill Grates: Once clean, lightly oil the grill grates to prevent the fish from sticking. Use a high-smoke-point oil like canola or vegetable oil. Avoid using olive oil, as it has a lower smoke point and can burn at high grill temperatures. You can apply the oil using a paper towel or a clean basting brush. A thin, even coating is sufficient; too much oil can create flare-ups.
Heating the Grill: For gas grills, preheat to medium-high heat (approximately 375-400°F or 190-200°C). This typically takes about 10-15 minutes. You should be able to hold your hand about 6 inches above the grates for only 2-3 seconds – this indicates the grill is hot enough. For charcoal grills, aim for a medium-hot fire with glowing embers. You can achieve this by arranging the coals evenly and allowing them to burn for about 30-45 minutes. Add more charcoal as needed to maintain a consistent temperature.
Testing the Grill Temperature: Before placing your fish on the grill, test the temperature by placing a small piece of fish or vegetable on the grates. If it sizzles immediately, the grill is ready. If it doesn’t sizzle, allow the grill to heat up further. Remember that the cooking time will depend greatly on the thickness of your fish fillets and the heat of your grill. Adjust accordingly.
Setting up the Grill Zone: For even cooking, consider creating two zones on your grill – one hot and one cooler. This is particularly useful for thicker fish fillets. You can sear the fish on the hot zone to create a nice crust, then move it to the cooler zone to finish cooking through. This technique helps prevent burning while ensuring the fish is cooked all the way through.
Grilling Technique
Grilling fish requires a gentle touch and careful attention to prevent it from sticking or overcooking. The key is to achieve perfectly cooked, flaky fish with delicious grill marks. We’ll be using a medium-high heat for this recipe, but always adjust based on your grill and the thickness of your fish fillets.
First, ensure your grill grates are clean and well-oiled. A lightly oiled surface prevents sticking. Use a high-smoke-point oil like canola or vegetable oil. Brush the grates with about 1 tablespoon of oil using a grill brush or paper towel held with tongs. Preheat your grill to medium-high heat (approximately 375-400°F or 190-200°C). You should be able to hold your hand about 6 inches above the grates for 4-5 seconds before it gets too hot.
Once the grill is hot, carefully place your fish fillets on the preheated grates. Avoid overcrowding the grill; leave some space between the fillets for even cooking. Overcrowding will lower the temperature and result in steaming rather than grilling. For a typical 6-ounce fish fillet, allow approximately 4-6 inches of space around it.
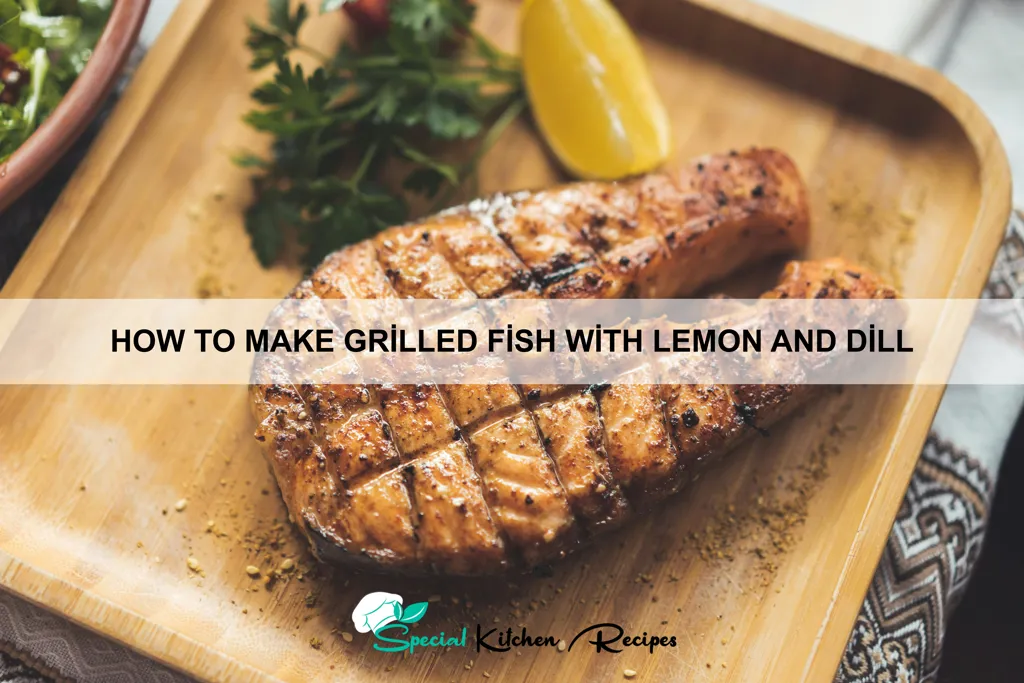
Grill the fish for 3-4 minutes per side, or until it is cooked through and flakes easily with a fork. The cooking time will depend on the thickness of your fillets; thicker fillets will require longer cooking time. Use a spatula to gently check for doneness. If the fish sticks, it’s not ready; give it another minute or two. If it flakes easily, it’s perfectly cooked.
Avoid pressing down on the fish with the spatula while it cooks, as this will squeeze out the juices and make it dry. Instead, use gentle, smooth movements to check for doneness and to carefully turn the fillets. To prevent sticking, gently loosen the fish with the spatula before flipping.
For extra flavor, you can baste the fish halfway through cooking with the lemon-dill mixture. This adds moisture and enhances the flavor profile. Simply brush the mixture over the fillets using a basting brush. Remember to be gentle to prevent breaking the fish.
Once cooked, remove the fish from the grill immediately and transfer it to a serving plate. Let it rest for a couple of minutes before serving. This allows the juices to redistribute, resulting in a more tender and flavorful fish.
Remember to always monitor your grill and adjust the heat as needed. If the fish is cooking too quickly, reduce the heat slightly. If it’s cooking too slowly, increase the heat. With practice, you’ll become more adept at grilling fish to perfection.
Recommendations
For the best results, ensure your fish is fresh and of high quality. Look for firm flesh with a bright, clear appearance and a mild, pleasant aroma. Different types of fish will have varying cooking times, so adjust accordingly based on thickness and type. Using a meat thermometer is highly recommended to ensure the fish is cooked through to a safe internal temperature of 145°F (63°C).
Serving suggestions are plentiful! This grilled fish with lemon and dill is delightful served with a simple side salad of mixed greens, cherry tomatoes, and cucumbers, dressed with a light vinaigrette. Alternatively, a vibrant quinoa or couscous salad adds a healthy and flavorful element. Roasted vegetables like asparagus, zucchini, and bell peppers also pair beautifully with the grilled fish. For a more substantial meal, consider serving it with crusty bread to soak up the delicious pan juices.
Storage: Leftover grilled fish should be stored in an airtight container in the refrigerator for up to 2 days. Reheat gently in a microwave or oven to avoid drying it out. Freezing is also an option; wrap the fish tightly in freezer-safe plastic wrap or aluminum foil and store for up to 3 months.
Complementary dishes to enhance your meal include a refreshing lemon-herb sauce, a zesty chimichurri, or a creamy dill sauce. A side of lemon wedges allows for extra zesty flavor. For a touch of spice, consider a sprinkle of red pepper flakes.
Nutritional Information (per serving, approximate values will vary depending on fish type and portion size): Calories: 200-300; Protein: 25-35g; Fat: 5-15g; Carbohydrates: 5-10g. This dish is a great source of lean protein and omega-3 fatty acids, contributing to overall health and well-being. Note: These are estimates and may vary depending on the specific ingredients and portion sizes used.
Remember to adjust seasoning to your personal preference. Experiment with different herbs and spices to create your own unique flavor combinations. Enjoy!