The fresh fruit tart, a seemingly simple yet elegant dessert, boasts a surprisingly rich history interwoven with various cultures. While pinpointing its exact origin is difficult, evidence suggests variations existed across Europe for centuries. Ancient Roman and Greek civilizations enjoyed pastries filled with fruits and honey, laying the groundwork for what we recognize today. The evolution of the tart, however, is largely tied to the development of pastry techniques and readily available seasonal fruits. The French, particularly, played a significant role in refining the tart’s form and presentation, elevating it from a rustic peasant treat to a sophisticated culinary creation.
The 17th and 18th centuries saw a rise in the popularity of elaborate pastries in French courtly life, influencing the development of the tart’s delicate crusts and artistic fruit arrangements. The precise recipe and design of a fruit tart varied significantly depending on region and season, demonstrating the dessert’s adaptability and its reflection of local agricultural bounty. The introduction of new world fruits during the Age of Exploration further enriched the possibilities, leading to the inclusion of ingredients like exotic citrus fruits and berries previously unavailable in Europe.
Today, the fresh fruit tart remains a beloved dessert worldwide, enjoying immense popularity across various occasions. Statistics show that fruit tarts account for a significant percentage of dessert sales in many bakeries and cafes globally, emphasizing its enduring appeal. Beyond its commercial success, the fruit tart also holds cultural significance in numerous celebrations, from birthdays and anniversaries to festive gatherings. Its visual appeal, with its vibrant colors and artful arrangement of fresh fruit, makes it an ideal centerpiece for any celebration. The tart’s versatility also allows for infinite customization, reflecting individual preferences and cultural nuances. From classic French preparations to modern interpretations, the fruit tart continues to evolve, adapting to contemporary tastes while remaining a testament to the enduring power of simple, delicious ingredients.
Ingredients and Measurements
This recipe yields one 9-inch fresh fruit tart. Accurate measurements are crucial for a successful tart, so please use a kitchen scale for the best results whenever possible. Volume measurements can be less precise.
For the Sweet Shortcrust Pastry:
- 200g (1 1/2 cups) all-purpose flour, preferably high-protein for a flakier crust. Sifting the flour before measuring ensures consistent results and prevents lumps.
- 100g (1/2 cup + 2 tbsp) unsalted butter, very cold and cubed. Using very cold butter is key to achieving a tender crust.
- 50g (1/4 cup + 1 tbsp) icing sugar, sifted. Sifting prevents lumps and ensures even sweetness.
- 1 large egg yolk. The yolk adds richness and helps bind the dough.
- 2-3 tbsp ice water. Add the ice water gradually, only until the dough just comes together. Overmixing will result in a tough crust.
- Pinch of salt.
For the Pastry Cream (Crème Pâtissière):
- 300ml (1 1/4 cups) whole milk. Use whole milk for richness and creaminess.
- 1/4 cup (35g) granulated sugar.
- 1/4 cup (20g) all-purpose flour. Ensure the flour is thoroughly whisked into the milk mixture to avoid lumps.
- 3 large egg yolks. Whisk the yolks well before adding them to the milk mixture.
- 1 tsp vanilla extract.
- 2 tbsp unsalted butter, cut into small pieces.
For the Fruit Filling:
- Assorted fresh fruits (berries, kiwi, peaches, etc.), approximately 400g total. Choose fruits that are ripe but firm enough to hold their shape. Wash and thoroughly dry all fruits before using.
- 2 tbsp apricot jam, melted (for glazing).
Optional: You may also want to add a sprinkle of powdered sugar for extra sweetness and visual appeal once the tart is assembled and the glaze has set.
Note: These measurements are guidelines. You can adjust the amount of fruit to your liking. Remember to always taste and adjust sweetness to your preference.
Crust Preparation
Creating a perfect tart crust is crucial for a delicious fresh fruit tart. This recipe uses a classic sweet pastry dough, but feel free to experiment with variations like almond flour or gluten-free blends.
Ingredients:
- 1 ½ cups (190g) all-purpose flour, plus extra for dusting
- ½ teaspoon salt
- ½ cup (113g) unsalted butter, very cold and cubed
- ¼ cup (50g) granulated sugar
- 2-4 tablespoons ice water
Instructions:
1. Combine Dry Ingredients: In a large bowl, whisk together the flour and salt. This ensures even distribution and prevents pockets of saltiness in your crust.
2. Cut in Butter: Add the cold, cubed butter to the flour mixture. Using a pastry blender or your fingertips, cut the butter into the flour until the mixture resembles coarse crumbs. Avoid overmixing, as this will develop the gluten and result in a tough crust. Work quickly to keep the butter cold.
3. Add Sugar: Stir in the granulated sugar. The sugar adds sweetness and helps to tenderize the crust.
4. Incorporate Water: Gradually add the ice water, one tablespoon at a time, mixing gently with a fork. Do not add all the water at once. The dough should just come together; it shouldn’t be sticky. If it’s too dry, add more water; if it’s too wet, add a little more flour.
5. Form the Dough: Once the dough is formed, gently gather it into a disc. Wrap the disc tightly in plastic wrap and refrigerate for at least 30 minutes. This chilling step allows the gluten to relax and prevents shrinkage during baking.
6. Roll and Bake (or Blind Bake): On a lightly floured surface, roll out the chilled dough into a circle slightly larger than your tart pan. Carefully transfer the dough to the pan, pressing it gently into the bottom and up the sides. Trim any excess dough. For a crispier crust, you can blind bake the crust by lining it with parchment paper and pie weights or dried beans before baking at 375°F (190°C) for 15-20 minutes. If not blind baking, bake the crust with your fruit filling according to the recipe instructions.
Professional Tip: For a truly flaky crust, use a combination of cold butter and shortening. The shortening adds tenderness, while the butter contributes flavor and flakiness.
Fruit Selection and Preparation
The success of your fresh fruit tart hinges significantly on the quality and preparation of your fruit. Choosing ripe, flavorful fruit is paramount. For a 9-inch tart, you’ll need approximately 3-4 cups of fruit, depending on the type and size. A mix of berries, stone fruits, and/or citrus works beautifully, offering a variety of textures and flavors.
Berry Selection: Strawberries, raspberries, blueberries, and blackberries are classic choices. Select berries that are plump, firm, and free from bruises or mold. Avoid berries that are overly soft or have a dull appearance. Gently rinse your berries under cool water just before using, and pat them dry with a clean kitchen towel. Over-washing can make them soggy.
Stone Fruit Selection: Peaches, nectarines, plums, and apricots are excellent additions. Choose fruits that are slightly soft to the touch but not mushy. Look for fruits with vibrant color and a pleasant aroma. Wash and thoroughly dry the stone fruit. Depending on the fruit and your preference, you can either slice them thinly (about 1/8 inch thick) or cut them into smaller, bite-sized pieces. Removing the pits is, of course, essential!
Citrus Selection: Citrus fruits like oranges, mandarins, or grapefruit add a refreshing zest to your tart. Select fruits that are heavy for their size and have smooth, unblemished skin. Peel the citrus fruit and segment it, removing any membranes. You can use a small knife or a citrus zester for this task. Consider using only the segments, and reserving some zest for sprinkling over the finished tart for added flavor.
General Preparation Tips: Regardless of the fruit you choose, it’s crucial to remove any stems or leaves before using them. If you are using a mix of fruits with varying levels of moisture, it’s a good idea to arrange them on a wire rack to allow excess moisture to drain before placing them on the tart shell. This will prevent a soggy bottom. Prepare your fruit just before assembling the tart for optimal freshness and to prevent discoloration. For fruits prone to browning (like apples or pears), consider tossing them with a little lemon juice to help preserve their color.
Quantity Considerations: The quantity of fruit you need will depend on the size of your tart shell and your desired fruit-to-custard ratio. For a visually appealing tart, aim for a generous layer of fruit that completely covers the pastry. Don’t be afraid to experiment with different combinations of fruits to create your signature tart!
Filling Preparation (if applicable)
The filling for your fresh fruit tart is as crucial as the pastry itself. A well-made filling complements the fruit and provides a delightful textural contrast. The type of filling will depend on your chosen fruits and personal preference. Here are a few popular options and how to prepare them:
Option 1: Classic Pastry Cream ( Crème Pâtissière): This creamy, custard-like filling is a timeless choice. It provides a rich and subtly sweet base for your fruit. For a tart with a 9-inch diameter crust, you’ll need:
- 1 cup whole milk
- 1/4 cup granulated sugar
- 1/4 cup all-purpose flour
- 1/4 teaspoon salt
- 3 large egg yolks
- 1 teaspoon vanilla extract
Instructions: Whisk together the sugar, flour, and salt in a medium saucepan. Gradually whisk in the milk until smooth. In a separate bowl, whisk the egg yolks. Slowly temper the warm milk mixture into the egg yolks, whisking constantly to prevent scrambling. Pour the mixture back into the saucepan and cook over medium heat, stirring constantly, until the cream thickens enough to coat the back of a spoon (about 5-7 minutes). Remove from heat, stir in the vanilla extract, and transfer to a bowl. Cover the surface directly with plastic wrap to prevent a skin from forming and chill completely before using.
Option 2: Simple Fruit Curd: A lighter alternative to pastry cream, fruit curd offers a bright, tangy complement to sweeter fruits. For a lemon curd (easily adaptable to other citrus fruits), you would need:
- 1 cup granulated sugar
- 1/2 cup fresh lemon juice
- 4 large eggs
- 6 tablespoons (3 ounces) unsalted butter, cut into cubes
- Zest of 1 lemon
Instructions: Whisk together the sugar, lemon juice, eggs, and lemon zest in a heatproof bowl. Set the bowl over a saucepan of simmering water (double boiler), making sure the bottom of the bowl doesn’t touch the water. Whisk constantly until the mixture thickens enough to coat the back of a spoon (about 10-15 minutes). Remove from heat and whisk in the butter, one cube at a time, until melted and incorporated. Strain the curd through a fine-mesh sieve for a smoother texture. Cool completely before using.
Option 3: No-Bake Filling: For a quicker option, consider a simple whipped cream or mascarpone cheese-based filling. Be mindful of using a filling that complements the tart’s overall flavor profile and won’t overpower the delicate taste of fresh fruit. Always ensure your filling is completely chilled before assembling the tart to prevent the pastry from becoming soggy.
Important Note: Regardless of the filling you choose, allow it to cool completely before adding the fruit. This prevents the pastry from becoming soggy and ensures a delightful eating experience.
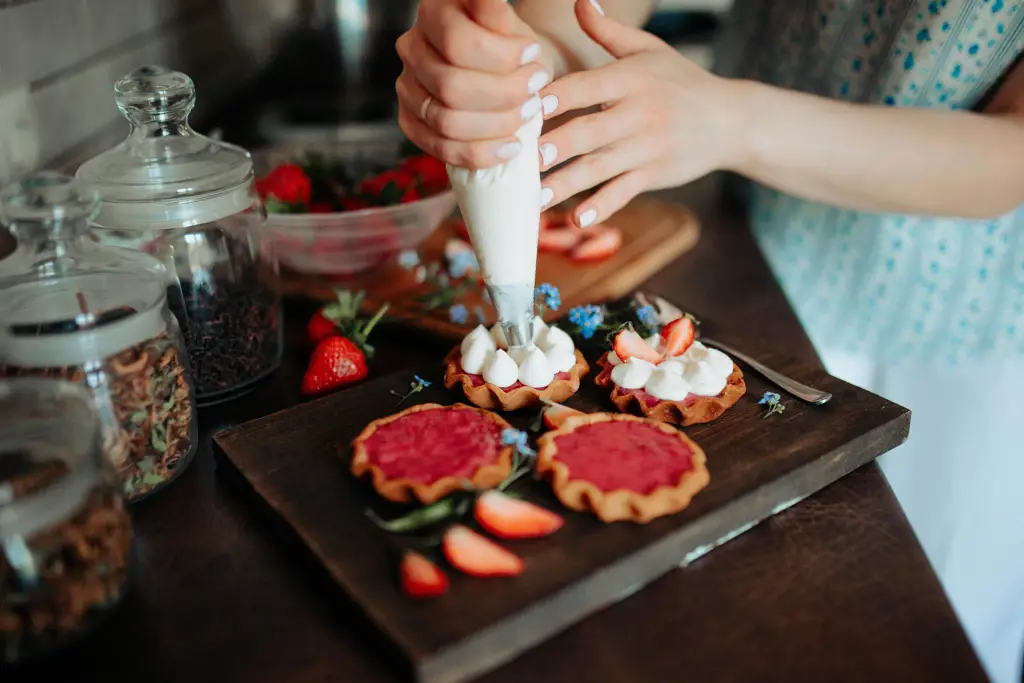
Tart Assembly
With your pre-baked tart shell and your prepared fruit, it’s time to assemble your masterpiece! This stage requires a gentle hand and attention to detail for a beautiful and delicious result. Begin by ensuring your tart shell is completely cool. A warm shell will cause the pastry cream to melt and become runny.
Prepare your pastry cream: If you haven’t already, make your pastry cream according to your recipe. Allow it to cool completely before filling the tart shell. This prevents the pastry cream from becoming watery or separating. A good pastry cream will be thick enough to hold its shape but still spreadable.
Filling the tart shell: Once cooled, gently spoon the pastry cream into the tart shell, spreading it evenly to within about ½ inch of the edge. Use a small offset spatula or the back of a spoon to create a smooth, even layer. Don’t overfill; leaving a little space around the edge allows room for the fruit and prevents overflow.
Arranging the fruit: The arrangement of your fruit is key to the tart’s visual appeal. Consider the colors, sizes, and shapes of your fruit. For a classic look, start with larger fruits in the center and work your way outwards with progressively smaller fruits. You can arrange the fruit in concentric circles, radiating lines, or a more random, yet aesthetically pleasing pattern. Experiment with different arrangements to find your favorite style.
Fruit selection and preparation: Choose ripe but firm fruits. Soft fruits tend to release more juice and might make the pastry soggy. Before arranging, wash and thoroughly dry all your fruits. For some fruits, like berries, you may want to gently remove the stems or any blemishes. For larger fruits like peaches or nectarines, you can slice them thinly or fan them out for a more elegant presentation. Use approximately 2 cups of assorted fresh fruit for a 9-inch tart. Adjust accordingly for different tart sizes.
Finishing touches: Once the fruit is arranged, you can add a final touch, such as a dusting of powdered sugar or a drizzle of fruit glaze. This not only enhances the visual appeal but also adds a subtle sweetness and shine. If you are using particularly juicy fruits, you might consider brushing the arranged fruit lightly with apricot glaze to help prevent them from releasing too much liquid. Refrigerate the assembled tart for at least 30 minutes before serving to allow the flavors to meld and the pastry cream to set completely.
Remember, the assembly process is where your creativity shines. Don’t be afraid to experiment with different fruit combinations and arrangements to create a unique and stunning tart.
Baking Instructions (if applicable)
This section details the baking instructions for the tart shell, assuming you’re using a homemade pastry crust. If using a store-bought pre-made crust, skip this section and proceed directly to the assembly instructions.
Preheat your oven to 375°F (190°C). This ensures even baking and a perfectly crisp crust. Before placing the tart shell in the oven, it’s crucial to blind bake the crust. This prevents a soggy bottom and allows the pastry to develop its characteristic flavor and texture.
To blind bake, line the tart shell with parchment paper and fill it completely with pie weights or dried beans. Use enough weights to cover the entire surface; this prevents the crust from puffing up during baking. Baking time will vary depending on your oven and the thickness of your crust, but generally, you should bake for 15-20 minutes, or until the edges are lightly golden brown.
Remove the pie weights and parchment paper after the initial baking. If the crust looks slightly underbaked, return it to the oven for another 5-7 minutes, keeping a close eye on it to prevent burning. Prick the bottom of the crust with a fork several times before blind baking to release steam and prevent excessive puffing.
Once the crust is baked, remove it from the oven and let it cool completely on a wire rack. This is a crucial step as a hot crust will melt the filling. Allowing the crust to cool completely prevents a runny filling and ensures the tart holds its shape beautifully.
If your recipe calls for a pre-baked tart shell that requires further baking after the filling is added (e.g., a custard tart), follow the specific instructions provided in your recipe. Baking times and temperatures will vary depending on the filling. Always check for doneness by gently shaking the tart; if the filling is set, it’s ready. Overbaking can lead to a dry crust and a cracked filling, so it’s essential to monitor closely.
Remember to always use an oven thermometer to ensure your oven is at the correct temperature. Oven temperatures can fluctuate, so using a thermometer provides accurate readings and helps you achieve consistent results.
Recommendations
For the best results, use high-quality, ripe fruits. Slightly underripe fruits will work, but they may not have the same vibrant flavor and texture as fully ripe ones. Avoid using overly ripe fruits, as they may be too soft and prone to breaking down. Consider seasonal fruits for the most intense flavor and affordability. Experiment with different combinations of fruits to create your own unique tart!
Storage is key to maintaining freshness. Once assembled, the tart should be refrigerated for optimal preservation. It’s best enjoyed within 2-3 days of making it. To prevent the crust from becoming soggy, avoid storing it in an airtight container; a loosely covered container or plastic wrap will suffice. If making the tart ahead of time, assemble it the day before serving for the best flavor and texture.
Serving suggestions are plentiful! This tart is a beautiful dessert on its own, perfect for a special occasion or an afternoon treat. Consider serving slices with a dollop of whipped cream or a scoop of vanilla ice cream for an extra touch of decadence. A drizzle of crème anglaise or a light dusting of powdered sugar also elevates the presentation and taste. For a sophisticated touch, pair it with a glass of chilled sparkling wine or rosé.
Complementary dishes include a light salad with vinaigrette dressing as a palate cleanser, or a simple cheese plate with crackers to balance the sweetness of the fruit. The tart’s bright fruit flavors pair well with lighter dishes, avoiding heavy or overly rich options which might clash with the tart’s delicate nature.
Nutritional Information (per serving, approximate; will vary based on fruit and crust recipe): Calories: 350-450; Fat: 15-25g; Saturated Fat: 5-10g; Cholesterol: 20-40mg; Sodium: 50-100mg; Carbohydrates: 50-70g; Sugar: 30-45g; Protein: 3-5g. Note: These are estimates and may vary significantly depending on the specific ingredients used. For more accurate nutritional information, use a nutritional calculator with your exact recipe details.
Remember to always practice safe food handling! Wash your hands thoroughly before handling ingredients and ensure all surfaces are clean. Refrigerate the tart promptly after preparation to minimize the risk of bacterial growth.