Prepare to embark on a culinary journey to the vibrant streets of the Middle East and the Mediterranean, where the humble yet incredibly flavorful falafel reigns supreme. This deep-fried chickpea fritter isn’t just a delicious snack; it’s a cornerstone of many cultures, boasting a history as rich and complex as its taste. While pinning down the exact origin is difficult, evidence points to Egypt as a possible birthplace, with some believing its roots stretch back to ancient times. Early forms likely involved fava beans rather than chickpeas, reflecting the readily available ingredients of the region. However, the chickpea-based falafel we know and love today is largely associated with the Levantine region, particularly Egypt, Lebanon, Israel, Palestine, and Jordan.
The rise of falafel’s popularity is intertwined with religious and cultural practices. As a vegetarian and relatively inexpensive protein source, it became a staple food for many communities, including those observing religious fasts or adhering to specific dietary restrictions. Its adaptability also contributed to its widespread appeal. Different regions boast unique variations, with subtle differences in the spice blends, the type of beans used (occasionally fava beans are still incorporated), and even the frying technique. This culinary diversity is a testament to its enduring legacy and its ability to adapt to local tastes and traditions. Today, falafel is a global phenomenon, enjoyed by millions across the world, a testament to its simple yet irresistible flavor profile. You’ll find it in dedicated falafel shops, street food stalls, and even high-end restaurants, a true testament to its versatility.
Beyond its deliciousness, falafel offers a fascinating glimpse into culinary history and cultural exchange. Statistics show a significant increase in the consumption of falafel worldwide in recent years, reflecting its growing popularity as a healthy and delicious vegetarian option. Its presence in various cuisines highlights the power of food to transcend borders and unite people through shared culinary experiences. Moreover, the simple act of making falafel from scratch allows you to connect with this rich history and create a dish infused with tradition and personal touch. This recipe will guide you through the process, providing you with the tools and knowledge to craft authentic falafel, brimming with the flavors of the Middle East and Mediterranean.
Ingredients and Measurements
Creating delicious falafel from scratch requires precise measurements and high-quality ingredients. The success of your falafel hinges on achieving the right balance of flavors and textures, so pay close attention to these details.
Dried Chickpeas (1 cup): This is the foundation of your falafel. Using dried chickpeas, rather than canned, allows for greater control over the texture and flavor. Ensure your chickpeas are dried and not pre-cooked. Soaking them properly is crucial for achieving a soft and fluffy interior. Measure one cup of dried chickpeas using a standard measuring cup, not a heaping one. Improper measuring can significantly affect the final consistency.
Water (Enough to cover chickpeas by 2 inches): The soaking process is essential for softening the chickpeas. Use enough cold water to completely submerge the chickpeas, leaving at least 2 inches of water above the surface. This ensures even hydration. Soaking time is typically 8-12 hours, or overnight in the refrigerator. Discard the soaking water before proceeding to the next step; this removes any bitter compounds and helps create a cleaner flavor.
Onion (1 medium, finely chopped): A medium-sized onion adds a sharp, savory element to the falafel. Finely chopping the onion ensures it’s evenly distributed throughout the mixture. Using a food processor can help achieve a consistent texture, but be careful not to over-process, which can release too much moisture.
Garlic (4 cloves, minced): Fresh garlic is essential for a robust flavor profile. Four cloves provide a good balance of garlic pungency without overpowering the other ingredients. Mince the garlic finely for even distribution and to prevent large chunks from appearing in the finished falafel.
Fresh Parsley (1 cup, packed): Fresh parsley provides a bright, herbaceous note that complements the other flavors. Use tightly packed, fresh parsley; wilted parsley will lack flavor and moisture. Roughly chop the parsley before adding it to the mixture; finely chopping can release too much moisture and make the mixture too wet.
Fresh Cilantro (½ cup, packed): Similar to parsley, cilantro adds a distinct, slightly citrusy flavor. Again, use tightly packed fresh cilantro. The combination of parsley and cilantro is essential for authentic falafel flavor. Roughly chop the cilantro, mirroring the parsley preparation.
Ground Coriander (1 tablespoon): Ground coriander adds a warm, earthy spice that enhances the overall flavor. Use freshly ground coriander for the best results. Avoid using pre-ground coriander that may have lost its potency.
Ground Cumin (1 tablespoon): Ground cumin complements the coriander, adding a slightly smoky and pungent note. Similar to coriander, use freshly ground cumin for optimal flavor.
Baking Powder (1 teaspoon): Baking powder acts as a leavening agent, creating a light and airy texture in the falafel. Do not substitute baking soda as it will result in a different flavor and texture.
Salt (1 teaspoon, or to taste): Salt enhances the flavors of all the ingredients. Adjust to your taste preference. Start with 1 teaspoon and add more gradually until you achieve the desired level of saltiness.
Vegetable Oil (for frying): Use a high-smoke-point oil like canola, vegetable, or sunflower oil for frying the falafel. You’ll need enough oil to completely submerge the falafel balls. Ensure the oil is heated to the correct temperature (around 350°F/175°C) before frying to avoid soggy falafel.
Soaking and Preparing the Dried Chickpeas
Making truly delicious falafel starts with properly preparing the dried chickpeas. This crucial step significantly impacts the final texture and flavor of your falafel. Don’t skip it! We’ll be using 1 cup of dried chickpeas for this recipe, yielding approximately 2 ½ cups of cooked chickpeas.
The first, and most important step, is thorough rinsing. Rinse your 1 cup of dried chickpeas under cold running water for at least 1 minute. This removes any debris, dust, or small stones that might be present. Be sure to check for any damaged or discolored chickpeas and discard them. These can affect the overall taste and texture.
Soaking is essential for optimal cooking and digestibility. Place the rinsed chickpeas in a large bowl and cover them with at least 4 cups of cold water. Add a generous pinch of baking soda (about ½ teaspoon) to the soaking water. The baking soda helps to soften the chickpeas and reduce cooking time. It also helps neutralize any phytic acid, which can inhibit nutrient absorption and contribute to gas. Cover the bowl with plastic wrap or a lid and let the chickpeas soak in the refrigerator for at least 8 hours, or preferably overnight (12-24 hours). This extended soaking time ensures that the chickpeas are fully hydrated and will cook more evenly.
After soaking, you’ll notice the chickpeas have significantly increased in size. Drain the soaking water completely. Give the chickpeas another quick rinse under cold water to remove any remaining baking soda.
Now it’s time to cook the chickpeas. You have two main options: boiling or pressure cooking. Boiling is a simpler method, but pressure cooking significantly reduces cooking time. For boiling, place the soaked chickpeas in a large pot and cover them with fresh water (about 6 cups). Bring the water to a boil, then reduce the heat to low, cover, and simmer for approximately 60-90 minutes, or until the chickpeas are very tender and easily mashed between your fingers. Check for doneness periodically.
For pressure cooking, add the soaked chickpeas and 4 cups of water to your pressure cooker. Cook on high pressure for 20-25 minutes, followed by a natural pressure release for at least 15 minutes. Then carefully release any remaining pressure manually. The chickpeas should be incredibly tender.
Once the chickpeas are cooked, drain them thoroughly. Allow them to cool slightly before proceeding with the next step of the falafel recipe. Properly soaked and cooked chickpeas are paramount for creating a wonderfully smooth and flavorful falafel. Don’t rush this process; take your time to ensure perfect results!
Making the Falafel Mixture (including blending and seasoning)
Creating the perfect falafel mixture is the cornerstone of delicious, crispy falafel. This section details the process, from preparing the ingredients to achieving the ideal consistency for optimal frying.
Begin by gathering your ingredients: 1 cup dried chickpeas (soaked overnight or for at least 8 hours in plenty of cold water), 1/2 cup finely chopped fresh parsley, 1/4 cup finely chopped fresh cilantro, 1 medium yellow onion, roughly chopped, 2 cloves garlic, roughly chopped, 1 teaspoon ground cumin, 1 teaspoon ground coriander, 1/2 teaspoon baking powder (this is crucial for achieving a light and airy texture), 1/2 teaspoon salt, 1/4 teaspoon black pepper, and 1/4 cup ice water (or more, as needed).
Thoroughly draining the soaked chickpeas is paramount. Any excess water will make the mixture too wet, resulting in soggy falafel. After draining, give the chickpeas a quick rinse.
Now, it’s time to blend. Add the drained chickpeas, parsley, cilantro, onion, and garlic to a food processor. Pulse several times, initially, to roughly chop the ingredients. This prevents the motor from being overloaded and ensures even processing. Then, process continuously until a coarse paste forms. Don’t over-process; you want some texture remaining. Over-processing will create a smooth, dense paste, leading to tough falafel.
With the motor running, gradually add the cumin, coriander, baking powder, salt, and pepper. Process for another 30 seconds to 1 minute, ensuring all the spices are evenly distributed. The mixture should be relatively thick but still workable.
Now, carefully add the ice water, a tablespoon at a time, while pulsing the food processor. The ice water is essential for maintaining a cool mixture, which helps prevent the falafel from becoming gummy. The goal is to achieve a consistency that holds its shape but isn’t too dry or crumbly. Add more ice water, if necessary, until you reach the desired consistency. It’s better to err on the side of slightly drier than too wet.
Taste the mixture and adjust the seasoning as needed. You may want to add more salt, pepper, or spices to suit your preference. Once you are satisfied with the flavour and consistency, transfer the mixture to a bowl and cover it. Allow it to rest in the refrigerator for at least 30 minutes. This resting period allows the flavours to meld and the mixture to firm up slightly, making it easier to shape the falafel.
Important Note: The quality of your ingredients directly impacts the final product. Use fresh herbs for the best flavour and aroma. If using canned chickpeas, ensure they are well-drained and rinsed before blending.
Shaping the Falafel Balls
Shaping the falafel balls is crucial for achieving perfectly crispy exteriors and evenly cooked interiors. The size and consistency of your balls directly impact the final texture and taste. This section will guide you through the process, ensuring you create consistently beautiful and delicious falafel.
Before you begin shaping, ensure your falafel mixture is well-chilled. This is incredibly important. A cold mixture is much easier to handle and will prevent the balls from becoming too sticky or falling apart during frying. Ideally, chill your mixture in the refrigerator for at least 30 minutes, or even up to 2 hours.
Once chilled, lightly dampen your hands with cold water. This will prevent the mixture from sticking to your hands, making the shaping process much smoother. Avoid using too much water, as this can make the mixture too wet and difficult to work with. A few drops on each hand should suffice.
Now, it’s time to start shaping. Take approximately 1.5 to 2 tablespoons of the falafel mixture – this should yield a ball roughly 1.5 inches in diameter. Consistency is key; aim for uniform ball sizes for even cooking. Using a consistent amount of mixture ensures all the falafel balls cook at the same rate.
Gently roll the mixture between your palms, creating a smooth, round ball. Avoid squeezing too tightly, as this can compact the mixture and result in dense, less crispy falafel. A light touch is essential here; you want to form a ball, not a dense patty.
As you shape each ball, place it on a plate or tray lined with parchment paper. This prevents the balls from sticking together and makes it easier to transfer them to the hot oil later. Continue shaping the remaining mixture, ensuring all the balls are roughly the same size and shape. If you find the mixture too sticky even with damp hands, consider adding a tablespoon or two of extra chickpea flour. This will help absorb excess moisture.
Before frying, take a moment to inspect your falafel balls. If any appear cracked or misshapen, gently reshape them. This is your last chance to ensure even cooking and a beautiful presentation. Remember, neat and uniform falafel balls are not only aesthetically pleasing but also cook more evenly, leading to a superior final product.
Now that your falafel balls are perfectly shaped and ready, you’re one step closer to enjoying delicious homemade falafel. Proceed to the frying instructions for the final step in creating this Middle Eastern culinary delight.
Deep Frying or Baking the Falafel
Once your falafel mixture is prepared and shaped into balls or patties, you have a choice of cooking methods: deep frying for a crispy exterior and soft interior, or baking for a healthier, slightly less crispy alternative. Both methods have their merits, and the best choice depends on your preferences and dietary goals.
Deep Frying: The Classic Approach
Deep frying delivers the quintessential falafel experience – that incredibly crisp, golden-brown exterior with a wonderfully soft and fluffy interior. For deep frying, you’ll need about 2-3 cups of vegetable oil (such as canola or sunflower oil) with a high smoke point. Heat the oil in a large, heavy-bottomed pot or deep fryer to 350°F (175°C). Use a thermometer to monitor the temperature precisely; this is crucial for even cooking and preventing burning.
Important Note: Never overcrowd the pot. Adding too many falafel balls at once will lower the oil temperature, resulting in greasy, undercooked falafel. Fry in batches, ensuring each falafel ball has ample space around it. Fry for approximately 3-4 minutes per batch, turning occasionally with a slotted spoon, until golden brown and cooked through. Remove the falafel with a slotted spoon and place them on a wire rack lined with paper towels to drain excess oil.
Baking: A Healthier Option
Baking falafel is a significantly healthier alternative to deep frying, reducing the overall fat content considerably. Preheat your oven to 400°F (200°C). Line a baking sheet with parchment paper for easy cleanup. Arrange the falafel balls or patties in a single layer, leaving some space between each one for even baking.
Pro Tip: For extra crispiness when baking, lightly brush the falafel with olive oil before placing them in the oven. You can also add a tablespoon of baking powder to your falafel mixture to enhance the texture, promoting a lighter and crisper result when baked. Bake for 20-25 minutes, flipping halfway through, until golden brown and cooked through. The baking time might vary depending on the size of your falafel and your oven.
Choosing Your Method:
While deep frying offers the most traditional, crispy texture, baking offers a healthier, lighter alternative that’s still incredibly delicious. If you’re watching your calorie intake or prefer a less greasy option, baking is the way to go. However, if you crave that intensely crisp exterior and are less concerned about fat content, deep frying will deliver the ultimate falafel experience. Experiment with both methods to determine your personal preference.
Regardless of the method you choose, always ensure the falafel are cooked through before serving. A properly cooked falafel will be firm to the touch and have a golden-brown color.
Serving Suggestions (including sauces and accompaniments)
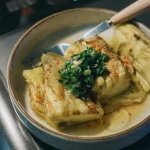
Your homemade falafel, bursting with flavor and texture, deserves a presentation that matches its deliciousness. The possibilities for serving are endless, allowing you to cater to different tastes and preferences. Here are some ideas to elevate your falafel experience.
Classic Pita Pockets: The quintessential way to enjoy falafel! Warm pita bread (about 4-6 inch diameter) provides the perfect vessel. For optimal taste, warm the pita in a dry pan or oven for a few minutes until soft and pliable. Fill each pita with 3-4 falafel balls, a generous dollop of your favorite sauce (see below), and a selection of fresh toppings. Aim for a balance of textures and flavors.
Sauces: A well-chosen sauce can make or break a falafel dish. Experiment with these options:
- Tahini Sauce (Classic): Whisk together 1/4 cup tahini, 2 tablespoons lemon juice, 1 tablespoon water (add more for desired consistency), 1 clove garlic (minced), and salt to taste. A drizzle of olive oil adds richness.
- Spicy Harissa Sauce: Use store-bought harissa paste or make your own. Mix 1-2 tablespoons of harissa paste with 2 tablespoons of plain yogurt or mayonnaise for a creamy, spicy kick. Adjust the amount of harissa to control the heat level.
- Tzatziki Sauce (Refreshing): Combine 1 cup plain Greek yogurt, 1/2 cup grated cucumber (squeeze out excess water), 2 tablespoons chopped fresh dill, 1 clove garlic (minced), 1 tablespoon lemon juice, and salt to taste. Let it sit for at least 30 minutes to allow the flavors to meld.
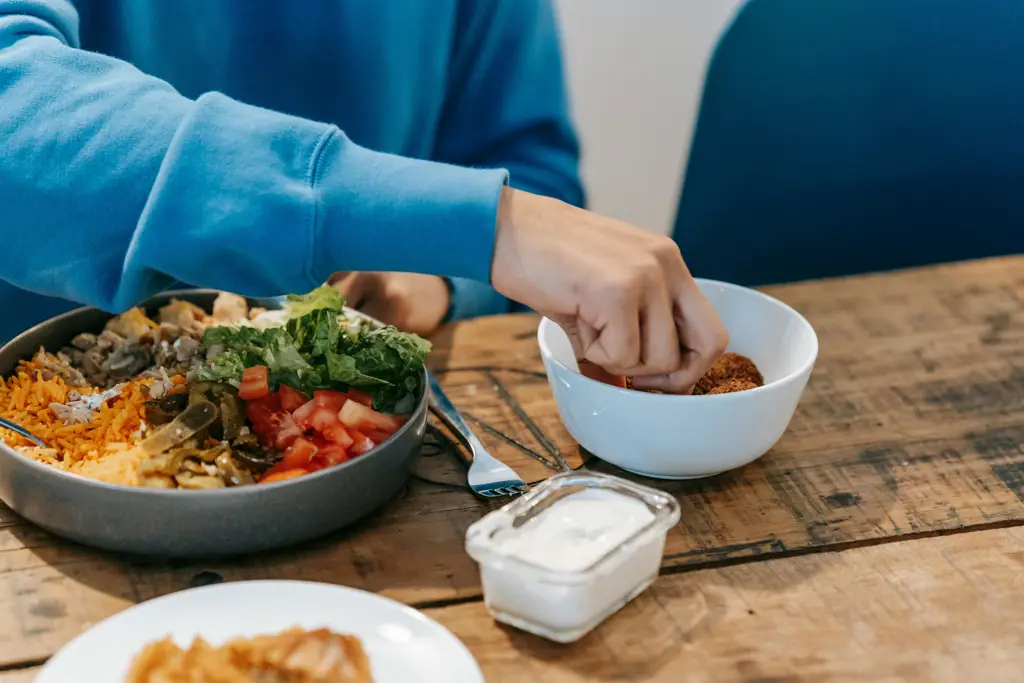
Accompaniments: Don’t underestimate the power of fresh accompaniments to enhance your falafel.
- Hummus: A smooth and creamy base, complementing the falafel beautifully. Use about 2-3 tablespoons per serving.
- Salads: A fresh salad adds crunch and vibrancy. Try a simple Israeli salad with chopped tomatoes, cucumbers, onions, and parsley, dressed with lemon juice and olive oil. A small amount (about 1/2 cup) is ideal.
- Vegetables: Include a variety of fresh vegetables like shredded lettuce, chopped tomatoes, sliced cucumbers, and thinly sliced red onions. Aim for a colorful and textural contrast.
- Pickled Vegetables: Adding a few pickled turnips, carrots, or other vegetables provides a tangy counterpoint to the richness of the falafel and sauces.
- Fresh Herbs: Sprinkle chopped parsley, cilantro, or mint for a refreshing aromatic touch. A tablespoon or two per serving is sufficient.
Serving Suggestions Beyond the Pita:
- Falafel Bowls: Layer falafel balls over a bed of rice or quinoa, topped with your chosen sauces and accompaniments. This is a more substantial and visually appealing option.
- Falafel Wraps: Use large flour tortillas or lavash bread as a wrap, similar to a pita pocket but offering a different texture.
- Falafel Salad: Crumble the falafel into a salad with your favorite greens, vegetables, and a light vinaigrette dressing.
Important Note: Prepare your sauces and accompaniments ahead of time to allow the flavors to develop and make serving easier. Keep your falafel warm, but not overcooked, to maintain its crisp texture and delicious taste. Enjoy!
Recommendations
To achieve the best results when making falafel from scratch, meticulous attention to detail is crucial. Ensure your chickpeas are thoroughly dried before processing; excess moisture can lead to soggy falafel. Don’t over-process the chickpea mixture in the food processor; some texture is desirable. Aim for a coarse, slightly chunky consistency rather than a completely smooth paste. Over-processing will result in dense, less flavorful falafel.
The frying process significantly impacts the final product. Use a generous amount of oil (around 1 inch deep in your pan) to ensure even cooking and a crispy exterior. Maintain a consistent oil temperature; if the oil is too cold, the falafel will absorb excess oil and be greasy. If it’s too hot, the outside will burn before the inside is cooked through. Fry the falafel in batches to avoid overcrowding the pan, which will lower the oil temperature and result in uneven cooking.
Proper seasoning is paramount. Don’t be shy with the spices! Experiment with different blends to find your favorite flavor profile. Fresh herbs, such as parsley and cilantro, add a vibrant freshness. Consider adding a pinch of baking soda to the mixture; it helps create a lighter, fluffier falafel. Allow the mixture to rest for at least 30 minutes after processing; this allows the flavors to meld and the mixture to firm up, leading to better-shaped falafel.
For serving, the possibilities are endless! Classic pita pockets filled with falafel, hummus, tahini sauce, and your favorite vegetables are always a crowd-pleaser. You can also serve falafel in salads, bowls, or as a delicious appetizer with various dips. Consider adding a squeeze of fresh lemon juice just before serving to enhance the flavors and add brightness.
Storage is key to maintaining freshness. Store leftover falafel in an airtight container in the refrigerator for up to 3 days. You can reheat them in a pan with a little oil until crispy, or in the oven at 375°F (190°C) for about 10-15 minutes. Freezing falafel is also an option; simply place them in a freezer-safe bag and freeze for up to 3 months. Reheat frozen falafel directly from frozen in the oven or air fryer.
Complementary dishes that pair beautifully with falafel include various salads (such as fattoush or tabbouleh), hummus, baba ghanoush, Israeli salad, and different types of pita bread. Rice, couscous, or quinoa also make excellent side dishes. Don’t forget about flavorful sauces – tahini sauce, tzatziki, or a simple lemon-herb dressing all enhance the falafel experience.
Nutritional Information (per falafel ball, approximate): Calories: 80-100, Protein: 3-4g, Fat: 5-7g, Carbohydrates: 10-12g, Fiber: 2-3g. Note: This nutritional information is an estimate and can vary depending on the ingredients used and the size of the falafel.
Enjoy your homemade falafel! Remember to experiment with different spices and herbs to create your own unique flavor combinations. The process is rewarding, and the delicious results are well worth the effort.