The classic fruit tart, a seemingly simple yet elegant dessert, boasts a surprisingly rich history interwoven with culinary traditions across Europe. While pinpointing its exact origin is difficult, its foundations lie in the evolution of pastry-making techniques and the increasing availability of seasonal fruits. Early forms of fruit tarts likely emerged in medieval Europe, utilizing readily available fruits and simple crusts. These early iterations were far simpler than the refined versions we enjoy today, often featuring a rustic crust and a less structured arrangement of fruits. The development of more sophisticated pastry techniques, particularly during the French Renaissance, significantly impacted the tart’s evolution. The focus shifted towards creating delicate, flaky crusts and artful fruit presentations.
France, in particular, played a pivotal role in elevating the fruit tart to its current status as a beloved dessert. The French patisserie tradition, with its emphasis on precision and artistry, is arguably responsible for the classic fruit tart’s refined form. The meticulous creation of the tart shell, the careful selection and arrangement of fruits, and the subtle use of glazes and creams all contribute to the dessert’s aesthetic appeal and exquisite flavor. While precise statistics on global fruit tart consumption are hard to come by, its popularity is undeniable, evident in its presence on menus in high-end restaurants and home kitchens alike. The dessert’s enduring appeal likely stems from its versatility; the type and arrangement of fruits can be infinitely varied, allowing for countless creative interpretations.
Beyond its culinary significance, the fruit tart holds cultural importance in many societies. It frequently features in celebratory events, from birthdays and anniversaries to weddings and holidays. Its visual appeal, with its vibrant colors and artful arrangement of fruits, makes it an ideal centerpiece for gatherings and celebrations. In some cultures, specific fruits hold symbolic meaning, adding another layer of significance to the tart’s presentation. For example, the use of strawberries might represent love and romance, while cherries could symbolize happiness and good fortune. The fruit tart therefore transcends its role as a mere dessert; it becomes a symbol of celebration, artistry, and the bounty of nature, reflecting a deep connection between food, culture, and human experience.
This recipe will guide you through the process of creating a classic fruit tart, emphasizing techniques that will help you achieve a professional-looking and delicious result. We will cover everything from creating a perfectly flaky crust to selecting and arranging the fruits for maximum visual impact and flavor. Get ready to embark on a culinary journey that will not only teach you how to make a stunning fruit tart but also deepen your appreciation for this timeless dessert and its rich history.
Ingredients and Measurements
This recipe yields a 9-inch classic fruit tart, perfect for serving 6-8 people. Accurate measurements are crucial for a successful tart, so please use a kitchen scale for the best results, especially for the pastry dough. Volume measurements can be less precise.
For the Sweet Pastry Dough:
- 250g (2 cups) all-purpose flour, preferably high-protein for a flakier crust. Ensure your flour is sifted before measuring for consistent results.
- 125g (1 cup) unsalted butter, very cold and cut into small cubes. Using very cold butter is essential for a tender crust. Consider chilling the butter for at least 30 minutes before starting.
- 60g (1/4 cup + 2 tablespoons) powdered sugar, sifted. Sifting removes lumps and ensures even sweetness.
- 1 large egg yolk, lightly beaten. The egg yolk adds richness and helps bind the dough.
- Pinch of salt. Salt enhances the flavors of the pastry.
- 2-4 tablespoons ice water, added gradually. Add the ice water sparingly, only as needed to bring the dough together. Over-mixing will result in a tough crust.
For the Frangipane Filling:
- 100g (1/2 cup) unsalted butter, softened. Ensure the butter is softened but not melted.
- 100g (3/4 cup) granulated sugar.
- 2 large eggs. Room temperature eggs will incorporate better into the mixture.
- 100g (1 cup) ground almonds. Use finely ground almonds for a smooth filling.
- 20g (2 tablespoons) all-purpose flour. This helps to thicken the frangipane.
- 1 teaspoon almond extract. This enhances the almond flavor of the frangipane.
- Pinch of salt.
For the Fruit Topping:
- Approximately 400g (14 oz) assorted fresh fruit, such as raspberries, blueberries, strawberries, and blackberries. Choose ripe but firm fruits for the best results. Wash and thoroughly dry the fruit before using.
- 1-2 tablespoons apricot jam, melted (optional, for glazing). This adds a beautiful shine and preserves the fruit’s color.
- Powdered sugar, for dusting (optional). A light dusting of powdered sugar adds a touch of elegance.
Important Note: These measurements are guidelines. You may need to adjust the amount of ice water for the pastry dough depending on the humidity and the type of flour used. Similarly, the amount of fruit can be adjusted based on your preference and the size of your tart pan.
Pastry Crust Preparation
Creating a flawless pastry crust is paramount to a successful fruit tart. This section details the process of making a classic sweet pastry dough, ensuring a tender, flaky crust that perfectly complements the fruit filling. We’ll be making enough dough for a 9-inch tart pan.
Ingredients:
- 2 ½ cups (300g) all-purpose flour, plus more for dusting
- 1 tsp salt
- 1 cup (2 sticks, 227g) unsalted butter, very cold and cubed
- ½ cup (113g) cold vegetable shortening, cubed
- 6-8 tablespoons (85-115g) ice water
Instructions:
1. Whisk Dry Ingredients: In a large bowl, whisk together the flour and salt. This ensures even distribution of salt throughout the dough, preventing pockets of intense saltiness. Thoroughly combining the dry ingredients is crucial for a consistent crust.
2. Cut in Fats: Add the cold, cubed butter and shortening to the flour mixture. Using a pastry blender or your fingertips, cut the fats into the flour until the mixture resembles coarse crumbs. Work quickly and efficiently to prevent the butter from melting. The goal is to have pea-sized pieces of fat incorporated throughout the dough. Over-mixing at this stage will result in a tough crust.
3. Add Ice Water Gradually: Slowly add the ice water, one tablespoon at a time, mixing gently with a fork. Do not overmix. The dough should just come together. If it seems too dry, add more water, a tablespoon at a time. If it’s too wet, add a little more flour. The dough should be slightly shaggy and not completely smooth.
4. Form the Dough: Turn the dough out onto a lightly floured surface. Gently bring the dough together into a disc. Avoid kneading, as this develops gluten and will result in a tough crust. Instead, use a gentle pressing motion to form the disc.
5. Chill the Dough: Wrap the dough disc tightly in plastic wrap and flatten it slightly. Refrigerate for at least 30 minutes, or preferably up to 2 hours. This allows the gluten to relax and the fats to firm up, resulting in a more tender and flaky crust. Chilling is absolutely essential for a successful crust.
6. Roll and Bake (Further instructions will be provided in subsequent sections): After chilling, roll out the dough on a lightly floured surface to a circle slightly larger than your tart pan. Carefully transfer the dough to the pan, pressing it gently into the bottom and up the sides. Trim any excess dough. Prick the bottom of the crust with a fork to prevent bubbling during baking. You can then blind bake the crust before adding your fruit filling (instructions for blind baking will be provided in a later section).
Professional Tip: For an even more flavorful crust, consider adding a tablespoon of sugar to the dry ingredients. This will add a subtle sweetness that complements the fruit filling. Also, using a combination of butter and shortening creates a flakier, more tender crust than using butter alone.
Fruit Preparation and Selection
Selecting the right fruit is paramount to a beautiful and delicious fruit tart. The best fruits for tarts are those that hold their shape well when baked and offer a vibrant color and intense flavor. Avoid overly ripe or bruised fruit as they will become mushy during baking and may leak excess juice, compromising the tart shell.
For a classic fruit tart, a mix of berries and stone fruits works beautifully. Consider using about 1-1.5 pounds of fruit in total. A good combination might include:
- 8 ounces raspberries
- 8 ounces blueberries
- 8 ounces sliced strawberries (about 1 pint)
- 4 ounces sliced peaches or nectarines (2 medium)
Feel free to adjust these quantities based on your preferences and the availability of seasonal fruits. You could also substitute with other fruits like blackberries, cherries (pitted), or even sliced kiwi, but remember to consider their moisture content.
Proper washing and preparation are crucial. Gently wash all fruits under cold running water. For berries, avoid soaking them as this can make them soggy. For stone fruits like peaches and nectarines, wash thoroughly and then slice them into roughly ¼-inch thick slices. Remove any damaged or bruised parts before slicing.
Strawberries require a little more attention to detail. Hull the strawberries by carefully removing the green caps with a paring knife or a strawberry huller. Slice them into halves or quarters depending on their size. Larger strawberries should be quartered to ensure even baking and to prevent them from overpowering the other fruits. Avoid slicing them too thinly, as they may become too soft and lose their shape.
Once the fruit is prepared, it’s important to consider the arrangement. A visually appealing tart showcases the beautiful colors and textures of the fruit. You can arrange the fruit in concentric circles, starting with the larger pieces in the center and working your way outwards with smaller berries. Alternatively, you can create a more rustic look by arranging the fruits in a random but pleasing pattern. Leave some space between the fruit pieces to allow for even baking and prevent overcrowding.
Before placing the fruit on the tart shell, consider glazing it. A simple apricot glaze provides both shine and a touch of sweetness that complements the tart’s flavors. You can make a glaze by combining apricot jam with a little bit of water and heating it gently until it becomes smooth. Brush the glaze lightly over the arranged fruit just before baking.
Proper preparation of the fruit is key to creating a stunning and delicious fruit tart. Taking the time to select high-quality, ripe fruit and preparing it correctly will ensure a beautiful and flavorful end product that will impress your guests.
Filling Preparation (Custard or Cream)
The success of your fruit tart hinges significantly on the quality of its filling. A classic choice is a pastry cream (custard), offering a rich, creamy texture that complements the fruit beautifully. Alternatively, a lighter whipped cream can be used for a less decadent, more refreshing tart. Below, we detail both options.
Pastry Cream (Custard)
This recipe yields approximately 2 cups of pastry cream, sufficient for a 9-inch tart. Begin by preparing an bain-marie (water bath). Fill a large saucepan with about 2 inches of water and bring it to a gentle simmer. This will prevent the custard from scorching.
In a medium-sized heatproof bowl, whisk together:
- 1/2 cup granulated sugar
- 1/4 cup cornstarch
- 1/4 teaspoon salt
Gradually whisk in:
- 2 cups whole milk
- 1 large egg
- 2 large egg yolks
- 1 teaspoon vanilla extract
Ensure there are no lumps. Place the bowl over the simmering water, making sure the bottom of the bowl doesn’t touch the water. Whisk continuously until the mixture thickens and comes to a simmer, about 5-7 minutes. The custard should coat the back of a spoon.
Remove from heat immediately and strain the custard through a fine-mesh sieve into a clean bowl. This removes any lumps and ensures a perfectly smooth texture. Press a piece of plastic wrap directly onto the surface of the custard to prevent a skin from forming. Allow to cool completely before using. Refrigerate for at least 2 hours to allow the custard to fully set.
Whipped Cream
For a lighter filling, whipped cream is an excellent alternative. This recipe is for approximately 2 cups of whipped cream.
In a chilled bowl, using a chilled whisk, beat:
- 2 cups heavy cream
- 1/4 cup powdered sugar
- 1 teaspoon vanilla extract
Begin beating on low speed, gradually increasing to medium-high as the cream begins to thicken. Do not overwhip; the cream should hold stiff peaks but not be grainy. Fold in any desired flavorings, such as lemon zest or a liqueur, gently after whipping.
Chill the whipped cream for at least 30 minutes before using to allow it to firm up further. This will prevent it from becoming too soft or runny when added to the tart.
Important Note: Regardless of which filling you choose, ensure it is completely chilled before assembling your fruit tart. This prevents the pastry shell from becoming soggy and ensures a delicious, well-structured dessert.
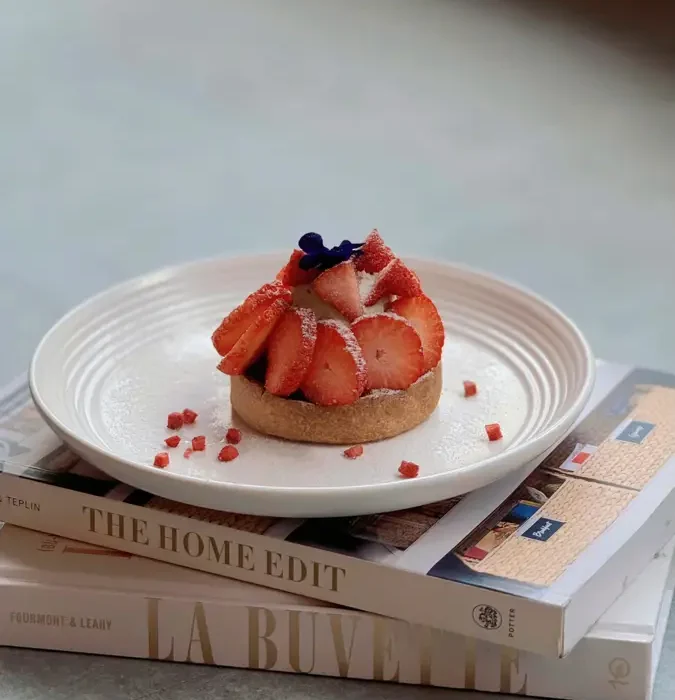
Tart Assembly
With your pre-baked tart shell cooled completely and your fruit filling prepared, it’s time for the assembly—the most visually rewarding part of making a classic fruit tart! This stage requires patience and a gentle hand to ensure a beautiful and structurally sound tart. Remember, a completely cooled tart shell is crucial to prevent the pastry from becoming soggy.
Begin by preparing your pastry cream or crème pâtissière. If you’re using a store-bought version, ensure it’s at room temperature for easier spreading. For a homemade version, allow it to cool completely before proceeding. You’ll need approximately 1 ½ cups of pastry cream for a standard 9-inch tart shell. Don’t overfill the tart shell; leave about ½ inch of space from the top edge. This prevents overflow and ensures a neat finish.
Using a small offset spatula or the back of a spoon, carefully spread the pastry cream evenly across the base of the cooled tart shell. Work from the center outwards, creating a thin, consistent layer. Avoid applying too much pressure, which could crack the shell. Aim for a smooth, level surface; any bumps or inconsistencies will be visible once the fruit is arranged.
Next comes the exciting part: arranging the fruit! For a classic fruit tart, we’ll use a combination of fresh, ripe berries and possibly some sliced citrus fruits. Start with your largest fruits, strategically placing them to create a visually appealing pattern. Consider the color and size of your fruit when arranging them. Alternate colors and sizes for a more dynamic look. For example, you might start with large strawberries around the perimeter, then fill the center with raspberries and blueberries.
For a 9-inch tart, you’ll need approximately 2 cups of mixed berries (strawberries, raspberries, blueberries) and perhaps ½ cup of sliced kiwi or mandarin segments. Don’t overcrowd the tart with fruit; the fruit should be visible and not piled too high. If using delicate fruits like raspberries, gently press them into the pastry cream to secure them in place.
Once the fruit is arranged, you can add a finishing touch. A light dusting of powdered sugar can enhance the visual appeal and add a touch of sweetness. Alternatively, a simple glaze made from apricot jam thinned with a little water can provide a glossy finish and help preserve the fruit’s freshness. Apply the glaze sparingly to avoid making the tart too wet.
Finally, chill the assembled tart in the refrigerator for at least 30 minutes before serving. This allows the flavors to meld and the pastry cream to set, ensuring a delightful eating experience. Serve chilled for the best results! Enjoy your beautiful and delicious homemade fruit tart.
Baking Instructions
Preheat your oven to 375°F (190°C). This is crucial for ensuring the pastry shell bakes evenly and develops a beautiful golden-brown color. A properly preheated oven is the foundation of successful baking.
Before placing the tart shell in the oven, blind bake the pastry crust. This prevents a soggy bottom, a common problem with fruit tarts. To do this, line the pastry shell with parchment paper and fill it with pie weights or dried beans. This will hold the pastry in place and prevent it from puffing up during baking. Blind bake for 15-20 minutes, or until the edges are lightly golden.
Remove the pie weights and parchment paper. Carefully lift out the weights and parchment paper. Prick the bottom of the pastry shell with a fork a few times to allow steam to escape during baking. This prevents air pockets that could cause the pastry to bubble or rise unevenly. Return the tart shell to the oven for another 5-7 minutes, or until it’s lightly golden brown and fully baked. This second baking ensures the bottom is completely dry and crisp.
While the pastry shell is baking, prepare your fruit filling. Arrange your prepped fruit (e.g., sliced strawberries, raspberries, blueberries, etc.) attractively on the cooled pastry shell. Overlap the fruit slightly for a visually appealing and densely packed tart. You may need approximately 2-3 cups of mixed berries and/or sliced fruits depending on the size of your tart pan.
Once the fruit is arranged, prepare the glaze or topping (if using). A simple glaze can be made with apricot jam, melted and strained to remove any lumps. Alternatively, a lemon curd or pastry cream can add extra flavor and richness. Gently brush the glaze over the fruit, ensuring even coverage. Be careful not to over-glaze, as this can make the tart too sweet or soggy.
Bake the tart with the fruit for an additional 10-15 minutes, or until the glaze is lightly set and the fruit is slightly softened but still retains its shape. Keep a close eye on the tart during this final baking stage, as ovens can vary in temperature. If the crust starts to brown too quickly, loosely tent the tart with aluminum foil.
Let the tart cool completely on a wire rack before serving. This allows the pastry to firm up and the filling to set properly. Rushing this step can result in a messy and potentially soggy tart. Once completely cool, you can transfer the tart to a serving platter or cake stand.
Professional Tip: For a truly professional finish, use a pastry brush to apply the glaze evenly and delicately. Avoid using too much glaze, as this can result in a sticky tart. Also, consider using a variety of fruits with contrasting colors and textures for a visually stunning and delicious tart. Remember to adjust baking times depending on the size of your tart pan and your oven’s characteristics.
Recommendations for Your Classic Fruit Tart
To achieve the perfect classic fruit tart, meticulous attention to detail is key. Begin by ensuring your pastry is properly chilled before baking; this prevents shrinkage and ensures a crisp, golden crust. Don’t overbake the pastry – a slightly underbaked crust will be more tender and less likely to crack. Allow the pastry to cool completely before adding the filling to prevent it from becoming soggy.
When preparing the pastry cream (or crème pâtissière), ensure the eggs and sugar are thoroughly whisked together before adding the hot milk. This prevents the eggs from scrambling and creates a smooth, luscious texture. Cook the cream over low heat, stirring constantly, to avoid lumps and ensure even cooking. Allow the pastry cream to cool completely before spreading it on the tart shell. Proper cooling prevents the pastry cream from softening the pastry crust.
Selecting the right fruit is crucial for both flavor and visual appeal. Choose ripe but firm fruits that will hold their shape during baking or chilling. Arrange the fruit attractively, overlapping slightly for a visually pleasing effect. Consider using a variety of colors and textures for a more interesting presentation. If using delicate fruits like berries, add them just before serving to prevent them from releasing their juices and softening.
Serving Suggestions: This classic fruit tart is best served chilled. It pairs perfectly with a dollop of lightly sweetened whipped cream or a scoop of vanilla bean ice cream. A sprinkle of confectioners’ sugar adds a touch of elegance. For a more sophisticated presentation, consider garnishing with fresh mint leaves or a few edible flowers.
Storage: Store leftover fruit tart in an airtight container in the refrigerator for up to 2 days. The pastry crust may become slightly softer over time, so it’s best enjoyed fresh. Freezing is not recommended, as the pastry and filling may lose their texture and flavor.
Complementary Dishes: This tart complements a light lunch or a sophisticated afternoon tea. It pairs well with a simple green salad, a fruit salad with a light vinaigrette, or a selection of cheeses and crackers. For a more substantial meal, consider serving it alongside a light chicken or fish dish.
Nutritional Information (Approximate per serving, based on a 6-serving tart): The nutritional content will vary depending on the specific ingredients used and portion size. However, a typical serving might contain approximately 350-450 calories, 15-20g of fat, 40-50g of carbohydrates, and 5-7g of protein. This is a rough estimate and should not be taken as a precise nutritional analysis. For accurate nutritional information, use a nutrition calculator with your specific recipe ingredients and serving size.
Important Note: All recommendations are guidelines. Feel free to experiment with different fruits, fillings, and decorations to create your own unique version of this classic dessert. Enjoy!