Prepare to embark on a culinary journey to discover the delightful world of classic Chicken Schnitzel! This iconic dish, a beloved staple across numerous cultures, boasts a surprisingly rich history. While its exact origins are debated, the most widely accepted theory traces schnitzel back to Wiener Schnitzel, a Viennese specialty that emerged sometime in the 19th century. Legend often credits it to the arrival of the Milanese-style cotoletta alla Milanese in Vienna, though the precise evolution of the dish remains shrouded in culinary folklore. Regardless of its exact beginnings, the crispy, tender, and flavorful nature of schnitzel quickly propelled it to fame.
The popularity of schnitzel is undeniable. Globally, millions of portions are consumed annually, a testament to its versatility and widespread appeal. Beyond its presence in traditional Austrian and German cuisine, variations of schnitzel can be found across Europe and beyond, showcasing the dish’s adaptability to local tastes and ingredients. From the classic veal schnitzel of Vienna to the chicken schnitzel favored in many American households, and even variations using pork, turkey, or even fish, the fundamental principle of a thinly pounded cutlet, breaded and pan-fried to perfection, remains constant. This consistency in technique, coupled with the endless possibilities for customization, explains its enduring popularity.
Chicken schnitzel, in particular, has gained significant traction in recent years, likely due to its affordability and accessibility compared to its veal counterpart. This version allows for a wider reach, making this delectable dish a family favorite and a frequent feature on restaurant menus worldwide. Its prevalence in both casual and fine-dining establishments further underscores its status as a true culinary classic. The satisfying crunch of the breading, the juicy tenderness of the chicken, and the delightful interplay of savory and subtly sweet flavors combine to create an unforgettable dining experience. Get ready to learn how to recreate this timeless dish in your own kitchen!
Ingredients and Measurements
Crafting the perfect Chicken Schnitzel hinges on using high-quality ingredients and precise measurements. Don’t skimp on the details – they make all the difference!
For this recipe, we’ll be making enough Chicken Schnitzel for approximately 4 servings. You can easily scale the recipe up or down depending on your needs. Always ensure your chicken breasts are thawed completely before beginning. This prevents uneven cooking and ensures a crispy result.
Chicken: You’ll need 4 boneless, skinless chicken breasts, weighing approximately 6-8 ounces each. Choose breasts that are relatively uniform in size and thickness for even cooking. If some are significantly thicker than others, consider pounding them to an even thickness (about ½ inch) using a meat mallet or the bottom of a heavy pan. This ensures they cook through at the same rate.
Breadcrumbs: Use 2 cups of good quality breadcrumbs. Panko breadcrumbs are highly recommended for their light and airy texture, leading to an extra crispy schnitzel. If using regular breadcrumbs, consider toasting them lightly in a pan before using to enhance their crispness.
Eggs: You’ll need 2 large eggs. Ensure the eggs are at room temperature for optimal whisking and better adhesion to the chicken. Whisk them thoroughly in a shallow dish until the yolks and whites are fully combined and slightly frothy.
Flour: Use 1 cup of all-purpose flour. Season the flour generously with salt and freshly ground black pepper before dredging the chicken. This initial seasoning is crucial for flavor penetration.
Seasoning: Besides salt and pepper for the flour, consider adding other seasonings to enhance the flavor profile. A pinch of paprika, garlic powder, or onion powder can add depth. Don’t be afraid to experiment with your favorite herbs and spices!
Oil: For frying, you’ll need about 2 cups of vegetable oil or another high-heat oil with a neutral flavor, such as canola oil. Use enough oil to submerge the chicken about halfway, allowing for even browning and crispiness. The oil should be heated to 350°F (175°C) before adding the chicken. A kitchen thermometer is essential for accurate temperature control.
Optional Garnishes: Lemon wedges, fresh parsley, and a sprinkle of parmesan cheese are classic accompaniments that add a delightful touch to your finished Chicken Schnitzel.
Equipment Preparation
Before you begin preparing your classic chicken schnitzel, ensuring you have the right equipment readily available and in optimal condition is crucial for a smooth and efficient cooking process. Proper preparation minimizes stress and maximizes the quality of your final dish.
First, you’ll need three shallow dishes, approximately 9-12 inches in diameter. These will be used for breading the chicken. Choose dishes that are wide enough to comfortably accommodate your chicken cutlets without overcrowding. Overcrowding can lead to uneven coating and sticking.
Next, gather your utensils. You’ll need a meat mallet, ideally one with a flat, broad surface. Avoid using a hammer, as its uneven surface can damage the chicken. A good quality meat mallet will ensure even thickness for consistent cooking.
You’ll also need a set of tongs. Tongs are far superior to using your hands for breading as they prevent excess handling and ensure a cleaner, more even coating. A good pair of kitchen shears will also be helpful for trimming any excess fat from the chicken breasts.
For cooking, you’ll need a large skillet, at least 12 inches in diameter. Cast iron skillets are ideal for schnitzel, as they provide even heat distribution, which is critical for achieving a perfectly golden-brown crust without burning the chicken. If you don’t have a cast iron skillet, a heavy-bottomed stainless steel skillet will also work well. Ensure your skillet is clean and completely dry before adding oil.
Measure out your cooking oil. You will need approximately 1/2 to 3/4 cup of vegetable oil or canola oil, depending on the size of your skillet and the number of schnitzel you’re making. Don’t skimp on the oil; sufficient oil is necessary to ensure even browning and prevent sticking. The oil should be about 1/4 inch deep in the skillet.
Finally, prepare a plate or baking sheet lined with paper towels for draining the cooked schnitzel. This will help absorb excess oil and keep your schnitzel crispy. Having everything organized and ready to go will streamline your cooking process and allow you to focus on creating delicious schnitzel.
Chicken Preparation (Tenderizing and Seasoning)
Choosing the right chicken is crucial for a perfect schnitzel. Opt for boneless, skinless chicken breasts, about 1 inch thick. Thinner breasts will cook too quickly and become dry, while thicker ones may require longer cooking times, leading to uneven browning. Aim for approximately 4-6 chicken breasts, depending on the number of servings.
Tenderizing the chicken breasts is key to ensuring a delicate, melt-in-your-mouth texture. There are several methods you can employ. You can use a meat mallet to gently pound the chicken breasts to an even thickness of about 1/4 inch. Avoid pounding too aggressively, as this can result in tearing the meat. Alternatively, you can use a rolling pin wrapped in plastic wrap for a more controlled approach.
Once the chicken is evenly pounded, it’s time for seasoning. Seasoning is crucial for enhancing the flavor of the schnitzel. For 4-6 chicken breasts, you’ll need approximately 2 teaspoons of salt and 1 teaspoon of freshly ground black pepper. Generously season both sides of the chicken breasts. Don’t be shy with the seasoning; it will penetrate the meat and create a flavorful crust.
For an extra layer of flavor, consider adding other seasonings. A pinch of paprika adds a subtle smoky sweetness, while a dash of garlic powder or onion powder will enhance the savory notes. You can also experiment with other herbs and spices, such as dried oregano, thyme, or even a touch of cayenne pepper for a little heat. Remember to adjust the amounts to your personal preference.
After seasoning, let the chicken rest for at least 15-20 minutes. This allows the seasoning to penetrate the meat and enhances the overall flavor. Letting the chicken rest at room temperature will also ensure even cooking. If you’re short on time, you can skip this step, but the flavor will be slightly less intense. Remember to always handle raw chicken carefully to avoid cross-contamination.
Pro Tip: For extra juicy schnitzel, you can briefly marinate the seasoned chicken in a mixture of milk or buttermilk for about 30 minutes before breading. This will help tenderize the meat further and add a richer flavor.
Breading the Chicken (Flour, Egg Wash, Breadcrumbs)
Proper breading is crucial for achieving that signature crispy, golden-brown schnitzel. This process involves three key steps: dredging in flour, dipping in egg wash, and finally coating in breadcrumbs. We’ll use about 1 cup of all-purpose flour, 2 large eggs beaten with 2 tablespoons of milk or water (for a thinner wash), and 2 cups of panko breadcrumbs for approximately 4 chicken breasts (about 1.5 lbs total). Adjust quantities as needed depending on the amount of chicken you’re using.
First, prepare your stations. Have three shallow dishes: one for the flour, one for the egg wash, and one for the breadcrumbs. This keeps everything organized and prevents a messy workflow. Ensure your chicken breasts are patted thoroughly dry with paper towels before breading. Excess moisture will prevent the breading from adhering properly, resulting in a soggy schnitzel.
Begin by dredging each chicken breast in the flour, ensuring it’s fully coated. Gently shake off any excess flour. This initial layer of flour helps the egg wash adhere better and provides a foundation for the breadcrumbs. Don’t press the chicken into the flour too hard; a light coating is sufficient. Over-coating with flour can lead to a thick, heavy crust.
Next, dip the floured chicken breast into the egg wash, making sure it’s completely submerged. Allow any excess egg wash to drip off before moving to the next step. A thin, even coating of egg wash is ideal. Too much egg wash will result in a soggy schnitzel, while too little will cause the breadcrumbs to not adhere properly.
Finally, coat the egg-washed chicken breast in the breadcrumbs, pressing gently to ensure the breadcrumbs adhere well. Use panko breadcrumbs for the best results; their coarser texture creates a wonderfully crisp crust. Again, avoid pressing too hard; a light but even coating is key. You can even gently press the breadcrumbs into the chicken to ensure better adhesion.
Once all the chicken breasts are breaded, you can either cook them immediately or refrigerate them for up to 30 minutes. Refrigerating allows the breading to set, leading to an even crispier schnitzel. However, avoid refrigerating for longer than 30 minutes, as the chicken may become too cold and take longer to cook.
Shallow Frying or Pan-Frying the Chicken Schnitzel
Shallow frying, also known as pan-frying, is the preferred method for achieving a perfectly crisp and golden-brown chicken schnitzel. Unlike deep frying, it requires less oil, making it a healthier option without sacrificing flavor or texture. For this recipe, we’ll use approximately 1/4 inch of oil in your pan – enough to come about halfway up the side of the schnitzel.
Choose the right oil: High-heat oils with a high smoke point are crucial for this process. Vegetable oil, canola oil, or sunflower oil are all excellent choices. Avoid oils with low smoke points like olive oil, as they can burn and impart an unpleasant flavor to your schnitzel. Use approximately 1/2 cup to 3/4 cup of oil, depending on the size of your pan and the number of schnitzels you’re cooking.
Heating the oil: Place your chosen oil in a large, heavy-bottomed skillet (cast iron is ideal) over medium-high heat. The oil is ready when a pinch of breadcrumbs sizzles immediately upon contact. Do not overheat the oil; this will result in burning and a bitter taste. It should be hot enough to cook the schnitzel quickly and evenly without burning it.
Cooking the schnitzel: Gently place the breaded schnitzels into the hot oil, ensuring not to overcrowd the pan. Overcrowding will lower the oil temperature, resulting in greasy schnitzel instead of crispy ones. Cook for approximately 3-4 minutes per side, or until golden brown and cooked through. Use tongs to gently flip the schnitzel; avoid piercing the breading with a fork, as this can release moisture and prevent crispiness.
Checking for doneness: The schnitzel is cooked through when the internal temperature reaches 165°F (74°C). You can check this with a meat thermometer. The meat should be firm to the touch and no longer pink inside. If you’re unsure, it’s always better to err on the side of caution and cook it for a little longer.
Draining the excess oil: Once cooked, remove the schnitzels from the pan and place them on a wire rack or paper towel-lined plate to drain any excess oil. This step is crucial for achieving a crispy schnitzel that isn’t soggy. Allow the schnitzel to rest for a few minutes before serving. This allows the juices to redistribute, resulting in a more tender and flavorful schnitzel.
Important Note: Always supervise the cooking process closely, and never leave the hot oil unattended. Be cautious of hot oil splatter.
Draining Excess Oil
Once your chicken schnitzel is golden brown and perfectly cooked, the next crucial step is draining the excess oil. This not only reduces the fat content of your dish but also ensures a crispier, less greasy final product. Improper oil draining can leave your schnitzel soggy and heavy, detracting from its overall deliciousness.
The best method involves using a wire rack placed over a baking sheet lined with paper towels. Avoid simply piling the schnitzel on a plate; this will trap the oil and steam the schnitzel, making it limp. A wire rack allows for maximum air circulation, promoting quicker cooling and oil drainage.
Carefully remove the schnitzel from the hot oil using tongs or a slotted spoon. Do not overcrowd the spoon or tongs, as this will cause oil to splash and potentially burn you. Work in batches if necessary to ensure each piece is handled gently and efficiently.
Transfer the schnitzel to the wire rack, spacing them slightly apart to allow for even cooling and draining. Approximately 2-3 inches between each piece is ideal. The paper towels underneath will absorb any excess oil that drips down.
Allow the schnitzel to rest on the rack for at least 5-7 minutes. This resting period is vital. It allows the oil to fully drain and the schnitzel to crisp up further. Resist the urge to eat them immediately; patience will be rewarded with a superior result.
After 5-7 minutes, you can carefully transfer the schnitzel to a serving plate. If you find that some oil remains, you can gently blot the schnitzel with fresh paper towels, but avoid excessive blotting, as this can remove the delicate breading.
Professional Tip: For even crispier schnitzel, consider placing the wire rack in a preheated oven at a low temperature (around 170°F or 77°C) for a few minutes after draining. This will help to further crisp the breading and remove any remaining moisture. However, monitor closely to avoid over-drying.
Proper oil draining is a critical step in achieving the perfect classic chicken schnitzel. By following these steps, you’ll ensure your schnitzel is crispy, delicious, and not overly greasy.
Recommendations
For the best classic chicken schnitzel, ensure your chicken breasts are pounded evenly to a uniform thickness. This guarantees even cooking and prevents some parts from being overcooked while others remain underdone. Using a meat mallet is highly recommended for this step.
Breadcrumbs are key to a crispy schnitzel. Choose good quality breadcrumbs, and consider adding a little grated Parmesan cheese or herbs like oregano or thyme to the breading mixture for extra flavour. Don’t overcrowd the pan when frying; work in batches to maintain a high oil temperature for optimal crispness. Overcrowding will lower the oil temperature and result in greasy schnitzel.
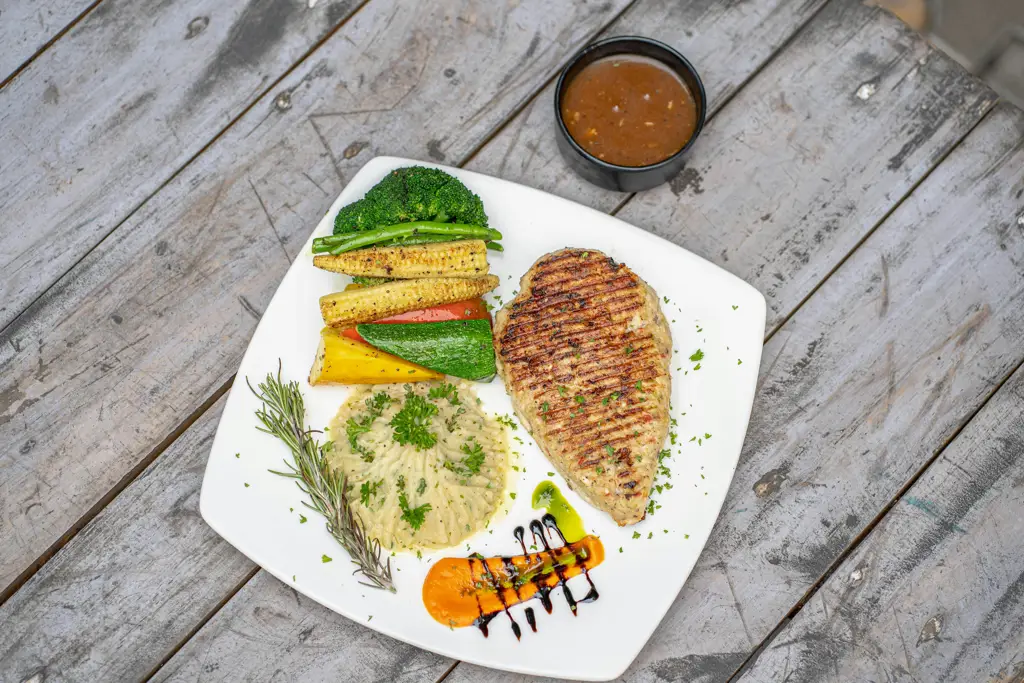
Serving suggestions are plentiful! Classic accompaniments include a simple green salad with a light vinaigrette, potato salad, or creamy mashed potatoes. For a more sophisticated touch, consider serving with lemon wedges, capers, and a side of steamed asparagus. A rich and tangy tartar sauce or a light lemon-herb sauce pairs wonderfully with the schnitzel.
Storage: Leftover schnitzel can be stored in an airtight container in the refrigerator for up to 3 days. Reheat gently in a pan or oven to avoid drying it out. Freezing is also an option; wrap the schnitzel tightly in plastic wrap and then foil before placing it in a freezer bag. It will keep for up to 3 months.
Nutritional Information (per serving, approximate): Calorie count varies based on the size of the schnitzel and the type of oil used. A typical serving (around 150g) might contain approximately 400-500 calories, 25-35g of protein, 20-30g of fat, and low carbohydrates. Note: Nutritional information is an estimate and can vary greatly depending on ingredients and preparation methods. For precise values, use a nutrition calculator with your specific recipe details.
Complementary Dishes: To create a well-rounded and satisfying meal, consider adding dishes that offer contrasting flavours and textures. A light and refreshing salad, such as a simple green salad with a vinaigrette dressing, can balance the richness of the schnitzel. Alternatively, a creamy potato salad or some roasted vegetables can offer a different textural element.