Homemade pita bread, with its characteristic puffy pockets and subtly sweet flavor, is a culinary staple across the Middle East and Mediterranean, a testament to the enduring power of simple ingredients transformed by skillful hands. Its origins are shrouded in the mists of time, predating written records, but archaeological evidence suggests flatbreads similar to pita were consumed as far back as the Neolithic period. The earliest known depictions of flatbreads, dating back thousands of years, can be found in ancient Egyptian tomb paintings and Mesopotamian art, hinting at the deep-rooted history of this ubiquitous food.
While pinpointing a precise origin is impossible, the name pita itself is believed to derive from the Greek word πίτα (pita), meaning flat cake or pastry. This etymology reflects its simple yet versatile nature. Over centuries, pita bread has evolved, adapting to local ingredients and culinary traditions, resulting in regional variations in texture, thickness, and even flavor profiles. From the thin, crispy pitas of Lebanon to the thicker, chewier versions found in Syria and Jordan, the variations are a delicious reflection of the diverse cultures that embrace this staple food.
Pita bread’s cultural significance extends far beyond its simple ingredients of flour, water, and yeast. It’s a fundamental component of countless meals, serving as a vessel for an array of fillings, from falafel and hummus to shawarma and grilled meats. It’s more than just bread; it’s a symbol of hospitality, often shared amongst family and friends, forming a cornerstone of social gatherings and celebrations across many cultures. Globally, the pita bread market is a significant one, estimated to be worth billions of dollars annually, showcasing its enduring popularity and economic impact. This impressive figure reflects not only its widespread consumption but also its use in a vast array of commercial applications, from restaurants to grocery stores.
Making pita bread at home allows for a deeper appreciation of its simplicity and the satisfying results of transforming basic ingredients into something so delicious and culturally rich. The process itself, though straightforward, requires a delicate balance of ingredients and technique to achieve that signature puffed pocket. The satisfying puff is a result of the steam created during baking, which causes the layers of dough to separate, creating the airy pockets perfect for scooping up flavorful dips and fillings. This homemade version is a chance to connect with ancient culinary traditions and experience the joy of creating a food that has nourished generations.
Ingredients and Measurements
Creating perfect homemade pita bread hinges on precise ingredient measurements and their quality. Using a kitchen scale is highly recommended for accuracy, especially when it comes to the flour. While volume measurements can work, inconsistencies in how flour is packed can significantly affect the final result. A scale ensures consistent dough texture and rise.
For this recipe, we’ll be using all-purpose flour. You can experiment with bread flour for a chewier pita, but all-purpose works perfectly well and is more readily available. Avoid using self-rising flour, as the added baking powder will alter the texture and flavour of the pita bread. The yeast is crucial for the signature airy pockets; using fresh yeast is ideal for the best flavour and rise, but active dry yeast is a perfectly acceptable substitute. Just remember to proof it according to the package instructions before adding it to the dough.
The water plays a critical role in hydration. The amount specified is a guideline; you might need slightly more or less depending on the humidity and the type of flour you are using. Start with the lower amount and gradually add more, a tablespoon at a time, until the dough comes together. The dough should be soft and slightly sticky, but not so wet that it’s unmanageable. It’s better to err on the slightly drier side than too wet, as you can always add more water, but removing excess water is much more difficult.
Salt is essential for flavour and controlling yeast activity. Don’t be tempted to skip it! The sugar acts as food for the yeast, promoting a faster and more vigorous fermentation process. It also contributes to the browning and flavour of the finished pita bread. Using granulated white sugar is recommended; brown sugar may impart an unwanted colour and flavour to the pita.
Here’s a detailed breakdown of the ingredients and their precise measurements:
- 1 cup (125g) warm water (105-115°F): Use a thermometer to ensure the water is at the correct temperature. Too hot, and you’ll kill the yeast; too cold, and it won’t activate properly.
- 2 teaspoons (7g) active dry yeast (or 15g fresh yeast): If using fresh yeast, simply crumble it into the warm water.
- 1 teaspoon (5g) granulated sugar: This feeds the yeast and contributes to flavour.
- 1 teaspoon (6g) salt: Enhances flavour and controls yeast activity.
- 3 cups (375g) all-purpose flour, plus more for dusting: Start with 3 cups and add more as needed to achieve the correct dough consistency. A kitchen scale is recommended for accurate measurement.
- 2 tablespoons (30ml) olive oil (optional): Adds richness and flavour. You can substitute with another neutral-flavoured oil.
Remember to always measure your ingredients accurately for optimal results. Enjoy the process of making your own pita bread!
Mixing the Dough
The success of your homemade pita bread hinges on properly mixing the dough. This seemingly simple step requires attention to detail to achieve the perfect texture and rise. We’ll be using a combination of the stand mixer and hand kneading for optimal results. Our recipe calls for 3 cups (375g) of all-purpose flour, 1 ¼ cups (300ml) of warm water (around 105-115°F), 1 teaspoon of salt, 1 tablespoon of sugar, and 2 teaspoons of active dry yeast.
Begin by activating your yeast. In a large bowl, combine the warm water, sugar, and yeast. Allow this mixture to sit for 5-10 minutes until foamy. This confirms your yeast is alive and ready to work its magic. If it doesn’t foam, your yeast might be old and you’ll need a fresh batch.
Once the yeast is activated, add the salt to the yeast mixture. Then, gradually add 2 cups of the flour to the yeast mixture, using a wooden spoon or spatula to combine. Don’t be tempted to add all the flour at once; this can make the dough too stiff and difficult to work with. Mix until a shaggy dough forms.
Now it’s time to bring out your stand mixer fitted with the dough hook attachment. Transfer the shaggy dough into your stand mixer bowl. With the mixer running on low speed, gradually add the remaining cup of flour. Continue mixing for 5-7 minutes, until the dough is smooth and elastic, pulling away from the sides of the bowl. If your dough seems too dry, add a tablespoon of water at a time until it reaches the desired consistency. Conversely, if it’s too sticky, add a tablespoon of flour.
The dough should be soft and slightly tacky, but not sticky to the touch. This is crucial for achieving a light and airy pita bread. If the dough is too sticky, it will be difficult to handle and may not rise properly. If it’s too dry, the pita will be tough and chewy.
After mixing in the stand mixer, turn the dough out onto a lightly floured surface. Knead the dough by hand for another 2-3 minutes. This additional kneading helps to develop the gluten further, resulting in a more pliable and flavorful pita. The kneading should be firm but gentle; avoid over-kneading, which can make the bread tough. You should feel the dough becoming smoother and more elastic under your hands.
Once the kneading is complete, lightly oil a large bowl and place the dough inside. Turn the dough to coat it with the oil. Cover the bowl with plastic wrap and let the dough rise in a warm place for at least an hour, or until doubled in size. The rising time can vary depending on the temperature of your environment. A warmer environment will result in a faster rise.
After the first rise, your dough is ready for the next steps. Remember, a well-mixed dough is the foundation of perfect pita bread. Take your time, be patient, and enjoy the process!
First Rise (Bulk Fermentation)
The first rise, or bulk fermentation, is a crucial step in making delicious pita bread. This stage allows the yeast to fully develop and produce the gases that will give your pita that characteristic airy texture. During this time, the dough will increase significantly in volume, and its structure will begin to develop. For this recipe, we’ll be working with a dough made from 500g strong bread flour, 350ml lukewarm water, 10g salt, and 10g active dry yeast (or 30g fresh yeast).
Mixing the Dough: Begin by combining the lukewarm water and yeast in a large bowl. Let it sit for about 5-10 minutes until the yeast is foamy. This indicates the yeast is active and ready to work its magic. Then, add the flour and salt to the yeast mixture. Using a stand mixer with a dough hook or your hands, knead the dough for 8-10 minutes until it becomes smooth and elastic. If using a stand mixer, it’s crucial to scrape the sides of the bowl occasionally to ensure all the ingredients are incorporated evenly.
The Importance of Kneading: Proper kneading is essential for developing gluten, the protein network in the flour that gives the pita its structure. Under-kneaded dough will result in flat, dense pita, while over-kneaded dough can become tough. You’ll know the dough is properly kneaded when it passes the windowpane test: stretch a small piece of dough thinly; if you can see light through it without tearing, you’re good to go.
Bulk Fermentation Conditions: Once kneaded, place the dough in a lightly oiled bowl, turning to coat. Cover the bowl tightly with plastic wrap or a damp kitchen towel. This prevents the dough from drying out. Allow the dough to rise in a warm place (ideally around 75-80°F or 24-27°C) for approximately 1-1.5 hours, or until it has doubled in size. The exact time will depend on the ambient temperature and the activity of your yeast. Avoid placing the dough in direct sunlight or near a heat source, as this can overheat the yeast and negatively affect the fermentation process.
Monitoring the Rise: Keep an eye on your dough during this process. You can gently poke it with a finger; if the indentation springs back slowly, the dough is ready. If it springs back quickly, it needs more time. Over-proofing can result in a flat pita, so it’s important to monitor the dough closely.
Dealing with a Slow Rise: If your dough is rising slower than expected, it could be due to several factors: cold ambient temperature, inactive yeast, or insufficient kneading. To speed up the rise slightly, you can place the bowl in a slightly warmer spot, but avoid excessive heat. If the dough doesn’t rise at all, there may be a problem with your yeast or ingredients. You should consider starting again with fresh ingredients.
After the first rise, you’re ready to proceed with shaping and the second rise of your pita bread. Remember, patience and attention to detail are vital for achieving perfectly fluffy and airy pita.
Shaping the Pitas
Shaping pita bread correctly is crucial for achieving those signature airy pockets. A poorly shaped pita will bake into a flatbread, missing the delightful texture we all crave. This section will guide you through the process, ensuring you create perfectly formed pitas ready for baking.
Begin by lightly dusting your work surface with flour. This prevents sticking and ensures smooth handling of the dough. Avoid using too much flour, as this can dry out the dough and result in tough pitas. A light dusting is all you need.
Divide your risen dough (refer to the previous section for instructions on rising) into 8 equal-sized pieces. For a standard recipe yielding about 8 pitas, each piece should weigh approximately 70-80 grams. Use a kitchen scale for accuracy; consistent sizing is key to even baking.
Gently roll each dough piece into a smooth ball. This is best achieved by cupping your hands around the dough and gently rotating it, tucking the edges inwards. Avoid kneading at this stage, as this will develop the gluten further and can make the pitas tough.
Now comes the shaping. Using a lightly floured rolling pin, roll each ball into a 6-7 inch circle. Aim for a uniform thickness; about 1/8 inch is ideal. Thin spots will burn while thicker areas will remain doughy. If you find your dough is sticking, lightly dust with more flour, but remember to use sparingly.
The key to achieving the characteristic pita pocket is to ensure the edges are slightly thinner than the center. This allows the edges to cook faster, creating a seal that traps steam, resulting in puffing. You can achieve this by gently stretching the edges while rolling, or by using your fingers to slightly thin them out after rolling.
Once you have shaped all your pitas, carefully transfer them to a lightly floured baking sheet or pizza stone. Leave a small space between each pita to allow for expansion during baking. Do not overcrowd the baking sheet; this will hinder proper puffing and result in uneven baking.
Before baking, let the shaped pitas rest for about 10-15 minutes. This allows the gluten to relax slightly, preventing shrinkage during baking and promoting a better rise. Cover the pitas loosely with a clean kitchen towel to prevent them from drying out.
With a little practice, shaping pitas will become second nature. Don’t be discouraged if your first attempt isn’t perfect. Pay attention to the consistency of your dough, the evenness of your rolling, and the thickness of your circles. Each pita will improve your technique and get you closer to that perfect puff!
Second Rise (Proofing)
After the initial bulk fermentation, your pita dough will need a second rise, often called proofing. This crucial step allows the gluten to fully relax and develop, resulting in airy, puffy pita pockets. The proofing process is gentler and shorter than the initial bulk fermentation, aiming for a more subtle increase in volume.
The goal of the second rise is to achieve a noticeable but not excessive increase in dough size. Over-proofing will lead to flat, dense pitas, while under-proofing will result in tough, chewy pockets. The ideal time will depend on your ambient temperature and the strength of your flour.
Gently turn the dough out onto a lightly floured surface. Divide the dough into 8 equal pieces (approximately 60-70g each, depending on your desired pita size). Accurate weighing ensures consistent pita sizes. Shape each piece into a smooth ball by gently tucking the edges underneath. Avoid aggressively kneading at this stage, as you risk tightening the gluten structure again.
Prepare a baking sheet lined with parchment paper. This prevents sticking and makes for easier transfer to the hot oven. Arrange the dough balls on the prepared baking sheet, leaving a couple of inches between each ball to allow for expansion during proofing.
Lightly oil the tops of the dough balls with olive oil. This helps prevent the surface from drying out during proofing and adds a subtle richness to the finished pita. You can also use a spray bottle for a finer mist.
Now, it’s time for the second rise. Cover the baking sheet loosely with plastic wrap or a damp kitchen towel. Avoid airtight sealing, as this can trap moisture and lead to uneven rising or a sticky surface. Let the dough proof in a warm place (ideally around 75-80°F or 24-27°C) for 45-60 minutes, or until the dough balls have increased in size by about 50%. The exact time will depend on your environment. A slightly warmer environment will shorten the proofing time.
Check for doneness by gently poking a dough ball with your finger. If the indentation slowly springs back, the dough is ready. If the indentation remains, it needs more time. If the dough feels overly soft and jiggly, it’s likely over-proofed.
Once proofed, your dough balls are ready for shaping and baking. Handle them gently to avoid deflating the air pockets formed during the proofing process. The next step involves gently pressing and stretching the dough balls into thin rounds, ready for the hot oven! Remember, the consistency and timing of this process are key to achieving perfectly puffed pita breads.
Troubleshooting: If your pitas are consistently flat, try reducing the proofing time. Conversely, if your pitas are too tough, increase the proofing time slightly. Experiment to find the perfect proofing time for your kitchen and flour.
Cooking the Pita Bread
Cooking pita bread requires a hot oven and a quick bake time to achieve those signature puffy pockets. The key is to get the dough to puff up dramatically, creating airy, soft interiors. We’ll be using a baking stone or steel for optimal results, but a regular baking sheet will work in a pinch. Preheat your oven to its maximum temperature, ideally 500°F (260°C). If you’re using a baking stone or steel, place it in the oven while it preheats.
Before you start cooking, lightly dust your work surface with flour. Gently roll out each pita dough ball to a 6-7 inch circle, about ⅛ inch thick. Avoid rolling them too thin, as this can prevent proper puffing. Consistency is key; aim for even thickness throughout each circle to ensure even cooking.
Carefully transfer the rolled-out pita rounds to the preheated baking stone or baking sheet. If using parchment paper, use a lightly floured surface to prevent sticking. Do not overcrowd the baking surface; leave at least an inch of space between each pita. Overcrowding will lower the oven temperature and prevent proper puffing.
Bake for 2-3 minutes per side. You’ll know they’re done when the pitas are puffed and lightly golden brown. The puffing happens quickly, so keep a close eye on them to avoid burning. You might notice some pitas puff up more than others – this is perfectly normal. The baking time can vary slightly depending on your oven and the thickness of your dough.
Once cooked, immediately remove the pitas from the oven and place them in a clean kitchen towel or a covered container to keep them soft and pliable. Do not let them cool completely on the baking sheet; this will cause them to become hard and flat. The steam trapped within the towel helps to maintain their softness.
Professional Tip: For extra crispy pitas, you can brush them with a little olive oil before baking. This will add a lovely flavor and enhance the browning process. Experiment with different flours; whole wheat or rye flour can add depth of flavor and a slightly chewier texture.
Troubleshooting: If your pitas are not puffing up, it might be due to several factors. Check that your oven is hot enough, and ensure you haven’t overcrowded the baking sheet. Also, make sure your dough has risen sufficiently before rolling and baking. Under-proofed dough will not puff as well.
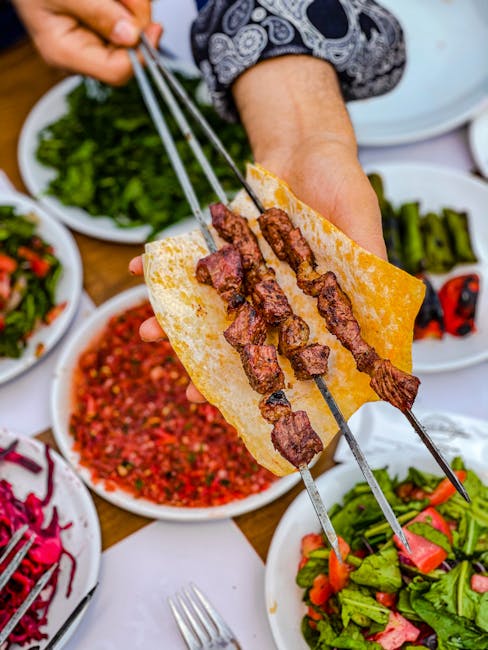
Once your pitas have cooled slightly, you can fill them with your favorite ingredients! From classic falafel and hummus to grilled vegetables and meats, the possibilities are endless. Enjoy your freshly baked, homemade pita bread!
Homemade Pita Bread: Recommendations
Your freshly baked homemade pita bread is best enjoyed immediately while still warm and slightly puffy. The texture is at its peak when the bread is fresh, offering a delightful chewiness and a soft interior. For optimal taste and texture, consume within 24 hours of baking.
Serving Suggestions: The versatility of pita bread is truly remarkable. It’s perfect as a vessel for various fillings, from savory to sweet. Warm the pita slightly to enhance its softness before serving. Try it filled with falafel and hummus for a classic Mediterranean experience, or create your own gyros with marinated meats, vegetables, and tzatziki sauce. Alternatively, use it as a base for pizza, topping it with your favorite ingredients and baking until crispy. For a lighter option, fill it with fresh vegetables, herbs, and a simple vinaigrette.
Storage: To maintain freshness, store leftover pita bread in an airtight container at room temperature for up to 2 days. For longer storage (up to a week), place the pita in a freezer-safe bag and freeze. To reheat frozen pita, simply warm it in a toaster oven or microwave until heated through. Avoid storing pita bread in the refrigerator, as this can dry it out and affect its texture.
Complementary Dishes: Homemade pita bread pairs beautifully with a wide range of dishes. It complements Mediterranean cuisine exceptionally well, acting as the perfect accompaniment to dishes like hummus, baba ghanoush, tabbouleh, and various dips. It also works wonderfully with grilled meats, such as kebabs or chicken shawarma. Consider serving it alongside soups and stews for dipping, or use it to mop up flavorful sauces. Even a simple salad can be elevated by the addition of warm, freshly baked pita bread.
Nutritional Information (per pita bread, approximate): The nutritional information will vary depending on the ingredients used (e.g., type of flour, amount of oil). This is an estimate for a medium-sized pita bread made with all-purpose flour:
- Calories: Approximately 150-200
- Protein: 4-6 grams
- Fat: 2-4 grams
- Carbohydrates: 30-40 grams
- Fiber: 2-3 grams
Important Note: These nutritional values are estimates and can vary based on the specific recipe and ingredients used. For accurate nutritional information, use a nutrition calculator with your exact recipe details.
Enjoy your delicious homemade pita bread! Experiment with different fillings and pairings to discover your favorite combinations.