The humble crumpet, a seemingly simple foodstuff, holds a surprisingly rich history within British culinary culture. While pinning down its precise origins is difficult, evidence suggests crumpets, or at least their ancestors, have been enjoyed in some form for centuries. The name itself is thought to derive from the Old French word crompe, meaning crooked or bent, potentially referencing the irregular shape of the cooked product. Early recipes resembling crumpets appear in various cookbooks from the 18th and 19th centuries, although these were often variations on griddle cakes or muffins, highlighting the gradual evolution of the crumpet as we know it today.
The rise of industrialization and improved baking techniques in the late 19th and early 20th centuries played a significant role in the crumpet’s journey towards widespread popularity. Mass production enabled crumpets to become more accessible to a wider range of the population, moving beyond the confines of home kitchens and into bakeries and eventually supermarkets. This period also saw the standardization of the crumpet’s characteristic texture – the numerous small holes created by the leavening process, which are crucial for absorbing butter and preserves. These holes aren’t a mistake; they’re a testament to the perfect balance of batter consistency and cooking time.
Today, crumpets remain a beloved staple of British breakfasts and afternoon teas. While precise sales figures fluctuate, it’s safe to say millions of crumpets are consumed annually in the UK alone. Their cultural significance extends beyond simply being a breakfast food; they often feature in popular media, from children’s literature to television shows, reinforcing their place within British national identity. Furthermore, the crumpet’s simple yet versatile nature has allowed it to transcend its traditional role. It’s now commonly enjoyed with a variety of toppings, from the classic butter and jam to savory alternatives like avocado and smoked salmon, exemplifying its adaptability and enduring appeal.
The enduring popularity of homemade British crumpets speaks volumes about the comfort and familiarity associated with this unassuming food. The process of making them from scratch allows for a personalized touch, controlling the ingredients and creating a uniquely textured and flavorful result unmatched by mass-produced versions. This recipe aims to guide you through the creation of authentic homemade crumpets, offering a taste of British culinary tradition and the satisfaction of crafting something truly special.
Ingredients and Measurements
Making perfect homemade British crumpets hinges on precise ingredient measurements and the quality of your ingredients. Don’t be tempted to substitute – the subtle balance of flavours and textures is crucial for achieving that authentic crumpet experience.
For this recipe, we’ll be making approximately 8-10 crumpets, depending on the size of your rings.
Dry Ingredients:
Strong Bread Flour (300g): This is paramount. Strong bread flour, with its higher protein content (around 12-14%), is essential for developing the gluten that gives crumpets their characteristic texture. Using plain flour will result in a flat, dense crumpet. Weighing your flour is crucial for accuracy; don’t rely on cup measurements as they can vary significantly.
Caster Sugar (15g): A small amount of caster sugar adds a touch of sweetness and helps with browning. Granulated sugar can also be used, but caster sugar dissolves more readily into the batter, ensuring a smoother texture.
Salt (5g): Don’t underestimate the importance of salt! It balances the sweetness and enhances the overall flavour of the crumpets. Use fine sea salt or table salt for even distribution.
Baking Powder (7g): This is the leavening agent responsible for the crumpets’ signature holes. Use a fresh packet of baking powder for the best results. Old baking powder might not provide sufficient lift.
Wet Ingredients:
Warm Milk (300ml): The milk should be lukewarm, around 37-40°C (99-104°F). Too hot will kill the yeast, and too cold will hinder its activation. Use whole milk for the richest flavour and texture. You can substitute with plant-based milk alternatives, but the results may vary slightly.
Active Dry Yeast (7g): Ensure your yeast is fresh. Check the expiry date and store it properly in a cool, dry place. Using old yeast could lead to a flat, under-risen batter.
Unsalted Butter (50g, plus extra for greasing): We’ll be incorporating 50g of melted butter into the batter for flavour and richness. You’ll also need extra butter for greasing the crumpet rings and the cooking surface to prevent sticking. Use unsalted butter to control the salt content of the recipe.
Important Notes:
Accuracy is Key: Using a kitchen scale for all ingredients is highly recommended for optimal results. Slight variations in measurements can significantly impact the final product.
Ingredient Quality: The quality of your ingredients directly affects the taste and texture of your crumpets. Use the best quality flour, milk, and yeast you can find.
Room Temperature: Make sure all of your ingredients, especially the milk and butter, are at room temperature before mixing. This will ensure even mixing and activation of the yeast.
Freshness: Use fresh ingredients whenever possible for the best flavour and texture.
Equipment List
Making perfect homemade British crumpets requires the right tools. While some items are essential, others offer significant improvements to the process and final product. This list details the equipment needed, categorized for clarity, along with recommendations for optimal results.
Essential Equipment:
1. Crumpet Rings: These are absolutely crucial for achieving the characteristic crumpet shape. Aim for rings with a 3-4 inch (7.5-10cm) diameter. Smaller rings produce smaller crumpets, while larger ones may result in uneven cooking. Cast iron rings, while more expensive, offer superior heat distribution and browning. However, non-stick rings are a perfectly acceptable and more affordable alternative. Ensure your rings are at least 1 inch (2.5cm) tall to accommodate the rising batter.
2. Large Mixing Bowl: You’ll need a spacious bowl, at least 4-quart (3.8-litre) capacity, for mixing the batter. This allows for easy incorporation of all ingredients without spillage. A stainless steel or glass bowl is preferable for its durability and ease of cleaning.
3. Whisk: A balloon whisk is ideal for whipping the batter until smooth and airy. This ensures a light and fluffy texture in the final crumpets. A hand mixer can also be used, but be careful not to overmix.
4. Measuring Cups and Spoons: Accurate measurements are essential for consistent results. Use standard measuring cups and spoons, preferably those made of stainless steel or plastic.
5. Non-stick Griddle or Frying Pan: A large, flat, non-stick griddle or frying pan is necessary for cooking the crumpets. Choose a surface with a diameter that comfortably accommodates at least two crumpet rings. A heavy-bottomed pan ensures even heat distribution, preventing hot spots that can burn the crumpets.
Recommended Equipment (for improved results):
1. Kitchen Scale: While not strictly essential, a kitchen scale provides the most accurate measurements, particularly for the flour, which can vary in weight depending on the type and brand. This leads to more consistent crumpet texture.
2. Spatula: A thin, flexible spatula is helpful for gently checking the crumpets’ doneness and for carefully removing them from the rings once cooked.
3. Tongs: Using tongs helps prevent burns when handling the hot crumpet rings and cooked crumpets.
4. Oven (optional): While crumpets are primarily cooked on the stovetop, a warm oven can be used to keep cooked crumpets warm while you finish cooking the remaining batch. A low temperature of around 170°F (77°C) is sufficient.
Cleaning Considerations: Always allow your equipment to cool completely before cleaning. Non-stick surfaces should be cleaned gently to avoid scratching. Cast iron rings may require more vigorous scrubbing if food residue sticks.
Mixing the Crumpet Batter
Creating the perfect crumpet batter is crucial for achieving those signature light and airy holes. This process requires a gentle hand and patience; rushing will result in tough crumpets. We’ll be using a simple, yet effective, method that prioritizes developing the gluten just enough without overworking it.
Begin by warming 150ml (½ cup + 2 tbsp) of full-fat milk in a small saucepan over low heat. Do not boil the milk; you simply want it lukewarm, around 37-40°C (99-104°F). This warm milk activates the yeast more effectively, leading to a faster and more consistent rise.
In a large mixing bowl, combine 7g (2 ¼ tsp) of fast-acting dried yeast with 50g (½ cup) of plain (all-purpose) flour. Gently whisk these together to distribute the yeast evenly through the flour. This prevents the yeast from clumping and ensures even fermentation throughout the batter.
Slowly pour the lukewarm milk into the flour and yeast mixture, whisking gently with a wooden spoon or spatula. Avoid using a whisk at this stage, as vigorous whisking will develop too much gluten, resulting in tough crumpets. The goal is to create a smooth, lump-free batter without incorporating too much air.
Once the milk is fully incorporated, add a further 150g (1 ¼ cup) of plain flour. Again, gently stir until just combined. There will be some lumps at this stage, which is perfectly fine. Do not overmix.
Now, add a generous pinch of salt (approximately 5g or 1 tsp) and 15g (1 tbsp + 1 tsp) of caster (granulated) sugar. These ingredients enhance the flavour and slightly adjust the yeast activity. Stir gently to combine.
Finally, stir in 2 tbsp of melted unsalted butter. The melted butter adds richness and contributes to the tender crumb of the crumpets. This should be done gently to ensure everything is well incorporated. Let the batter rest for at least 30 minutes, and up to 2 hours. This resting period allows the yeast to fully activate and the gluten to relax, resulting in a lighter, airier crumpet.
During the resting period, you’ll notice the batter rising slightly and becoming bubbly. This is a sign that the yeast is working its magic. Once rested, gently stir the batter again before cooking. This will redistribute any settled yeast and ensure even cooking.
Tip: For a richer flavour, you can substitute some of the milk with buttermilk. Experiment with different flours too; wholemeal flour will give a slightly nuttier flavour and a denser texture.
Remember, patience and a gentle hand are key to making perfect crumpets. Don’t rush the process, and enjoy the rewarding results of your homemade efforts!
Cooking the Crumpets
Cooking crumpets perfectly requires a bit of finesse, but the results are well worth the effort. The key is to achieve a beautifully bubbly surface and a soft, slightly chewy interior. We’ll achieve this using a lightly oiled, medium-hot griddle or frying pan.
Begin by preheating your griddle or heavy-bottomed frying pan over medium heat. Do not overheat; a scorching hot pan will burn the crumpets before the inside cooks through. A good way to test the temperature is to sprinkle a few drops of water onto the surface. If the water sizzles gently and evaporates quickly, your pan is ready. If it evaporates instantly, it’s too hot. If it sits there, it’s too cool.
Lightly oil the hot surface with a neutral-flavored oil like vegetable or canola oil. You can use a paper towel or a pastry brush to apply a thin, even coating. Avoid using too much oil, as this will lead to greasy crumpets and potentially make them burn before cooking through. Aim for a light sheen on the surface.
Carefully place your crumpet mixture onto the hot griddle using a 1/4 cup measure for each crumpet. This will ensure even-sized and evenly cooked crumpets. Leave a small gap between each crumpet to allow for expansion during cooking. Do not overcrowd the pan; this will lower the temperature and result in uneven cooking.
Cook for approximately 2-3 minutes per side, or until you see small bubbles forming on the surface of the crumpet. These bubbles are a sign that the crumpet is rising and cooking properly. Once the bubbles start to burst and the edges appear slightly golden brown, it’s time to flip.
Flipping the crumpets requires a gentle touch. Use a thin spatula to carefully loosen the edges and flip the crumpets over. Avoid pressing down too hard, as this can flatten them. Cook for another 2-3 minutes on the second side, until golden brown and cooked through. The crumpets should be nicely puffed up and feel springy to the touch.
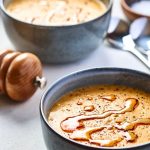
Once cooked, remove the crumpets from the pan and place them on a wire rack to cool slightly. Avoid stacking the crumpets while they are still hot, as this can make them soggy. Serve immediately with your favorite toppings – butter, jam, marmalade, or even a savory topping like cream cheese and smoked salmon.
Troubleshooting: If your crumpets are browning too quickly, lower the heat. If they are not browning enough, increase the heat slightly. If they are collapsing, your batter might be too thin or your pan too hot. Experiment with different cooking times and temperatures to find what suits your equipment best. Remember, practice makes perfect!
Enjoy your perfectly cooked homemade British crumpets!
Checking for Doneness
Achieving perfectly cooked crumpets is a crucial step in this recipe. Undercooked crumpets will be doughy and gummy in the center, while overcooked ones will be dry and hard. Mastering the art of checking for doneness requires a keen eye and a gentle touch.
The first visual clue is the appearance of bubbles on the surface of the crumpet. As the batter cooks, you’ll see small bubbles forming and expanding. These bubbles are your friend! They indicate that the batter is setting and the internal structure is beginning to form. Don’t rush this process; allow the bubbles to fully develop and become somewhat larger and less frequent before moving to the next step.
Once the initial bubbling subsides slightly, and you notice a distinct change in color around the edges of the crumpet – a light golden brown – it’s time to start paying closer attention. This typically takes around 2-3 minutes per side on a medium heat. However, your stovetop may vary, so adjust cooking time as needed.
The crucial test comes with gently pressing the surface of the crumpet with a spatula or your finger (be careful, it will be hot!). A well-cooked crumpet will offer slight resistance, yet spring back gently. It shouldn’t feel soft and sticky, nor should it feel completely hard. The ideal texture is a delicate balance between firm and slightly yielding.
If the crumpet feels significantly soft and uncooked in the center, give it another minute or two on each side. Remember to keep the heat at a medium level to ensure even cooking and prevent burning. High heat will brown the outside before the inside is cooked, creating a hard exterior and a raw interior, which is undesirable.
Conversely, if you press the crumpet and it feels hard and dry, it’s likely overcooked. This usually happens when the heat is too high or the cooking time is excessive. Unfortunately, there’s no easy fix for overcooked crumpets, so careful monitoring is key.
For perfectly cooked crumpets, aim for a light golden-brown color on both sides, a slightly spongy texture, and a pleasant resistance when gently pressed. The holes should be evenly distributed, and there should be no raw batter remaining in the center. Practice makes perfect, and with a little experience, you’ll learn to judge doneness with ease. Remember, a slight variation in cooking time is perfectly acceptable depending on your stovetop and the thickness of your batter.
If you’re unsure, it’s always better to err on the side of caution and cook for a slightly shorter period. You can always cook the crumpet for a little longer if needed, but you can’t undo overcooking. Trust your senses, observe the visual cues, and use the gentle press test to achieve crumpets that are perfectly cooked and utterly delicious.
Cooling and Serving Your Homemade British Crumpets
Once your crumpets are cooked to perfection, golden brown and puffed up beautifully, the next crucial step is cooling and serving them correctly to maintain their texture and flavour. Improper cooling can lead to soggy crumpets, diminishing the overall enjoyment of your hard work.
The initial cooling phase is critical. Immediately after removing the crumpets from the pan, transfer them to a wire rack. This allows for even air circulation around each crumpet, preventing trapped moisture that can lead to sogginess. Avoid stacking them directly on top of each other; instead, arrange them in a single layer to ensure optimal airflow. Let them cool for at least 10-15 minutes on the wire rack.
The cooling environment matters. Avoid placing the cooling crumpets in a drafty area or near a source of heat, such as an oven or stovetop. A cool, dry area at room temperature is ideal. Excessive heat will dry the crumpets out, while a humid environment will promote sogginess. A well-ventilated kitchen counter is a perfect spot.
For longer storage (up to 2 days), allow the crumpets to cool completely before storing them. Once cool, place them in an airtight container – a plastic container with a tight-fitting lid works well. A bread box is also a suitable option. Do not refrigerate fresh crumpets as this will significantly impact their texture, making them dry and stale more quickly. Room temperature is best for preserving their softness.
Reheating leftover crumpets. If you have leftover crumpets, you can easily refresh them. The best method is to lightly toast them in a toaster for 30-60 seconds, or until warmed through and lightly crisp. Alternatively, you can gently heat them in a non-stick pan over medium-low heat for a minute or two per side, ensuring they don’t burn. Avoid using high heat, as this can lead to burning and uneven heating.
Serving suggestions: British crumpets are incredibly versatile. Traditionally, they are served warm with butter, and perhaps a generous spread of jam or marmalade. However, your culinary creativity knows no bounds! Consider these options:
- Savory toppings: Cream cheese and smoked salmon, avocado and poached eggs, mushrooms and wilted spinach, or even a full English breakfast spread.
- Sweet toppings: Nutella, lemon curd, honey and ricotta, or fresh berries and whipped cream.
Presentation is key: When serving your homemade crumpets, arrange them attractively on a plate or serving platter. A simple dusting of icing sugar can add a touch of elegance to sweet variations. For savory options, consider garnishing with fresh herbs or a sprinkle of seasoning. Remember, the presentation should reflect the effort and care you put into making these delicious crumpets.
By following these cooling and serving guidelines, you can ensure your homemade British crumpets retain their delightful texture and flavour, leading to a truly satisfying and enjoyable experience for you and your guests. Enjoy!
Recommendations for Homemade British Crumpets
Your freshly baked homemade British crumpets are best enjoyed immediately while still warm and slightly soft. The slight crispiness on the outside and the airy, spongy interior is what makes them truly special. For optimal enjoyment, serve them within 1-2 hours of baking. However, if you have leftovers, don’t despair, there are ways to enjoy them even later.
Serving Suggestions: The classic way to enjoy a crumpet is simply toasted lightly and spread generously with butter. However, the possibilities are endless! Consider adding a layer of your favourite jam (strawberry, raspberry, or even marmalade are excellent choices), a dollop of clotted cream (for a truly luxurious experience), or a spread of lemon curd for a zesty twist. For a savoury option, try topping your crumpets with avocado and a sprinkle of chilli flakes, smoked salmon and cream cheese, or even a fried egg. The versatility of crumpets allows for delicious sweet and savoury pairings.
Storage: To maintain the best quality, store leftover crumpets in an airtight container at room temperature for up to 2 days. After two days, they may start to dry out. You can extend their shelf life by freezing them. Wrap individual crumpets tightly in cling film and then place them in a freezer bag. Frozen crumpets will last for up to 3 months. To reheat frozen crumpets, simply toast them from frozen or thaw them overnight in the refrigerator and then toast as usual. Microwaving is not recommended as it can make them soggy.
Complementary Dishes: Crumpets are wonderfully versatile and can be part of a larger breakfast, brunch, or even light lunch. They pair beautifully with a full English breakfast, adding a lighter element to the richness of the sausages, bacon, and eggs. For a more refined brunch, serve them alongside fresh fruit salad, yoghurt, and a pot of tea or coffee. They also make a great accompaniment to a light soup or salad for a simple lunch. For afternoon tea, crumpets are a delightful alternative to scones.
Nutritional Information (per crumpet, approximate values): The nutritional content will vary depending on the ingredients used, particularly the type of flour and the amount of butter or other additions. However, a typical homemade crumpet will contain approximately: Calories: 150-200; Fat: 5-8g; Saturated Fat: 2-4g; Carbohydrates: 25-30g; Sugars: 2-4g; Protein: 4-6g; Fibre: 2-3g. These are estimates and should be considered approximate. For precise nutritional information, use a nutrition calculator with your specific recipe ingredients and quantities.
Important Note: These are general recommendations. The taste and texture of your crumpets will depend on the specific recipe you follow and the quality of your ingredients. Experiment with different toppings and serving suggestions to find your favourite combinations!