Prepare yourself for a journey into the tangy, probiotic-rich world of homemade berry kefir! This delightful fermented beverage boasts a history as rich and complex as its flavor profile. Its origins trace back thousands of years, with evidence suggesting kefir grains – the crucial ingredient responsible for fermentation – were first discovered in the Caucasus Mountains, a region spanning parts of Russia, Georgia, and other countries. These grains, actually a symbiotic culture of bacteria and yeasts, are not grains at all, but rather a living, dynamic colony that multiplies during the fermentation process. Their exact origin remains shrouded in some mystery, but legends speak of their discovery by nomadic tribes, who attributed miraculous health benefits to the drink.
For centuries, kefir remained a treasured secret, passed down through generations within these communities. It held significant cultural importance, often associated with longevity and robust health. This wasn’t just folklore; studies have indeed shown the potential health benefits of kefir, including improved digestion due to its high probiotic content. In fact, a single serving of kefir can contain upwards of 10 billion beneficial microorganisms—a significant boost to your gut microbiome. The traditional preparation methods involved using animal milk, primarily goat or cow’s milk, which further contributed to its nutritional value. However, modern variations, like this homemade berry kefir recipe, offer exciting adaptations using plant-based milks and fruit additions for a delightful twist on this ancient drink.
The spread of kefir beyond the Caucasus Mountains was relatively slow initially. It wasn’t until the late 19th and early 20th centuries that kefir gained wider recognition in Europe and eventually the rest of the world. This global dissemination, facilitated by increased travel and communication, led to diverse interpretations of the traditional recipe. While the core fermentation process remains consistent, the types of milk, added fruits, and sweeteners vary significantly depending on regional preferences and availability. Interestingly, the global kefir market is experiencing significant growth, projected to reach billions of dollars in the coming years, reflecting a growing consumer interest in probiotic-rich foods and beverages. This homemade recipe allows you to reclaim control over the ingredients, ensuring a high-quality, delicious, and authentic kefir experience, customized to your taste.
Ingredients and Measurements
Creating delicious homemade berry kefir requires careful attention to ingredient quality and precise measurements. The success of your kefir depends heavily on using fresh, high-quality ingredients and maintaining accurate proportions. Let’s delve into the specifics:
Kefir Grains: You’ll need approximately 2 tablespoons of active kefir grains. The quality of your kefir grains is paramount. Ensure they are white or slightly yellowish, with a pleasant, slightly sour aroma. Avoid using grains that appear slimy, discolored, or have an off-putting odor. These may indicate spoilage and could negatively impact your kefir’s flavor and texture. If you’re starting with a small amount of grains, don’t worry; they will multiply with each batch.
Milk: For this recipe, we’ll use 1 liter (approximately 4 cups) of whole milk. Whole milk is recommended because its higher fat content provides a richer, creamier kefir with a more pronounced flavor. You can experiment with other types of milk, such as goat’s milk or almond milk, but keep in mind that the resulting kefir may have a different texture and taste. Always use pasteurized milk to ensure safety and prevent unwanted bacteria growth. Avoid using ultra-high-temperature (UHT) pasteurized milk, as the high heat treatment can negatively affect the kefir grains’ activity.
Berries: The beauty of homemade berry kefir lies in its versatility. Feel free to experiment with your favorite berries! For this recipe, we’ll use a mix of 1 cup of fresh raspberries, 1/2 cup of fresh blueberries, and 1/2 cup of fresh strawberries. Use ripe, but not overripe, berries. Overripe berries can lead to unwanted fermentation and an unpleasant taste. Thoroughly wash and gently dry the berries before adding them to the kefir. You can adjust the quantities of berries based on your preference for sweetness and berry flavor intensity.
Sugar (Optional): While not strictly necessary, you can add a touch of sweetness to your kefir. Consider adding 1-2 tablespoons of granulated sugar or honey. Adding sugar is entirely optional and depends on your taste preference. The natural sweetness of the berries often provides enough sweetness for many people. If you add sugar, ensure it’s completely dissolved before adding the kefir grains to prevent clumping.
Sweetener Alternatives: If you prefer a sugar-free option, consider using a sugar substitute like stevia or erythritol. Remember to adjust the amount according to the substitute’s sweetness level. Always follow the manufacturer’s instructions for the specific sweetener you choose. Excessive amounts of artificial sweeteners can affect the fermentation process.
Important Note: Accurate measurements are crucial for a successful kefir fermentation. Use a kitchen scale for the most precise measurements, especially for the kefir grains and milk. Using measuring cups can lead to slight variations, potentially affecting the final product.
Equipment List
Making homemade berry kefir requires a relatively small amount of equipment, but the quality of your equipment can significantly impact the final product and the safety of your fermentation process. Investing in a few key items will ensure a smooth and successful kefir-making experience.
Glass Jars: You’ll need at least one, preferably two, wide-mouth glass jars for fermenting your kefir. Choose jars with a capacity of at least 1-quart (approximately 1 liter). Larger jars are preferable if you plan on making larger batches. Avoid using plastic containers, as they can leach chemicals into your kefir and harbor bacteria. Glass is non-reactive and the best choice for fermentation. Properly cleaned and sanitized jars are crucial to prevent unwanted microbial growth.
Fine-Mesh Sieve or Cheesecloth: This is essential for separating the kefir grains from the finished kefir. A fine-mesh sieve (with holes smaller than 1mm) is ideal as it prevents the loss of even the smallest kefir grains. If you use cheesecloth, ensure it’s a tightly woven, food-grade variety. Avoid using loosely woven cheesecloth, as it may allow small grains to escape.
Measuring Cups and Spoons: Accurate measurements are key to successful fermentation. Use measuring cups and spoons that are clearly marked in both metric (milliliters and grams) and US customary units (cups, tablespoons, teaspoons) to ensure consistency in your recipes. This is particularly important when measuring your kefir grains and starter cultures.
Wooden or Silicone Spoon: Avoid using metal utensils when stirring your kefir. Metal can react with the kefir and potentially affect its taste or introduce unwanted metallic ions. Wooden or silicone spoons are excellent choices, as they are non-reactive and easy to clean.
Airtight Container for Storage: Once your kefir is strained, you’ll need an airtight container to store it in the refrigerator. Glass jars with airtight lids or food-grade plastic containers are suitable options. Proper storage will ensure your kefir remains fresh and flavorful for several days.
Bottle Brush: Thorough cleaning is paramount in preventing contamination. A long-handled bottle brush will help you easily clean the inside of your fermentation jars. Ensure the bottle brush is well-rinsed after each use to prevent the build-up of residue and bacteria.
Sanitizing Solution: Before each use, sanitize all your equipment to eliminate potential contaminants. A solution of 1 part bleach to 10 parts water is effective, but ensure you rinse thoroughly with clean water afterwards. Alternatively, you can use a dedicated food-safe sanitizer.
Optional: Thermometer: While not strictly necessary, a thermometer can help you monitor the temperature of your fermenting kefir. This is especially helpful if you are experimenting with different fermentation times and temperatures. A digital thermometer with a wide temperature range is ideal.
Optional: Kitchen Scale: A kitchen scale can aid in precise measurements of ingredients, particularly when working with larger batches or when using specific recipes that require precise weights of berries or other ingredients.
Berry Preparation for Homemade Berry Kefir
The quality of your berries directly impacts the flavor and overall success of your homemade berry kefir. Careful preparation is key to achieving a delicious and safe final product. This section details the steps for properly preparing your berries, regardless of whether you’re using fresh, frozen, or a combination of both.
Choosing Your Berries: Start with high-quality berries. Look for firm, plump berries that are free from mold, bruises, or significant blemishes. Avoid berries that are overly soft or show signs of spoilage. While organic berries are preferable, conventionally grown berries are perfectly acceptable as long as they are thoroughly washed.
Washing and Cleaning: Thorough washing is crucial to remove any pesticides, dirt, or other contaminants. Gently rinse 1 pound (approximately 450 grams) of berries under cool, running water in a colander. Avoid soaking the berries for extended periods, as this can lead to them becoming waterlogged and losing their flavor. For particularly delicate berries like raspberries or blueberries, a gentle swish in the water is sufficient. For strawberries, consider using a berry huller to remove the green caps, which can harbor dirt and bacteria.
Removing Stems and Hulls (If Applicable): Depending on the type of berries you’re using, you may need to remove stems and hulls. Strawberries require hulling, while raspberries and blackberries often benefit from having their stems removed. This can be done manually or with a berry huller and small paring knife. Be sure to discard any damaged or moldy parts of the berries during this process. Careful removal helps prevent unwanted bitterness or mold contamination in your final kefir.
Preparing Frozen Berries: If using frozen berries, allow them to thaw completely before using. This is essential to ensure even fermentation and prevent icy pockets in your kefir. The best way to thaw berries is to transfer them from the freezer to the refrigerator overnight. Avoid thawing them at room temperature, as this can encourage bacterial growth. Once thawed, gently drain any excess liquid before adding them to your kefir mixture. This liquid can dilute the flavor and potentially affect the fermentation process.
Optional: Crushing or Pureeing: While you can add whole berries to your kefir, crushing or pureeing them can enhance the flavor and texture of your final product. For a slightly chunky kefir, simply gently crush the berries with a potato masher or the back of a spoon. For a smoother kefir, use an immersion blender or food processor to puree the berries until you achieve your desired consistency. Remember that pureeing will result in a smoother, potentially sweeter kefir.
Measuring Your Berries: Accurate measurement is important for consistent results. Use a kitchen scale to weigh your berries for the most precise measurement. If you don’t have a scale, use a measuring cup, remembering that the volume will vary depending on the type and size of the berries. A general guideline is approximately 1 cup (about 150 grams) of prepared berries per quart (approximately 1 liter) of kefir milk.
By following these steps, you’ll ensure your berries are properly prepared for making delicious and safe homemade berry kefir. Remember to always prioritize hygiene and food safety throughout the entire process.
Kefir Grain Preparation: Getting Started with Your Culture
Before you begin making your delicious homemade berry kefir, you need to properly prepare your kefir grains. This crucial step ensures the health and longevity of your culture, leading to consistently successful batches of kefir.
Acquiring Kefir Grains: You can purchase kefir grains online from reputable suppliers or, if you’re lucky, from a friend who already makes kefir. When receiving your grains, inspect them carefully. They should appear as small, off-white to tan, irregular nodules, resembling tiny cauliflower florets. Avoid grains that smell sour or unpleasant; this indicates potential problems.
Initial Rinsing: Upon receiving your grains, gently rinse them under cool, filtered water. This removes any excess whey or packaging residue. Use a fine-mesh sieve or a clean, fine cheesecloth to prevent losing any of the delicate grains. Avoid using hot water, as this can kill the beneficial bacteria and yeast.
First Kefir Fermentation: For the initial fermentation, you’ll need approximately 1/4 cup of kefir grains and 1 cup of milk. Use whole milk for the best results; the fat content provides essential nutrients for the grains. You can also experiment with other milks like goat’s milk or coconut milk, but whole cow’s milk is recommended for beginners. Pour the milk into a clean glass jar (avoid using metal containers). Add the rinsed kefir grains and stir gently to ensure they are fully submerged in the milk.
Incubation: Cover the jar with a breathable cloth (cheesecloth works well) secured with a rubber band. This allows for gas exchange while preventing contamination. Avoid using airtight lids, as the fermentation process produces carbon dioxide gas, which needs to escape. Place the jar in a warm location (ideally between 70-75°F or 21-24°C) for 24-48 hours. The fermentation time depends on the temperature and the activity of your grains; warmer temperatures lead to faster fermentation.
Monitoring Fermentation: Observe the kefir regularly. It’s ready when it has a slightly tangy aroma and a consistency similar to yogurt. The milk will likely thicken, and you may see some separation of whey (a clear liquid). If the kefir is too thin after 48 hours, you can leave it to ferment for a longer period. If it’s too thick or sour, shorten the fermentation time for your next batch.
Separating Kefir Grains: Once the kefir is ready, gently strain it through a fine-mesh sieve or cheesecloth to separate the grains from the kefir. Be gentle to avoid damaging the delicate grains. Rinse the grains again with cool, filtered water and store them in a clean, glass jar with 1/4 cup of fresh milk. This keeps them alive and ready for your next batch of kefir.
Storing Kefir Grains: Store the grains in the refrigerator between fermentations. They can be stored in the milk for up to a week, but you can also store them in a smaller amount of milk (approximately 2 tablespoons) for longer periods.Regularly check your grains and replace the milk as needed to prevent them from drying out. With proper care, your kefir grains can last for many years, providing you with a continuous supply of this healthy and delicious drink.
Fermentation Process
Making homemade berry kefir involves a two-stage process: first, preparing the kefir grains and milk mixture, and then the fermentation itself. This section details the fermentation process, crucial for achieving a tangy, probiotic-rich drink.
Sterilization is paramount. Before you begin, ensure all your equipment – jars, spoons, and funnels – are thoroughly sterilized. You can achieve this by boiling them in water for at least 10 minutes, or running them through a dishwasher on a high-heat cycle. This prevents unwanted bacteria from competing with your kefir grains and spoiling the final product.
Prepare your kefir grains. Start with approximately 2 tablespoons of active kefir grains. If your grains are dry, rehydrate them by gently stirring them into 1/2 cup of milk (whole milk is recommended for richer kefir) and letting them sit at room temperature for 2-4 hours. This helps to reactivate the grains and prepare them for the fermentation process.
Combine ingredients. In a clean, sterilized 1-quart glass jar, combine the rehydrated kefir grains with 1 cup of whole milk. Add 1/2 cup of your chosen berries (fresh or frozen, but make sure they are thoroughly washed and any stems removed). Avoid using overly ripe or moldy berries, as this can negatively affect the fermentation and the taste of your kefir.
Cover loosely. Cover the jar with a cheesecloth or a breathable lid (like a coffee filter secured with a rubber band). Do not seal the jar airtight, as this can cause pressure buildup and potentially lead to an explosion or unwanted off-flavors. The cheesecloth allows gases produced during fermentation to escape while preventing contamination from airborne particles.
Fermentation time and temperature. The fermentation process usually takes 12-48 hours at room temperature (ideally around 70-75°F or 21-24°C). The fermentation time depends on several factors, including the temperature of your environment, the activity of your kefir grains, and your desired level of tartness. A warmer environment will result in faster fermentation, while a colder environment will slow it down. Check on your kefir every 12 hours to monitor its progress. The kefir is ready when it has reached your desired level of tartness and the berries have released their flavor and color into the milk.
Testing for readiness. Taste test a small amount to determine if the kefir has reached your desired level of tanginess. You should also observe the kefir for signs of fermentation – it will have a slightly thicker consistency and may show some separation of whey (a watery liquid). If it tastes too sour, it’s over-fermented. If it tastes too mild, allow it to ferment for a few more hours.
Strain and store. Once the fermentation is complete, carefully strain the kefir through a fine-mesh sieve lined with cheesecloth to separate the kefir grains from the fermented milk. Gently press the solids to extract as much liquid as possible. Return the kefir grains to a clean jar with fresh milk and berries to start a new batch. Store the strained berry kefir in an airtight container in the refrigerator. It will keep for up to 7-10 days, although the flavor may change slightly over time.
Important Note: Always practice good hygiene and follow these instructions carefully to ensure safe and successful fermentation. If you notice any unusual smells or mold growth, discard the batch immediately.
Storage Instructions for Homemade Berry Kefir
Proper storage is crucial for maintaining the quality, safety, and beneficial properties of your homemade berry kefir. Improper storage can lead to spoilage, off-flavors, and even the growth of harmful bacteria. Follow these instructions carefully to ensure you enjoy your kefir for as long as possible.
Immediately after straining your kefir, transfer it to clean, sanitized glass containers. Avoid using plastic containers, as they can leach chemicals into your kefir, altering its taste and potentially affecting its beneficial bacteria. Glass is the best option for preserving both flavor and beneficial cultures.
Fill the containers to within 1 inch of the top. This leaves room for expansion during fermentation, preventing spills and potential overflow. Overfilling can cause pressure buildup, leading to cracks or breakage of the glass containers.
Seal the containers tightly with airtight lids. Loose lids can allow oxygen to enter, potentially impacting the quality of your kefir and allowing unwanted molds or bacteria to grow. Ensure the lids are properly secured to create an airtight seal.
Refrigerate your kefir immediately after bottling. The cold temperature of the refrigerator slows down fermentation and prevents further changes in the kefir’s consistency and flavor. Storing at a temperature below 40°F (4°C) is essential. Higher temperatures can encourage unwanted bacterial growth.
Your homemade berry kefir should be stored in the refrigerator for no more than 7-10 days. After this time, the flavor and texture may start to deteriorate, and the risk of spoilage increases significantly. While some kefir may last longer, it’s best to err on the side of caution and consume it within this timeframe for optimal quality and safety. Discard any kefir that shows signs of spoilage, such as mold growth, unusual discoloration, or an off-putting odor.
For longer storage (beyond 7-10 days), consider freezing your kefir. Freezing preserves the kefir for an extended period, although some texture changes may occur upon thawing. Pour your kefir into freezer-safe containers, leaving approximately 1 inch of headspace to accommodate expansion during freezing. Properly sealed containers will help prevent freezer burn. Frozen kefir can typically be stored for up to 3 months.
When thawing frozen kefir, thaw it slowly in the refrigerator. Rapid thawing can alter the kefir’s texture and flavor. Once thawed, consume the kefir within 24 hours.
Always practice good hygiene when handling your kefir. Wash your hands thoroughly before and after handling the kefir and its containers. Use clean utensils and sanitized equipment throughout the entire process to minimize the risk of contamination.
Remember, these are general guidelines. The actual shelf life of your kefir might vary depending on factors such as the initial quality of the ingredients, the cleanliness of your equipment, and the ambient temperature during storage. Always trust your senses – if something looks, smells, or tastes off, discard it immediately.
Homemade Berry Kefir: Recommendations
Your homemade berry kefir is now ready to enjoy! This tangy, probiotic-rich drink is a delicious and healthy addition to your diet. To maximize its benefits and flavor, follow these recommendations.
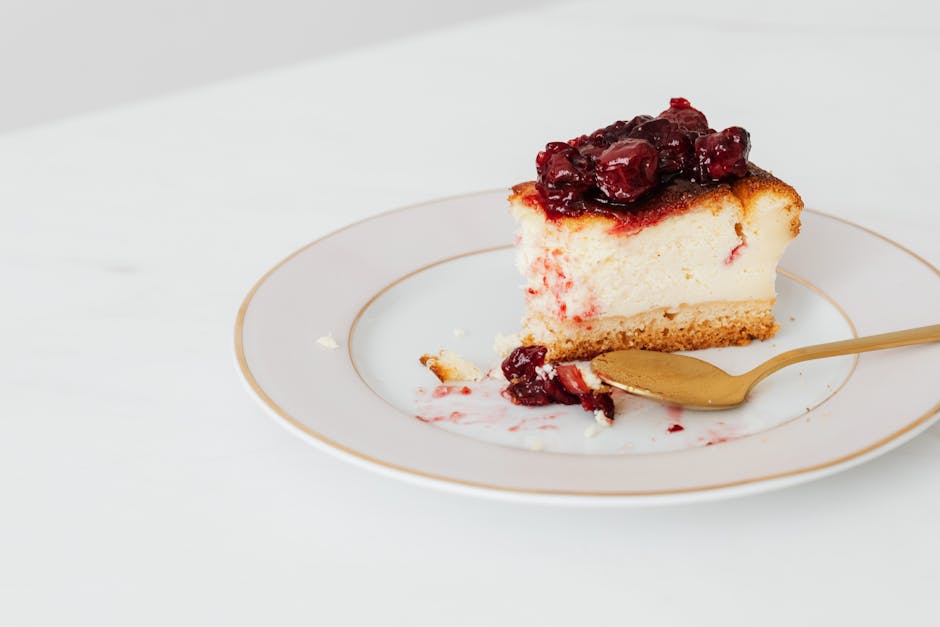
Serving Suggestions: This kefir is incredibly versatile. Enjoy it chilled straight from the refrigerator as a refreshing beverage. For a thicker consistency, strain the kefir through a cheesecloth lined sieve for a few hours. This creates a thicker, yogurt-like texture perfect for topping with granola, fresh berries, or a drizzle of honey. You can also blend your kefir with other fruits and vegetables for a delicious smoothie. Consider adding spinach, banana, or mango for a nutrient-packed treat. It also makes a fantastic base for vinaigrettes, adding a unique tang to your salads.
Storage Conditions: Proper storage is crucial for maintaining the quality and beneficial bacteria in your kefir. Store your homemade berry kefir in an airtight container in the refrigerator. It should remain fresh and flavorful for up to 7-10 days. However, it’s best consumed within 5 days for optimal probiotic activity. After this time, the flavor might begin to change, and the probiotic count may decrease. Avoid storing your kefir at room temperature, as this can promote unwanted bacterial growth.
Complementary Dishes: The slightly tart and subtly sweet flavor of berry kefir complements a wide array of dishes. It pairs beautifully with pancakes or waffles, adding a unique twist to your breakfast. It is also a fantastic addition to smoothies, providing a creamy texture and a boost of probiotics. Use it as a marinade for chicken or fish, tenderizing the meat and adding a subtle tang. Its slightly acidic nature also makes it a great accompaniment to rich and savory dishes, cutting through the heaviness of a meal. Consider serving it alongside a hearty stew or a grilled cheese sandwich for a balanced and flavorful meal.
Nutritional Information (Approximate per 8oz serving): The exact nutritional content will vary depending on the specific berries used and the amount of sugar added. However, a typical serving of homemade berry kefir provides approximately 100-150 calories, 2-3 grams of protein, and a significant amount of probiotics beneficial for gut health. It’s also a good source of vitamin C and various antioxidants, depending on the berries used. Please note that these are estimates, and the actual nutritional content may vary.
Important Note: While kefir is generally safe for consumption, individuals with compromised immune systems or those with specific health conditions should consult their doctor before incorporating it into their diet. If you notice any unusual changes in taste, smell, or texture, discard the kefir immediately.