Homemade almond milk, a creamy, subtly sweet beverage, boasts a history as rich and nuanced as its flavor profile. While pinpointing its exact origin is difficult, its roots can be traced back to ancient civilizations, particularly in the Middle East and Mediterranean regions where almonds thrived. Evidence suggests that almond-based drinks have been consumed for centuries, possibly even millennia, as a nutritious and refreshing alternative to water or other beverages. These early iterations likely differed significantly from the commercially produced almond milks available today, relying on simpler methods of preparation and featuring a more rustic texture.
The widespread adoption of almond milk, however, is a relatively recent phenomenon. Historically, it remained largely a niche beverage, primarily consumed within specific cultures or by individuals with dietary restrictions or allergies. Its popularity exploded in the late 20th and early 21st centuries, fueled by several converging factors. The growing awareness of lactose intolerance and the rise of veganism and vegetarian diets created a significant demand for dairy-free alternatives. Simultaneously, advancements in food processing and packaging technologies made it easier to produce and distribute almond milk on a large scale, leading to its presence in supermarkets worldwide.
Today, almond milk is a global phenomenon. The market for plant-based milk alternatives, of which almond milk is a significant component, is booming. Industry reports estimate the market value to be in the billions of dollars, and it continues to grow annually. This reflects not only the increasing number of consumers seeking dairy-free options but also the growing recognition of almond milk’s nutritional benefits. It’s a good source of vitamin E, a powerful antioxidant, and is often fortified with calcium, vitamin D, and other essential nutrients, making it a popular choice among health-conscious individuals.
Beyond its nutritional value, almond milk holds cultural significance in various parts of the world. In some regions, it remains a traditional drink, deeply embedded in local culinary practices and often associated with specific celebrations or rituals. Its versatility also contributes to its cultural appeal. It can be enjoyed on its own, as a part of breakfast cereals, added to coffee or tea, or used as an ingredient in various recipes, from smoothies to soups, showcasing its adaptability and widespread acceptance across diverse culinary traditions.
Making almond milk at home offers a rewarding experience, allowing for greater control over ingredients and the creation of a personalized beverage tailored to individual preferences. Unlike commercially produced versions, homemade almond milk avoids many additives and preservatives, resulting in a fresher, often more flavorful, and arguably healthier product. This return to more traditional food preparation methods reflects a growing consumer interest in simplicity, authenticity, and the direct connection to the source of their food.
Ingredients and Measurements
Making homemade almond milk is surprisingly simple and allows for complete control over the ingredients and sweetness. The following recipe yields approximately four cups of almond milk. You can easily scale it up or down depending on your needs. Remember to always use high-quality ingredients for the best results.
Almonds: The foundation of your almond milk is, of course, the almonds themselves. We recommend using 1 cup of raw, unsalted almonds. Avoid using blanched almonds, as the skins contain beneficial nutrients and contribute to a richer flavor and creamier texture. If you prefer a smoother milk, you can blanch a portion of the almonds, but using all raw almonds is generally preferred. Ensure your almonds are fresh and free from any visible blemishes or signs of spoilage.
Water: The quantity of water you use will influence the consistency of your almond milk. This recipe calls for 4 cups of filtered or spring water. Using filtered water is recommended to avoid any off-flavors that might be present in tap water. If you prefer a thicker almond milk, start with 3 cups of water and add more as needed to reach your desired consistency. Conversely, for a thinner milk, use up to 5 cups of water.
Sweetener (Optional): Many people prefer to sweeten their almond milk. The amount is entirely up to your personal preference. Popular choices include maple syrup, agave nectar, or dates. If using maple syrup or agave, start with 2-4 tablespoons and adjust to taste. If using dates, pit and roughly chop 2-4 Medjool dates. Remember that the sweetness of the dates can vary depending on their ripeness, so start with a smaller amount and add more as needed. You can also omit the sweetener altogether for a completely unsweetened almond milk.
Salt (Optional): A pinch of salt (approximately 1/4 teaspoon) can enhance the flavor of your homemade almond milk, balancing the sweetness and adding a subtle savory note. This is entirely optional, but highly recommended for a more well-rounded taste profile. It also acts as a natural preservative, extending the shelf life of your almond milk slightly.
Vanilla Extract (Optional): A teaspoon or two of pure vanilla extract can add a lovely aroma and flavor to your almond milk. Use high-quality vanilla extract for the best results. This is entirely optional and depends on your flavor preference.
Other Flavorings (Optional): Feel free to experiment with other flavorings to customize your almond milk. A pinch of cinnamon, cardamom, or nutmeg can create warm and comforting flavors. You could also add cocoa powder for a chocolate almond milk or blend in some fresh or frozen fruit for a naturally sweetened and fruity version. The possibilities are endless!
Important Note: Always measure your ingredients accurately for consistent results. Using a kitchen scale for the almonds is recommended for precision, especially if you are scaling the recipe up or down. Accurate measurements are crucial for achieving the desired texture and flavor in your homemade almond milk.
Soaking the Almonds (Preparation Phase)
Soaking almonds is a crucial step in making homemade almond milk. It significantly improves the digestibility and nutrient bioavailability of the almonds, making the resulting milk creamier and more nutritious. This process also helps to reduce the amount of phytic acid, an antinutrient that can hinder the absorption of minerals.
For this recipe, we’ll be using 1 cup (approximately 150 grams) of raw, unsalted almonds. Avoid using blanched almonds as the skin contains beneficial nutrients. Using roasted almonds will also alter the flavor profile of your final product. Make sure to choose almonds that are free from visible damage or discoloration.
Before beginning the soaking process, thoroughly rinse your almonds under cold running water. This removes any surface debris or potential contaminants. A good rinse is essential for hygiene and optimal results. After rinsing, place the almonds in a large bowl or a suitable container.
Now, cover the almonds with plenty of filtered or spring water. You want to ensure they’re fully submerged. A good rule of thumb is to use at least three times the volume of water to the volume of almonds. So, for 1 cup of almonds, use at least 3 cups of water. Adding more water won’t hurt; it just ensures complete submersion.
Once the almonds are adequately covered, add a pinch of sea salt (approximately 1/4 teaspoon). The salt helps to soften the almond skins and enhance the overall flavor. This is optional, but highly recommended.
Now, cover the bowl with a lid or plastic wrap and let the almonds soak at room temperature for at least 8-12 hours, ideally overnight. Soaking for longer, up to 24 hours, can further improve digestibility and creaminess, but avoid soaking for longer than 48 hours as this can lead to fermentation and spoilage. The optimal soaking time will depend on the age and type of almonds you use. If you notice the water becoming cloudy or discolored, it indicates that the almonds are releasing enzymes and is a normal part of the process.
After the soaking period, drain the water and rinse the almonds again thoroughly under cold running water. You’ll notice the skins are loosened; some might even slip off during rinsing. You can choose to remove the skins at this point, which results in a smoother almond milk. However, leaving the skins on adds extra fiber and nutrients.
Now your soaked almonds are ready for the next stage of making your homemade almond milk. Remember to follow the next steps promptly to prevent the almonds from spoiling. Proper soaking is critical for a superior almond milk experience; don’t skip this vital step!
Blending Instructions
Making creamy, delicious homemade almond milk is easier than you think! This section details the blending process, ensuring you achieve the perfect consistency and flavor. Follow these steps carefully for optimal results.
Step 1: Soaking the Almonds (Crucial for optimal texture and flavor): Before you even begin blending, you need to soak your almonds. This step significantly softens the almonds, making them easier to blend and resulting in a smoother, creamier milk. Place 1 cup of raw almonds in a bowl and cover them with at least 4 cups of filtered water. Let them soak for at least 8 hours, or preferably overnight (12-16 hours). This allows the almonds to fully hydrate and release their beneficial nutrients. After soaking, drain the water thoroughly.
Step 2: Rinsing and initial blending: Once soaked, rinse the almonds under cold water to remove any excess debris. Now, add the drained almonds to your high-speed blender. Add 4 cups of fresh, filtered water. Begin blending on a low speed, gradually increasing to high speed. Blend for at least 1-2 minutes, scraping down the sides of the blender as needed to ensure all the almonds are thoroughly processed. You should notice a creamy, milky consistency developing.
Step 3: Fine-tuning the consistency (Optional): At this point, you can adjust the consistency of your almond milk to your preference. For a thinner milk, add more water, one cup at a time, and blend again briefly. For a thicker milk, simply skip this step. Experiment to find your ideal consistency. Some prefer a thicker milk for smoothies, while others prefer a thinner milk for cereal or drinking straight.
Step 4: Strain for a smoother texture (Recommended): For a truly smooth and creamy almond milk, straining is highly recommended. Line a fine-mesh sieve or cheesecloth over a large bowl. Slowly pour the blended almond mixture through the strainer. Use a spatula to gently press down on the almond pulp to extract as much milk as possible. This step removes any remaining almond fibers, leaving you with a beautifully smooth and refined almond milk.
Step 5: Sweetening and flavoring (Optional): Once strained, your almond milk is ready for customization! Add sweeteners like maple syrup, honey, or dates to taste. You can also experiment with different flavorings such as vanilla extract, cinnamon, or cocoa powder. Start with small amounts and adjust to your preference. Remember that the sweetness and flavor will intensify as the almond milk chills.
Step 6: Storage: Store your homemade almond milk in an airtight container in the refrigerator. It will typically last for 3-5 days. While consuming it fresh is best, it can also be frozen for longer storage. Pour it into ice cube trays or freezer-safe containers and freeze. Thaw overnight in the refrigerator before use.
Important Note: The quantity of almonds and water can be adjusted based on your needs. Always use a high-speed blender for optimal results. If your blender struggles, add a little more water to help it along. Enjoy your delicious homemade almond milk!
Straining the Almond Milk
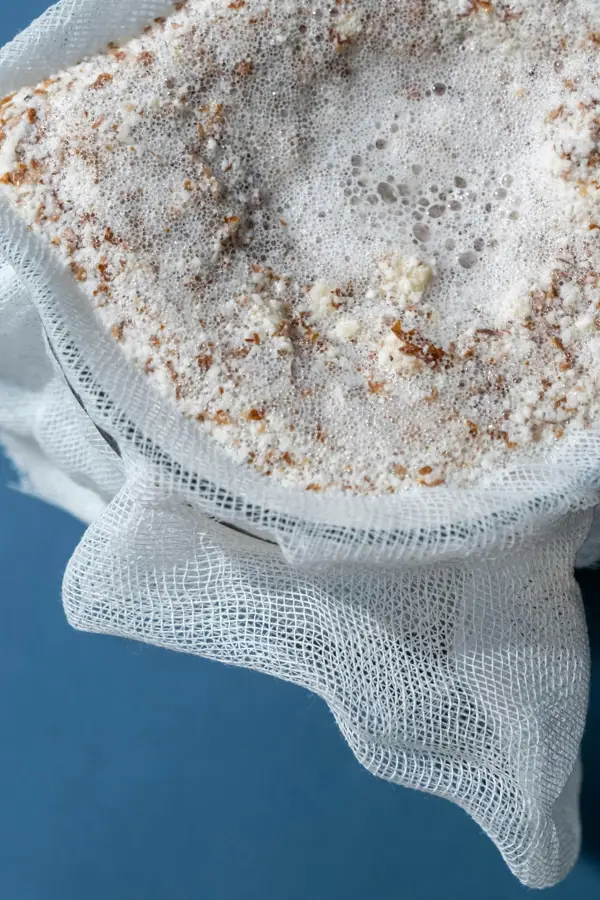
After soaking and blending your almonds, the crucial next step is straining the almond milk to achieve a smooth, creamy texture free from almond pulp. This process separates the delicious, milky liquid from the fibrous almond meal, which can be repurposed in other recipes (see our suggestions below!). Proper straining is key to the overall quality of your homemade almond milk.
You’ll need a fine-mesh strainer and a large bowl. A nut milk bag is highly recommended for the best results. Nut milk bags are specifically designed for this purpose and allow for a smoother, less pulpy final product compared to using only a strainer. If using a nut milk bag, place it over the bowl. If using only a strainer, line it with a double layer of cheesecloth for optimal filtration.
Slowly pour the blended almond mixture into the strainer or nut milk bag. Don’t rush this process; pouring too quickly can clog the strainer and make the straining process much longer and more difficult. A steady, controlled pour is essential.
Gently press the pulp against the sides of the strainer or nut milk bag to extract as much milk as possible. Use a spatula or your hands (if using gloves for hygiene) to thoroughly press the pulp, ensuring you don’t miss any of the delicious almond milk trapped within. The more you press, the higher your yield will be. However, be careful not to tear the cheesecloth or nut milk bag.
Once the majority of the liquid has drained, you can further enhance the smoothness of your almond milk. Consider a second straining. This step is especially helpful if you’re aiming for a very smooth, commercially comparable consistency. Simply transfer the strained almond milk to another clean bowl and strain it again through a fresh nut milk bag or cheesecloth-lined strainer. This will remove any remaining small particles of almond pulp.
After straining, you’ll have a bowl of almond milk and a bowl of leftover almond pulp. Don’t discard the pulp! It’s packed with nutrients and can be used in a variety of ways. You can add it to baked goods for added moisture and nutty flavor, use it as a base for homemade granola, or even incorporate it into veggie burgers for a boost of protein and fiber. Get creative and explore the possibilities!
Measure your almond milk. The yield will vary depending on the amount of almonds used and how thoroughly you press the pulp. Typically, you’ll get approximately 4 cups of almond milk from 1 cup of almonds. However, this can vary slightly depending on the type of almonds and the amount of water added during the blending process.
Once strained, your homemade almond milk is ready for further processing, such as adding sweeteners, flavorings, or preservatives if desired. Store your homemade almond milk in an airtight container in the refrigerator for up to 5 days for optimal freshness.
Sweetening and Flavoring Options (Optional)
While homemade almond milk is delicious on its own, adding sweeteners and flavorings can elevate it to a truly customized beverage. The beauty of making your own almond milk is the complete control you have over the final product. This section explores various options, highlighting the best approaches for achieving your desired taste profile.
Sweeteners: The type and amount of sweetener you choose will depend on your personal preference and dietary needs. A good starting point is to add sweetness gradually, tasting as you go. Over-sweetening can easily occur, masking the subtle nuttiness of the almond milk. Here are some popular choices:
Maple Syrup: Offers a rich, complex sweetness with a hint of caramel. Start with 1-2 tablespoons per cup of almond milk and adjust to your liking. Note: Maple syrup adds a distinct flavor, so consider this when choosing other flavorings.
Honey: Provides a slightly floral sweetness that complements almond milk well. Similar to maple syrup, begin with 1-2 tablespoons per cup and adjust according to your taste. Raw honey offers additional health benefits, but may have a slightly stronger flavor.
Agave Nectar: Offers a mild, slightly fruity sweetness. It’s a liquid sweetener, making it easy to incorporate. Use 1-2 tablespoons per cup, bearing in mind its higher glycemic index compared to maple syrup or honey.
Dates: For a natural and less processed approach, pitted Medjool dates are a fantastic option. Add 2-3 dates per cup of almond milk to the blender during the initial blending process. They blend seamlessly and contribute a caramel-like sweetness.
Stevia or other Sugar Substitutes: If you’re looking for a low-calorie or sugar-free option, stevia or other sugar substitutes can be used. However, exercise caution as these can sometimes have a slightly bitter aftertaste. Start with a small amount and gradually increase until you reach your desired sweetness.
Flavorings: The possibilities for flavoring your homemade almond milk are endless. Experiment with different combinations to discover your favorites.
Vanilla Extract: A classic choice, a teaspoon of pure vanilla extract per cup of almond milk adds a warm, comforting aroma and flavor.
Cocoa Powder: For a chocolate almond milk, add 1-2 tablespoons of unsweetened cocoa powder to the blender with the almonds and water. Adjust the sweetness accordingly, as cocoa powder can be quite bitter.
Spices: Experiment with spices like cinnamon, cardamom, or nutmeg for a warming and aromatic beverage. Start with a small amount (1/4 – 1/2 teaspoon) and adjust based on your preference. Cinnamon pairs particularly well with almond milk and sweeteners like maple syrup.
Nut butters: Add a tablespoon or two of your favorite nut butter (peanut, cashew, etc.) for a creamy texture and nutty flavor boost. This adds healthy fats and extra creaminess.
Extracts: Almond, peppermint, or coconut extracts can add a unique twist. Use sparingly, as a few drops can go a long way.
Important Note: When adding flavorings, always taste test throughout the process and adjust accordingly. It’s much easier to add more than to take away. Enjoy the creative process of crafting your perfect homemade almond milk!
Storage Instructions
Proper storage of your homemade almond milk is crucial to maintaining its freshness, flavor, and nutritional value. Following these guidelines will help you enjoy your delicious creation for as long as possible.
Refrigeration is key. Unlike commercially produced almond milk that often undergoes ultra-high-temperature processing (UHT) for extended shelf life, homemade almond milk is unpasteurized and therefore highly perishable. Always refrigerate your homemade almond milk immediately after preparation. Store it in an airtight container; a glass jar or a food-grade plastic container with a tight-fitting lid works best. Avoid using metal containers, as they can react with the almond milk and affect its taste.
Optimal storage temperature is between 35°F and 40°F (1.7°C and 4.4°C). Place the container towards the back of your refrigerator where the temperature is most consistent. Avoid storing it in the door, as the temperature fluctuates more there.
Shelf life: Homemade almond milk typically lasts for 3-5 days when properly refrigerated. However, this can vary depending on several factors, including the freshness of the ingredients used, the cleanliness of your equipment, and the overall storage conditions. Always observe the milk for signs of spoilage before consuming it.
Recognizing spoilage: Several indicators can signal that your almond milk has gone bad. These include: a sour or off-putting smell, curdling or separation of the liquid, the appearance of mold (which might present as fuzzy patches or discoloration), and a noticeable change in texture (becoming thicker or thinner than usual). If you notice any of these signs, discard the milk immediately. Do not risk consuming spoiled almond milk, as it can cause foodborne illness.
Freezing for longer storage: If you wish to extend the shelf life of your homemade almond milk beyond 5 days, you can freeze it. Pour the almond milk into freezer-safe containers, leaving about an inch of headspace to allow for expansion during freezing. Freeze in portions suitable for your needs; for example, individual servings or family-sized portions. Frozen almond milk can last for 2-3 months. Thaw the almond milk gradually in the refrigerator overnight. After thawing, shake well before use, as some separation may occur. The texture might be slightly different after freezing, but the flavor should remain largely intact.
Important Note: While freezing can extend the shelf life, it can slightly impact the texture and flavor of the almond milk. For optimal taste and texture, it’s best to consume homemade almond milk within 3-5 days of preparation.
Proper hygiene: Maintain good hygiene throughout the entire process, from washing your almonds thoroughly to sanitizing your equipment. This minimizes the risk of bacterial contamination and helps prolong the shelf life of your almond milk.
By following these storage instructions diligently, you can ensure that you enjoy the freshest and tastiest homemade almond milk possible.
Homemade Almond Milk: Recommendations
Your homemade almond milk is now ready to enjoy! This recipe offers a delicious and healthy alternative to store-bought varieties, allowing you to control the sweetness and ingredients. Remember to always refrigerate your homemade almond milk after making it.
Serving Suggestions: The versatility of homemade almond milk is one of its greatest strengths. It’s perfect as a refreshing beverage on its own, especially chilled. You can also use it in smoothies for a creamy texture and subtle nutty flavor. It works wonderfully in coffee, tea, or even oatmeal, adding a touch of richness and creaminess without the heaviness of dairy milk. Consider adding a dash of cinnamon, vanilla extract, or maple syrup for extra flavor depending on your preference. For a truly decadent treat, try using it in your favorite baking recipes, such as muffins, cakes, or pancakes, where it adds moisture and a delicate almond flavor.
Storage Conditions: For optimal freshness and flavor, store your homemade almond milk in an airtight container in the refrigerator. It should ideally be consumed within 3-5 days for the best quality. While it might last longer, the flavor and texture may start to degrade after this period. Avoid storing it in direct sunlight or near heat sources.
Complementary Dishes: The mild, nutty flavor of homemade almond milk pairs well with a wide variety of dishes. It’s a fantastic addition to breakfast cereals, complementing the sweetness of fruits and the crunch of granola. It can also be used in savory dishes such as soups and stews, adding a subtle creaminess without overpowering other flavors. Try it in creamy pasta sauces or as a base for a light and refreshing gazpacho. Its versatility makes it a perfect addition to both sweet and savory culinary creations.
Nutritional Information (per 1 cup serving, approximate values may vary depending on recipe): The nutritional content of your homemade almond milk depends on the recipe used, particularly the amount of almonds and water. However, a typical serving provides approximately 30-50 calories, 1-2 grams of protein, 2-4 grams of fat (mostly unsaturated), and 1-2 grams of carbohydrates. It is naturally low in saturated fat and cholesterol and is a good source of vitamin E. Note that adding sweeteners will increase the calorie and carbohydrate content.
Important Note: Always check for any potential allergies before consuming almond milk, particularly if serving to children or individuals with known allergies. If you have any concerns about the nutritional content or potential health implications, consult with a registered dietitian or healthcare professional.