Pancakes, in their myriad forms, boast a history as rich and varied as the ingredients used to create them. While pinpointing the exact origin is difficult, evidence suggests flatbreads cooked on hot stones date back to ancient civilizations. Ancient Egyptians, Greeks, and Romans all enjoyed variations of flatbreads, often made from grains like barley or wheat. These early forms, while not precisely pancakes as we know them today, laid the groundwork for the evolution of this beloved breakfast staple. The addition of leavening agents, like yeast or baking powder, significantly altered the texture and lightness, moving the flatbread concept towards the fluffier pancakes we recognize. Over centuries, recipes diversified across cultures, reflecting local ingredients and culinary traditions. Think of the delicate crêpes of France, the fluffy American pancakes, or the hearty blinis of Russia – each a testament to the pancake’s adaptability.
The rise of gluten-free diets in recent decades has spurred a significant shift in pancake-making. Celiac disease, an autoimmune disorder triggered by gluten, affects approximately 1% of the global population, according to the National Institutes of Health. This, coupled with the increasing awareness of gluten sensitivity and other related conditions, has created a substantial demand for gluten-free alternatives. This demand has led to innovation in gluten-free flours, such as almond flour, coconut flour, rice flour, and blends thereof, allowing for the creation of delicious and satisfying gluten-free pancakes. The market for gluten-free foods is booming, with global sales projected to reach billions of dollars in the coming years, demonstrating the significant impact of dietary restrictions on the food industry.
Gluten-free pancakes, therefore, aren’t simply a dietary adaptation; they represent a significant culinary evolution. They reflect a broader cultural shift towards inclusivity and accommodating diverse dietary needs. The availability of gluten-free pancake mixes in supermarkets and the proliferation of gluten-free pancake recipes online highlight this trend. Moreover, the increasing sophistication of gluten-free baking techniques has allowed for the creation of pancakes that closely mimic the texture and taste of their gluten-containing counterparts. While the history of pancakes stretches back millennia, the relatively recent emergence of gluten-free variations showcases the continuous adaptation and innovation within food culture, driven by both health concerns and the pursuit of delicious and accessible food for everyone.
Ingredients and Measurements
Creating light and fluffy gluten-free pancakes requires careful attention to ingredient selection and precise measurements. The following recipe yields approximately 8-10 medium-sized pancakes, depending on your pan size and desired thickness.
Gluten-Free Flour Blend: 1 ½ cups (190g). The success of your gluten-free pancakes hinges significantly on the quality of your flour blend. Avoid using single gluten-free flours like rice flour alone, as they often result in dense, gummy pancakes. Instead, opt for a pre-made blend specifically designed for baking, containing a variety of flours such as brown rice flour, tapioca starch, potato starch, and possibly a small amount of xanthan gum. Look for a blend that clearly states it’s suitable for pancakes or baking. The inclusion of xanthan gum is crucial, as it helps mimic the binding properties of gluten, resulting in a more cohesive batter.
Sugar: 2 tablespoons (25g). Granulated white sugar is preferred for this recipe. You can substitute with coconut sugar or other granulated sweeteners, but be aware that the resulting flavor and browning might differ slightly. Don’t be tempted to significantly increase the sugar, as it can lead to overly sweet and potentially gummy pancakes.
Baking Powder: 2 teaspoons (10g). This is your leavening agent, providing the lift for fluffy pancakes. Ensure your baking powder is fresh; old baking powder will result in flat pancakes. Check the expiration date before using.
Salt: ½ teaspoon (3g). Salt enhances the flavors of the other ingredients and balances the sweetness. Don’t skip this crucial ingredient!
Eggs: 2 large. Eggs provide structure and richness to the pancakes. Use large eggs for consistent results. If you’re using smaller eggs, you might need to add a tablespoon or two of extra liquid.
Milk (Dairy or Non-Dairy): 1 cup (240ml). Milk adds moisture and helps create a tender texture. You can use any type of milk you prefer – cow’s milk, almond milk, soy milk, oat milk, etc. If using a non-dairy milk, ensure it’s unsweetened to prevent the pancakes from becoming too sweet. If your chosen milk is particularly thick, you might need to add a tablespoon or two of water to adjust the batter consistency.
Melted Butter (or Oil): 2 tablespoons (30ml). Melted butter adds flavor and richness. You can substitute with vegetable oil, coconut oil, or other neutral-flavored oils if you prefer. Ensure the butter or oil is completely melted and cooled slightly before adding it to the batter, to avoid cooking the eggs prematurely.
Optional additions: Feel free to customize your pancakes with additions like blueberries, chocolate chips, chopped nuts, or even a pinch of cinnamon. Remember to add these ingredients gently to the batter to avoid damaging their texture.
Important Note: Accurate measuring is critical in gluten-free baking. Use a kitchen scale for the most precise measurements, especially for the flour blend. Volume measurements can be unreliable with gluten-free flours due to their varying density.
Equipment List
Making gluten-free pancakes requires specific tools to achieve the best texture and consistency. While some items might seem optional, using the right equipment significantly improves the outcome. This list details essential and recommended equipment, along with explanations for their use.
Mixing Bowls (at least two): You’ll need at least two mixing bowls of different sizes. A large bowl (approximately 5-quart capacity) is crucial for combining wet and dry ingredients. A smaller bowl (approximately 2-quart capacity) is useful for whisking together dry ingredients separately before combining them with the wet ingredients. This helps prevent lumps and ensures even distribution of gluten-free flour blends, which can sometimes be clumpy.
Measuring Cups and Spoons: Precise measurements are essential when baking gluten-free. Invest in a set of accurate measuring cups (liquid and dry) and spoons. Avoid using household spoons or cups for baking as these can lead to inaccurate measurements, impacting the final texture and rise of your pancakes. For liquid measurements, use a liquid measuring cup with a spout for easy pouring. Dry ingredients should be measured using dry measuring cups, spooning the ingredient into the cup and leveling off with a straight edge.
Whisk: A sturdy whisk is vital for thoroughly combining wet ingredients and for preventing lumps in the batter. A balloon whisk is ideal due to its larger surface area, which effectively incorporates air into the batter, resulting in lighter and fluffier pancakes. Ensure your whisk is large enough to comfortably handle the volume of batter.
Spatula (Rubber or Silicone): A flexible spatula, either rubber or silicone, is essential for gently folding dry ingredients into the wet ingredients and scraping down the sides of the bowl to ensure everything is incorporated. A sturdy spatula is also needed for flipping the pancakes on the griddle. Choose a heat-resistant spatula that won’t melt or warp when used on a hot surface.
Griddle or Non-Stick Frying Pan: A large, flat griddle or a non-stick frying pan (at least 8-10 inches in diameter) is ideal for cooking multiple pancakes simultaneously. A non-stick surface is highly recommended to prevent sticking and makes flipping easier. Ensure your griddle or pan is properly heated before adding the batter. A griddle allows for even cooking, making it preferable to a frying pan, especially when making a larger batch.
Pancake Turner or Spatula: You’ll need a thin, wide spatula or pancake turner to flip the pancakes without tearing them. Opt for a thin, flexible spatula to ensure that you can easily slide it under the pancake. A stiff spatula may damage the delicate gluten-free pancakes.
Optional but Recommended: A sifter for dry ingredients can help to aerate the flour blend and prevent lumps. A pastry brush for lightly greasing the griddle or pan can further prevent sticking. Finally, a timer can help to ensure even cooking and prevent burning.
Cleaning Up: Remember to clean all equipment immediately after use, especially non-stick surfaces. Soaking tools in warm, soapy water can help to loosen any stuck-on batter.
Preparation Phase: Dry Ingredients
The success of gluten-free pancakes hinges significantly on the careful preparation of the dry ingredients. Unlike traditional wheat-based pancakes, gluten-free blends require a more meticulous approach to ensure a light and fluffy texture. This section details the precise steps for measuring and combining your dry ingredients, maximizing the chances of pancake perfection.
Begin by gathering your dry ingredients: 1 ½ cups of your preferred gluten-free flour blend. The choice of blend is crucial. Many blends are available, each with varying properties. Some blends contain xanthan gum already incorporated, while others require you to add it separately. Carefully read the label of your chosen blend to understand its composition and any additional instructions. A good quality blend will typically include a mix of starches (like tapioca or potato starch) and flours (such as rice flour or almond flour) for the best texture and rise.
Next, measure out 2 tablespoons of granulated sugar. This adds sweetness and helps to tenderize the pancakes. You can adjust this amount to your preference, adding more for sweeter pancakes or less for a more subtly sweet flavor. Use a kitchen scale for the most accurate measurements, especially for flour. Spooning flour directly from the bag can lead to significant variations in volume, impacting the final consistency of your pancakes. If you don’t have a scale, use the spoon and level method: gently spoon the flour into a measuring cup, avoiding packing it down, and then level off the top with a straight edge.
2 teaspoons of baking powder is the next crucial ingredient. Baking powder is the leavening agent, responsible for the rise of your pancakes. Ensure your baking powder is fresh; old baking powder loses its effectiveness and will result in flat pancakes. Check the expiration date on the container. The same applies to ½ teaspoon of baking soda. Baking soda works in conjunction with the baking powder and acidic ingredients in the recipe to create a lighter texture. If using a gluten-free blend that already contains baking powder or soda, adjust the quantities accordingly, referencing the instructions on your flour blend packaging.
Finally, add ½ teaspoon of fine sea salt. Salt enhances the flavors of the other ingredients and balances the sweetness. Do not skip the salt, even if you prefer less salty food; it plays a vital role in the overall taste and texture of the pancakes. Once all your dry ingredients are measured, gently whisk them together in a large bowl. Whisk thoroughly to ensure that the baking powder, baking soda, and salt are evenly distributed throughout the flour mixture. This step prevents pockets of leavening agents from creating unevenly cooked pancakes. Lumps in the dry ingredients are acceptable at this stage, as they will typically be incorporated during the wet ingredient mixing stage.
With your dry ingredients perfectly prepped, you’re ready to move on to the wet ingredients and the exciting final stages of pancake-making! Remember to always double-check your measurements and ingredient list before proceeding to the next step.
Preparation Phase: Wet Ingredients
The success of gluten-free pancakes hinges significantly on the proper preparation and combination of wet ingredients. This phase requires precision and attention to detail to achieve the perfect texture and consistency. We’ll be focusing on creating a smooth, lump-free batter that will translate to light and fluffy pancakes.
Begin by gathering your wet ingredients: 1 cup of milk (dairy or non-dairy), 1 large egg (or flax egg for vegan option), 2 tablespoons of melted unsalted butter (or oil for vegan option), and 1 teaspoon of vanilla extract. The type of milk you choose will impact the final flavor and texture. Dairy milk generally produces richer pancakes, while almond or soy milk offer a slightly nuttier taste. Experiment to find your preference!
Temperature matters! Using room temperature ingredients is crucial for optimal mixing. Cold ingredients can lead to a lumpy batter and uneven cooking. Allow your milk and eggs to sit at room temperature for at least 30 minutes before starting. This ensures even distribution of the wet ingredients throughout the batter. The melted butter should also be slightly cooled before adding, preventing the eggs from cooking prematurely.
In a medium-sized bowl, whisk the egg (or flax egg – 1 tbsp flaxseed meal mixed with 3 tbsp water and allowed to sit for 5 minutes) vigorously until light and frothy. This step incorporates air into the batter, contributing to the lightness of the finished pancakes. Don’t skip this step! Properly whisking the egg is essential for a fluffy texture.
Next, slowly pour in the room temperature milk while continuing to whisk. Whisk gently but thoroughly to combine the milk and egg completely. Avoid over-mixing, as this can lead to tough pancakes. Aim for a smooth and homogenous mixture without any visible streaks of egg.
Gently incorporate the melted butter (or oil) into the milk and egg mixture. Whisk until fully combined. The addition of fat contributes to the tenderness and moisture of the pancakes. If using oil, choose a neutral-flavored oil like canola or vegetable oil to avoid overpowering the other flavors.
Finally, stir in the vanilla extract. Vanilla extract adds a subtle sweetness and enhances the overall flavor profile of the pancakes. Be mindful not to overdo it; a teaspoon is usually sufficient. Taste the batter at this stage; you can always add a touch more vanilla if desired.
Once all the wet ingredients are thoroughly combined, set the mixture aside and prepare your dry ingredients. The combined wet ingredients should be smooth and free of lumps. If lumps persist, use a whisk or a fork to gently break them up. Remember, patience is key during this process! A properly prepared wet ingredient mixture is the foundation for delicious gluten-free pancakes.
Mixing the Batter
Creating the perfect gluten-free pancake batter requires a gentle hand and careful attention to detail. Unlike traditional wheat-based batters, gluten-free mixtures can be more sensitive to overmixing, leading to tough and rubbery pancakes. The key is to combine the wet and dry ingredients just until they are moistened, leaving a few small lumps is perfectly acceptable.
Begin by measuring out your dry ingredients precisely. For this recipe, we’ll assume a standard batch: 1 ½ cups of your favorite gluten-free flour blend (ensure it’s a blend designed for pancakes or baking, not just all-purpose gluten-free flour). 2 tablespoons of granulated sugar will add sweetness and help with browning. 2 teaspoons of baking powder is essential for lift, and ½ teaspoon of baking soda provides additional leavening. Finally, add ½ teaspoon of salt to balance the sweetness and enhance the overall flavor. Sift the dry ingredients together twice for even distribution and to aerate the flour, preventing dense pancakes.
In a separate bowl, combine the wet ingredients. This recipe calls for 1 ¼ cups of milk (dairy or non-dairy, your preference). 1 large egg binds the ingredients and adds richness. 2 tablespoons of melted unsalted butter contributes flavor and tenderness. Whisk the wet ingredients together thoroughly until well combined. The butter should be completely incorporated but not emulsified to a frothy consistency.
Now comes the crucial step of combining the wet and dry ingredients. Gently pour the wet ingredients into the dry ingredients, avoiding a forceful stream that could overmix the batter. Use a rubber spatula or a whisk to fold the ingredients together, making sure to scrape the bottom and sides of the bowl to incorporate any dry flour that might have settled. Do not overmix! The batter should be just combined, with a few small lumps remaining. Overmixing develops the gluten-free flour’s starches, resulting in a tough final product. Aim for a slightly lumpy batter – it’s perfectly fine and will yield fluffy pancakes.
Let the batter rest for 5-10 minutes. This allows the gluten-free flour to fully hydrate and the baking powder and soda to activate, resulting in lighter, fluffier pancakes. Don’t skip this step! The resting period is crucial for success. After resting, you can give the batter a gentle stir before cooking, but avoid vigorous mixing.
Professional Tip: If your gluten-free pancake batter seems too thick, add a tablespoon or two of milk at a time until you reach the desired consistency. Conversely, if it’s too thin, add a tablespoon or two of gluten-free flour, mixing gently to incorporate. Always err on the side of a slightly thicker batter, as it tends to cook up better than a thin one.
Once the batter is prepared and rested, you’re ready to cook your delicious gluten-free pancakes! Enjoy!
Cooking Techniques: Griddle Preparation
Proper griddle preparation is paramount to achieving perfectly cooked, gluten-free pancakes. A well-prepared griddle ensures even cooking, prevents sticking, and contributes to the overall texture and appearance of your pancakes. Neglecting this crucial step can lead to unevenly browned pancakes, stuck-on batter, and a frustrating cooking experience.
Choosing the right griddle: While a non-stick skillet can work in a pinch, a dedicated griddle offers superior surface area and even heat distribution, ideal for cooking multiple pancakes simultaneously. Cast iron griddles are excellent for retaining heat but require a bit more attention during the seasoning process. Electric griddles offer precise temperature control, making them a great option for consistent results. Regardless of your choice, ensure your griddle is clean and free of any food residue before starting.
Preheating the griddle: This is a critical step often overlooked. A cold griddle will result in soggy pancakes that stick. Preheat your griddle over medium heat for at least 5-7 minutes. For electric griddles, set the temperature to approximately 350°F (175°C). For gas or electric coil griddles, you should aim for medium heat; you can check if the heat is right by sprinkling a few drops of water on the surface. If the water sizzles and evaporates immediately, your griddle is ready. If the water sits, your griddle needs more time to heat up.
Oiling the griddle: Properly oiling your griddle prevents sticking and promotes even browning. Use a high-smoke-point oil like canola, vegetable, or avocado oil. Avoid using butter or olive oil, as they have lower smoke points and can burn at high temperatures, imparting a bitter taste to your pancakes. Pour approximately 1-2 tablespoons of oil onto the preheated griddle. Use a paper towel or a silicone pastry brush to spread the oil evenly across the entire cooking surface. Ensure a thin, even coating; too much oil will result in greasy pancakes.
Testing the griddle’s readiness: After oiling, wait for about a minute for the oil to heat up. A small drop of batter placed on the hot griddle should sizzle gently and begin to set around the edges within a few seconds. If the batter immediately sticks or doesn’t sizzle, your griddle isn’t hot enough. Allow it to heat up further. If the batter burns immediately, your griddle is too hot; reduce the heat slightly.
Maintaining the griddle’s temperature: Throughout the cooking process, maintain a consistent temperature. Avoid drastically increasing or decreasing the heat, as this can lead to unevenly cooked pancakes. Adjust the heat as needed to ensure that the pancakes are cooking at a steady pace, browning evenly without burning.
Cleaning the griddle: Once you’ve finished cooking, allow the griddle to cool slightly. Wipe it clean with a paper towel or a soft cloth. For stubborn residue, you can use warm soapy water and a non-abrasive sponge or pad. Never use steel wool or abrasive cleaners on your griddle, as they can scratch the surface. For cast iron griddles, follow specific cleaning instructions to maintain their seasoning.
Gluten-Free Pancake Recommendations
These gluten-free pancakes are delicious and versatile, perfect for breakfast, brunch, or even a light dinner. To ensure optimal taste and texture, follow these recommendations carefully.
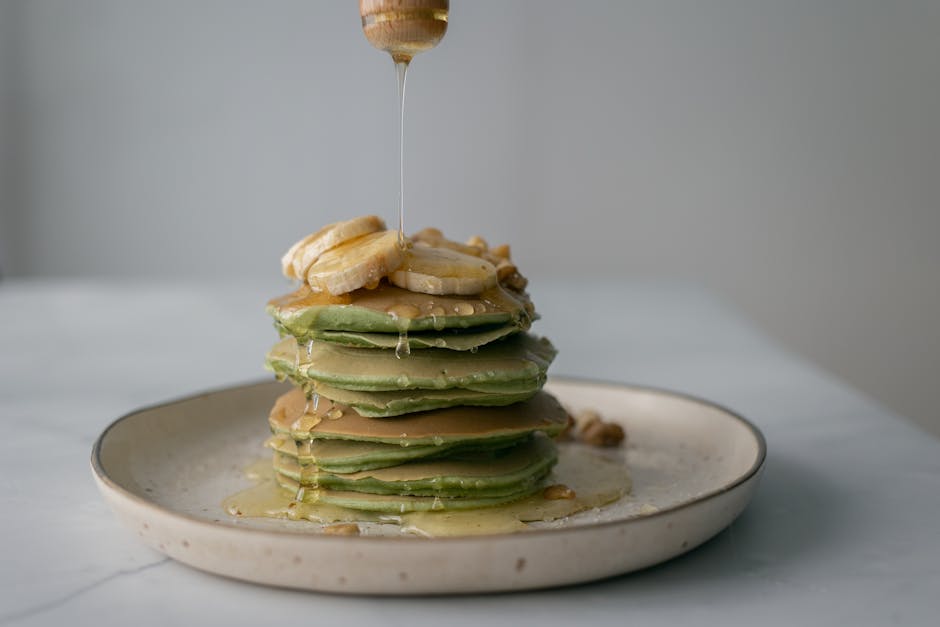
Serving Suggestions: The possibilities are endless! For a classic experience, serve your pancakes hot off the griddle with a generous pat of butter and a drizzle of pure maple syrup. Alternatively, explore creative toppings such as fresh berries (strawberries, blueberries, raspberries), sliced bananas, whipped cream, chocolate chips, nuts (chopped pecans or walnuts), or a dollop of your favorite fruit compote. Consider savory options by topping with a fried egg and a sprinkle of cheese for a hearty breakfast. For a truly decadent treat, try a scoop of vanilla ice cream or a drizzle of caramel sauce.
Storage Conditions: For best results, consume your gluten-free pancakes immediately after cooking. Leftovers can be stored in an airtight container in the refrigerator for up to 3 days. To reheat, gently warm them in a lightly oiled pan over medium heat or in the microwave for about 30 seconds. Avoid over-reheating, as this can lead to a dry texture. Freezing is also an option; allow the pancakes to cool completely before placing them in a freezer-safe bag. They can be stored frozen for up to 2 months. To reheat from frozen, simply thaw overnight in the refrigerator and then reheat gently as described above.
Complementary Dishes: These gluten-free pancakes pair well with a variety of side dishes. A side of crispy bacon or sausage adds a savory element to balance the sweetness of the pancakes. A fresh fruit salad provides a light and refreshing contrast. Consider serving them with a side of scrambled eggs or a breakfast casserole for a more substantial meal. For a brunch setting, a mimosa or a fruit smoothie would complement the pancakes perfectly.
Nutritional Information (per pancake, approximate values may vary based on recipe): This information is approximate and depends heavily on the specific recipe used. Always check the nutritional information of your specific ingredients.
Calories: Approximately 150-200 calories
Fat: Approximately 5-8 grams
Saturated Fat: Approximately 2-4 grams
Cholesterol: Approximately 0-5 milligrams
Sodium: Approximately 100-150 milligrams
Carbohydrates: Approximately 25-35 grams
Fiber: Approximately 2-4 grams
Sugar: Approximately 5-10 grams
Protein: Approximately 4-6 grams
Important Note: While these pancakes are gluten-free, it’s crucial to ensure that all ingredients used are certified gluten-free to avoid cross-contamination, especially if serving to someone with celiac disease or a severe gluten intolerance. Always check ingredient labels carefully.