Chia seeds, the tiny, nutrient-packed powerhouses at the heart of this easy chia pudding recipe, boast a history as rich and complex as their flavor profile. Originating in the dry and arid regions of southern Mexico and Guatemala, chia (Salvia hispanica) held immense significance for the ancient Aztec and Mayan civilizations. For centuries, these cultures revered chia not merely as a food source, but as a vital component of their daily lives, using it for sustenance, medicine, and even in religious ceremonies. Archaeological evidence suggests that chia was a cornerstone of their diets, providing essential nutrients and energy to sustain their active lifestyles. In fact, chia seeds were so highly valued that they were sometimes used as currency.
The nutritional prowess of chia seeds is undeniable. A single ounce packs in approximately 10 grams of fiber, contributing significantly to digestive health and satiety. This high fiber content, coupled with their impressive protein and omega-3 fatty acid profile, makes them a modern-day superfood. However, their resurgence in popularity is a relatively recent phenomenon. While chia seeds were a dietary staple for centuries, their consumption waned significantly following the Spanish conquest of the Americas. It wasn’t until the late 20th and early 21st centuries that chia seeds experienced a global revival, largely driven by growing awareness of their nutritional benefits and the increasing demand for healthy and convenient foods.
The simplicity of chia pudding, a dish requiring minimal ingredients and preparation time, perfectly complements the versatility of chia seeds. Its preparation involves little more than combining chia seeds with a liquid base (like milk, yogurt, or juice), allowing the seeds to absorb the liquid and create a creamy, pudding-like consistency. This ease of preparation has contributed significantly to its global popularity, making it a breakfast or snack staple for health-conscious individuals worldwide. The culinary adaptability of chia pudding is equally impressive; it can be customized with an endless array of flavors and toppings, from fresh fruits and nuts to spices and sweeteners, catering to diverse palates and dietary preferences. Recent market research indicates a significant upward trend in the global consumption of chia seeds, directly impacting the popularity of chia pudding recipes, reflecting its enduring appeal as a healthy and delicious food.
Beyond its nutritional and practical advantages, chia pudding also holds cultural significance in its adaptation across various culinary traditions. While its roots lie in ancient Mesoamerican cultures, chia pudding has transcended geographical boundaries, finding its place in modern kitchens around the globe. Its adaptability allows for the incorporation of local ingredients and flavors, enriching its cultural tapestry and demonstrating the enduring legacy of this ancient seed. From the vibrant fruit-infused puddings of South America to the subtly spiced variations found in Asian cuisine, chia pudding stands as a testament to the power of simple ingredients to create a globally appreciated and cherished food.
Ingredients and Measurements
This recipe for Easy Chia Pudding provides a delicious and versatile base that you can customize to your liking. The following ingredients and measurements are for a single serving, but can easily be multiplied to make larger batches. Remember to always use a kitchen scale for the most accurate measurements, especially for the chia seeds, as their volume can vary greatly depending on the brand and how they are packed.
Chia Seeds: 1 tablespoon (approximately 20 grams). This is the crucial ingredient that provides the pudding’s characteristic texture. Using a kitchen scale guarantees consistent results. Don’t be tempted to skimp on the chia seeds, as less might result in a thinner, less satisfying pudding. Look for high-quality chia seeds, preferably organic, for the best flavor and nutritional value.
Liquid: 1 cup (240ml) of your chosen liquid. This is where you can really get creative! Milk is the classic choice, and you can use any type: dairy milk (whole milk, 2%, skim), plant-based milk (almond, soy, oat, coconut). The type of milk will significantly impact the flavor and richness of your pudding. For a richer, creamier pudding, whole milk is recommended. Plant-based milks can offer unique flavor profiles – coconut milk, for example, will lend a tropical twist. You can even use yogurt for a tangier pudding!
Sweetener (Optional): 1-2 tablespoons (depending on your preference and the sweetness of your chosen liquid). Honey, maple syrup, agave nectar, or even a touch of granulated sugar can be used. Start with the lower amount and add more to taste. Remember that the sweetness of the milk itself will affect how much sweetener you need. If using a naturally sweet milk like coconut milk, you may require less added sweetener.
Flavor Enhancers (Optional): This is where you can truly personalize your chia pudding. A teaspoon of vanilla extract adds classic sweetness and aroma. A pinch of cinnamon or nutmeg brings warmth and spice. Cocoa powder can transform your pudding into a chocolate delight. Experiment with different extracts, spices, and even fruit purees to discover your favorite flavor combinations.
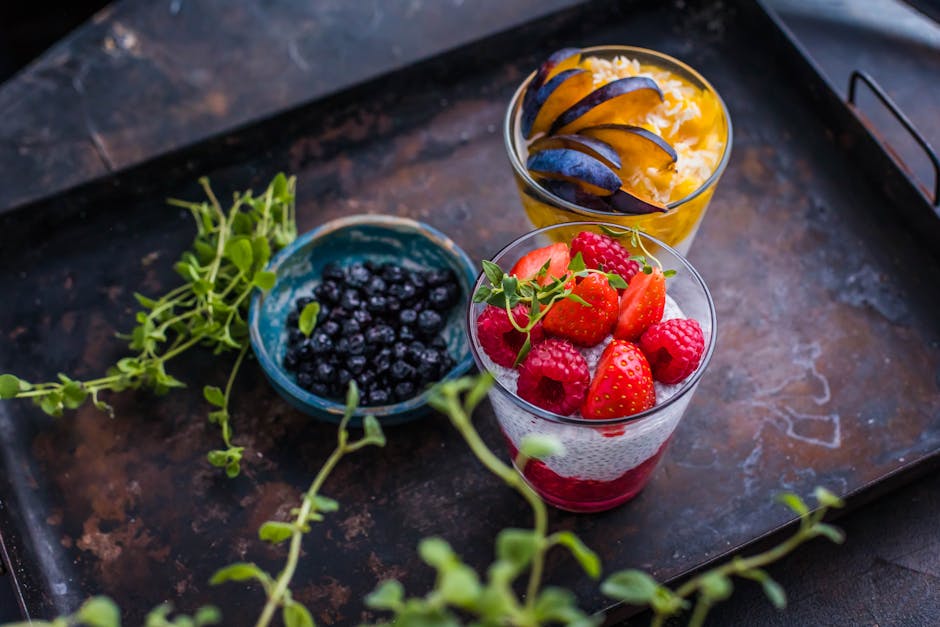
Toppings (Optional): Once your pudding is set, the fun really begins! Fresh or frozen berries, sliced bananas, chopped nuts, seeds, granola, shredded coconut, or a drizzle of nut butter are all fantastic topping options. Consider the overall flavor profile when choosing your toppings to complement your pudding base.
Important Note: The amount of liquid you use can affect the consistency of your pudding. For a thicker pudding, slightly reduce the liquid amount. For a thinner pudding, slightly increase it. It’s always best to start with the recommended amount and adjust according to your preference.
Instructions
Making this Easy Chia Pudding is incredibly straightforward, but following these instructions carefully will ensure a perfectly smooth and creamy result. We’ll be focusing on achieving the optimal texture and flavor balance.
Step 1: Preparing the Chia Seeds. Begin by measuring out 1/4 cup of chia seeds. It’s crucial to use high-quality chia seeds for the best texture and nutritional value. Avoid using seeds that are clumped or have an off-putting odor. If your chia seeds are particularly dusty, consider briefly rinsing them under cold water and then draining them thoroughly in a fine-mesh sieve. This will help prevent any gritty texture in your final pudding.
Step 2: Combining Ingredients. In a medium-sized bowl or jar (mason jars work wonderfully!), combine the 1/4 cup of chia seeds with 1 cup of your chosen milk. We recommend using whole milk for the creamiest texture, but almond milk, oat milk, or soy milk also work well. Feel free to experiment with different milk types to find your preferred taste and consistency. After adding the milk, add your sweetener. We suggest starting with 2 tablespoons of maple syrup or honey, but adjust to your preference. If you prefer a less sweet pudding, you can use less, or even omit it altogether. Finally, stir in 1 teaspoon of vanilla extract for enhanced flavor.
Step 3: Mixing and Resting. Once all the ingredients are in the bowl, stir vigorously for at least 30 seconds to ensure the chia seeds are fully incorporated and evenly distributed throughout the milk mixture. There shouldn’t be any large clumps of chia seeds. Thorough mixing is key to preventing a grainy texture. After mixing, cover the bowl or jar with a lid or plastic wrap. Refrigerate for at least 4 hours, or preferably overnight. This allows the chia seeds to fully absorb the liquid and create that characteristic pudding-like consistency. The longer it sits, the thicker it will become.
Step 4: Checking Consistency and Adjusting. After the minimum 4-hour refrigeration period, remove the pudding from the refrigerator. Check the consistency. If it’s still too thin, you can add more chia seeds (1-2 teaspoons at a time) and stir gently. Let it sit in the refrigerator for another 30 minutes to an hour before checking again. If it’s too thick, you can add a tablespoon or two of milk to thin it out to your desired consistency. Remember to stir gently to avoid creating lumps.
Step 5: Serving and Enjoying. Once you’ve reached your desired consistency, your chia pudding is ready to enjoy! Serve it straight from the jar, or transfer it to a bowl. You can top it with your favorite fruits, nuts, seeds, granola, or a drizzle of honey or maple syrup for extra flavor and visual appeal. Get creative with your toppings! This simple pudding is a blank canvas for your culinary imagination. Store leftover pudding in an airtight container in the refrigerator for up to 5 days.
Professional Recommendation: For the smoothest possible pudding, use a high-speed blender to blend the mixture for about 15 seconds *before* refrigerating. This will help to break down the chia seeds further and result in an incredibly silky texture. However, this step is optional.
Chilling Time: Achieving Perfect Pudding Consistency
The chilling time is crucial for achieving the perfect creamy, set consistency of your chia pudding. While the pudding will thicken somewhat at room temperature, refrigeration is essential to allow the chia seeds to fully absorb the liquid and create that delightful, spoonable texture we all crave. This section details the optimal chilling process for your Easy Chia Pudding recipe.
Recommended Chilling Time: For the best results, we recommend chilling your chia pudding for at least 4 hours in the refrigerator. This allows ample time for the chia seeds to fully hydrate and the pudding to thicken considerably. However, you can also chill it for up to 24 hours, which will result in an even firmer, more set pudding. Beyond 24 hours, the pudding may become slightly too firm, though still perfectly edible.
Container Selection: The choice of container affects the chilling process. Using an airtight container is recommended to prevent the pudding from absorbing any unwanted odors from the refrigerator. Glass containers are ideal because they are non-reactive and easy to clean. However, plastic containers are also suitable, provided they are food-safe and BPA-free. Avoid using metallic containers, as they can potentially react with the ingredients.
Proper Storage Techniques: Once you’ve poured your prepared chia pudding into your chosen container, ensure the lid is securely fastened to maintain freshness and prevent spills. It’s best to chill the pudding in a consistent temperature zone of the refrigerator; avoid placing it near the door where the temperature fluctuates more significantly. This will ensure even thickening across the entire batch.
Monitoring the Consistency: While 4 hours is a good minimum, you can check the consistency of your pudding after 2-3 hours. If you prefer a less firm pudding, you can remove it from the refrigerator earlier. If you prefer a firmer consistency, let it chill for the full 4-24 hours. Remember that the pudding will continue to thicken slightly even after it’s removed from the refrigerator.
Troubleshooting: If after 4 hours your pudding seems too thin, it may be due to using too much liquid. Next time, reduce the liquid quantity by 1-2 tablespoons. Conversely, if your pudding is too thick, add a tablespoon or two of your chosen milk or liquid at a time until you reach your desired consistency. Always stir gently to incorporate the additional liquid fully.
Serving Suggestions: Once chilled, your chia pudding is ready to enjoy! Scoop it into bowls and top with your favorite additions – fresh fruits, nuts, seeds, granola, honey, or maple syrup. The possibilities are endless! The chilled pudding holds its shape well, making it perfect for layering or serving in individual glasses or jars.
Important Note: Chia seeds can absorb a significant amount of liquid. If you are adding additional ingredients post-chilling, be mindful that this may slightly alter the overall consistency. It’s advisable to add toppings just before serving to maintain the desired texture.
Serving Suggestions
Your creamy and delicious chia pudding is ready! But the fun doesn’t stop there. The beauty of chia pudding lies in its versatility. Here are some serving suggestions to elevate your culinary experience, from simple additions to more elaborate creations.
Basic Enhancements: For a quick and easy treat, start with the basics. A drizzle of honey (1-2 tablespoons, depending on sweetness preference) or maple syrup (1-2 tablespoons) adds a touch of natural sweetness. A sprinkle of cinnamon (1/2 teaspoon) provides warmth and spice, complementing the pudding’s texture perfectly. A dash of vanilla extract (1/2 teaspoon) enhances the overall flavor profile. Consider adding a pinch of sea salt (a tiny pinch, about 1/8 teaspoon) to balance the sweetness and highlight the other flavors.
Fruit Fiesta: Fresh or frozen fruit is a fantastic addition. Berries (strawberries, blueberries, raspberries – approximately 1/2 cup) are a classic pairing, offering a burst of sweetness and juicy texture. Sliced bananas (1/2 a medium banana) add creaminess and potassium. Mango chunks (1/2 cup, diced) offer a tropical twist. Remember to gently fold the fruit into the pudding just before serving to prevent it from sinking to the bottom and becoming mushy. For frozen fruit, let it thaw slightly before adding to prevent the pudding from becoming too cold or watery.
Nutty Delights: Toasted nuts and seeds add a delightful crunch and boost the nutritional value. A tablespoon of chopped almonds, walnuts, or pecans provides healthy fats and protein. Chia seeds themselves are already rich in omega-3 fatty acids, but adding a sprinkle of flax seeds (1 teaspoon) further enhances the nutritional profile. Remember to toast the nuts lightly before adding them for a more intense flavor and satisfying crunch.
Gourmet Garnishes: Elevate your chia pudding to a gourmet dessert with sophisticated garnishes. A dollop of coconut cream (2 tablespoons) adds richness and tropical flair. A drizzle of melted dark chocolate (1 ounce, melted) offers a decadent touch. A sprinkle of cocoa powder (1 teaspoon) adds a chocolatey aroma and visual appeal. Consider grating some fresh coconut (1 tablespoon) for an extra layer of texture and flavor. Be mindful of the overall sweetness when adding these elements, as some are naturally sweeter than others.
Layered Creations: Get creative with layering! Create visually appealing and delicious parfaits by layering your chia pudding with granola (1/4 cup), yogurt (1/4 cup), or even different types of fruit. This approach not only enhances the presentation but also provides a variety of textures and flavors in each bite. Experiment with different combinations to find your favorite layered masterpiece.
Serving Temperature: Chia pudding can be enjoyed chilled directly from the refrigerator, or at room temperature for a slightly different texture. Allow the pudding to sit at room temperature for about 15-20 minutes if you prefer it less cold.
No matter how you choose to serve your Easy Chia Pudding, remember to enjoy the process and experiment with different flavor combinations to create your perfect bowl.
Variations
The beauty of chia pudding lies in its adaptability. While the basic recipe is simple and delicious, there’s a world of flavor and texture possibilities waiting to be explored. Here are some exciting variations to elevate your chia pudding game.
Fruity Delights: Infuse your pudding with the vibrant flavors of fresh or frozen fruit. Start by blending 1/2 cup of your favorite berries (strawberries, blueberries, raspberries, or a mix!) with 1 tablespoon of maple syrup or honey for a naturally sweetened puree. Stir this puree into your prepared chia pudding for a burst of fruity goodness. Alternatively, you can layer fresh fruit slices – like bananas, mangoes, or kiwi – directly into the pudding for a visually appealing and texturally diverse dessert. Consider the natural sweetness of the fruit when adjusting the amount of added sweetener in the base recipe.
Chocolate Indulgence: For a decadent treat, incorporate cocoa powder into your chia pudding. Add 2-3 tablespoons of unsweetened cocoa powder to the milk mixture before adding the chia seeds. Ensure the cocoa powder is thoroughly whisked to prevent clumping. For an extra luxurious experience, stir in 1-2 tablespoons of melted dark chocolate after the pudding has thickened. A sprinkle of shredded coconut or chopped nuts adds a delightful textural contrast.
Nutty & Seed-y Adventures: Enhance the nutritional value and flavor profile of your chia pudding by adding nuts and seeds. A tablespoon of almond butter, tahini, or sunflower seed butter stirred into the pudding creates a creamy, nutty texture and adds healthy fats. You can also sprinkle chopped nuts (almonds, walnuts, pecans) or seeds (pumpkin, flax, hemp) on top for added crunch. Remember to adjust the sweetness accordingly, as nut butters often contain added sugar.
Spiced Sensations: Experiment with spices to create unique and aromatic chia puddings. A pinch of cinnamon, cardamom, or nutmeg adds warmth and complexity. For a more adventurous flavor, try incorporating a dash of ginger or even a few drops of vanilla extract. Start with small amounts of spices and adjust to your preference, as strong spices can overpower the delicate flavor of chia seeds.
Creamy Coconut Bliss: Replace the regular milk with full-fat coconut milk for a richer, creamier texture and a subtle coconut flavor. This works particularly well with tropical fruits like mango or pineapple. Ensure you use full-fat coconut milk for the best results; light coconut milk may result in a thinner pudding.
Dairy-Free Options: The beauty of chia pudding is its versatility with various milk alternatives. Experiment with almond milk, soy milk, oat milk, or even rice milk. The texture might slightly vary depending on the type of milk used, so adjust the amount of chia seeds if necessary to achieve your desired consistency. Always ensure the milk you choose is unsweetened to better control the sweetness of the pudding.
Pro Tip: Let your creativity run wild! Don’t be afraid to combine different variations to create your signature chia pudding recipe. The possibilities are endless!
Tips and Tricks for Easy Chia Pudding
Making the perfect chia pudding is easier than you think! Follow these tips and tricks to elevate your chia pudding game from basic to brilliant.
Choosing Your Chia Seeds: While all chia seeds are essentially the same nutritionally, look for seeds that are dark in color and have a slightly glossy sheen. Avoid seeds that are dusty or pale, as these may be older and less effective at thickening your pudding.
Liquid Ratio: The key to perfectly textured chia pudding lies in the liquid-to-chia seed ratio. A general guideline is 1 cup of liquid to 2-3 tablespoons of chia seeds. For a thicker pudding, use 3 tablespoons of chia seeds per cup of liquid. For a thinner, more pourable pudding, use 2 tablespoons. Experiment to find your perfect consistency!
Liquid Options: Don’t limit yourself to just milk! While dairy milk (cow’s milk, almond milk, soy milk) works wonderfully, you can also use other liquids such as coconut milk (full-fat for extra richness!), yogurt (Greek yogurt adds a lovely tang), or even juice (for a naturally sweetened and flavorful pudding). Note: If using a thicker liquid like coconut milk, you may need to adjust the amount slightly to achieve your desired consistency.
Sweetener: The amount of sweetener you add is entirely up to you. Start with 1-2 tablespoons of your preferred sweetener (maple syrup, honey, agave nectar, or even stevia) per cup of liquid and adjust to taste. Remember that the sweetness will intensify as the pudding sits, so it’s better to start with less and add more later.
Flavor Enhancements: The possibilities are endless! Add extracts like vanilla, almond, or peppermint for subtle flavor boosts. Incorporate spices like cinnamon, nutmeg, or cardamom for warmth. Mix in cocoa powder for a chocolate chia pudding. Consider adding fresh or frozen fruit, nuts, seeds, or even chocolate chips for extra texture and flavor. Experiment with different combinations to create your signature chia pudding.
Soaking Time: While chia seeds will start to absorb liquid almost immediately, allowing the pudding to soak in the refrigerator for at least 2 hours, or preferably overnight, will result in the best texture. The longer it sits, the smoother and creamier it will become. However, if you’re short on time, 30 minutes will give you a perfectly edible, though slightly less creamy pudding.
Storage: Store your prepared chia pudding in an airtight container in the refrigerator for up to 5 days. The texture may thicken slightly over time, but it will still be delicious.
Troubleshooting: If your pudding is too thick, add a splash more liquid. If it’s too thin, add a tablespoon or two more chia seeds and stir well. Let it sit for another 30 minutes to an hour to allow the seeds to fully absorb the liquid.
Professional Recommendation: For the best results, always use fresh chia seeds and measure your ingredients accurately. Don’t be afraid to experiment with different flavor combinations to discover your favorite chia pudding recipe!
Recommendations for Easy Chia Pudding
This Easy Chia Pudding recipe is a fantastic base for a variety of delicious and healthy breakfasts, snacks, or desserts. To make the most of your pudding, consider these recommendations:
Serving Suggestions: The versatility of chia pudding is one of its greatest strengths. Enjoy it straight from the fridge for a simple yet satisfying treat. For added texture and flavor, consider topping your pudding with fresh berries (strawberries, blueberries, raspberries), sliced bananas, chopped nuts (almonds, pecans, walnuts), seeds (sunflower, pumpkin), shredded coconut, or a drizzle of honey or maple syrup. A sprinkle of cocoa powder transforms it into a decadent chocolate pudding. For a more substantial meal, layer your pudding with granola for added crunch and fiber. You can also add a dollop of Greek yogurt or a scoop of your favorite nut butter for extra protein and creaminess. Experiment with different flavor combinations to find your perfect match!
Storage Conditions: Proper storage is crucial to maintaining the freshness and quality of your chia pudding. Store your pudding in an airtight container in the refrigerator for up to 5 days. After 5 days, the pudding may start to lose its desirable texture and freshness. Avoid storing it at room temperature for extended periods, as this can lead to bacterial growth. If you’re preparing the pudding in advance for the week, consider making individual servings in small containers for easy grab-and-go breakfasts.
Complementary Dishes: Chia pudding pairs beautifully with a variety of other dishes. It makes a wonderful accompaniment to a light breakfast of fresh fruit and toast. It’s also a fantastic addition to a brunch spread, alongside items like pancakes, waffles, or scrambled eggs. For a more unique pairing, consider serving it alongside a light salad with a citrus vinaigrette. The creamy texture of the pudding provides a delightful contrast to the crispness of the salad. If you are feeling more adventurous, you can incorporate the pudding into smoothies for added thickness and nutrition. The mild flavor profile makes it an adaptable ingredient for many culinary creations.
Nutritional Information (per serving, approximate values will vary based on specific ingredients used): These values are estimates and can change based on the specific ingredients and quantities used. It is recommended to use a nutrition calculator with your specific recipe for precise information.
Calories: Approximately 200-250 calories per serving
Protein: Approximately 5-7 grams per serving
Fiber: Approximately 8-10 grams per serving
Fat: Approximately 5-8 grams per serving (depending on added ingredients)
Carbohydrates: Approximately 25-30 grams per serving
Important Note: These nutritional values are estimates. The actual nutritional content may vary depending on the specific ingredients and quantities used in your recipe. Always refer to the nutrition labels of your individual ingredients for the most accurate information. If you have any dietary concerns or restrictions, please consult a healthcare professional or registered dietitian before incorporating this recipe into your diet.