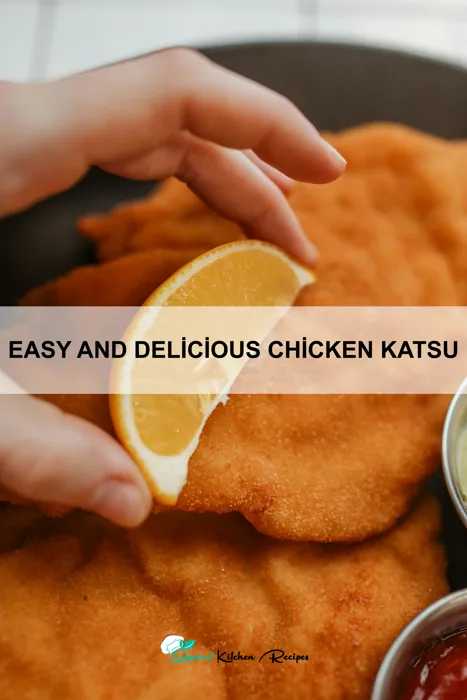
Prepare yourself for a culinary journey to Japan with our recipe for Easy and Delicious Chicken Katsu! This iconic dish, a true testament to the simplicity and brilliance of Japanese cuisine, boasts a crispy, golden-brown exterior encasing succulent, tender chicken. Chicken Katsu’s origins lie in the Western-influenced tonkatsu (pork cutlet), which itself arrived in Japan during the Meiji period (1868-1912) via Western culinary influences. The adaptation to chicken, however, likely occurred later, benefiting from the increasing affordability and popularity of chicken in post-war Japan.
The cultural significance of katsu dishes in Japan is immense. They are a staple across various demographics, appearing frequently on restaurant menus, in home kitchens, and even in school lunches. While exact statistics are hard to pin down on the popularity of chicken katsu specifically versus tonkatsu, the combined popularity of both is undeniable, representing a significant portion of Japan’s popular comfort food landscape. The dish’s versatility is also key to its appeal; it’s equally enjoyable as a standalone meal, paired with rice and a simple salad, or as part of a larger teishoku (set meal). The satisfying crunch and savory flavor profile make it a crowd-pleaser across generations.
Beyond Japan, Chicken Katsu has gained significant global traction, becoming a beloved dish in many parts of the world. Its adaptability allows for variations and fusion elements, with chefs incorporating different breading techniques, sauces, and even adding spicy elements. The ease of preparation also contributes to its widespread appeal, making it a perfect dish for both novice and experienced cooks. This recipe aims to simplify the process even further, ensuring that anyone can experience the joy of creating this delicious and historically significant Japanese comfort food in their own kitchens. So, let’s dive in and discover the magic of Chicken Katsu!
Ingredients and Measurements
This recipe yields approximately 4 servings of delicious Chicken Katsu. Accurate measurements are crucial for achieving the perfect crispy texture and flavorful result. Use a kitchen scale for the most precise measurements, especially for the flour and panko breadcrumbs.
Chicken Breast: 4 boneless, skinless chicken breasts (approximately 6-8 ounces each). Choosing chicken breasts of similar size ensures even cooking. If your breasts are significantly different in size, consider pounding the thicker ones to achieve uniform thickness of about ½ inch. This prevents some parts from being overcooked while others remain undercooked.
For the Marinade: We’ll be using a simple but effective marinade to tenderize and flavor the chicken. The quantities below are easily adjustable to your preference.
- Soy Sauce: 2 tablespoons (30ml) – Provides a savory base and enhances the overall flavor.
- Mirin: 1 tablespoon (15ml) – Adds a touch of sweetness and depth to the marinade.
- Sake (optional): 1 tablespoon (15ml) – Further enhances the savory notes and contributes to a tender chicken breast. If you don’t have sake, you can substitute with an equal amount of dry sherry or white wine.
- Ginger (grated): 1 teaspoon (5g) – Adds a subtle spicy warmth.
- Garlic (minced): 1 clove (2g) – Contributes a pungent aroma and flavor.
For the Coating: The three-step breading process is key to achieving a perfectly crispy katsu. Make sure your ingredients are at room temperature for optimal adhesion.
- All-Purpose Flour: ½ cup (60g) – Use a light dusting to coat the chicken before dipping in the egg wash.
- Eggs: 2 large eggs, lightly beaten – Acts as a binder between the flour and panko breadcrumbs, ensuring the coating adheres well.
- Panko Breadcrumbs: 1 ½ cups (180g) – Panko breadcrumbs are essential for that signature light and airy crunch. Avoid pressing the breadcrumbs too firmly onto the chicken, as this can result in a heavy, dense coating.
For Frying: Use a high-smoke-point oil like vegetable or canola oil for deep frying.
- Oil: Enough to fill a deep skillet or pot to a depth of at least 2 inches (5cm).
For Serving (optional): Add your favorite accompaniments to elevate your Chicken Katsu experience.
- Japanese Curry Sauce: A classic pairing for Chicken Katsu
- Shredded Cabbage: Provides a refreshing contrast to the rich katsu.
- Rice: Steamed Japanese rice is the perfect side.
Important Note: Always ensure the oil is hot enough before adding the chicken. The oil should shimmer and a small piece of breadcrumb dropped in should sizzle immediately. Overcrowding the pan will lower the oil temperature and result in soggy katsu. Fry in batches if necessary.
Equipment List
Making delicious Chicken Katsu requires the right tools. While you might have some already, having the correct equipment will significantly improve your cooking experience and the final result. Below is a detailed list of what you’ll need, with recommendations for optimal performance.
Meat Mallet (approximately 6 inches long): A meat mallet is crucial for tenderizing the chicken breasts. A heavier mallet will be more efficient, but be careful not to over-tenderize and turn the chicken to mush. A flatter mallet surface is preferable for even pounding. If you don’t have a meat mallet, you can use the bottom of a heavy pan, but be gentler to avoid tearing the meat.
Three shallow dishes (approximately 8-10 inches diameter): You’ll need three shallow dishes for the breading process: one for the flour, one for the beaten eggs (approximately 2 large eggs, lightly beaten), and one for the panko breadcrumbs (approximately 2 cups). Using shallow dishes allows for even coating and prevents excess batter from accumulating.
Whisk (approximately 8-10 inches long): A whisk is ideal for lightly beating the eggs, ensuring they’re evenly distributed and not too frothy. You can use a fork, but a whisk creates a lighter, more even coating.
Large Non-Stick Frying Pan (approximately 10-12 inches diameter): A large non-stick frying pan is essential for frying the chicken katsu evenly. Ensure you have enough space in the pan; overcrowding will lower the temperature of the oil and result in soggy katsu. A non-stick surface prevents sticking and makes cleanup easier.
Tongs or Spatula: Use tongs or a spatula to carefully turn the chicken during frying, preventing damage and ensuring even browning. Avoid using forks, as they can puncture the chicken and release juices.
Kitchen Thermometer (optional but recommended): A kitchen thermometer is highly recommended for monitoring the oil temperature. The ideal temperature for frying chicken katsu is between 350-375°F (175-190°C). Consistent temperature is key to achieving a crispy exterior and juicy interior.
Paper Towels: You’ll need plenty of paper towels to drain excess oil from the fried chicken katsu after cooking. This helps to reduce the greasiness and enhance the crispy texture.
Cutting Board and Sharp Knife: A sturdy cutting board and a sharp knife are needed for preparing the chicken breasts. Using a sharp knife ensures clean cuts and prevents tearing the meat.
Measuring Cups and Spoons: Accurate measurements are crucial for consistent results. Having a set of measuring cups and spoons will ensure you use the correct amount of flour, eggs, and panko breadcrumbs.
Chicken Preparation (including tenderizing)
Choosing the right chicken is crucial for perfect Chicken Katsu. Opt for boneless, skinless chicken breasts, about 1.5 lbs (680g) total. This will yield approximately 4-6 cutlets, depending on their size. Avoid chicken breasts that are too thick; they may not cook evenly.
Before you begin, ensure your chicken breasts are completely thawed and patted dry with paper towels. This is vital for achieving a crispy, golden-brown crust. Excess moisture will hinder the breading process and result in a soggy Katsu.
Now, let’s tackle tenderizing. Tenderizing the chicken breasts ensures even cooking and a more delicate texture. There are several methods you can employ. You can use a meat mallet to gently pound the chicken breasts to an even thickness of about 1/4 inch (6mm). Avoid pounding too hard; you want to flatten, not pulverize, the chicken. Alternatively, you can use a rolling pin wrapped in a plastic bag for a gentler approach. If you prefer a more hands-off method, you can carefully slice the thicker parts of the chicken breast horizontally to create a more uniform thickness, preventing uneven cooking.
Once tenderized, season the chicken generously with salt and freshly ground black pepper on both sides. About 1 teaspoon of salt and 1/2 teaspoon of black pepper for the entire batch is a good starting point, but adjust to your preference. You can also add other seasonings at this stage, such as garlic powder or paprika, for extra flavour. Don’t be shy with the seasoning, as some will be lost during cooking.
Finally, before breading, it’s helpful to lightly dust the chicken with all-purpose flour. This acts as a binder, helping the egg and panko breadcrumbs adhere better to the chicken, resulting in a crispier crust. Make sure to shake off any excess flour after coating.
Proper preparation is key to delicious Chicken Katsu. Take your time with each step, and you’ll be rewarded with perfectly tender and crispy cutlets.
Breading Station Setup: The Key to Crispy Katsu
Setting up your breading station efficiently is crucial for achieving that signature crispy, golden-brown crust on your chicken katsu. A well-organized station ensures a smooth and even coating process, preventing clumps and maximizing the deliciousness of your dish. Here’s how to set up yours for success:
Gather your ingredients and tools: You’ll need three shallow dishes (approximately 9-11 inches in diameter) for the breading process. A larger plate or tray is also helpful for resting breaded cutlets. Line your work surface with paper towels to absorb excess moisture and maintain cleanliness. Prepare approximately 1 cup of all-purpose flour, 2 large eggs lightly beaten with 2 tablespoons of water (this helps with adhesion), and 2 cups of panko bread crumbs.
Arrange your stations: Place your three shallow dishes in a line. The first dish should contain the flour, the second the egg mixture, and the third the panko bread crumbs. This linear arrangement allows for a smooth, efficient workflow. Ensure each dish has enough space around it to work comfortably. Having your larger plate or tray nearby for resting breaded cutlets before frying is essential to prevent sticking and maintain consistency.
Flour Station: Generously season your flour with salt and pepper (approximately 1 teaspoon of each per cup of flour). This step adds flavor directly to the chicken. Avoid overcrowding the flour; ensure there’s enough space for the chicken to be fully coated without clumping. A light dusting is all you need in this stage; heavy flouring will result in a soggy katsu.
Egg Station: Whisk your eggs thoroughly with the water to create a smooth, even mixture. This helps the bread crumbs adhere better to the chicken. Make sure each piece of chicken is fully submerged in the egg mixture, ensuring complete coverage before proceeding to the next step.
Panko Station: Use high-quality panko bread crumbs for optimal texture and crispiness. Don’t press the panko onto the chicken; gently press the chicken into the crumbs to ensure an even coating. Excess panko will fall off naturally, so don’t worry about overdoing it. Avoid over-handling the breaded chicken as this can compact the crumbs and hinder crispiness.
Cleanliness: Keep paper towels handy to wipe your hands and clean up any spills. A clean work surface will help prevent sticking and maintain a smooth breading process. Remember, a well-organized and clean breading station is the key to consistently delicious and crispy chicken katsu.
Panko Breadcrumb Coating Technique
Achieving that signature light and crispy Katsu coating relies heavily on the panko breadcrumb technique. This section will guide you through the process, ensuring your chicken is perfectly coated for a truly delicious result.
First, prepare your dredging station. This involves setting up three shallow dishes. The first will contain 1 cup of all-purpose flour seasoned with 1 teaspoon of salt and ½ teaspoon of black pepper. The second dish holds your beaten egg wash – whisk together 2 large eggs lightly with 2 tablespoons of water. This helps the breadcrumbs adhere better. Finally, the third dish contains 2 cups of panko breadcrumbs. Ensure your chicken is completely dry before proceeding; patting it dry with paper towels is crucial for optimal breading.
Now, begin the breading process. Gently dredge each chicken breast piece in the seasoned flour, ensuring it’s fully coated. Shake off any excess flour to prevent a thick, heavy coating. Next, dip the floured chicken into the egg wash, making sure it’s fully submerged. Let any excess egg drip off before moving to the final step.
Carefully coat the chicken in the panko breadcrumbs, pressing gently to ensure the breadcrumbs adhere well. Don’t be afraid to use a generous amount of panko; this contributes to the light and airy texture. For extra crispy results, you can even gently press the panko onto the chicken to help it adhere better. Avoid over-packing the breadcrumbs, as this can lead to a soggy coating.
A professional tip: For a truly authentic Katsu experience, consider adding a pinch of grated nutmeg or a dash of your favorite spice blend to the flour for added depth of flavor. Experimentation is key!
Once all your chicken pieces are perfectly coated, you’re ready to proceed to the frying stage. Remember, a well-prepared panko coating is the foundation of perfect Chicken Katsu. Follow these steps meticulously, and you’ll be rewarded with a deliciously crispy and flavorful result every time.
Important Note: If you are preparing the chicken in advance, it’s best to bread it just before frying to prevent the breadcrumbs from becoming soggy.
Cooking the Chicken Katsu (Frying Method and Temperature Control)
Frying the chicken katsu perfectly requires attention to detail, particularly regarding temperature control. The goal is a golden-brown, crispy crust with juicy, tender meat inside. We’ll achieve this using a two-stage frying process.
First, prepare your frying station. You’ll need a large, heavy-bottomed pot or deep fryer capable of holding at least 3-4 inches of oil. We recommend using a neutral-flavored oil with a high smoke point, such as vegetable oil, canola oil, or peanut oil. Measure out approximately 2 cups (475ml) of oil. Do not overcrowd the pot; this will lower the oil temperature and result in soggy katsu.
Heat the oil to the correct temperature. This is crucial. Use a deep-fry thermometer to monitor the oil temperature closely. The ideal temperature for the first fry is 325°F (165°C). Do not exceed 350°F (175°C) as this will burn the breadcrumbs before the chicken is cooked through. Once the oil reaches the target temperature, gently lower the breaded chicken cutlets into the oil, ensuring not to overcrowd the pot. Fry for approximately 3-4 minutes per side, or until the breadcrumbs are lightly golden and the chicken is beginning to cook through.
Remove the chicken from the oil and place it on a wire rack set over a baking sheet to drain excess oil. This allows the chicken to crisp up further and prevents it from becoming soggy. Let it rest for at least 5 minutes.
For the second fry (optional but recommended), increase the oil temperature to 350°F (175°C). This higher temperature will ensure an extra crispy exterior. Carefully place the rested chicken cutlets back into the hot oil and fry for another 1-2 minutes per side, until golden brown and crispy. Be careful not to burn the breadcrumbs at this stage.
Remove the chicken katsu from the oil and place it back on the wire rack to drain excess oil. Allow the chicken to rest for a few more minutes before serving. This allows the juices to redistribute, resulting in a more tender and flavorful katsu. Immediately serve your delicious chicken katsu with your favorite dipping sauces!
Important Note: Always exercise caution when working with hot oil. Never leave hot oil unattended. Keep a fire extinguisher nearby as a safety precaution.
Recommendations for Easy and Delicious Chicken Katsu
For the ultimate Chicken Katsu experience, we recommend serving your crispy cutlets with a generous portion of Japanese curry rice. The rich, savory curry perfectly complements the crunchy exterior and tender chicken. Alternatively, a simple bowl of steamed rice topped with shredded Japanese cabbage salad dressed in a light vinaigrette provides a refreshing contrast. You can also add a side of pickled ginger to cut through the richness of the dish.
To elevate the flavor profile, experiment with different dipping sauces. While the classic tonkatsu sauce is a must-have, consider adding a squeeze of fresh lime or lemon juice for a zesty twist. A spicy mayo, made by mixing mayonnaise with sriracha or your favorite hot sauce, offers a delightful kick. Don’t be afraid to get creative and explore various dipping options to find your perfect combination!
Storage: Leftover Chicken Katsu should be stored in an airtight container in the refrigerator for up to 3 days. To maintain its crispiness, we recommend reheating it in a preheated oven at 350°F (175°C) for about 10-15 minutes, or until heated through. Avoid microwaving, as this can make the katsu soggy.
Nutritional Information (per serving, approximate): Please note that nutritional information will vary depending on specific ingredients and portion sizes. This is an estimate based on a standard serving of Chicken Katsu. Calories: Approximately 450-550 calories. Protein: Around 35-45 grams. Fat: Approximately 25-35 grams. Carbohydrates: Around 20-30 grams. For more precise nutritional information, use a nutrition calculator with your specific recipe ingredients and quantities.
Important Note: The calorie and nutritional information provided is an estimate and may vary based on the specific ingredients used and portion sizes. For accurate nutritional data, we recommend using a nutrition tracking app or consulting a registered dietitian.


