Prepare your taste buds for an unforgettable culinary journey to Thailand with a dish that transcends mere food—it’s an experience. We’re talking about Mango Sticky Rice, a seemingly simple dessert that holds a profound place in Thai culture and boasts a history as rich and sweet as its flavor profile. While the exact origins are difficult to pinpoint, its popularity exploded in the 20th century, solidifying its status as a national treasure and a must-try for any visitor to the Land of Smiles.
The magic lies in the harmonious blend of contrasting textures and flavors. Sweet, ripe mangoes, often the golden-yellow variety, are paired with sticky rice, cooked to a perfect, almost ethereal, consistency. This rice, typically glutinous or sweet rice, is then generously coated in a creamy, intensely flavored coconut milk mixture, often infused with a touch of salt to balance the sweetness and enhance the overall taste. The dish showcases a mastery of simple ingredients, elevating them to a level of culinary artistry. Its popularity is undeniable; you’ll find countless variations across Thailand, each reflecting regional preferences and traditions.
Beyond its delightful taste, Mango Sticky Rice carries significant cultural weight. It’s frequently served at celebrations, festivals, and special occasions, symbolizing abundance, prosperity, and sweetness. The vibrant yellow of the mango is often associated with royalty and good fortune. You’ll find it served at weddings, birthdays, and religious ceremonies—a testament to its deep cultural significance. Although precise statistics on annual consumption are hard to come by, its ubiquitous presence in markets, street food stalls, and high-end restaurants across Thailand speaks volumes about its popularity. It’s estimated that millions of servings are enjoyed annually, both domestically and internationally, contributing significantly to Thailand’s culinary tourism.
The global appeal of Mango Sticky Rice has also led to variations and adaptations in other countries. However, authentic Thai Mango Sticky Rice remains a benchmark of quality and flavor, a testament to the country’s rich culinary heritage. Its enduring popularity is a reflection of its simple elegance, its ability to evoke a sense of place, and its delicious harmony of sweet, creamy, and subtly salty notes. So, prepare to be transported to the heart of Thailand with each bite of this exquisite dessert—a culinary masterpiece that is both comforting and unforgettable.
Ingredients and Measurements
Creating authentic and delicious Thai Mango Sticky Rice hinges on using high-quality ingredients and precise measurements. This recipe yields approximately 4 servings.
For the Sticky Rice:
- 1 cup (200g) Thai glutinous rice (also known as sweet rice). Using Thai glutinous rice is crucial; other types of rice won’t achieve the same texture. Rinse the rice thoroughly under cold water until the water runs clear. This removes excess starch and prevents clumping.
- 1 ¼ cups (300ml) coconut milk. Use full-fat coconut milk for the richest flavor and creamy texture. Light coconut milk will result in a drier, less flavorful dish.
- ½ cup (100g) granulated sugar. Adjust to your preference. Some prefer a less sweet sticky rice, while others prefer it sweeter. Start with ½ cup and taste-test before adding more.
- ¼ teaspoon salt. A pinch of salt enhances the sweetness and balances the flavors.
- 1 tablespoon coconut oil or vegetable oil. This helps prevent sticking and adds a subtle coconut flavor if using coconut oil.
For the Mango Topping:
- 2 ripe mangoes, preferably Ataulfo or Nam Dok Mai mangoes. Choose mangoes that are fragrant and perfectly ripe, with a soft yield to gentle pressure. Underripe mangoes will be too tart, and overripe mangoes will be mushy.
- Optional: A few fresh mint leaves for garnish. A sprig of fresh mint adds a lovely aromatic touch and a refreshing contrast to the sweetness.
For the Coconut Sauce (optional but highly recommended):
- ½ cup (120ml) full-fat coconut milk.
- 2 tablespoons granulated sugar. Again, adjust this to your sweetness preference.
- 1 tablespoon water.
- Pinch of salt.
Important Notes on Measurements:
Accuracy is key in this recipe. Using a kitchen scale for measuring the rice and sugar will ensure consistent results. For liquid measurements, use a liquid measuring cup for precise amounts. Do not pack the rice into the measuring cup; gently spoon it in to avoid over-measuring. Similarly, do not compress the sugar when measuring it.
Professional Recommendation: Soak the sticky rice for at least 4 hours, or preferably overnight, before cooking. This step is crucial for achieving the perfect texture. Soaking allows the rice to absorb the liquid properly, resulting in a softer, chewier texture. After soaking, drain the rice thoroughly before steaming or cooking.
Following these guidelines and using high-quality ingredients will guarantee a truly authentic and delightful Thai Mango Sticky Rice experience.
Equipment List: Delicious Thai Mango Sticky Rice
Creating authentic and delicious Thai Mango Sticky Rice requires the right tools. While some items might seem replaceable, using the recommended equipment will significantly improve your cooking experience and the final product’s quality. This list details the essential and optional equipment, including specific recommendations where applicable.
Essential Equipment:
1. Medium-Sized Saucepan (2-quart capacity): This is crucial for cooking the sticky rice. A heavy-bottomed saucepan distributes heat evenly, preventing scorching and ensuring perfectly cooked rice. Look for a stainless steel or non-stick saucepan with a well-fitting lid. Avoid using thin-walled saucepans, as they can lead to uneven cooking and burning. A 2-quart capacity is ideal for making a sufficient amount of sticky rice for 4-6 servings.
2. Rice Cooker (Optional, but Highly Recommended): While a saucepan works, a rice cooker simplifies the sticky rice cooking process significantly. It ensures perfectly cooked rice every time, minimizing the risk of burning or undercooking. If using a rice cooker, choose one with a capacity of at least 1.5 liters. Ensure the rice cooker is designed for sticky rice or short grain rice, as the cooking process and water ratio differ from other rice varieties.
3. Steamer Basket (if using a pot): If you’re not using a rice cooker, a steamer basket is essential for steaming the sticky rice. Choose a steamer basket that comfortably fits inside your 2-quart saucepan, leaving enough space for water to boil below without overflowing. A bamboo steamer is ideal for its breathability and even steaming, but a stainless steel steamer basket also works well.
4. Medium-Sized Mixing Bowls (2): You’ll need at least two medium-sized mixing bowls. One for preparing the coconut milk mixture and another for tossing the cooked sticky rice with the coconut milk and sugar. Use bowls that are heat-safe if you plan on mixing the ingredients while still warm.
5. Whisk or Fork: A whisk is ideal for smoothly incorporating the sugar and coconut milk, creating a uniform consistency. A fork will also work, but a whisk ensures a smoother, lump-free mixture. Choose a sturdy whisk or fork that can easily handle the slightly thicker coconut milk mixture.
6. Measuring Cups and Spoons: Accurate measurements are essential for achieving the perfect balance of flavors and texture. Invest in a set of reliable measuring cups and spoons for precise measurements of ingredients like sugar, salt, and water.
7. Sharp Knife and Cutting Board: For preparing the mangoes, a sharp knife and a sturdy cutting board are necessary. A serrated knife is ideal for slicing mangoes, preventing tearing and ensuring clean, even slices. Choose a cutting board that is large enough to accommodate the mangoes comfortably.
Optional Equipment:
1. Food Processor or Blender: While not strictly necessary, a food processor or blender can help create a smoother coconut milk mixture. This is especially useful if you are using coconut cream.
2. Serving Dishes: Choose attractive serving dishes to showcase your beautiful Thai Mango Sticky Rice. Individual bowls or a larger platter are both suitable options.
Sticky Rice Preparation
Making perfect Thai sticky rice is the cornerstone of this delicious dessert. Follow these steps carefully to achieve that wonderfully chewy texture that complements the sweet mango and coconut milk perfectly.
Begin with the right rice: Use high-quality glutinous rice, also known as sweet rice or sticky rice. This specific type of rice contains more amylopectin, a starch responsible for the unique stickiness. Avoid using regular long-grain rice, as it will not achieve the desired texture.
Rinse thoroughly: Measure out 1 cup of glutinous rice. Rinse the rice under cold running water until the water runs clear. This crucial step removes excess starch and prevents the rice from becoming overly sticky and clumping together. You should rinse for at least 5-7 minutes, changing the water several times.
Soaking is key: After rinsing, soak the rice in ample cold water for at least 4-6 hours, or preferably overnight. This soaking process allows the rice to fully absorb water, resulting in a more even cooking process and a softer, chewier texture. Ensure the rice is completely submerged in water.
Steaming, not boiling: Boiling sticky rice will result in a mushy texture. Instead, steam the rice. Place the soaked rice into a steamer basket lined with a clean cheesecloth or a perforated steamer insert. Place the basket over a pot of boiling water, ensuring the water level doesn’t touch the bottom of the basket. Maintain a consistent, vigorous simmer throughout the steaming process. Cover the pot tightly to trap the steam.
Steaming time: Steam the rice for approximately 20-25 minutes, or until all the water is absorbed and the rice is tender and translucent. Do not lift the lid during steaming as this will cause a loss of steam and affect the cooking process. After 20 minutes, gently test a grain of rice. It should be soft and sticky, yet not mushy.
Fluffing and resting: Once the rice is cooked, carefully remove the steamer basket from the pot. Using a rice paddle or wooden spoon, gently fluff the rice to separate the grains and allow any excess steam to escape. Avoid over-fluffing as this can break the rice grains. Cover the cooked rice loosely with a clean kitchen towel and let it rest for about 10 minutes. This allows the rice to fully absorb the remaining moisture and develop its optimal texture.
Serving suggestion: For the best results, serve the sticky rice immediately after preparing. If you need to prepare it ahead of time, store it in an airtight container at room temperature. Reheat gently by steaming or microwaving before serving to restore its texture. Avoid refrigerating sticky rice as it will become hard and difficult to fluff.
Following these steps will ensure your sticky rice is perfectly cooked, providing a delightful base for your delicious Thai Mango Sticky Rice dessert.
Mango Preparation
Preparing the mangoes is crucial for achieving the perfect balance of sweetness and texture in your Thai Mango Sticky Rice. The ripeness of your mangoes will significantly impact the final dish, so selecting the right fruit is the first step. Choose mangoes that are firm yet give slightly to gentle pressure; they should be fragrant and free of bruises.
For this recipe, we recommend using 2-3 ripe mangoes, depending on their size. A good average mango weighs around 1 pound (450g). If your mangoes are smaller, you may need to use three. Larger mangoes might allow you to use just two. The goal is to have approximately 1 ½ – 2 cups of diced mango.
Begin by thoroughly washing the mangoes under cold running water. This removes any dirt or residue from the skin. Then, using a sharp knife, carefully slice the mangoes lengthwise, following the natural curve of the fruit. Avoid cutting too deeply to prevent accidentally slicing the pit.
Next, gently peel away the skin from each mango half. You can use a vegetable peeler for this, or simply use your knife to carefully slice away the skin. Be mindful not to waste any of the delicious mango flesh. Once peeled, you can easily separate the mango flesh from the large, flat pit.
Now comes the dicing. For optimal presentation and texture, dice the mango flesh into roughly ½-inch (1.25cm) cubes. Consistency is key here; aiming for uniform cubes ensures even distribution of sweetness throughout the sticky rice. Avoid dicing too small, as this can lead to a mushy texture. Too large, and the contrast with the sticky rice becomes less appealing.
Once diced, you can choose to immediately use the mango or store it briefly. If storing, place the diced mango in an airtight container and refrigerate for no more than 2-3 hours. Prolonged refrigeration can affect the mango’s texture and flavor. It’s best to prepare the mangoes just before assembling the sticky rice to maintain optimal freshness and prevent browning.
A professional tip: To prevent browning, you can lightly toss the diced mangoes with a small amount of lemon juice (about ½ teaspoon) after dicing. The citric acid in the lemon juice helps inhibit enzymatic browning, keeping your mangoes looking vibrant and beautiful until serving.
Finally, before adding the mango to your sticky rice, gently pat any excess moisture from the diced mango using a paper towel. This will prevent the sticky rice from becoming overly watery and will help maintain its texture. With properly prepared mangoes, your Thai Mango Sticky Rice will be a truly delectable masterpiece.
Coconut Milk Sauce Preparation
The rich and creamy coconut milk sauce is the cornerstone of delicious Thai Mango Sticky Rice. Its balance of sweetness, saltiness, and subtle coconut flavor elevates the dish to a truly unforgettable experience. This section details the preparation of a perfect coconut milk sauce, ensuring your mango sticky rice is a resounding success.
Ingredients:
- 1 (13.5 ounce) can full-fat coconut milk, refrigerated overnight
- 1/2 cup granulated sugar (adjust to your preference)
- 1/4 teaspoon salt
- 1 tablespoon cornstarch
- 2 tablespoons water
- 1/2 teaspoon vanilla extract (optional, but recommended)
Instructions:
Step 1: Prepare the Coconut Cream: This step is crucial for achieving the desired creamy texture. The coconut milk must be refrigerated overnight. This allows the cream to separate from the watery liquid. Carefully scoop out the thick, solidified coconut cream from the top of the can, leaving the watery liquid behind. You should aim for approximately 1 cup of thick coconut cream. Reserve the remaining liquid for another use (such as in a curry).
Step 2: Create the Coconut Milk Sauce Base: In a medium saucepan over medium heat, combine the scooped coconut cream and the reserved coconut milk liquid. Add the granulated sugar and salt. Stir continuously until the sugar dissolves completely and the mixture begins to simmer gently. Do not boil. Boiling can cause the sauce to curdle and become grainy.
Step 3: Thicken the Sauce: In a small bowl, whisk together the cornstarch and water until a smooth slurry forms. Slowly pour the cornstarch slurry into the simmering coconut milk mixture, whisking constantly to prevent lumps from forming. Continue to whisk until the sauce thickens to your desired consistency. This usually takes about 2-3 minutes. Be careful not to overcook, as this can result in a gummy sauce.
Step 4: Infuse with Flavor: Remove the saucepan from the heat and stir in the vanilla extract (if using). The vanilla adds a lovely depth of flavor that complements the coconut perfectly. Allow the sauce to cool slightly before using.
Professional Recommendations:
- Use full-fat coconut milk: This is essential for achieving the rich, creamy texture of the sauce. Light coconut milk will result in a thinner, less flavorful sauce.
- Adjust sweetness to taste: Start with 1/2 cup of sugar, but feel free to adjust based on your preference. Some prefer a slightly less sweet sauce.
- Don’t rush the process: Take your time to ensure the sugar dissolves completely and the sauce thickens evenly. Rushing can lead to lumps and an uneven texture.
- Taste and adjust: Before serving, taste the sauce and adjust the sweetness or saltiness as needed. A pinch of extra salt can enhance the overall flavor profile.
By following these instructions carefully, you’ll create a luscious coconut milk sauce that perfectly complements the sweetness of the mango and the chewiness of the sticky rice, resulting in a truly authentic and delectable Thai Mango Sticky Rice.
Combining and Cooking
This section details the crucial steps of combining the ingredients and cooking the components of your delicious Thai Mango Sticky Rice. Precise measurements and techniques are key to achieving the perfect balance of sweetness, texture, and aroma.
Preparing the Sticky Rice: Begin by rinsing 1 cup of glutinous (sticky) rice thoroughly under cold running water until the water runs clear. This removes excess starch and prevents clumping. Soaking the rice is crucial for optimal texture. Soak the rinsed rice in ample cold water for at least 4 hours, or preferably overnight. This allows the rice to fully absorb the water, resulting in a softer, more pliable texture after cooking.
Cooking the Sticky Rice: Drain the soaked rice completely. Transfer it to a steamer basket or a fine-mesh sieve lined with cheesecloth. Place the basket over a pot of simmering water, ensuring the water doesn’t touch the bottom of the basket. Steam the rice for approximately 20-25 minutes, or until all the grains are tender and translucent. The cooking time may vary depending on your steamer and the type of rice used. Regularly check the rice to prevent overcooking, which can lead to mushiness.
Making the Coconut Milk Mixture: While the rice is steaming, prepare the coconut milk mixture. In a medium saucepan, combine 1 cup of thick coconut milk, 1/2 cup of granulated sugar, and a pinch of salt. Stir constantly over medium heat until the sugar dissolves completely and the mixture is slightly thickened. Do not boil the mixture, as this can cause it to become grainy. Reduce the heat to low and simmer for about 5 minutes, stirring occasionally, to allow the flavors to meld. The consistency should be creamy and slightly syrupy.
Combining the Rice and Coconut Milk: Once the sticky rice is cooked, gently transfer it to a large bowl. Carefully pour the warm coconut milk mixture over the hot rice. Use a rice paddle or spatula to gently fold the mixture together, ensuring all the rice grains are evenly coated with the coconut milk. Avoid mashing the rice. Allow the rice to sit for at least 10-15 minutes, allowing the rice to fully absorb the coconut milk and become wonderfully sticky and fragrant. This resting period is essential for developing the characteristic texture of Thai Mango Sticky Rice.
Professional Recommendation: For an even richer flavor, consider adding a teaspoon of vanilla extract or a few drops of pandan extract to the coconut milk mixture. You can also adjust the sugar quantity to your preference. If you prefer a less sweet version, reduce the sugar to 1/4 cup. Always taste and adjust the sweetness as needed before serving.
Important Note: The success of this recipe relies heavily on the quality of the glutinous rice and coconut milk. Use high-quality ingredients for the best results. Don’t be afraid to experiment with different types of mango for a variety of flavor profiles.
Delicious Thai Mango Sticky Rice: Recommendations
This section provides comprehensive recommendations for enjoying your Delicious Thai Mango Sticky Rice to its fullest potential. We’ll cover serving suggestions, storage to maintain freshness, complementary dishes that enhance the experience, and essential nutritional information.
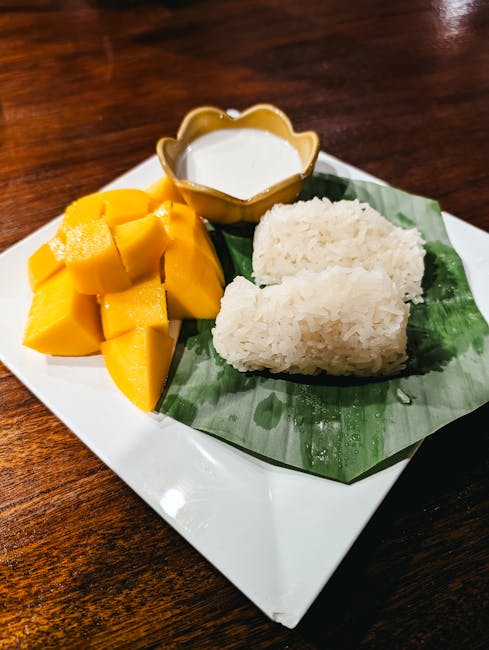
Serving Suggestions: For the best experience, serve your Thai Mango Sticky Rice immediately after preparation. The warm, sticky rice provides the perfect contrast to the cool, juicy mango. Consider plating it in a shallow bowl or on a small dessert plate. A drizzle of extra coconut milk adds richness and visual appeal. Garnish with a sprinkle of toasted sesame seeds or a few fresh mint leaves for an added textural and aromatic element. For a more elegant presentation, you can use a small spoon to create a swirl pattern on top of the sticky rice before adding the mango slices. Individual portions are ideal for a party or buffet setting.
Storage: While best enjoyed fresh, leftover Mango Sticky Rice can be stored in an airtight container in the refrigerator for up to 2 days. However, the texture of the sticky rice may change slightly after refrigeration. To restore some of its original texture, you can gently microwave it for a short period, adding a splash of coconut milk if needed to rehydrate it. Avoid freezing this dessert, as the texture will significantly degrade upon thawing.
Complementary Dishes: Thai Mango Sticky Rice stands beautifully on its own, but it can also be a delightful complement to other dishes. Consider serving it alongside a light and refreshing Thai green curry or a mild tom yum soup to balance the sweetness. It also pairs well with other desserts, such as fresh fruit platters featuring tropical fruits like pineapple or rambutan. For a more substantial meal, you can serve it alongside grilled chicken or fish satay for a sweet and savory contrast. A light scoop of coconut ice cream can also be a delicious addition.
Nutritional Information (per serving, approximate): The nutritional content of Thai Mango Sticky Rice varies depending on the specific ingredients and portion size. However, a typical serving (approximately 1 cup) might contain around 300-400 calories. This includes carbohydrates from the sticky rice, natural sugars from the mango, and fats from the coconut milk. It’s a good source of carbohydrates for energy and provides some vitamins and minerals from the mango, such as vitamin C and potassium. However, it’s also relatively high in sugar, so it’s best enjoyed in moderation as part of a balanced diet. Specific nutritional values will vary based on recipe and ingredients used.
Important Note: Always check the freshness of your ingredients before preparing this dish. Use ripe, sweet mangoes for the best flavor. The quality of the coconut milk also significantly impacts the overall taste and texture. Experiment with different types of coconut milk (full-fat, light, etc.) to find your preference.