Prepare your taste buds for a culinary adventure to Egypt with Koshari, a dish so beloved it’s considered the national food. Koshari’s origins are surprisingly humble, with its exact beginnings shrouded in some mystery. Some believe it emerged as a result of the Italian occupation of Egypt in the late 19th and early 20th centuries, incorporating influences from various cultures already present – specifically, the lentils and rice of Indian and Middle Eastern cuisine, combined with the pasta element perhaps introduced by the Italians. Others trace its roots back further, arguing that a simpler version of the dish existed for centuries, gradually evolving into the complex and flavorful meal we know today. Regardless of its precise genesis, one thing is certain: Koshari’s popularity has exploded.
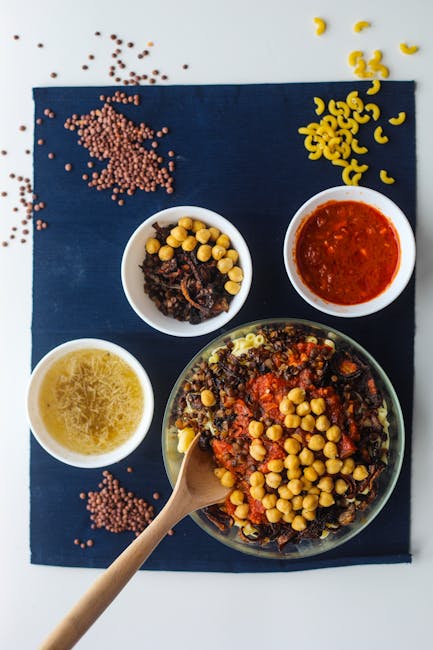
What makes Koshari so unique is its layered complexity. This isn’t just a simple rice and lentil dish; it’s a vibrant tapestry of flavors and textures. The base typically consists of rice, lentils (both brown and yellow), and macaroni, all cooked separately to perfection. On top of this foundation sits a rich tomato sauce, a flavorful garlic-vinegar sauce, and a generous helping of crispy fried onions. Sometimes, chickpeas are added to the mix, further enriching the already diverse culinary profile. This careful layering of ingredients is what makes each bite a symphony of tastes, a testament to Egyptian culinary ingenuity. Estimates suggest that upwards of 50% of Egyptians consume Koshari regularly, highlighting its place in the national food landscape.
Beyond its deliciousness, Koshari holds significant cultural importance in Egypt. It transcends socioeconomic boundaries; you’ll find it served everywhere from humble street food stalls to more upscale restaurants. Its affordability makes it a staple for many Egyptians, particularly those with limited budgets. This accessibility contributes to its widespread popularity and cultural significance. Furthermore, Koshari is often associated with everyday life and simple pleasures. It’s a dish that brings people together, a comforting and familiar taste for millions. Its pervasiveness in Egyptian society is undeniable, often appearing in popular culture, films, and television, solidifying its status as a national treasure. The dish’s enduring popularity, simple ingredients, and ability to cross social barriers further underscores its importance as a symbol of Egyptian identity and culture.
The preparation of Koshari itself is a fascinating process. While seemingly simple in its ingredients, the precise cooking techniques, the balance of flavors, and the artistry of layering all contribute to the dish’s unique character. The careful balancing of the crunchy fried onions against the soft lentils and rice, the tangy vinegar sauce against the rich tomato sauce – these are all crucial elements in creating the perfect Koshari experience. It’s a dish that rewards patience and attention to detail, a reflection of the care and effort that goes into creating this beloved national dish. Many families have their own secret recipes and techniques passed down through generations, emphasizing its deeply rooted cultural significance.
Ingredients and Measurements: Delicious Egyptian Koshari
This recipe yields approximately 6 servings of delicious Egyptian Koshari. Accurate measurements are crucial for achieving the perfect balance of flavors and textures. We’ll break down the ingredients into categories for clarity.
I. For the Rice:
1 cup long-grain rice: Basmati rice is traditionally preferred for its fluffy texture and subtle aroma. Rinse the rice thoroughly under cold water until the water runs clear. This removes excess starch and prevents clumping. Do not skip this step!
2 cups water: Use filtered water for the best results. Adjust the water amount slightly depending on your rice and stovetop; some rices may require a little more or less water for optimal cooking.
1/2 teaspoon salt: Salt enhances the flavor of the rice. You can also add a pinch of sugar to help with fluffiness.
1 tablespoon vegetable oil (optional): Adds a touch of richness to the rice. You can substitute with ghee or butter for a richer flavor.
II. For the Lentils:
1 cup brown or green lentils: Brown lentils hold their shape better than red lentils, which tend to break down. Rinse the lentils before cooking.
3 cups water: The water-to-lentil ratio is important for achieving the desired consistency. Adjust if needed depending on your lentils and preference.
1/2 teaspoon salt: Seasoning the lentils while cooking enhances their flavor.
1/4 teaspoon cumin: A pinch of cumin adds a warm, earthy note to the lentils. Feel free to experiment with other spices like coriander.
III. For the Pasta:
1 cup small macaroni or ditalini pasta: These small pasta shapes are traditional for Koshari. Avoid using large pasta shapes as they might not cook evenly with the other components.
2 cups water: Cook the pasta according to package instructions, ensuring it’s al dente (slightly firm to the bite). Overcooked pasta will ruin the texture of the dish.
1/4 teaspoon salt: Season the pasta water just like you would any other pasta dish.
IV. For the Garlic Vinegar Sauce (Tahini Sauce):
1/2 cup tahini: High-quality tahini is essential for a rich and creamy sauce. If your tahini is thick, add a little water to thin it to your desired consistency.
1/4 cup lemon juice: Freshly squeezed lemon juice is best. The acidity balances the richness of the tahini.
2 cloves garlic, minced: Fresh garlic adds a pungent flavor. Adjust the amount to your liking.
1/4 cup water: Add water gradually to achieve the desired consistency. Start with less and add more as needed.
1/4 teaspoon salt: Adjust to taste.
Pinch of ground cumin (optional): Enhances the overall flavor profile.
V. For the Fried Onions (optional, but highly recommended):
1 large yellow onion, thinly sliced: Use a mandoline slicer for even slices to ensure even frying.
1/2 cup vegetable oil: Use a high smoke point oil like canola or vegetable oil for deep frying. Fry in batches to avoid overcrowding the pan.
Remember to adjust the quantities based on your needs and preferences. Enjoy creating your delicious Egyptian Koshari!
Equipment List: Delicious Egyptian Koshari
Creating authentic and delicious Egyptian Koshari requires the right tools. While some items might seem interchangeable, using the correct equipment will significantly impact the final outcome, ensuring optimal cooking and presentation. This list details the necessary equipment, categorized for clarity and efficiency.
Large Stockpot (8-10 quarts): This is crucial for cooking the lentils and rice. A larger pot allows for even cooking and prevents sticking. Stainless steel is recommended for its durability and even heat distribution. Avoid using non-stick pots for long, simmering cooking processes, as the coating can degrade over time.
Medium-Sized Saucepans (2-3, 2-3 quarts each): You’ll need at least two saucepans; one for cooking the macaroni and another for preparing the tomato sauce. A third saucepan is highly recommended for separately preparing the vinegar-based sauce (optional). Stainless steel or heavy-bottomed pans are preferred for even heating and preventing burning.
Large Frying Pan (12-inch): A large frying pan is essential for crisping the fried onions. Cast iron is ideal for achieving perfectly caramelized onions but requires more attention to avoid burning. A non-stick pan is an acceptable alternative, but you might need to adjust cooking times and oil quantities.
Colander or Sieve: You’ll need a large colander to drain the cooked lentils, rice, and macaroni. Choose a sturdy colander that can easily handle the weight of the cooked ingredients without bending or breaking. A fine-mesh sieve can also be helpful for straining the tomato sauce.
Measuring Cups and Spoons: Accurate measurements are paramount in cooking. Invest in a good set of measuring cups and spoons to ensure consistent results. Use standard measuring cups and spoons (cups, tablespoons, teaspoons) as opposed to arbitrary estimations.
Wooden Spoon or Spatula: A sturdy wooden spoon or spatula is ideal for stirring the lentils, rice, and tomato sauce while they’re cooking. Avoid using metal utensils in non-stick pans to prevent scratching.
Whisk: A whisk is useful for incorporating ingredients into the tomato sauce and ensuring a smooth consistency. A balloon whisk is particularly useful for this purpose.
Serving Bowls or Platters: Choose large, shallow bowls or platters for serving the koshari. The presentation of the layered koshari is a key element of the dish, so selecting visually appealing serveware enhances the overall dining experience.
Sharp Knife and Cutting Board: While not directly involved in the cooking process, a sharp knife and cutting board are essential for preparing the onions (if you are not using pre-chopped onions) and any other optional garnishes.
Optional Equipment: A food processor can speed up the process of preparing the fried onions, particularly if dealing with larger quantities. A deep fryer can also be used for the fried onions, ensuring even cooking and crisping.
Important Note: Always ensure your equipment is clean and in good working order before you begin cooking. This will not only ensure food safety but also contribute to a more efficient and enjoyable cooking experience.
Preparation of Rice for Delicious Egyptian Koshari
The rice in Koshari is a crucial element, providing a fluffy and subtly sweet counterpoint to the other savory components. Achieving the perfect texture requires attention to detail and a few key techniques. This recipe uses 1 ½ cups of long-grain rice, which is ideal for its ability to hold its shape without becoming mushy.
Rinse the Rice: Begin by rinsing the 1 ½ cups of long-grain rice thoroughly under cold running water. This removes excess starch, preventing the rice from becoming sticky and clumping together. Continue rinsing until the water runs clear. This step is crucial for achieving light and fluffy rice.
Soaking (Optional but Recommended): Soaking the rice for at least 30 minutes, or even up to an hour, before cooking is highly recommended. Soaking helps the grains absorb water evenly, resulting in more consistent cooking and a fluffier final product. Simply place the rinsed rice in a bowl, cover with cold water, and let it sit.
Cooking the Rice: Once rinsed (and soaked, if desired), combine the rice with 3 cups of water in a medium-sized saucepan. Add 1 teaspoon of salt and ½ teaspoon of sugar. The sugar enhances the natural sweetness of the rice and complements the overall flavor profile of the Koshari. Do not stir the rice after adding the water; this can break the grains.
Bring to a Boil: Bring the mixture to a rolling boil over high heat. Once boiling, immediately reduce the heat to the lowest setting, cover the saucepan tightly with a lid, and simmer for 15-18 minutes. Do not lift the lid during this time. Lifting the lid will release steam and cause the rice to become dry and undercooked.
Resting the Rice: After 15-18 minutes, remove the saucepan from the heat and let the rice rest, still covered, for another 5-10 minutes. This allows the remaining water to be absorbed completely and the rice to steam gently, resulting in a perfectly cooked, fluffy texture. Resist the urge to fluff the rice immediately after removing it from the heat; let it rest to achieve optimal results.
Fluffing and Serving: Once the resting period is complete, gently fluff the rice with a fork. Be careful not to mash the grains. The rice should be light, fluffy, and each grain should be separate. Serve the rice hot as a component of your delicious Egyptian Koshari. Properly cooked rice should be light and fluffy, not sticky or mushy. Adjust cooking time if necessary, depending on your stove and the type of rice used.
Troubleshooting: If your rice is too sticky, you may have used too little water or not rinsed it sufficiently. If your rice is too dry, you may have used too much water or cooked it for too long. Experiment with the water-to-rice ratio and cooking time to find the perfect consistency for your stove and preferred texture.
Preparation of Lentils for Delicious Egyptian Koshari
The lentils in Koshari form a crucial element of its hearty texture and subtle earthiness. Proper preparation is key to achieving the perfect consistency – neither mushy nor overly firm. This section details the process of preparing approximately 2 cups of cooked brown or green lentils, suitable for a serving of 4-6 people. You can adjust the quantities proportionally for larger or smaller batches.
Choosing your lentils: Brown or green lentils are traditionally used in Koshari. Avoid red lentils, as they tend to become too mushy during cooking. Rinse the lentils thoroughly under cold running water for at least 2 minutes. This removes any dust, debris, or small stones that might be present. Proper rinsing is crucial for achieving a cleaner flavor.
Soaking (Optional but Recommended): Soaking the lentils beforehand significantly reduces cooking time and improves their texture. Place the 1 cup of dried lentils in a bowl and cover them with at least 3 cups of cold water. Let them soak for at least 4 hours, or preferably overnight. This allows the lentils to absorb water, leading to more even cooking and a softer final product. Discard the soaking water before cooking.
Cooking the Lentils: In a medium-sized saucepan, combine the rinsed (and soaked, if applicable) 1 cup of lentils with 3 cups of fresh water. Add a pinch of salt (approximately 1/4 teaspoon) to enhance the flavor. Bring the mixture to a boil over high heat. Once boiling, reduce the heat to low, cover the saucepan with a tight-fitting lid, and simmer gently for approximately 30-45 minutes, or until the lentils are tender but still hold their shape. The cooking time will vary depending on the type of lentils and whether they were pre-soaked. Regularly check the pot and stir gently to prevent sticking.
Checking for Doneness: The lentils are done when they are easily mashed with a fork but still retain some firmness. Overcooked lentils will become mushy and lose their texture. If the lentils become too dry during cooking, add a little more water, a tablespoon at a time, until you reach the desired consistency. Avoid overcooking, as this will negatively impact the overall texture of the Koshari.
Seasoning and Finishing: Once cooked, remove the saucepan from the heat and let the lentils cool slightly. Taste and adjust the seasoning if necessary. You can add a little more salt or a squeeze of lemon juice to brighten the flavor. For a richer flavor profile, consider adding a small piece of bay leaf during the simmering process; remove it before serving. Do not over-season, as the lentils will be part of a larger dish with multiple flavor components.
Storage: Cooked lentils can be stored in an airtight container in the refrigerator for up to 3-4 days. They can also be frozen for longer storage. Allow them to cool completely before storing to prevent bacterial growth.
Preparation of Chickpeas
Chickpeas, or ḥammus (حمص) in Arabic, are a cornerstone of Koshari, contributing a hearty texture and subtle earthy flavor. Proper preparation is crucial for achieving the perfect balance of tenderness and firmness in your dish. We’ll detail two methods: soaking and quick-cooking.
Method 1: Soaking and Simmering (Recommended for best texture)
This method yields the most tender and flavorful chickpeas. Begin by sorting through 1 cup (200g) of dried chickpeas, discarding any shriveled or damaged ones. Thoroughly rinse the chickpeas under cold running water to remove any debris. Then, place them in a large bowl and cover with at least 4 cups (950ml) of cold water. Add 1 teaspoon of baking soda; this helps break down the tough outer layer and shortens cooking time, resulting in softer chickpeas. Allow the chickpeas to soak for at least 8 hours, or preferably overnight (12-24 hours). The longer they soak, the quicker they’ll cook.
After soaking, drain the chickpeas and rinse them again. Transfer them to a large pot and cover with fresh water – approximately 6 cups (1.4 liters). Add 1 teaspoon of salt. Bring the water to a rolling boil, then reduce the heat to low, cover the pot, and simmer gently for 60-90 minutes, or until the chickpeas are tender but not mushy. Check for doneness by piercing a chickpea with a fork; it should be easily pierced but still hold its shape. If they are still too firm, continue simmering in small increments until they reach the desired consistency. Once cooked, drain the chickpeas and set them aside. You can optionally reserve some of the cooking liquid to adjust the consistency of your koshari if needed.
Method 2: Quick Cooking (No Soaking)
If you’re short on time, you can skip the soaking step, but be prepared for a longer cooking time and potentially slightly firmer chickpeas. Start with 1 cup (200g) of dried chickpeas, rinsed thoroughly. Place them in a large pot and cover with 6 cups (1.4 liters) of water. Bring to a boil, then reduce heat to low, cover, and simmer for 1.5 to 2 hours, or until tender. Add 1 teaspoon of baking soda and 1 teaspoon of salt to the pot during the initial boil to aid in the cooking process. Again, check for doneness with a fork. This method requires more vigilant monitoring to prevent burning.
Important Considerations:
Regardless of the method chosen, always use a heavy-bottomed pot to ensure even cooking and prevent sticking. Overcooked chickpeas will become mushy and detract from the overall texture of your koshari. Taste the chickpeas before adding them to your koshari; you may need to season them further with salt or other spices depending on your preference. Properly prepared chickpeas are a key element to a delicious and authentic Egyptian Koshari.
Preparation of Fried Onions
Perfectly fried onions are crucial for the authentic flavor and texture of Egyptian Koshari. They provide a delightful crunch and a rich, caramelized sweetness that balances the other components of the dish. This section details the process of achieving flawlessly fried onions, ensuring your Koshari is truly exceptional.
Ingredients:
- 2 large yellow onions (approximately 1 kg), thinly sliced. Using a mandoline slicer is highly recommended for consistent, even slices, which ensures even cooking.
- Vegetable oil (about 2 cups), or enough to comfortably submerge the onions in a deep pan or pot.
- Salt (to taste), approximately 1 teaspoon. Adding salt helps to draw out moisture from the onions, promoting crispier results.
Equipment:
- Large, heavy-bottomed pot or deep pan. A heavy-bottomed pan ensures even heat distribution, preventing the onions from burning.
- Slotted spoon or spider for removing the onions.
- Paper towels for draining excess oil.
- Optional: Mandoline slicer for even onion slices.
Instructions:
1. Preparation: Begin by thinly slicing the onions. The thinner the slices, the faster and more evenly they will fry. Aim for slices that are approximately 1/8 inch thick. After slicing, gently toss the onions with salt. Let them sit for at least 15 minutes. This allows the salt to draw out excess moisture, resulting in crispier fried onions. Gently pat them dry with paper towels before frying to remove as much moisture as possible.
2. Frying: Pour the vegetable oil into your heavy-bottomed pot. Heat the oil over medium-low heat. It’s crucial to maintain a low to medium-low heat throughout the frying process. High heat will cause the onions to brown too quickly on the outside while remaining raw inside, or even burn before they caramelize properly. Once the oil is hot (a small piece of onion dropped in should sizzle gently), add the onions to the pot in batches, ensuring not to overcrowd the pan. Overcrowding will lower the oil temperature and result in soggy onions instead of crispy ones.
3. Cooking Process: Fry the onions gently, stirring occasionally with a spatula to prevent sticking and ensure even browning. The frying process will take considerable time, anywhere from 30-45 minutes, depending on the thickness of your slices and your stovetop’s heat. Patience is key here. The onions should gradually transform from translucent to golden brown, then a deep amber color as they caramelize. You should be able to hear a gentle sizzle as the onions fry.
4. Draining and Cooling:Once the onions have reached your desired color and are crisp, carefully remove them from the oil using a slotted spoon. Place them on a plate lined with paper towels to absorb excess oil. Allow them to cool completely before adding them to your Koshari. Cooling the fried onions allows them to crisp up further.
5. Storage: Fried onions can be stored in an airtight container at room temperature for up to 3 days, or frozen for longer storage. However, they are best enjoyed fresh.
Delicious Egyptian Koshari: Recommendations
Serving Suggestions: For the ultimate Koshari experience, we recommend serving it hot, straight from the pot or a gently warmed serving dish. The contrasting textures and temperatures of the crispy fried onions, the soft rice and lentils, and the tangy tomato sauce are best enjoyed when everything is at its optimal temperature. Consider garnishing each serving generously with a further sprinkle of crispy fried onions, a dollop of extra hot sauce, and a squeeze of fresh lemon juice for an extra burst of flavor. Don’t forget a generous helping of the flavorful vinegar-based sauce! A small bowl on the side for the various sauces allows diners to customize their experience.
Storage Conditions: Leftover Koshari is best enjoyed within 2 days of cooking. Store it in an airtight container in the refrigerator. While the rice and lentils will hold up well, the fried onions may soften slightly. To maintain the crispiness of the fried onions, consider storing them separately and adding them back to the dish just before serving. For longer storage, freezing is possible, but the texture might alter slightly upon thawing. It’s recommended to reheat gently in a microwave or on low heat on the stovetop, avoiding overcooking which can lead to a mushy texture.
Complementary Dishes: Koshari is a hearty and filling dish, but it pairs wonderfully with a variety of complementary side dishes. A simple green salad with a light vinaigrette can provide a refreshing counterpoint to the richness of the Koshari. A side of pickled turnips or other pickled vegetables offers a delightful tangy contrast. For a heartier accompaniment, consider serving it alongside some grilled halloumi cheese or falafel for added protein and flavor. A refreshing hibiscus tea or a light mint tea would make a perfect beverage pairing.
Nutritional Information (per serving, approximate): The nutritional content of Koshari can vary significantly depending on the specific recipe and portion size. However, a typical serving provides a substantial amount of carbohydrates, primarily from the rice and lentils, making it a good source of energy. It also offers a moderate amount of protein from the lentils and other components. The exact calorie count can range from 400-600 calories per serving, depending on the amount of oil used in frying the onions and the portion size. It’s a good source of fiber, contributing to digestive health. However, it is relatively high in sodium due to the sauces, so individuals watching their sodium intake should be mindful of portion sizes. Specific macronutrient break down (carbohydrates, protein, and fat) would need to be calculated based on the exact ingredients and quantities used in the recipe.
Important Note: This nutritional information is an estimate and may vary depending on the specific ingredients and preparation methods used. For precise nutritional information, it is recommended to use a nutrition calculator with the exact recipe details.