Indulge in the decadent delight of a perfectly molten chocolate lava cake, a dessert that transcends mere confectionery and becomes a sensory experience. While pinpointing its exact origin is difficult, the lava cake’s story is interwoven with the evolution of modern patisserie and the enduring global fascination with chocolate. Its rise to fame is often credited to the late 20th century, with various chefs claiming variations of the recipe, each contributing to its legendary status. The concept of a warm, gooey center encased in a crisp, slightly firm shell likely drew inspiration from classic French desserts, leveraging the rich textures and intense flavors already beloved by sophisticated palates.
The lava cake’s popularity isn’t just a fleeting trend; it’s a testament to our enduring love affair with chocolate. Global chocolate consumption statistics reveal a staggering annual figure exceeding 7 million metric tons, underscoring the worldwide appreciation for this versatile ingredient. The cake itself taps into our primal craving for sweetness and richness, offering a perfect balance of contrasting textures – the smooth, molten chocolate heart against the slightly crisp exterior. This textural duality is what truly sets the lava cake apart, creating a memorable culinary experience that’s both luxurious and intensely satisfying.
Beyond its deliciousness, the lava cake holds a significant cultural position. It’s frequently featured in upscale restaurants, showcasing the artistry and precision required for its preparation. Its presentation is almost as important as its taste; the visually stunning crack in the cake’s surface, revealing the molten chocolate interior, is a key element of its appeal. It’s often chosen for celebratory occasions, romantic dinners, or simply as a luxurious treat to elevate an everyday moment. The lava cake has transcended its culinary origins to become an emblem of indulgence and a symbol of sophisticated dessert culture, found in countless variations across the globe, each reflecting the chef’s unique interpretation and regional influences.
This recipe aims to provide you with a straightforward yet refined approach to creating this iconic dessert. We’ll guide you through each step, ensuring you achieve that perfect balance of crisp exterior and molten chocolate heart, allowing you to experience the magic of a homemade lava cake. Whether you’re an experienced baker or a kitchen novice, this recipe will empower you to recreate this beloved dessert, sharing its rich history and undeniable deliciousness with friends and family.
Ingredients and Measurements
Creating the perfect molten chocolate lava cake hinges on precise measurements and high-quality ingredients. Don’t be tempted to substitute ingredients willy-nilly; the delicate balance of flavors and textures is crucial for achieving that signature gooey center.
For this recipe, we’ll be using unsalted butter. Using salted butter will significantly alter the final taste, making the cake too salty. If you only have salted butter on hand, you can reduce the amount of salt added later in the recipe, but it’s best to stick to unsalted for the most accurate results.
We’ll start with 170 grams (1 1/2 sticks or 6 ounces) of unsalted butter, cut into cubes. Make sure the butter is softened but not melted. Room temperature butter is ideal; this ensures it creamily blends with the sugar without any lumps. If your butter is too cold, it will be difficult to incorporate properly, leading to a less smooth batter. If it’s too warm, it can create a grainy texture.
Next, we need 150 grams (1 1/4 cups) of granulated sugar. Granulated sugar is preferred for its ability to dissolve evenly and create a fine texture in the cake. Using other types of sugar, like brown sugar or powdered sugar, will change the final outcome dramatically. Avoid using substitutes here unless you’re experienced with adjusting baking recipes.
For the eggs, we’ll use 2 large eggs. Large eggs are essential as they provide the right amount of binding agents and richness. Using smaller or larger eggs can affect the final rise and texture of your cake. Make sure your eggs are at room temperature; cold eggs can cause the batter to curdle.
The richness of the lava cake comes from the chocolate. We’ll be using 170 grams (6 ounces) of high-quality dark chocolate, chopped finely. The finer the chop, the better it will melt and incorporate into the batter. Using a good quality chocolate is essential for the best flavor. 70% cacao or higher is recommended for a deep, rich chocolate flavor, but you can adjust this to your preference.
For the dry ingredients, we’ll need 70 grams (1/2 cup + 2 tablespoons) of all-purpose flour. Sifting the flour before measuring will ensure a lighter and airier cake. Don’t pack the flour when measuring; scoop it lightly into the measuring cup. Over-measuring flour can lead to a dry and dense cake.
Finally, we’ll add a pinch of salt (about 1/4 teaspoon) to enhance the chocolate flavor and balance the sweetness. A pinch of salt is crucial; it doesn’t make the cake salty but rather rounds out the overall flavor profile.
Remember to accurately measure all ingredients for optimal results. Using a kitchen scale is highly recommended for the most precise measurements, particularly for the butter, sugar, and chocolate.
Equipment List
Creating the perfect, molten-centered chocolate lava cake requires not only precise ingredients but also the right equipment. The success of this dessert hinges on even heating and accurate measuring, so investing in quality tools will significantly improve your results. This list details the essential equipment, along with recommendations for optimal performance.
Mixing Bowls: You will need at least two mixing bowls. One medium-sized bowl (approximately 8-10 inches in diameter) is ideal for creaming together the butter and sugar. A smaller bowl (approximately 6-8 inches) is perfect for whisking together the dry ingredients. Choose stainless steel or glass bowls for even heat distribution and easy cleanup. Avoid using plastic bowls, as they can retain odors and may not be as durable.
Measuring Cups and Spoons: Accurate measurements are crucial in baking. Invest in a set of both dry and liquid measuring cups. For dry ingredients like flour and cocoa powder, use dry measuring cups and level off the top with a straight edge. For liquid ingredients such as eggs and oil, use liquid measuring cups and check the measurement at eye level. Similarly, accurate measuring spoons are essential for smaller quantities of ingredients like baking powder and salt. Using a kitchen scale for weighing ingredients, especially flour, is highly recommended for the most consistent results.
Whisk: A sturdy whisk, preferably a balloon whisk, is necessary for thoroughly combining the wet and dry ingredients. A balloon whisk incorporates air effectively, creating a light and fluffy batter. Ensure your whisk is clean and free of any residue before use to prevent clumping.
Rubber Spatula or Silicone Scraper: A rubber spatula or silicone scraper is invaluable for scraping down the sides of the bowls and ensuring all ingredients are incorporated. This is especially important when combining the wet and dry ingredients to avoid lumps in the batter. Choose a heat-resistant spatula if you plan to use it for folding ingredients into the batter after incorporating the melted chocolate.
Oven-Safe Ramekins or Mugs: This is arguably the most crucial piece of equipment. You’ll need individual ramekins or oven-safe mugs to bake the lava cakes. Ramekins with a diameter of approximately 4-5 inches and a depth of 2-2.5 inches are ideal. Ensure they are oven-safe and can withstand high temperatures. If using mugs, make sure they are microwave and oven safe, and choose ones with straight sides for even cooking. Lightly greasing the ramekins or mugs with butter before pouring in the batter will prevent sticking.
Baking Sheet: A baking sheet is required to provide a stable base for the ramekins or mugs in the oven. This prevents them from tipping over and ensures even baking. A standard half-sheet baking pan is perfectly adequate.
Oven: A properly functioning oven is essential for achieving the perfect lava cake. Ensure your oven is preheated to the correct temperature before placing the ramekins or mugs inside. Using an oven thermometer can help ensure accuracy.
Optional Equipment: While not strictly necessary, a stand mixer can simplify the creaming process. A pastry bag with a large round tip can be used for a more elegant presentation, although spooning the batter directly into the ramekins works perfectly fine.
Preparation Phase: Melting Chocolate
Melting chocolate correctly is crucial for achieving a smooth, luscious lava cake. Improper melting can lead to seizing (where the chocolate becomes grainy and unusable), so careful attention to detail is key. This section outlines the best methods for melting 6 ounces (170g) of high-quality dark chocolate (70% cacao or higher is recommended for a rich, intense flavor) for your delicious lava cake.
Method 1: Double Boiler Method (Recommended) This method provides the most gentle and consistent heat, minimizing the risk of burning or seizing. Fill a small saucepan with about an inch of water and bring it to a simmer over medium-low heat. Place a heatproof bowl (glass or stainless steel) on top of the saucepan, ensuring the bottom of the bowl doesn’t touch the water. The steam from the simmering water will gently melt the chocolate.
Chop the chocolate: Before beginning, chop your 6 ounces (170g) of dark chocolate into small, roughly equal-sized pieces. Smaller pieces melt more evenly and quickly. This is a crucial step for preventing hot spots and uneven melting.
Add the chocolate: Add the chopped chocolate to the heatproof bowl. Stir occasionally with a spatula, using gentle, circular motions. Do not stir vigorously, as this can incorporate air and create a grainy texture. The chocolate should melt smoothly and evenly within 5-7 minutes. If it seems to be taking too long, reduce the heat slightly.
Maintaining the correct temperature: The water in the saucepan should be at a gentle simmer; it should never boil vigorously. A rolling simmer is ideal. If the water boils aggressively, remove the bowl from the saucepan immediately to prevent overheating. Overheating will seize the chocolate.
Method 2: Microwave Method (Quick, but requires caution) While faster, the microwave method requires careful supervision to prevent burning. Place the chopped chocolate in a microwave-safe bowl. Microwave in 30-second intervals, stirring thoroughly after each interval. Continue until the chocolate is completely melted and smooth. This method requires careful monitoring to avoid overheating. It’s easy to accidentally burn the chocolate using this method if you are not attentive.
Important Considerations for Both Methods:
- Use high-quality chocolate: The flavor of your lava cake will depend heavily on the quality of the chocolate you use. Invest in good chocolate for the best results.
- Avoid water contamination: Even a small amount of water can seize chocolate. Ensure no water from the double boiler or condensation gets into your chocolate.
- Patience is key: Take your time and melt the chocolate gently. Rushing the process will increase the risk of seizing.
- Use a clean bowl and utensils: Any trace of grease or water on your equipment can affect the melting process.
Once the chocolate is completely melted and smooth, it’s ready to be incorporated into your lava cake batter. Remember to remove the bowl from the heat source immediately once the chocolate is melted to prevent further heating. Enjoy the process and the delicious results!
Preparation Phase: Combining Wet Ingredients
This phase focuses on creating the rich, decadent base of your chocolate lava cake. The precise combination of wet ingredients is crucial for achieving that perfect molten center and a delightfully moist crumb. We’ll be working with unsalted butter, eggs, sugar, and a touch of vanilla extract. Accuracy in measurement is paramount here, so ensure you use a kitchen scale for the most consistent results.
Begin by preheating your oven to 425°F (220°C). This ensures your cake bakes perfectly and the molten center sets properly. While the oven heats, prepare your ramekins. Lightly grease six 6-ounce ramekins with butter and dust them with a thin layer of cocoa powder. This prevents sticking and adds a subtle chocolatey flavor to the finished product. Set them aside.
Next, melt 170g (1 1/2 sticks) of unsalted butter in a heatproof bowl set over a pan of simmering water (double boiler method). Avoid direct heat, as this can burn the butter and affect the final flavor. Stir occasionally until the butter is completely melted and smooth. Remove from the heat and set aside to cool slightly. Allowing the melted butter to cool slightly before adding other ingredients prevents the eggs from scrambling.
In a separate large bowl, whisk together 200g (1 cup) of granulated sugar and 4 large eggs until the mixture is light and pale yellow. Whisk vigorously for at least 2-3 minutes. This incorporates air into the batter, leading to a lighter and airier texture. The sugar will dissolve partially, creating a slightly thicker mixture. If you are using room temperature eggs, the emulsification process will be smoother and faster.
Once the melted butter has cooled slightly, gently pour it into the egg and sugar mixture. Add the butter gradually, whisking continuously to prevent the eggs from curdling. A gradual addition allows for proper emulsification and prevents separation. This step requires patience and a steady hand. The mixture should become smooth and homogenous.
Finally, stir in 1 teaspoon of pure vanilla extract. Use a high-quality vanilla extract for the best flavor. Vanilla enhances the chocolate flavor beautifully, adding depth and complexity to the cake. Gently fold the vanilla extract into the batter to distribute evenly. Your wet ingredients are now fully combined and ready to be integrated with the dry ingredients in the next stage of the recipe.
Important Note: If you notice any curdling, don’t panic! A small amount of curdling can be rectified by adding a tablespoon of hot water and whisking vigorously. However, preventing curdling in the first place is always preferable. Using room temperature eggs and adding the butter gradually will minimize this risk.
Preparation Phase: Combining Dry Ingredients
The success of a perfectly molten chocolate lava cake hinges on the precise combination of its dry ingredients. This stage, while seemingly simple, requires attention to detail to ensure a smooth, evenly textured batter. We’ll be focusing on creating a harmonious blend of flour, sugar, cocoa powder, and a pinch of salt – the foundation for our decadent dessert.
Begin by measuring out your ingredients accurately. Using a kitchen scale is highly recommended for baking, as it provides the most precise measurements. However, if using measuring cups, ensure you spoon the ingredients into the cups and level them off with a straight edge, avoiding packing them down. This prevents lumps and ensures even baking.
We’ll need the following dry ingredients: 100g (¾ cup) all-purpose flour, 150g (¾ cup + 2 tablespoons) granulated sugar, 50g (⅓ cup) unsweetened cocoa powder, and a generous ¼ teaspoon of fine sea salt. The type of cocoa powder can impact the flavor and intensity of the chocolate. Dutch-processed cocoa powder will yield a richer, darker, and less acidic cake, while natural cocoa powder offers a brighter, more tangy chocolate flavor. Choose your preferred option based on your taste preference.
Sift the flour and cocoa powder together twice. This crucial step aerates the flour, preventing clumps, and ensures a lighter, smoother batter. Don’t skip this step – the difference in texture is significant! Using a fine-mesh sieve is ideal for this process. If you don’t have a sieve, you can whisk the ingredients together vigorously in a bowl, but sifting is always preferred.
After sifting, add the granulated sugar and salt to the bowl containing the flour and cocoa powder. Gently whisk all the dry ingredients together until they are thoroughly combined and there are no visible clumps. Avoid over-mixing at this stage, as it can lead to a tough cake. A few gentle whisks are all that’s necessary to ensure everything is evenly distributed.
Ensure your workspace is clean and your tools are ready before you begin. Having everything measured and prepared beforehand will streamline the process and prevent any last-minute scrambling. This is especially important when working with delicate ingredients and ensuring a consistent batter texture.
Once your dry ingredients are perfectly combined, you’re ready to move on to the next stage – incorporating the wet ingredients. Remember, a well-combined dry mixture is the first step towards achieving the perfect, molten chocolate lava cake!
Preparation Phase: Combining Wet and Dry Ingredients
This section details the crucial step of combining the wet and dry ingredients for your decadent chocolate lava cake. Precise measurements and careful technique are key to achieving that perfect molten center and rich, fudgy texture. We’ll be working with two distinct groups: the wet ingredients and the dry ingredients. Do not combine them prematurely! This will lead to a tough, dense cake, far from the desired result.
First, let’s prepare the wet ingredients. You will need: 4 large eggs, 1 cup (2 sticks) unsalted butter, melted and slightly cooled, 1 cup granulated sugar, and 1 teaspoon pure vanilla extract. Ensure your butter is completely melted but not hot; slightly warm is ideal. Hot butter can scramble the eggs, resulting in a grainy texture. In a large bowl, whisk together the melted butter and sugar until well combined. This step creates a smooth base for the other wet ingredients. Next, add the eggs one at a time, whisking vigorously after each addition. Whisking vigorously incorporates air, contributing to a lighter cake. Finally, stir in the vanilla extract. Set this mixture aside.
Next, prepare the dry ingredients. You’ll need: 1 ½ cups all-purpose flour, ¾ cup unsweetened cocoa powder (preferably Dutch-processed for a deeper, richer flavor), ½ teaspoon baking powder, and ¼ teaspoon salt. In a separate medium-sized bowl, whisk together the flour, cocoa powder, baking powder, and salt. Sift these ingredients together for even distribution and to prevent lumps. This is crucial for a smooth, evenly textured cake. If you don’t have a sifter, vigorously whisk the dry ingredients together for at least 30 seconds to ensure thorough mixing.
Now, we carefully combine the wet and dry ingredients. Gradually add the dry ingredients to the wet ingredients, mixing gently with a rubber spatula or wooden spoon. Do not use an electric mixer at this stage, as overmixing will develop the gluten in the flour, leading to a tough cake. Fold the dry ingredients into the wet ingredients in a gentle, circular motion, ensuring that all the dry ingredients are incorporated without overmixing. Stop mixing as soon as the dry ingredients are just combined; a few small lumps are acceptable. Overmixing will result in a dense, rubbery cake, negating all our efforts.
Once the batter is just combined, it’s ready to be transferred to your prepared ramekins. Avoid overfilling the ramekins, leaving about ½ inch of space at the top. This allows for the cake to rise properly without overflowing during baking. The batter should be thick and slightly glossy. If it seems too thin, you may have added too much liquid or not enough flour; refer back to the recipe and your measurements to ensure accuracy.
With your batter prepared, you’re ready to proceed to the baking stage. Remember, patience and attention to detail in this preparation phase are essential for achieving the perfect chocolate lava cake.
Recommendations for the Delicious Chocolate Lava Cake
This decadent chocolate lava cake is best enjoyed immediately after baking, while the molten chocolate center is still warm and gooey. However, if you need to prepare it ahead of time, allow it to cool completely before storing. We strongly recommend serving it warm for the optimal experience.
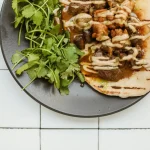
Serving Suggestions: To elevate this already amazing dessert, consider pairing it with a scoop of vanilla bean ice cream or a dollop of whipped cream. The cool creaminess cuts through the richness of the chocolate, creating a delightful contrast in temperature and texture. A sprinkle of sea salt flakes on top also enhances the chocolate flavor surprisingly well. For a more sophisticated presentation, dust the cake with powdered sugar or cocoa powder before serving. A drizzle of chocolate sauce or raspberry coulis adds another layer of flavor complexity.
Storage: Leftover lava cakes (if there are any!) should be stored in an airtight container in the refrigerator for up to 2 days. To reheat, microwave for short intervals until warmed through, being careful not to overcook and dry out the cake. Alternatively, you can reheat it in a preheated oven at a low temperature (around 300°F/150°C) for a few minutes until heated through. Do not freeze this cake, as the texture will be significantly compromised upon thawing.
Complementary Dishes: This rich chocolate lava cake pairs beautifully with a variety of dishes, depending on the occasion. For a light and refreshing contrast, serve it with a light fruit salad featuring berries or citrus fruits. For a more decadent experience, consider pairing it with a strong coffee or a glass of dessert wine, such as a tawny port or a late-harvest Riesling. If you’re planning a more formal dinner, it could be a perfect ending to a meal featuring rich and savory dishes, such as a lamb stew or a steak. The sweetness of the lava cake acts as a wonderful counterpoint to savory flavors.
Nutritional Information (Approximate per serving, based on a 6-serving recipe): These values are estimates and can vary depending on the specific ingredients used. It’s crucial to use a nutrition calculator with your exact ingredients for precise values.
Calories: Approximately 400-500 calories
Fat: Approximately 25-30g
Saturated Fat: Approximately 15-20g
Cholesterol: Approximately 80-100mg
Sodium: Approximately 100-150mg
Carbohydrates: Approximately 50-60g
Sugar: Approximately 30-40g
Protein: Approximately 5-7g
Important Note: The calorie and nutritional information provided is an estimate and may vary depending on the specific ingredients and portion size. For accurate nutritional information, we recommend using a nutrition calculator with the exact ingredients and quantities used in your recipe.