Crispy baked chicken wings, a seemingly simple dish, boast a surprisingly rich and complex history. While pinpointing the exact origin is difficult, the widespread popularity of chicken wings as a food item can be largely attributed to the ingenuity of Teressa Bellissimo, owner of the Anchor Bar in Buffalo, New York. In the 1960s, she invented Buffalo wings – the spicy, deep-fried precursor to the baked versions we know today – as a late-night snack for her son and his friends. This accidental invention quickly gained traction, transforming from a local bar snack to a global culinary phenomenon. The precise recipe remains debated, but the core elements – crispy skin, juicy meat, and a flavorful sauce – remain constant across countless variations.
The evolution from deep-fried to baked chicken wings reflects a broader shift in consumer preferences toward healthier cooking methods. Deep frying, while resulting in undeniably crispy wings, is high in fat and calories. Baking offers a more healthful alternative, reducing the fat content significantly without sacrificing the satisfying crunch. This shift is reflected in recent dietary trends, with a growing emphasis on mindful eating and healthier alternatives to traditional comfort foods. In fact, according to a recent study by the NPD Group, the consumption of baked chicken wings has increased by 15% in the last five years, showcasing the growing appeal of this healthier, yet equally delicious, option.
Beyond the health benefits, baked chicken wings have become a staple in various cultural contexts. They are a ubiquitous feature at sporting events, parties, and casual gatherings across the globe. Their versatility is key to their widespread appeal. The basic recipe is easily adaptable to countless flavor profiles, from classic buffalo sauce to teriyaki, honey garlic, or even spicy Korean BBQ. This adaptability is what makes them a truly global food, transcending geographical boundaries and cultural differences. The sheer number of recipes and variations available online testifies to the dish’s enduring popularity and cultural impact. It’s no longer just a bar snack; it’s a versatile appetizer, a main course option, and a crowd-pleasing dish found in restaurants, homes, and even high-end catering menus.
The cultural significance of chicken wings extends beyond their taste and convenience. They represent a sense of community and shared experience, often associated with gatherings and celebrations. The act of sharing a plate of wings, whether it’s family, friends, or colleagues, fosters a sense of camaraderie and togetherness. From casual get-togethers to large-scale sporting events, the crispy, flavorful snack unites people across different backgrounds and cultures, solidifying its place as a truly iconic food of the modern era. The seemingly simple chicken wing has, therefore, evolved into a powerful symbol of social interaction and culinary adaptability.
Ingredients and Measurements
This recipe for Crispy Baked Chicken Wings yields approximately 4 pounds of delicious, crispy wings. Adjust quantities as needed depending on the number of servings you require. The key to achieving perfectly crispy wings lies in properly drying the chicken and using the right amount of seasoning.
Chicken Wings: You’ll need 2.5 pounds (approximately 24-30) of chicken wings. It’s crucial to use fresh, high-quality chicken wings for optimal results. Frozen wings will work, but ensure they are completely thawed and patted thoroughly dry before proceeding. Separate the wings into drumettes and flats for even cooking. Discard wing tips, as they tend to be quite fatty and don’t offer much meat.
Dry Rub: The dry rub is what gives these wings their incredible flavor and crispy exterior. This recipe utilizes a blend of spices, but feel free to customize it to your liking. For this recipe, we’ll use the following:
- 2 tablespoons paprika (smoked paprika adds a deeper, smoky flavor)
- 1 tablespoon garlic powder
- 1 tablespoon onion powder
- 1 tablespoon brown sugar (light or dark, depending on your preference for sweetness)
- 1 tablespoon salt (kosher salt is recommended for its even distribution)
- 1 teaspoon black pepper (freshly ground is best)
- 1 teaspoon cayenne pepper (or more, to taste, for extra heat)
- ½ teaspoon dried oregano
- ½ teaspoon dried thyme
Note: Adjust the amount of each spice to your taste preference. If you prefer a less spicy wing, reduce or omit the cayenne pepper. If you want a stronger garlic or onion flavor, increase the respective amounts.
Baking Requirements: You’ll need a baking sheet or two, depending on the amount of wings you’re baking. Line your baking sheet(s) with parchment paper or a silicone baking mat for easier cleanup and to prevent sticking. This is highly recommended, especially when working with high heat and potentially sticky sauces.
Optional additions: Many people enjoy adding a sauce to their chicken wings after baking. This is entirely optional, but if you choose to add a sauce, keep in mind that it will add moisture and might slightly reduce the crispiness. Consider a buffalo wing sauce, BBQ sauce, teriyaki sauce, or any other sauce that suits your taste. You could use approximately ½ cup to 1 cup of your favorite sauce, depending on your preference and the amount of wings.
Important Note on Measurement: For best results, use a kitchen scale to measure your ingredients, especially the spices. This ensures consistency and accuracy in flavor. If you don’t have a scale, use measuring spoons and cups, but be sure to level them off to avoid adding too much of any single ingredient. Proper measuring is key to achieving the perfect flavor profile.
Equipment List
Preparing crispy baked chicken wings requires the right tools to ensure even cooking and optimal results. This list details the essential equipment, along with recommendations for maximizing your success.
Baking Sheet: A large, rimmed baking sheet (approximately 18 x 13 inches) is crucial. The rim prevents spills and keeps the wings contained during baking. Avoid using non-stick baking sheets, as they can sometimes lead to uneven browning. Consider using two baking sheets if you’re making a large batch to ensure proper airflow and even cooking. Overcrowding the pan will result in steaming rather than crisping.
Wire Rack: This is arguably the most important piece of equipment for achieving perfectly crispy chicken wings. Placing the wings on a wire rack elevated above the baking sheet allows for optimal air circulation around each wing, promoting even browning and crisping on all sides. A standard wire rack measuring approximately 16 x 10 inches will fit comfortably on a standard baking sheet. Ensure the rack fits snugly within the baking sheet to prevent it from shifting during baking.
Mixing Bowls: You’ll need at least two mixing bowls. One large bowl (at least 3-quart capacity) is necessary for tossing the chicken wings in the sauce and seasoning mixture. A smaller bowl (approximately 1-quart capacity) is useful for preparing the dry seasoning blend separately, allowing for better control and preventing clumping.
Measuring Cups and Spoons: Accurate measurements are essential for achieving consistent results. Invest in a set of measuring cups (dry and liquid) and measuring spoons for precise measurements of all ingredients, including the spices, oil, and any additional liquids in your recipe. Using a kitchen scale for weighing ingredients, particularly the spices, can further enhance accuracy and consistency.
Whisk or Fork: A whisk is ideal for thoroughly combining the wet and dry ingredients of your marinade or sauce. However, a fork can also be used effectively. Ensure thorough mixing to guarantee even coating of the chicken wings.
Tongs or Spatula: These are essential for handling the hot wings during and after baking. Tongs allow for easy flipping and transferring the wings to a serving dish. A spatula can be helpful for scraping up any excess seasoning or sauce from the baking sheet.
Oven Thermometer (Optional but Recommended): An oven thermometer ensures your oven is set to the correct temperature. Oven temperatures can vary, and an accurate reading guarantees consistent cooking results. Calibrating your oven temperature with a thermometer is a good practice for all baking.
Paper Towels: Paper towels are crucial for patting the chicken wings completely dry before seasoning. Thoroughly dried wings are essential for achieving a crispy skin.
Optional Equipment: A silicone baking mat can be used as an alternative to a wire rack, although it might not produce quite as crispy results. A meat thermometer can be used to check the internal temperature of the wings to ensure they are fully cooked.
Preparation Phase: Cleaning and Cutting
Before you embark on the journey to crispy, flavorful baked chicken wings, proper preparation is key. This crucial first step ensures both the safety and the deliciousness of your final product. We’ll begin with cleaning and then move onto cutting, focusing on techniques that maximize flavor and even cooking.
Cleaning the Chicken Wings: Start with approximately 2 pounds of fresh chicken wings. Thoroughly rinse the wings under cold, running water. This removes any surface contaminants and ensures a clean starting point. Pay close attention to the crevices between the drumettes and the flats; these areas can sometimes harbor more debris. Avoid soaking the wings, as this can lead to a less crispy final product.
Separating the Drumettes and Flats: Most chicken wings arrive whole, comprised of the drumette (the smaller, upper section) and the flat (the larger, flatter section). You’ll want to separate these for even cooking and easier handling. Simply grab the joint where the drumette and flat meet and gently bend until it separates. Use a sharp knife to cut through any remaining connective tissue if the wing doesn’t separate cleanly. Discard the wing tips; they tend to be quite bony and add little flavor.
Patting Dry: This step is critically important for achieving crispy skin. Once separated, thoroughly pat the chicken wings dry with paper towels. Excess moisture will steam the wings during baking, resulting in a soggy, rather than crispy, texture. Take your time and ensure all surfaces are completely dry. You may need to use multiple paper towels to achieve this.
Optional: Removing excess skin: For those who prefer less fat, you can optionally remove some of the excess skin from the flats. This is a matter of personal preference. Use a sharp knife to carefully peel back and remove the skin, being careful not to tear the meat underneath. Remember, some skin helps with crisping, so don’t remove it all unless you strongly prefer a leaner wing.
Making Uniform Cuts (Optional): While not strictly necessary, making uniform cuts can contribute to even cooking. If you wish to do so, you can make small slits across the thicker parts of the drumettes and flats. This allows heat to penetrate more easily and prevents uneven cooking. Be careful not to cut too deeply, as you risk damaging the meat.
After completing these steps, your chicken wings are ready for the next stage: marinating or seasoning. Proper cleaning and cutting ensures a significantly better final product, maximizing both flavor and texture. Remember, attention to detail in this preparation phase makes all the difference in achieving perfectly crispy baked chicken wings.
Marinade/Seasoning Preparation
The key to achieving truly crispy and flavorful baked chicken wings lies in the marinade and seasoning. Don’t rush this step; proper preparation ensures tender meat and a deeply satisfying crunch.
For this recipe, we’ll be using a vibrant blend of sweet, savory, and spicy notes. You can adjust the quantities to suit your personal preference, but the ratios are designed for optimal balance. We’ll start with a base marinade that tenderizes the chicken and adds incredible flavor, followed by a dry rub for extra crunch and textural complexity.
Marinade Ingredients:
- 1/2 cup soy sauce (low sodium preferred)
- 1/4 cup honey
- 2 tablespoons rice vinegar
- 2 tablespoons Worcestershire sauce
- 1 tablespoon grated fresh ginger
- 2 cloves garlic, minced
- 1 teaspoon smoked paprika
- 1/2 teaspoon black pepper
Instructions for Marinade: In a medium-sized bowl, whisk together all the marinade ingredients until well combined. Ensure the honey is fully dissolved. The longer your chicken marinates, the more flavorful it will be. Aim for at least 2 hours, but ideally, marinate overnight in the refrigerator for the best results. If marinating overnight, ensure the chicken is stored in an airtight container.
Dry Rub Ingredients:
- 1/4 cup all-purpose flour
- 2 tablespoons paprika (sweet or smoked, or a mix)
- 1 tablespoon garlic powder
- 1 tablespoon onion powder
- 1 tablespoon cayenne pepper (or less, to taste)
- 1 teaspoon salt
- 1 teaspoon black pepper
Instructions for Dry Rub: In a separate bowl, combine all the dry rub ingredients. Whisk thoroughly to ensure even distribution of spices. Adjust the amount of cayenne pepper according to your desired spice level. For a milder flavor, use less; for a fiery kick, add more. Remember that the cayenne’s heat will intensify during baking.
Combining Marinade and Dry Rub: Once the chicken has marinated, remove it from the refrigerator and let it come to room temperature for about 30 minutes. This helps ensure even cooking. Then, generously coat each wing piece in the dry rub, ensuring that every surface is well covered. This creates a flavorful crust and helps the wings crisp up beautifully in the oven. Press the rub firmly into the chicken to help it adhere.
Important Note: For extra crispy wings, you can add a thin coating of cornstarch or potato starch to the wings after the dry rub. This will help create an even crispier exterior. However, this step is optional.
Baking Preparation
Before you embark on the journey of creating crispy baked chicken wings, meticulous preparation is key. This stage sets the foundation for achieving that perfect balance of crispy skin and juicy meat. Let’s delve into the crucial steps to ensure your wings are ready for the oven.
Start with the right chicken wings: Choose about 2 pounds of fresh or thawed frozen chicken wings. Separate them into drumettes and flats – many find the flats crispier, but both are delicious. If using frozen wings, ensure they are completely thawed before proceeding to avoid uneven cooking. Pat the wings thoroughly dry with paper towels. This is incredibly important for achieving crispy skin. Any remaining moisture will steam the wings instead of crisping them.
The marinade (optional but highly recommended): While not strictly necessary, marinating your wings significantly enhances their flavor and tenderness. A simple marinade can be made with 1/4 cup of your favorite hot sauce (Frank’s RedHot is a classic choice), 2 tablespoons of olive oil, 1 tablespoon of soy sauce, 1 teaspoon of garlic powder, 1 teaspoon of paprika, and 1/2 teaspoon of black pepper. Mix these ingredients thoroughly in a large bowl or resealable bag. Add the chicken wings and ensure they are completely coated. Marinate for at least 30 minutes, or preferably for several hours in the refrigerator, or even overnight for maximum flavor penetration.
The crucial drying step (repeat!): After marinating (or if skipping the marinade), remove the wings and once again pat them thoroughly dry with paper towels. This cannot be stressed enough. Excess moisture is the enemy of crispy chicken wings. Take your time and ensure the wings are as dry as possible. You can even let them air dry on a wire rack for 30 minutes to an hour if you have the time.
Preparing the baking sheet and rack: Line a baking sheet with parchment paper or aluminum foil for easy cleanup. Using a wire rack placed on top of the baking sheet is crucial. This allows air to circulate around the wings, promoting even cooking and crispier skin. Avoid overcrowding the baking sheet; arrange the wings in a single layer, ensuring they are not touching each other. If you have a large quantity of wings, bake them in batches to prevent steaming.
Seasoning generously: Now it’s time to season. While your marinade may have already imparted some flavor, a generous coating of seasoning will further enhance the taste and texture. Use your favorite seasoning blend; a simple combination of salt and black pepper works wonders. You can also experiment with garlic powder, onion powder, paprika, cayenne pepper, or any other spice blend you enjoy. Press the seasoning into the wings to ensure it adheres properly.
Final preparations: Preheat your oven to 400°F (200°C). Once preheated, carefully transfer the seasoned wings to the prepared baking sheet and wire rack. Ensure they are arranged in a single layer for even cooking. Now you’re ready to bake your delicious crispy chicken wings!
Cooking Techniques: Baking the Wings
Baking chicken wings offers a healthier alternative to deep-frying, resulting in crispy skin and juicy meat without the excess oil. This method requires careful preparation and attention to detail to achieve optimal results. The key is to create a dry surface on the wings before baking to encourage crispiness.
Preparation is Key: Begin by patting your chicken wings thoroughly dry with paper towels. This step is crucial; any remaining moisture will steam the wings instead of crisping them. We recommend using about 2 lbs of chicken wings, separated into drumettes and flats. You can leave them whole or cut them into smaller pieces for even cooking.
The Toss: In a large bowl, combine your dried wings with your chosen seasoning. For a classic flavor profile, use 2 tablespoons of paprika, 1 tablespoon of garlic powder, 1 tablespoon of onion powder, 1 teaspoon of cayenne pepper (or more, to taste), 1 teaspoon of salt, and 1/2 teaspoon of black pepper. Feel free to experiment with other spices like cumin, oregano, or chili powder to create your unique blend. Ensure the wings are evenly coated, tossing them gently until completely seasoned.
Baking Time and Temperature: Preheat your oven to 400°F (200°C). Line a baking sheet with parchment paper or a silicone baking mat for easy cleanup and to prevent sticking. Arrange the wings in a single layer, ensuring they aren’t overcrowded. Overcrowding will lead to steaming instead of crisping. Bake for 40-45 minutes, flipping the wings halfway through for even browning. Use a baking rack for extra crispiness; this allows air to circulate around the wings.
Achieving Maximum Crispiness: For extra crispy skin, consider these techniques: You can increase the oven temperature to 425°F (220°C) for the last 10-15 minutes of baking. Alternatively, broil the wings for the final few minutes, keeping a close eye to prevent burning. Be mindful of the broiling feature as it can burn the wings quickly. Another option is to toss the wings with a tablespoon of cornstarch or arrowroot powder before baking; this helps to absorb excess moisture and promote crispiness.
Resting is Important: Once the wings are cooked through and golden brown, remove them from the oven and let them rest for at least 5-10 minutes before serving. This allows the juices to redistribute, resulting in more tender and flavorful wings. Do not overcrowd the baking sheet during the resting period, as this will cause the wings to become soggy.
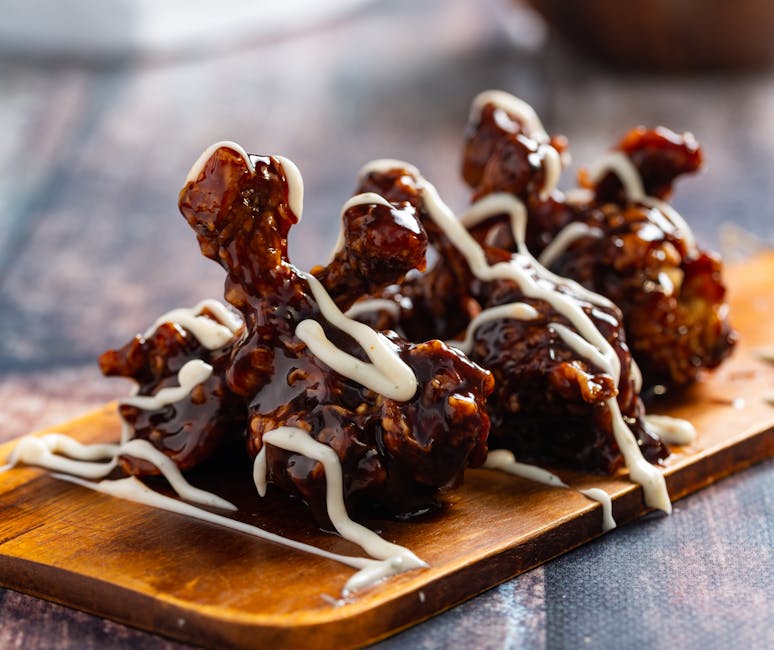
Serving Suggestions: Serve your crispy baked chicken wings with your favorite dipping sauces, such as ranch dressing, blue cheese dressing, or buffalo wing sauce. They are a fantastic appetizer or main course, perfect for game days, parties, or a casual weeknight dinner. Enjoy!
Crispy Baked Chicken Wings: Recommendations
These crispy baked chicken wings are a delicious and relatively healthy alternative to deep-fried versions. To maximize enjoyment and ensure optimal quality, we offer the following recommendations.
Serving Suggestions: These wings are incredibly versatile and pair well with a variety of sides and sauces. For a classic experience, serve them with your favorite dipping sauces – blue cheese dressing, ranch dressing, BBQ sauce, honey mustard, or a spicy sriracha mayo are all excellent choices. Consider offering a selection of sauces for guests to customize their wing experience. Beyond dipping sauces, these wings are also fantastic served with celery sticks and carrot sticks for a refreshing contrast in texture and flavor. For a more substantial meal, pair them with coleslaw, potato salad, or a simple green salad.
Storage Conditions: For best results, consume the wings immediately after baking for optimal crispiness. However, leftovers can be stored properly. Allow the wings to cool completely before storing them in an airtight container in the refrigerator. They will remain fresh and safe to eat for up to 3 days. To reheat, you can bake them in a preheated oven at 350°F (175°C) for about 10-15 minutes, or until heated through. Reheating in a microwave is not recommended as it can make the wings soggy. Freezing is also an option. Place the cooled wings in a freezer-safe bag or container and freeze for up to 3 months. Thaw completely in the refrigerator before reheating.
Complementary Dishes: The versatility of these crispy baked chicken wings allows for a wide range of complementary dishes. They are a natural fit for game day gatherings, casual get-togethers, or even a satisfying weeknight dinner. Consider serving them alongside classic comfort foods like mac and cheese, creamy mashed potatoes, or baked beans. For a lighter option, a fresh and vibrant salad with a light vinaigrette would be a perfect counterpoint to the richness of the wings. If you’re looking for something a bit more adventurous, try serving them with Mexican-inspired sides like guacamole, pico de gallo, or a side of Mexican rice. The possibilities are endless!
Nutritional Information (per wing, approximate values): The exact nutritional content will vary depending on the size of the wings and the ingredients used in the marinade or seasoning. However, a general estimate for a medium-sized baked chicken wing is as follows: Calories: 80-100, Fat: 5-7g, Protein: 8-10g, Carbohydrates: 1-2g. These values are approximate and should be considered as estimates only. For precise nutritional information, consider using a nutrition calculator app or website and inputting the specific ingredients and quantities used in your recipe.
Important Note: While baking is a healthier cooking method than deep frying, it’s still important to watch your portion size and be mindful of overall calorie intake. Enjoy these delicious wings as part of a balanced diet.