Few desserts evoke the same sense of comfort and nostalgia as a perfectly baked apple pie. This classic confection, a staple of American cuisine, boasts a history far richer and more complex than its simple ingredients might suggest. While pinpointing the exact origin is difficult, apple pie’s story is intertwined with the history of apples themselves, their cultivation spreading across Europe and eventually to the New World with early settlers. Evidence suggests that variations of apple pies existed in Europe centuries before the colonization of America, with recipes appearing in cookbooks as early as the 16th century. However, the apple pie as we know it today—with its flaky crust and sweet, spiced filling—is largely a product of American culinary innovation.
The association of apple pie with American identity is deeply ingrained in our culture. It’s often cited as the quintessential American dessert, a symbol of home, family, and tradition. This strong cultural connection is reflected in popular culture, from countless songs and stories to its frequent appearance in advertisements and media. In fact, a 2018 survey conducted by the American Pie Council (yes, it exists!) revealed that apple pie is the most popular pie in the United States, with over 60% of respondents naming it as their favorite. This widespread popularity isn’t just a matter of taste; it speaks to the dessert’s role in shaping our collective memory and sense of national identity.
The evolution of the apple pie recipe itself is a fascinating journey. Early versions often differed significantly from modern interpretations. Spices like cinnamon, nutmeg, and cloves were introduced relatively late, reflecting the changing availability of these ingredients across the centuries. The crust, too, has undergone transformations, evolving from simpler, less flaky versions to the intricate lattice tops and buttery, melt-in-your-mouth creations we often see today. The rise of readily available, pre-made pie crusts in the 20th century simplified the baking process, making apple pie accessible to a wider audience, further contributing to its enduring popularity. This recipe, however, hearkens back to a more classic approach, emphasizing the importance of homemade crust and the perfect balance of sweet and tart apples.
Beyond its cultural significance, the appeal of apple pie lies in its versatility. The filling can be adapted to suit individual preferences, incorporating different types of apples, variations in spices, and the addition of nuts or other fruits. From the humble beginnings of its ingredients to its prominent place in our cultural landscape, the classic apple pie stands as a testament to the enduring power of simple pleasures and the creativity of culinary traditions across time and geography. This recipe aims to capture the essence of that tradition, offering a taste of history baked into every delicious bite.
Ingredients and Measurements
This classic apple pie recipe calls for fresh, high-quality ingredients to ensure the best flavor and texture. Precise measurements are crucial for a perfectly balanced pie, so please use a kitchen scale for the most accurate results, especially for the flour and butter. Volume measurements can be less consistent.
For the Crust:
• 2 ½ cups (300g) all-purpose flour: Using a good quality all-purpose flour is essential for a tender and flaky crust. Avoid using self-rising flour as the added baking powder will affect the texture. If using a scale, weigh the flour directly into your mixing bowl for the most accurate measurement. If using measuring cups, lightly spoon the flour into the cup and level it off with a straight edge. Do not scoop directly from the bag.
• 1 tsp (5g) salt: Salt enhances the flavors in the crust and balances the sweetness of the apples. Use fine sea salt or table salt.
• 1 cup (2 sticks, 227g) unsalted butter, very cold and cubed: Using very cold butter is key for a flaky crust. Cut the butter into small cubes before adding it to the flour. This ensures even distribution and prevents the butter from melting too quickly during the mixing process. Unsalted butter allows you to control the salt level in your recipe.
• ½ cup (120ml) ice water: Gradually add the ice water to the flour and butter mixture. Start with less water than indicated and add more as needed to achieve a dough that comes together without being sticky. The dough should be slightly shaggy, not smooth.
For the Apple Filling:
• 6-8 medium apples (about 2 lbs or 900g): The type of apple you choose will greatly impact the flavor and texture of your pie. A combination of tart and sweet apples is ideal, such as Granny Smith, Honeycrisp, and Braeburn. Peel, core, and slice the apples thinly and evenly for consistent baking.
• ¾ cup (150g) granulated sugar: Adjust the sugar amount to your preference based on the sweetness of your apples. Taste the apples before adding the sugar to ensure the filling isn’t overly sweet.
• ¼ cup (50g) packed light brown sugar: Brown sugar adds depth of flavor and moisture to the filling. Packed brown sugar means firmly pressing the sugar into the measuring cup.
• 2 tbsp (20g) all-purpose flour: The flour helps to thicken the apple filling and prevents it from becoming too runny.
• 1 tsp (2g) ground cinnamon: Cinnamon is a classic apple pie spice. Adjust to your preference.
• ½ tsp (1g) ground nutmeg: Nutmeg adds warmth and complexity to the apple filling.
• ¼ tsp (0.5g) ground allspice (optional): A small amount of allspice adds a subtle spice note.
• 2 tbsp (30ml) lemon juice: Lemon juice helps to prevent the apples from browning and adds a touch of brightness to the filling.
For the Egg Wash (optional):
• 1 large egg, beaten: Brushing the crust with an egg wash before baking gives the pie a beautiful golden-brown color and a slightly glossy finish.
For the Topping (optional):
• Coarse Sugar for sprinkling
Crust Preparation (including pastry tips)
A truly classic apple pie hinges on a flawlessly flaky crust. This section details how to create a buttery, tender crust that will perfectly complement your delicious apple filling. We’ll be making a double crust pie, requiring two identical crusts.
Ingredients for the Crust:
- 2 ½ cups (300g) all-purpose flour, plus extra for dusting
- 1 tsp salt
- 1 cup (2 sticks, 227g) unsalted butter, very cold and cut into ½-inch cubes
- ½ cup (120ml) ice water
Instructions:
1. Prepare the Dough: Begin by whisking together the flour and salt in a large bowl. Ensure your butter is extremely cold; this is crucial for a flaky crust. Cut the cold butter into the flour mixture using a pastry blender or your fingertips, working quickly to incorporate the butter without overmixing. The goal is to create a mixture that resembles coarse crumbs with some pea-sized pieces of butter remaining.
2. Add the Ice Water: Gradually add the ice water, one tablespoon at a time, mixing gently with a fork. Do not overmix; the dough should just come together. If it seems too dry, add a tablespoon more water; if it’s too wet, add a little more flour. The dough should be slightly shaggy and not completely smooth.
3. Form the Dough: Turn the dough out onto a lightly floured surface. Gently bring it together into two discs, one slightly larger than the other (for the bottom and top crusts respectively). Wrap each disc tightly in plastic wrap and refrigerate for at least 30 minutes. This chilling step allows the gluten to relax and the fat to firm up, resulting in a more tender crust.
4. Rolling Out the Dough: On a lightly floured surface, roll out one disc of dough into a 12-inch circle. Use gentle, even pressure and rotate the dough frequently to prevent sticking. If the dough becomes too difficult to roll, let it rest in the refrigerator for a few minutes before continuing. Carefully transfer the rolled-out dough to your pie plate.
5. Trimming and Crimping: Gently trim the overhanging dough, leaving about a ½-inch overhang. Fold the overhang under itself and crimp the edges decoratively using your fingers or a fork. This creates a neat and professional finish and prevents the filling from overflowing.
6. Rolling and Topping the Second Crust: Repeat steps 4 and 5 with the second disc of dough. You can either place it directly over the filling or cut it into strips for a lattice top. If using a lattice top, arrange the strips over the filling, weaving them over and under each other.
Pastry Tips for Success:
- Use cold ingredients: Cold butter and ice water are essential for flakiness.
- Don’t overwork the dough: Overmixing develops gluten, resulting in a tough crust.
- Chill the dough: Chilling allows the gluten to relax and the fat to firm up.
- Use a lightly floured surface: This prevents sticking.
- Handle the dough gently: Avoid excessive pressing or stretching.
- Get creative with your crimping: Experiment with different crimping techniques for a unique touch.
Following these steps and tips will ensure you create a beautiful and delicious pie crust that will impress even the most discerning pie connoisseur!
Apple Filling Preparation (including peeling, coring, and slicing techniques)
This section details the preparation of the apple filling for your classic apple pie. Proper preparation ensures optimal texture and flavor in your final product. We’ll be using approximately 6 medium-sized apples (about 3 pounds total) for this recipe. You can adjust the quantity based on your pie dish size.
Choosing Your Apples: The best apples for pie are tart-sweet varieties that hold their shape well when baked. Granny Smith, Honeycrisp, Braeburn, and Pink Lady are excellent choices. A mix of apple varieties can offer a complex flavor profile. Avoid overly soft or mealy apples as they will break down too much during baking.
Peeling the Apples: There are several ways to peel apples. A vegetable peeler is the most common and efficient method. Hold the apple firmly and use smooth, even strokes to remove the peel. Avoid peeling too deeply, as you want to retain as much of the apple flesh as possible. A paring knife can also be used, but requires more care and time. For a rustic look, you can leave the skins on, but be aware that the baking time might need adjustment.
Coring the Apples: An apple corer is the quickest way to remove the core, including the seeds and stem. If you don’t have a corer, a small sharp knife works well. Cut the apple in half lengthwise, then carefully use the knife to remove the core from each half. Be precise to avoid wasting too much apple flesh. For a more rustic filling, you can leave small pieces of the core in, but be sure to remove the seeds.
Slicing the Apples: Consistent slicing is key for even baking. Once cored, slice each apple half into 1/4-inch thick slices. Aim for uniform thickness to ensure all the slices cook at the same rate. If some slices are significantly thicker than others, they may not cook through properly. You can use a mandoline slicer for perfectly even slices if you have one. However, a sharp knife is perfectly adequate for this task.
Preventing Browning: Apple slices tend to brown quickly when exposed to air. To prevent this, immediately place the sliced apples in a large bowl of cold water with 2 tablespoons of lemon juice. The lemon juice helps to inhibit the enzymatic browning process. Keep the apples submerged in the water until you’re ready to add them to the filling. This will significantly improve the appearance and prevent discoloration.
Preparing the Filling: Once all the apples are sliced, drain them thoroughly. In a large bowl, combine the sliced apples with 3/4 cup of granulated sugar, 1/4 cup of all-purpose flour, 1 teaspoon of ground cinnamon, 1/2 teaspoon of ground nutmeg, and a pinch of salt. Gently toss to coat all the apple slices evenly with the mixture. Avoid over-mixing, as this can cause the apples to become mushy. Your apple filling is now ready to be added to your pie crust.
Important Note: Adjust the amount of sugar based on the sweetness of your apples. If using very tart apples, you may need to add a bit more sugar. Conversely, if using sweeter apples, you may want to reduce the amount of sugar.
Assemble the Pie (including crimping and venting techniques)
With your perfectly chilled bottom crust ready in your 9-inch pie plate, it’s time to assemble your masterpiece. Gently spoon the prepared apple filling (from the previous section of the recipe) evenly over the bottom crust. Avoid overfilling; leave about 1 inch of space from the top edge of the crust to allow for expansion during baking. Overfilling can lead to a messy overflow and a soggy bottom crust.
Next, carefully place the top crust over the filling. Ensure the edges of the top crust overhang the bottom crust by about ½ inch. This overhang will be crucial for creating a beautiful crimped edge. Before crimping, trim any excess dough from the edges, leaving a neat ½-inch overhang. This prevents excessively thick edges that might burn before the center is cooked through.
Now comes the fun part: crimping! There are several techniques you can employ. A classic method involves pinching the top and bottom crusts together between your thumb and forefinger, creating small, evenly spaced pleats along the edge. Work your way around the entire circumference of the pie, ensuring a tight seal to prevent leaks. Another option is to use a fork to crimp the edges, creating a decorative pattern. Simply press the tines of the fork firmly into the dough, creating a series of indentations along the edge. For a more rustic look, you can simply fold the top crust over the bottom crust and crimp it loosely.
Venting is crucial for preventing steam buildup during baking, which could cause the crust to burst or the filling to boil over. There are several effective venting techniques. You can cut several slits, approximately ½ inch long, across the top crust using a sharp knife or a pastry wheel. Space these slits evenly to allow for adequate steam release. For a more decorative approach, you can cut out small shapes from the top crust using cookie cutters, creating a charming window to the delicious filling.
Alternatively, you can create a decorative vent by cutting a small circle in the center of the top crust and replacing it with a small piece of parchment paper to prevent filling from escaping. This parchment paper will also prevent the center from over-browning too quickly. Remember to remove the parchment paper after the pie has baked for about 40 minutes. Regardless of your chosen venting method, ensure sufficient ventilation to prevent a soggy or burst pie.
Before placing the pie in the oven, you can brush the top crust with a wash of milk or cream for a golden-brown finish. An egg wash (one egg beaten with a tablespoon of water) will also yield a beautiful shine and richer color. This step is optional but highly recommended for enhancing the appearance and flavor of your pie.
Finally, place your beautifully assembled apple pie in a preheated oven and bake according to the recipe instructions. Enjoy the aroma and anticipation as your classic apple pie bakes to golden perfection!
Baking Instructions (including temperature and time)
Preheat your oven to 375°F (190°C). This temperature ensures even baking and a beautifully golden crust. Ensure your oven is properly preheated before placing the pie in; this is crucial for a successful bake. Using an oven thermometer is highly recommended to verify the accuracy of your oven’s temperature.
Gently place the assembled apple pie on a baking sheet. This will catch any spills and make it easier to transfer the hot pie. Using a baking sheet is highly recommended, even if your pie dish is oven-safe.
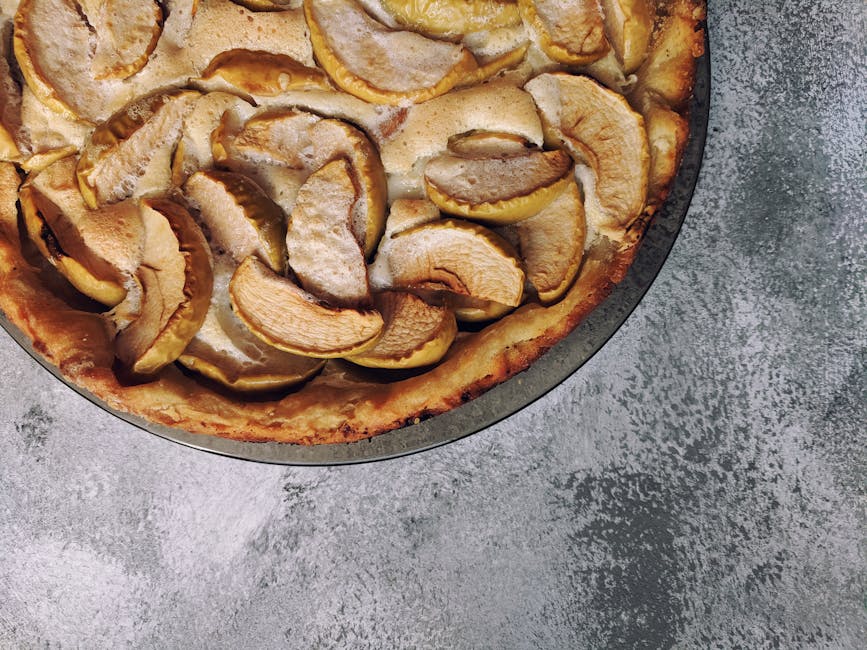
Bake for 45-55 minutes, or until the crust is deeply golden brown and the filling is bubbling vigorously. The exact baking time will depend on your oven and the thickness of your crust. Start checking for doneness around the 45-minute mark. To test for doneness, gently insert a toothpick or thin knife into the center of the pie; it should come out clean or with only a few moist crumbs clinging to it. If the crust is browning too quickly but the filling isn’t quite done, loosely cover the edges of the pie with aluminum foil to prevent over-browning.
During the baking process, keep a close eye on your pie. Every oven is slightly different, so you might need to adjust the baking time slightly. If the crust starts to brown too quickly, reduce the oven temperature by 25°F (15°C) and continue baking. Conversely, if the filling appears undercooked but the crust is golden brown, you can increase the oven temperature by 25°F (15°C) for the remaining baking time.
Once the pie is baked, carefully remove it from the oven and let it cool on a wire rack for at least 2-3 hours. This cooling period is essential. It allows the filling to set properly and prevents a soggy bottom. The longer you let it cool, the easier it will be to slice and serve cleanly. Resist the temptation to cut into it too soon!
For a perfectly browned top crust, you can brush the top with a little bit of milk or cream before baking. This adds shine and enhances the browning process. Alternatively, you can sprinkle a little coarse sugar over the top before baking for added sweetness and texture. Experiment with different techniques to find your preferred method.
If you notice the crust is browning too quickly while the filling is still undercooked, consider using a pie shield or covering the edges of the pie with aluminum foil during the last part of the baking time. This will help to protect the crust from over-browning while allowing the filling to finish cooking properly. Remember to always prioritize food safety; ensure the internal temperature reaches a safe level before consuming.
Once cooled, your Classic Apple Pie is ready to be sliced and served. Enjoy! Remember to store any leftover pie in an airtight container in the refrigerator for up to 3-4 days.
Cooling and Setting
The cooling and setting process is crucial for a perfect classic apple pie. Improper cooling can lead to a soggy bottom crust or a filling that’s too runny. Take your time with this step to ensure a beautiful, delicious result.
Once your apple pie has finished baking, exhibiting a deep golden-brown crust and a bubbly, fragrant filling, remove it carefully from the oven using oven mitts. Let it rest on a wire rack for at least 15-20 minutes. This initial cooling period allows the filling to begin to set and prevents the bottom crust from becoming overly saturated with juices.
Resist the urge to cut into the pie immediately. The filling needs time to solidify. Cutting too soon will result in a messy, unappetizing pie with a runny filling that spills everywhere. The internal temperature of the pie needs to drop significantly to allow the pectin in the apples to gel properly, creating a firm, yet tender, filling.
After the initial 15-20 minute rest, carefully transfer the entire pie to a wire rack to cool completely. A wire rack allows for air circulation around the entire pie, promoting even cooling and preventing moisture buildup which can lead to a soggy bottom crust. Avoid placing the hot pie directly on a countertop or other surface, as this can trap heat and steam, hindering the cooling process.
Allow the pie to cool completely at room temperature, which will take approximately 2-3 hours. You’ll notice the filling gradually thicken and set as it cools. Patience is key here; rushing this process will compromise the texture and overall quality of your pie.
For optimal setting, you can consider refrigerating the pie after it has cooled completely at room temperature. This will further solidify the filling and enhance its texture. Refrigerating for at least 2-4 hours, or preferably overnight, will result in a firmer, more sliceable pie that holds its shape beautifully.
Once the pie is completely cool and set, you can carefully slice and serve it. Use a sharp knife and wipe it clean between slices to prevent the crust from sticking and tearing. A serrated knife works particularly well for cutting through the flaky crust without crumbling it. Serve your masterpiece with a scoop of vanilla ice cream or a dollop of whipped cream for an extra touch of indulgence.
Proper cooling and setting are essential for a beautifully presented and delicious apple pie. By following these steps carefully, you’ll ensure your pie is a triumph, appreciated for its perfect texture and flavor.
Recommendations for Your Classic Apple Pie
This classic apple pie recipe is best enjoyed when served warm, allowing the filling’s delicious flavors to fully bloom. For optimal enjoyment, let the pie cool slightly after baking (about 15-20 minutes) before slicing and serving. This prevents a messy filling and allows for easier cutting.
Serving suggestions are plentiful! A scoop of vanilla bean ice cream is a timeless classic pairing, providing a cool contrast to the warm, spiced apples. A dollop of whipped cream or crème fraîche adds a touch of richness and tang, complementing the sweetness of the pie. For a more sophisticated touch, consider serving a small quenelle of apple cider caramel sauce alongside each slice. Experiment with different toppings to discover your favorite combination.
To enhance the overall dining experience, consider pairing your apple pie with complementary dishes. A simple scoop of vanilla ice cream is a classic and satisfying choice. For a more substantial meal, a scoop of vanilla ice cream or a dollop of whipped cream adds a touch of richness and tang, complementing the sweetness of the pie. A light salad with a vinaigrette dressing would provide a refreshing counterpoint to the richness of the pie. Alternatively, a slice of sharp cheddar cheese surprisingly complements the sweetness and spice of the pie.
Proper storage is crucial for maintaining the quality and freshness of your apple pie. Allow the pie to cool completely before covering it tightly with plastic wrap or aluminum foil. Store the pie at room temperature for up to 2 days, or in the refrigerator for up to 4 days. If freezing is necessary, wrap the cooled pie tightly in plastic wrap, followed by aluminum foil, and place it in a freezer-safe bag. Frozen apple pie can be stored for up to 3 months. When reheating, let the pie thaw overnight in the refrigerator and then warm it in a preheated oven at 350°F (175°C) for 10-15 minutes, or until heated through.
Nutritional information (per slice, approximate, will vary based on ingredients and portion size): Calories: 400-500, Fat: 20-25g, Saturated Fat: 8-10g, Cholesterol: 30-40mg, Sodium: 150-200mg, Carbohydrates: 60-70g, Fiber: 3-4g, Sugar: 30-40g, Protein: 4-5g. Note: This is an estimation, and the actual nutritional content may differ depending on specific ingredients used and portion size. For a more precise analysis, use a nutrition calculator with your specific ingredient list and serving size.
Enjoy your homemade apple pie! Remember to adjust sweetness and spice levels to your personal preference. Experiment with different apple varieties for a unique flavor profile. Most importantly, have fun creating this delicious classic treat!