Granola, a seemingly simple blend of oats, nuts, seeds, and sweeteners, boasts a surprisingly rich history and surprising cultural impact. While its exact origins are debated, the generally accepted narrative points to the early 20th century in the United States. Many credit Dr. James Caleb Jackson, a health reformer who ran a sanitarium in the 1860s, with creating an early precursor – a baked oat mixture that was part of his health regime. However, the granola we know and love today emerged later, likely in the 1960s, as part of the growing health food movement. This resurgence saw a shift towards natural, wholesome ingredients, fueling the popularity of homemade versions alongside commercially produced options.
The rise of granola perfectly mirrors the changing dietary trends of the past century. Initially positioned as a health food, its appeal transcended strict dietary regimes to become a beloved breakfast staple and snack. Its versatility is a key factor in its enduring popularity. From simple, classic combinations to those featuring exotic fruits and spices, the possibilities are endless, allowing for customization to individual taste preferences. This adaptability is reflected in the sheer variety of granolas available today, a market estimated to be worth billions of dollars globally, highlighting its significant economic impact.
Beyond its commercial success, granola holds a significant cultural position. It’s become a symbol of healthy living and a conscious approach to food. Its association with natural ingredients and homemade preparation resonates with a growing emphasis on artisanal foods and mindful eating. Furthermore, granola’s presence in cafes, breakfast bars, and even upscale restaurants demonstrates its acceptance across diverse social and economic groups. Interestingly, a significant percentage of granola consumers are millennials and Gen Z, further solidifying its relevance in contemporary culture. The very act of making granola at home has become a popular activity, representing a connection to simpler times and a sense of self-sufficiency – a trend reflected in the countless online recipes and tutorials dedicated to perfecting the craft.
This recipe for ‘Best Homemade Granola’ aims to capture the essence of this beloved food, offering a guide to creating a delicious and nutritious granola from scratch. We’ll explore the nuances of different ingredients, techniques for achieving the perfect texture, and variations to personalize your batch. Through this recipe, we hope to highlight not just the deliciousness of homemade granola, but also its enduring cultural significance and the satisfying experience of creating something wholesome and delicious from simple, natural ingredients.
Ingredients and Measurements
This recipe for the Best Homemade Granola yields approximately 6 cups of delicious, crunchy granola. The measurements are designed to be easily adaptable to your needs; feel free to double or even triple the recipe depending on your consumption rate and storage capacity. Accurate measurement is key to achieving the perfect texture and flavor balance. Use a kitchen scale for the most precise results, especially for the oats and nuts.
Oats: 4 cups (300g) rolled oats. We recommend using old-fashioned rolled oats for their superior texture and ability to absorb the liquid without becoming mushy. Quick-cooking oats can be used, but they will result in a slightly softer granola. Avoid using steel-cut oats, as they require a much longer cooking time and will not achieve the desired crispness.
Nuts and Seeds: 1 cup (100g) mixed nuts and seeds. This is where you can get creative! We suggest a combination of 1/2 cup (50g) almonds (sliced or chopped), 1/4 cup (25g) walnuts (chopped), and 1/4 cup (25g) pumpkin seeds (pepitas). Feel free to substitute with other nuts like pecans, cashews, or Brazil nuts, or add sunflower seeds, chia seeds, or flax seeds. Remember to chop larger nuts and seeds for even cooking and to prevent overly large pieces in the finished granola.
Sweetener: 1/2 cup (100g) honey or maple syrup. This provides the necessary sweetness and helps bind the granola together. Honey will result in a slightly richer flavor, while maple syrup offers a more subtle sweetness. You can adjust the amount depending on your preferred level of sweetness. If using a darker honey or maple syrup, you might find a slightly less amount is necessary.
Oil: 1/4 cup (60ml) melted coconut oil or olive oil. The oil adds moisture and helps create a crispy texture. Coconut oil imparts a subtle coconut flavor, while olive oil adds a slightly more robust taste. Make sure the oil is fully melted before adding it to the mixture to ensure even distribution. Avoid using butter or other solid fats, as they won’t create the same desirable crispness.
Spices: 1 teaspoon ground cinnamon, 1/2 teaspoon ground ginger. These spices add warmth and complexity to the granola. Feel free to experiment with other spices, such as nutmeg, cardamom, or allspice, to create your own unique flavor profile. Start with small amounts and adjust to your taste.
Salt: 1/4 teaspoon sea salt. A pinch of salt enhances the overall flavor of the granola, balancing the sweetness and bringing out the other flavors. Don’t skip the salt! It’s a crucial element in achieving a well-rounded and delicious granola.
Optional additions: Dried fruit (1/2 cup – 1 cup raisins, cranberries, chopped apricots, etc.), chocolate chips (1/2 cup dark chocolate chips), coconut flakes (1/4 cup unsweetened coconut flakes).
Important Note: Always measure ingredients accurately for optimal results. Adjust ingredient quantities based on your preference and available ingredients, keeping in mind that alterations may slightly affect the final texture and flavor.
Equipment List
Making the best homemade granola requires the right tools to ensure even cooking and optimal texture. While you might be able to adapt with substitutes, having the proper equipment will significantly improve your results and make the process more efficient. Below is a detailed list of the equipment you’ll need, along with recommendations and alternatives where applicable.
1. Large Baking Sheet (18×26 inches or similar): This is crucial for achieving even baking. A smaller pan will result in overcrowding and unevenly cooked granola. Avoid using dark-colored baking sheets as they tend to over-brown the granola quickly. A light-colored, non-stick baking sheet is ideal. If you don’t have a large enough baking sheet, consider using two smaller ones, ensuring you adjust baking time accordingly.
2. Large Mixing Bowls (at least two, 5-quart capacity recommended): You’ll need one bowl for combining the dry ingredients (oats, nuts, seeds, etc.) and another for whisking together the wet ingredients (oil, syrup, sweetener). Larger bowls provide ample space for thorough mixing, preventing clumps and ensuring even distribution of the wet ingredients. Using stainless steel or glass bowls is recommended for their durability and ease of cleaning.
3. Whisk: A whisk is essential for smoothly combining the wet ingredients, creating a uniform consistency that will evenly coat the dry ingredients. A balloon whisk is ideal due to its larger surface area, allowing for quicker and more effective mixing. A fork can be used as a substitute, but it may not be as effective in preventing lumps.
4. Measuring Cups and Spoons: Accurate measurements are key to achieving the desired texture and taste in your granola. Invest in a good quality set of measuring cups and spoons, ensuring they are properly calibrated. Using volume measurements (cups and tablespoons) rather than weight (grams) is acceptable for this recipe, but consistency in your measuring technique is crucial.
5. Rubber Spatula or Wooden Spoon: This is needed for thoroughly combining the wet and dry ingredients in the final mixing stage. A rubber spatula is excellent for scraping down the sides of the bowl, ensuring all ingredients are incorporated. A wooden spoon can also work, but a spatula is generally more effective for this task. Avoid using metal utensils as they can scratch non-stick surfaces.
6. Parchment Paper: Lining your baking sheet with parchment paper prevents sticking and makes cleanup incredibly easy. Cut a piece of parchment paper slightly larger than your baking sheet to ensure complete coverage. This is a crucial step for effortless removal of the finished granola.
7. Cooling Rack: Once the granola is baked, transferring it to a cooling rack allows for even cooling and prevents it from becoming soggy. A wire rack is ideal; however, a clean, dry surface will suffice if you don’t have a cooling rack. Allow the granola to cool completely before storing to prevent clumping.
8. Airtight Container: Storing your homemade granola in an airtight container will help maintain its freshness and crispness for several weeks. Choose a container made of glass or food-grade plastic to prevent absorption of odors or flavors from other stored items.
Preparation Phase: Prepping the Oats and Nuts
The foundation of any great granola lies in the quality of its ingredients, particularly the oats and nuts. Proper preparation ensures even cooking and optimal texture, resulting in a crunchy, delicious final product. This section details the crucial steps to get your oats and nuts ready for the baking process.
Choosing your Oats: We recommend using rolled oats (also known as old-fashioned oats) for this recipe. Avoid quick-cooking or instant oats, as they have a finer texture and will result in a softer, less crunchy granola. For this recipe, we’ll use 4 cups of rolled oats. You can experiment with different oat types – adding a cup of steel-cut oats for extra chewiness is a great option, but be aware that they will require a slightly longer baking time.
Measuring the Oats: Accurate measuring is paramount for consistent results. Don’t just scoop the oats directly from the container; use a measuring cup and gently spoon the oats into it, avoiding packing them down. This ensures you’re using the correct volume and achieving the desired texture. Packing the oats will lead to a denser, potentially soggy granola.
Selecting and Preparing the Nuts: The choice of nuts is entirely up to you, but a blend usually provides the best flavor and texture. For this recipe, we suggest using a combination of nuts: 1 cup of almonds (roughly chopped), ½ cup of walnuts (roughly chopped), and ½ cup of pecans (roughly chopped). You can easily substitute these with your favorites – cashews, macadamia nuts, hazelnuts, or even seeds like pumpkin or sunflower seeds work wonderfully.
Preparing the Nuts for Baking: Before adding the nuts to the granola mixture, it’s crucial to prepare them correctly. Roughly chopping the nuts ensures even distribution and prevents large pieces from burning during baking. Avoid chopping them too finely, as this will result in a powdery texture. A large knife or a food processor with the pulse function works well for this task. Remember to remove any shells or debris from your nuts before chopping.
Optional Additions: Consider toasting your nuts before adding them to the granola mixture for an enhanced flavor and a deeper color. Spread the chopped nuts on a baking sheet and toast them in a preheated oven at 300°F (150°C) for 5-7 minutes, keeping a close eye to prevent burning. Toasting enhances the nutty flavor and adds a delightful crunch. Always cool the nuts completely before adding them to the oat mixture.
The Importance of even distribution: Once your oats and nuts are prepared, gently combine them in a large bowl. Ensure the oats and nuts are evenly distributed to guarantee consistent baking and prevent pockets of undercooked or overcooked ingredients. This careful preparation sets the stage for a perfectly balanced and delicious homemade granola.
Cooking Techniques: Baking the Granola
Baking your granola is the crucial final step that transforms a mixture of ingredients into a delicious, crunchy treat. This section will guide you through the process, ensuring you achieve perfectly baked granola every time.
Preheat your oven to 300°F (150°C). This lower temperature ensures even baking and prevents burning. Higher temperatures will result in unevenly cooked granola, with some pieces burning while others remain soft. Using a fan-assisted oven may require slightly lower temperatures or a shorter baking time – keep a close eye on it!
Prepare your baking sheet. Line a large baking sheet (approximately 18×13 inches) with parchment paper. This prevents sticking and makes cleanup a breeze. Lightly greasing the parchment paper with oil or cooking spray is optional but can help prevent sticking even further, especially if using a very sticky ingredient like honey.
Spread the granola mixture evenly. Once your oven is preheated and your baking sheet is prepared, carefully spread your granola mixture in a single, even layer on the prepared baking sheet. Avoid overcrowding the pan; this will hinder even baking and result in soggy granola. Aim for a layer no thicker than ½ inch. A thinner layer will result in crispier granola, while a thicker layer will take longer to bake and may be less crunchy.
Bake for 20-30 minutes. The exact baking time will depend on your oven and the specific ingredients in your granola. Start checking for doneness at 20 minutes. The granola should be golden brown and fragrant. Stir the granola halfway through baking to ensure even browning and crisping. Use a spatula to gently break up any clumps that may have formed.
Test for doneness. The granola is done when it’s golden brown and has a noticeably crunchy texture. If you’re unsure, take a small sample and let it cool completely. It will crisp up further as it cools. Overbaking can lead to burnt granola, so it’s better to slightly underbake and allow it to crisp up as it cools.
Cool completely. Once removed from the oven, let the granola cool completely on the baking sheet before breaking it into smaller pieces. This allows the granola to crisp further and prevents it from becoming soggy. Avoid transferring it to a container while it’s still warm, as the residual heat and moisture can make it soft.
Store properly. Once completely cool, break the granola into smaller clusters and store it in an airtight container at room temperature. Proper storage will help maintain its crunchiness for several weeks. Avoid storing in a humid environment, which can lead to sogginess.
Professional Recommendation: For extra crispy granola, consider reducing the amount of liquid in your recipe slightly. Conversely, if you prefer a chewier granola, you may add a bit more liquid. Experiment with different baking times and temperatures to find your perfect granola texture.
Cooling and Storage
Once your homemade granola is baked to a beautiful golden brown and smells heavenly, the next crucial step is proper cooling and storage to maintain its freshness, crispness, and delicious flavor. Improper handling can lead to sogginess, clumping, and even spoilage.
Cooling the Granola: After removing your baking sheet from the oven, let the granola cool completely on the baking sheet itself for at least 15-20 minutes. This allows the clusters to firm up and prevents them from breaking apart when you transfer them. Resist the urge to immediately transfer it to a container while it’s still hot; this will trap steam and lead to a soggy mess. The baking sheet’s surface helps distribute the heat and aids in even cooling.
Breaking Apart Clusters (Optional): Once cooled slightly, you can gently break apart any large clusters into smaller, more manageable pieces. Use a spatula or your hands (if the granola isn’t too hot) to do this. For those who prefer larger clusters, skip this step entirely. Avoid over-breaking; you want some texture variation.
Transferring to an Airtight Container: After the granola has completely cooled (at least 30-45 minutes), transfer it to an airtight container. This is absolutely vital for preserving its crispness and preventing it from becoming stale. Glass jars or heavy-duty plastic containers with tight-fitting lids are ideal. Avoid using containers that are too large, as this will leave excess air space which can promote staleness.
Storage Recommendations: Proper storage is key to maximizing the shelf life of your homemade granola. Store your granola in a cool, dark, and dry place. Avoid storing it in the refrigerator; the moisture in the refrigerator can actually make the granola soggy. Room temperature is perfect for long-term storage. A pantry or cupboard away from direct sunlight or heat sources is ideal.
Shelf Life: When stored correctly in an airtight container at room temperature, your homemade granola should remain fresh and crunchy for 2-3 weeks. However, you’ll likely find that it’s devoured much sooner! If you notice any signs of staleness, such as a noticeable loss of crispness or a change in aroma, it’s best to discard it. Don’t risk consuming stale or potentially spoiled granola.
Freezing Granola (for longer storage): For longer storage, you can freeze your granola. Place the cooled granola in a freezer-safe, airtight container or a freezer bag, removing as much air as possible. Frozen granola will keep its quality for 2-3 months. To thaw, simply remove it from the freezer and let it sit at room temperature until it reaches your desired consistency. You might find it’s still slightly crisp even after thawing.
Following these cooling and storage guidelines will ensure your homemade granola remains delicious and enjoyable for weeks to come. Enjoy!
Serving Suggestions
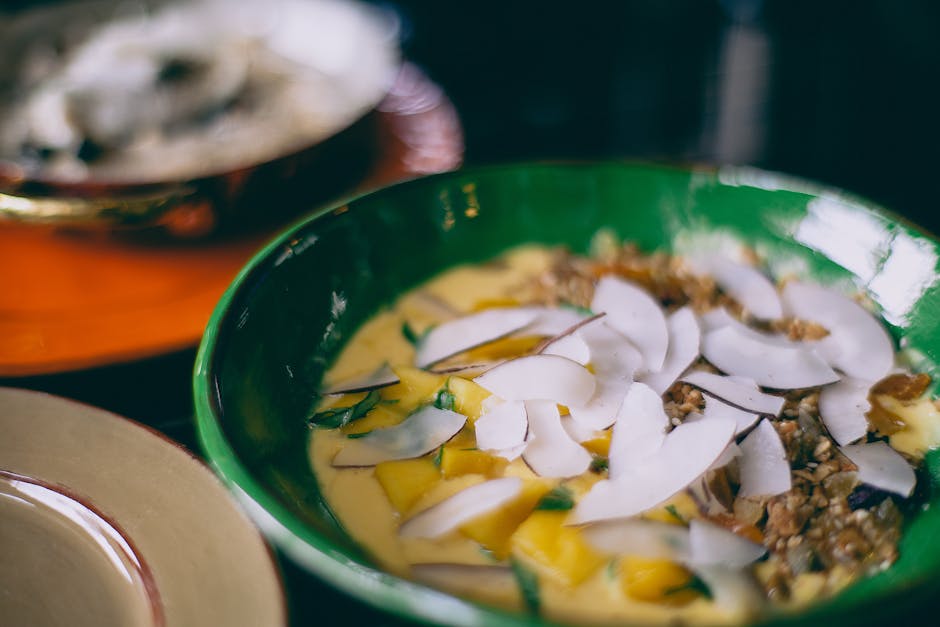
Our Best Homemade Granola is incredibly versatile and delicious in a multitude of ways! Beyond the simple bowl of granola and milk, explore these creative serving suggestions to elevate your breakfast, snack, or even dessert experience.
Classic & Simple: Start with the basics. Enjoy 1/2 cup of granola with 1 cup of your favorite milk – dairy or non-dairy alternatives like almond, soy, or oat milk work perfectly. For extra creaminess, let the granola soak in the milk for a few minutes before eating. You can also add a dollop of yogurt (plain Greek yogurt is a great choice) for extra protein and tang.
Yogurt Parfait Perfection: Layer 1/4 cup granola with 1/2 cup yogurt (Greek or regular) and your choice of fresh berries (1/4 cup raspberries, blueberries, or strawberries). Repeat the layers for a visually appealing and delicious parfait. A drizzle of honey or maple syrup adds a touch of sweetness. Consider adding a sprinkle of chia seeds or flax seeds for an extra nutritional boost.
Elevated Breakfast Bowl: Create a hearty and nutritious breakfast bowl by combining 1/2 cup granola with 1/4 cup chopped nuts (almonds, walnuts, pecans), 1/4 cup dried fruit (cranberries, raisins, apricots), and a handful of fresh fruit (banana slices, sliced apples, or berries). Top with a drizzle of honey or a sprinkle of cinnamon for added flavor. This option is perfect for a filling and satisfying start to your day.
Snacking Made Easy: Our granola is the perfect on-the-go snack. Pack 1/4 cup to 1/2 cup in a reusable container for a healthy and satisfying treat between meals. It’s a great alternative to processed snacks and provides sustained energy.
Dessert Delight: Think outside the breakfast box! Use our granola as a crunchy topping for yogurt parfaits, ice cream sundaes, or even homemade oatmeal cookies. A sprinkle of granola on top of your favorite baked apples or cobblers adds a delightful textural contrast and nutty flavor. For a truly decadent treat, try adding a spoonful to your hot chocolate or coffee.
Creative Combinations: Experiment with different flavor combinations! Add a sprinkle of granola to your morning smoothie for added texture and crunch. Incorporate it into trail mix for a more substantial and flavorful snack. Get creative and don’t be afraid to experiment with different ingredients to find your perfect granola combination.
Storage Recommendations: Store your homemade granola in an airtight container at room temperature for up to 2 weeks to maintain its freshness and crispness. Avoid storing it in the refrigerator, as this can make the granola soggy.
No matter how you choose to enjoy it, our Best Homemade Granola is sure to become a staple in your kitchen. Enjoy!
Best Homemade Granola: Recommendations
This homemade granola recipe is designed for optimal flavor and texture. To ensure you enjoy it at its best, please follow these recommendations:
Serving Suggestions: This granola is incredibly versatile! Enjoy it as a standalone snack, a delicious addition to your yogurt parfait, or sprinkled over your favorite ice cream. It’s particularly delightful when paired with fresh berries, sliced bananas, or a drizzle of honey or maple syrup. You can also use it as a crunchy topping for oatmeal, smoothies, or even baked goods like muffins or crumble toppings. Experiment with different combinations to discover your favorite!
Storage Conditions: For optimal freshness and to prevent the granola from becoming soggy, store it in an airtight container at room temperature in a cool, dry place. Avoid storing it in the refrigerator or freezer, as this can affect its texture. Properly stored, your homemade granola should remain fresh and crunchy for up to two weeks. After this time, while it may still be safe to consume, the texture and flavor may begin to diminish.
Complementary Dishes: The nutty and subtly sweet flavor profile of this granola makes it a wonderful addition to a variety of dishes. Consider serving it alongside:
- Yogurt Parfaits: Layer your favorite yogurt with granola, fresh fruit, and a drizzle of honey for a healthy and satisfying breakfast or snack.
- Smoothie Bowls: Create a vibrant and nutritious smoothie bowl and top with a generous helping of granola for added crunch and texture.
- Breakfast Bowls: Combine the granola with milk or your preferred milk alternative, fresh fruit, and nuts for a quick and easy breakfast.
- Baked Goods: Use it as a crumble topping for cobblers, crisps, or muffins for a delightful textural contrast.
- Salads: Add a surprising crunch to your salads by sprinkling a small amount of granola over the top.
Nutritional Information (per 1/4 cup serving, approximate values may vary based on specific ingredients used):
- Calories: Approximately 150-200
- Fat: 8-12g (depending on the type and amount of nuts and seeds used)
- Saturated Fat: 1-3g
- Carbohydrates: 20-25g
- Fiber: 4-6g
- Sugar: 5-8g (naturally occurring sugars from fruits and added sweeteners)
- Protein: 4-6g
Important Note: Nutritional information is an estimate and can vary based on the specific ingredients and quantities used in your recipe. For precise nutritional information, use a nutrition calculator and input your exact ingredients and measurements.