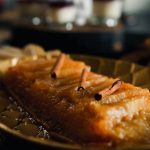
The molten heart of a perfectly executed chocolate lava cake is a dessert experience unlike any other. This decadent treat, characterized by its intensely rich chocolate exterior giving way to a warm, gooey chocolate center, has captivated palates worldwide. While pinpointing its exact origin is difficult, the lava cake’s popularization is largely attributed to Jean-Georges Vongerichten, a renowned French chef. Although variations of intensely chocolatey cakes existed before, Vongerichten’s version, introduced at his New York City restaurant in the late 1980s, is widely credited with launching the lava cake into the culinary stratosphere. His recipe, with its precise balance of ingredients and baking time, ensured a consistently perfect molten core, setting a new standard for chocolate desserts.
The cultural significance of the chocolate lava cake lies in its ability to transcend culinary boundaries and become a universally appreciated indulgence. It’s a dessert that speaks to the primal human desire for rich, comforting sweetness. Its popularity is evident in its widespread presence on restaurant menus globally, from Michelin-starred establishments to casual cafes. The ease with which the recipe can be adapted – from variations using dark, milk, or white chocolate to the inclusion of added ingredients like nuts or spices – further contributes to its lasting appeal. In fact, online searches for chocolate lava cake recipe number in the millions annually, demonstrating a consistent and widespread interest in both creating and consuming this delightful dessert.
Beyond its widespread popularity, the chocolate lava cake holds a special place in modern culinary culture. It represents a sophisticated yet approachable dessert, perfect for special occasions or a simple moment of self-indulgence. The theatrical reveal of the molten chocolate center, often accompanied by a satisfying ooze, adds a visual element that elevates the experience beyond a mere dessert. It has inspired countless imitations, variations, and reinterpretations, cementing its status as a classic within the world of pastry. Its enduring popularity is a testament to the power of simple, high-quality ingredients skillfully combined to create a truly unforgettable culinary experience. The lava cake’s story is not just about chocolate and butter; it’s a story of culinary innovation, global appeal, and the timeless allure of delicious indulgence.
Ingredients and Measurements
Creating the perfect chocolate lava cake hinges on precise measurements and high-quality ingredients. Don’t skimp on the good stuff – the richness of the chocolate truly shines through in this decadent dessert. We’ll be using both unsweetened and bittersweet chocolate, offering a balanced flavor profile that avoids being overly sweet.
Butter: We’ll start with 6 tablespoons (85g) of unsalted butter. Use high-quality butter, preferably European style, for a richer flavor. Make sure the butter is softened to room temperature. This is crucial for proper creaming with the sugar and for a smooth batter. If your butter is too cold, it will result in a lumpy batter, and if it’s melted, the cake will be flat.
Sugar: The recipe calls for ¾ cup (150g) of granulated sugar. This amount provides the perfect balance of sweetness without overpowering the deep chocolate flavor. Using caster sugar (superfine sugar) can also work well, resulting in a slightly smoother batter. Avoid using brown sugar, as it will alter the texture and color of the cake.
Eggs: Two large eggs are needed. Ensure your eggs are at room temperature. Cold eggs will create a less consistent batter. Room temperature eggs also incorporate better with the other ingredients, leading to a more even rise and a smoother texture. Separate the eggs if you want to achieve a lighter texture, but it’s not strictly necessary for this recipe.
Chocolate: This recipe utilizes a combination of chocolates for a complex flavor. We use 4 ounces (113g) of bittersweet chocolate (70% cacao or higher is recommended) and 2 ounces (57g) of unsweetened chocolate. High-quality chocolate is paramount. Chop the chocolate into small, roughly equal pieces for even melting. Using chocolate chips is acceptable, but chopping your own allows for better control over the size of the pieces and ensures even melting.
Flour: We use 2 tablespoons (15g) of all-purpose flour. Do not over-measure the flour. Too much flour will result in a dense and dry cake. Lightly spoon the flour into the measuring cup and level it off with a straight edge. Using a kitchen scale for measuring is the most accurate method.
Vanilla Extract: ½ teaspoon of pure vanilla extract enhances the overall flavor. Use high-quality vanilla extract for a more pronounced and delicious aroma. Artificial vanilla extract can be used, but it will not offer the same depth of flavor.
Salt: A pinch of salt (¼ teaspoon) balances the sweetness and enhances the chocolate flavor. Don’t skip the salt! It plays a crucial role in the overall taste of the cake.
Optional additions: For an extra touch of decadence, you can add a tablespoon of espresso powder to intensify the chocolate flavor, or a splash of your favorite liqueur such as Grand Marnier or Kahlúa. You can also add chopped nuts or berries to the batter for added texture and flavor.
Equipment List
Creating the perfect chocolate lava cake requires not only the right ingredients but also the right tools. Having the correct equipment ensures even cooking, prevents sticking, and ultimately contributes to a flawlessly molten center. This section details the essential equipment, along with recommendations for optimal results.
Oven and Baking Dish: You’ll need a reliable oven capable of reaching and maintaining an accurate temperature. A convection oven is ideal, but a standard oven will work perfectly fine. Precise temperature control is crucial for achieving that signature gooey center. The baking dishes are equally important. We recommend using ramekins, specifically 6-ounce ramekins. These individual portions are elegant, easy to serve, and provide consistent cooking. Avoid using larger dishes, as this will increase cooking time and may result in over-baked lava cakes. You should have at least four 6-ounce ramekins for a standard recipe.
Mixing Bowls: You’ll need at least two mixing bowls. One medium-sized bowl (approximately 8-10 inches in diameter) is ideal for combining the dry ingredients, while a larger bowl (approximately 12 inches in diameter) is best for creaming together the butter and sugar. Using separate bowls prevents accidental clumping and ensures even mixing. Stainless steel or glass bowls are preferred, as they are durable and easy to clean.
Measuring Tools: Accuracy is paramount in baking. Invest in a good quality set of measuring cups and spoons. Accurate measurements of both wet and dry ingredients are essential for achieving the correct consistency and texture. A kitchen scale is highly recommended for even greater precision, especially when measuring the butter and flour. Using a scale helps avoid inconsistencies that can arise from using only volume measurements.
Mixing Utensils: A sturdy whisk is necessary for whipping the eggs and incorporating the dry ingredients smoothly. A rubber spatula or wooden spoon is essential for scraping down the sides of the bowls and ensuring all ingredients are thoroughly combined. A high-quality whisk will incorporate air effectively, leading to a lighter texture. A flexible spatula is invaluable for transferring the batter into the ramekins neatly and efficiently.
Other Useful Tools: While not strictly essential, a few additional tools can significantly improve your baking experience. A pastry bag with a large round tip can create a professional-looking finish by piping the batter into the ramekins. Silicone baking mats can prevent sticking and make cleanup easier. An oven thermometer is highly recommended to ensure your oven is calibrated correctly and maintaining the desired temperature. Invest in quality tools; they will last and enhance your baking results.
Cleaning Supplies: Finally, don’t forget the cleaning supplies! Having dish soap, sponges, and a clean kitchen towel readily available simplifies the post-baking cleanup. Cleanliness is crucial in baking; it prevents cross-contamination and ensures a smooth workflow.
Preparation of Ingredients
The success of a perfect chocolate lava cake hinges significantly on the proper preparation of its ingredients. This seemingly simple step often gets overlooked, leading to variations in texture and taste. Let’s meticulously prepare each component for optimal results.
We’ll start with the butter. Use high-quality unsalted butter, preferably European-style, for its rich flavor and higher fat content. Measure out 6 ounces (170g) of butter and cut it into small, roughly 1-inch cubes. This smaller size ensures even melting and incorporation into the batter. Room temperature butter is crucial; if it’s too cold, it will clump and not emulsify properly. If your butter is too firm, you can gently microwave it in short bursts (10-15 seconds at a time) until it’s pliable but not melted.
Next, we address the bittersweet chocolate. Use high-quality bittersweet chocolate with a minimum of 70% cacao for a deep, intense chocolate flavor. Roughly chop 8 ounces (227g) of the chocolate into small, irregular pieces. This increases the surface area, facilitating quicker and more complete melting. Avoid using chocolate chips, as they contain stabilizers that can affect the texture of the cake.
For the eggs, ensure they are at room temperature. Cold eggs can cause the batter to curdle. This is especially important for achieving a smooth and glossy lava cake. Crack four large eggs into a separate bowl before adding them to the batter. This allows you to check for any shell fragments that might have accidentally fallen in.
Now, let’s prepare the dry ingredients. Measure out 1/2 cup (60g) of all-purpose flour. Sifting the flour is highly recommended. This removes any lumps and aerates the flour, resulting in a lighter and more tender cake. Also, measure out 1 cup (200g) of granulated sugar – this provides sweetness and helps to create a tender crumb. Finally, add a pinch of salt (about 1/4 teaspoon). Salt enhances the chocolate flavor and balances the sweetness.
Finally, prepare your ramekins. Grease them generously with butter and then dust them with a thin layer of cocoa powder or sugar. This prevents the cake from sticking and adds to the overall presentation. Choose ramekins that are approximately 6-ounce capacity. Having your ramekins ready will streamline the baking process. Remember to preheat your oven to 425°F (220°C) while you prepare the ingredients. This ensures the cake bakes evenly and achieves that perfect molten center.
By meticulously preparing each ingredient as described above, you lay the foundation for a flawless and decadent chocolate lava cake. Paying attention to detail during this stage is key to unlocking the recipe’s full potential.
Mixing the Batter (Wet and Dry Ingredients)
Creating the perfect chocolate lava cake hinges on the careful and precise blending of wet and dry ingredients. This section details the process, ensuring a smooth, luscious batter that yields that signature molten chocolate center.
First, gather your wet ingredients: 4 large eggs, at room temperature for optimal emulsification; 1 cup (2 sticks) unsalted butter, melted and slightly cooled; 1 cup granulated sugar; 1 teaspoon pure vanilla extract; and 1/2 cup unsweetened cocoa powder. Room temperature eggs are crucial; cold eggs can cause the batter to curdle. Similarly, ensure the melted butter is only slightly cooled – too hot and it will cook the eggs.
In a large bowl, whisk together the melted butter, sugar, and cocoa powder until completely combined and smooth. Take your time with this step; lumps of cocoa powder will result in a less-than-smooth final product. A whisk is ideal, but a sturdy spatula will also work. The mixture should be a rich, dark brown and completely free of any dry cocoa powder streaks.
Next, add the eggs one at a time, whisking vigorously after each addition. Do not add all the eggs at once. This gradual incorporation ensures proper emulsification, preventing the batter from separating. Whisk until each egg is fully incorporated before adding the next. The batter will become noticeably thicker as you add each egg.
Finally, stir in the vanilla extract. This enhances the overall flavor profile of the cake. A high-quality vanilla extract is recommended for the best results. Avoid overmixing at this stage; gentle folding is sufficient to incorporate the vanilla evenly.
Now, let’s prepare the dry ingredients: 1 cup all-purpose flour, 1/2 teaspoon baking powder, and 1/4 teaspoon salt. Sift these ingredients together in a separate bowl. Sifting the flour is essential for achieving a light and airy texture; it removes lumps and aerates the flour, preventing a gummy cake. Do not skip this step.
Gently fold the dry ingredients into the wet ingredients in three additions, ensuring each addition is fully incorporated before adding the next. Avoid overmixing; overmixing develops the gluten in the flour, resulting in a tough cake. Mix only until just combined – a few small streaks of flour are acceptable.
Once the dry ingredients are incorporated, you should have a smooth, thick batter. The batter will be slightly thicker than a typical cake batter. This is normal. Now your batter is ready to be portioned into your prepared ramekins and baked to perfection.
Baking the Lava Cakes
With your batter prepared and your ramekins buttered and sugared, it’s time to bake the stars of the show: your decadent chocolate lava cakes. Precise baking is key to achieving that perfect molten chocolate center, so follow these instructions carefully.
Preheat your oven to 425°F (220°C). This high initial temperature is crucial for creating a crisp crust while keeping the inside gooey. Don’t skip preheating; it’s the foundation for success. Place a baking sheet on the middle rack of your oven. This will provide stability for the ramekins and help distribute heat evenly.
Divide the batter evenly among your prepared ramekins. Fill each about ¾ full. Overfilling will result in overflowing lava cakes, and underfilling will yield smaller, less impressive portions. Aim for approximately 4 ounces (115g) of batter per ramekin. Use a kitchen scale for the most accurate measurements.
Carefully place the ramekins onto the preheated baking sheet. Avoid jarring or shaking the ramekins once they are in the oven; this can disrupt the batter and affect the final texture.
Bake for 12-15 minutes. This is where precise timing becomes vital. Baking time will depend on the size of your ramekins and your oven’s characteristics. Start checking for doneness around the 12-minute mark. The cakes should be set around the edges but still jiggly in the center. A toothpick inserted into the center should come out with moist crumbs attached – not completely clean, but not with wet batter either.
Overbaking is the most common mistake when making lava cakes. If the cakes are overbaked, the center will be dry and cakey instead of molten. It’s better to slightly underbake them; they will continue to cook slightly as they rest.
Once baked, immediately remove the ramekins from the oven and let them cool for a few minutes on the baking sheet before carefully transferring them to individual plates. Use oven mitts to avoid burns. The ramekins will be hot!
Allow the lava cakes to rest for another 2-3 minutes before inverting them onto plates. This allows the center to slightly set, making them easier to serve and preventing a complete chocolate eruption. Serve immediately to enjoy the warm, gooey chocolate center at its peak deliciousness.
Professional Tip: For perfectly even baking, consider using ramekins of the same size and material. Darker ramekins will absorb heat more quickly, potentially resulting in slightly faster baking times. If using dark ramekins, reduce baking time by 1-2 minutes.
Enjoy your perfectly baked chocolate lava cakes! Remember to dust with powdered sugar or serve with a scoop of vanilla ice cream or fresh berries for an extra touch of elegance and flavor.
Cooling and Setting: Achieving the Perfect Lava Cake
The cooling and setting stage is crucial for achieving that signature molten chocolate center in your lava cake. Getting this right is the difference between a delicious dessert and a disappointing, overbaked cake. It’s a delicate balance between setting the edges for structure and maintaining a lusciously runny center.
Once you remove your lava cakes from the oven, immediately let them cool in the ramekins for approximately 5-7 minutes. This initial cooling period allows the edges to firm up slightly, preventing them from collapsing when transferred to serving plates. Resist the urge to rush this step; patience is key.
After 5-7 minutes, carefully run a thin, flexible knife or offset spatula around the edges of each cake to gently loosen them from the ramekins. This helps prevent sticking and ensures a clean release. Avoid using excessive force, as the cakes are still quite delicate at this stage.
To transfer the cakes, you have two options: You can either carefully invert each ramekin onto a serving plate, allowing the cake to slide out, or you can use the knife or spatula to gently lift the cakes out. The inversion method is generally preferred as it minimizes the risk of damage, but the lifting method works well if your ramekins are particularly non-stick. Choose the method that you feel most comfortable with and proceed slowly and carefully.
Once the lava cakes are on their serving plates, allow them to cool for an additional 5-10 minutes. This additional cooling time allows the cakes to set further, while still retaining that desirable molten center. The exact cooling time will depend on factors such as the size of your ramekins, the oven temperature, and the specific recipe you’re using. If you prefer a more set cake, allow for longer cooling time. For a more intensely molten center, reduce the cooling time slightly.
Dusting with powdered sugar is a classic finishing touch, enhancing both the visual appeal and the subtle sweetness of the lava cake. A sprinkle of sea salt flakes can also be added for a sophisticated contrast in flavor and texture. Consider adding a dollop of fresh whipped cream or a scoop of vanilla ice cream to further complement the rich chocolate flavor.
Important Note: Over-cooling will result in a completely set cake, losing the signature lava effect. Under-cooling, on the other hand, may lead to a messy, unstable cake that’s difficult to handle. Therefore, carefully observe the cakes during the cooling process and adjust the timing according to your preferences and the consistency of your batter.
With careful attention to these cooling and setting instructions, you’ll be able to create perfectly decadent chocolate lava cakes that are both visually stunning and incredibly delicious. Enjoy!
Best Chocolate Lava Cake: Recommendations
Our Best Chocolate Lava Cake is designed for a truly decadent experience. To maximize enjoyment, we recommend serving it immediately after baking, while the molten chocolate center is still warm and gooey. Allow the cake to rest for 5-10 minutes after removing it from the oven to slightly cool and firm up before inverting onto a plate. This prevents the lava from immediately spilling out and ensures a more controlled presentation.
For the ultimate indulgence, we suggest serving the lava cake with a scoop of high-quality vanilla bean ice cream or a dollop of freshly whipped cream. The cool creaminess cuts through the richness of the chocolate, creating a perfect balance of textures and temperatures. A sprinkle of sea salt flakes on top also enhances the chocolate’s flavor, adding a surprising yet delightful salty-sweet contrast. Consider a drizzle of your favorite chocolate sauce or a raspberry coulis for an extra touch of elegance and flavor complexity.
Storage: Leftover lava cake (if there is any!) should be stored in an airtight container in the refrigerator for up to 2 days. However, we strongly advise enjoying it fresh from the oven for the optimal experience. Reheating is possible, but it may alter the texture of the cake, making the molten center less fluid. If you must reheat, we recommend using a microwave for short intervals, checking frequently to prevent overcooking.
Complementary Dishes: This rich and decadent dessert pairs wonderfully with lighter, contrasting flavors. A simple green salad with a light vinaigrette can cleanse the palate between bites of the intense chocolate cake. Alternatively, a fruit salad featuring berries or citrus fruits offer a refreshing counterpoint to the richness. For a more sophisticated pairing, consider a glass of dessert wine, such as a late-harvest Riesling or a tawny port, to complement the chocolate’s intensity.
Nutritional Information (per serving, approximate): Calories: 450-500; Fat: 28-32g; Saturated Fat: 18-22g; Cholesterol: 80-100mg; Sodium: 150-200mg; Carbohydrates: 50-60g; Sugar: 35-45g; Protein: 5-7g. Please note that these values are estimates and may vary depending on specific ingredients and portion sizes.
Important Note: The calorie and nutritional information provided is an approximation. The exact values may vary slightly depending on the specific ingredients used and the portion size. Always check the nutritional information of your specific ingredients for accurate calculations.