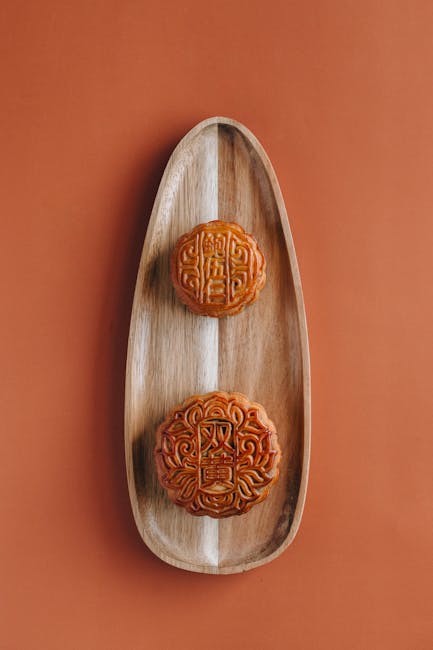
Journey with us into the enchanting world of authentic Chinese mooncakes, a culinary tradition steeped in history and brimming with cultural significance. These delectable treats are far more than just a sweet dessert; they are a symbol of family reunion, prosperity, and the harvest moon, deeply entwined with the Mid-Autumn Festival, one of the most important holidays in Chinese culture. Dating back to the Yuan Dynasty (1271-1368), mooncakes were initially used as a covert means of communication amongst rebels plotting against the Mongol rulers. Hidden messages were baked within the cakes, facilitating coordinated uprisings. This clandestine history adds a layer of intrigue to the already rich tapestry of mooncake lore.
The Mid-Autumn Festival, also known as the Moon Festival, is celebrated on the 15th day of the 8th month of the lunar calendar, when the moon is at its fullest and brightest. It’s estimated that billions of mooncakes are consumed globally each year during this festival, showcasing its immense popularity. The traditional mooncake is typically round, symbolizing the full moon and family togetherness. Over centuries, countless variations have emerged, each reflecting regional preferences and culinary artistry. From the classic lotus seed paste filling to the more contemporary flavors like custard, ice cream, and even chocolate, the diversity is staggering, offering a delightful exploration for the palate.
The intricate designs stamped onto the mooncake’s surface are another testament to the artistry involved. These patterns often depict scenes from nature, mythology, or auspicious symbols, further enhancing their symbolic meaning. The golden-brown crust, often achieved through baking in traditional wood-fired ovens, contributes to the mooncake’s captivating aesthetic appeal. Beyond the individual enjoyment, the act of sharing mooncakes with loved ones is a cherished tradition, strengthening family bonds and fostering a sense of community. The exchange of mooncakes transcends mere gifting; it’s a powerful expression of affection and shared celebration.
While mass-produced mooncakes are readily available, the true essence of authentic Chinese mooncakes lies in the meticulous craftsmanship and use of high-quality ingredients. Many families still cling to age-old recipes, passed down through generations, ensuring the continuation of this culinary heritage. The subtle nuances in flavor and texture, achieved through careful attention to detail, distinguish authentic mooncakes from their mass-produced counterparts. So, as you indulge in this exquisite treat, remember you’re partaking in a centuries-old tradition, a cultural legacy that continues to unite families and communities across the globe.
Ingredients and Measurements: Authentic Chinese Mooncakes
Creating authentic Chinese mooncakes requires precise measurements and high-quality ingredients. The success of your mooncakes hinges on the careful balance of these components. This section details the ingredients and their respective quantities for a batch yielding approximately 8 mooncakes, using metric measurements. Feel free to adjust the recipe proportionally for larger or smaller batches.
For the Lotus Seed Paste Filling (approx. 500g):
- 250g White Lotus Seed Paste (single-bean is preferred for a smoother texture): Ensure your lotus seed paste is of good quality; the flavor will significantly impact the final taste of your mooncakes. Avoid those with excessive sugar or preservatives.
- 100g Fine Sugar (adjust to your preference): Granulated sugar works best for dissolving evenly. Powdered sugar can lead to a drier filling.
- 50g Vegetable Oil (neutral flavored): This adds richness and prevents the filling from becoming overly dry. Use a high-smoke-point oil like canola or grapeseed oil.
- 25g Milk Powder (optional, for added creaminess): This is optional but enhances the texture and adds a subtle dairy note.
- 1 tbsp Water (or more, as needed): Add water gradually to adjust the consistency of the paste. The filling should be smooth and pliable, not too wet or too dry.
For the Mooncake Dough (approx. 300g):
- 150g All-Purpose Flour (cake flour can also be used for a slightly softer texture): Using high-gluten flour is not recommended; it will make the dough tough.
- 50g Vegetable Shortening (or Lard for a richer flavor): Shortening or lard contributes to the characteristic flaky texture. Using only oil will result in a denser mooncake.
- 30g Alkaline Water (Kansui): This is crucial for the characteristic color and flavor of mooncakes. Use a food-grade alkaline water solution; improper usage can cause an unpleasant taste. It is typically available at Asian grocery stores.
- 70g Sugar (adjust to your preference): The sugar level in the dough balances the sweetness of the filling.
For Egg Wash (optional, for a glossy finish):
- 1 large Egg Yolk: Use only the yolk for a richer color.
- 1 tsp Water: This thins the egg wash for better spreading.
Important Notes:
Weighing your ingredients is crucial for consistent results. Using volume measurements can lead to variations in the final product. Ensure all ingredients are at room temperature before mixing. Proper mixing techniques are essential for both the filling and the dough. Overmixing can lead to a tough dough or a gummy filling. Finally, allow your mooncakes to rest properly after baking for optimal flavor development.
The exact quantities may need slight adjustments based on the specific brands of ingredients used and moisture content. Observe the consistency of your dough and filling; you might need to slightly adjust the amount of water or oil to achieve the desired texture.
Lotus Seed Paste Preparation
Creating authentic lotus seed paste is a crucial step in making exquisite Chinese mooncakes. The quality of your paste directly impacts the final flavor and texture of the mooncakes. This section details the process, from preparing the lotus seeds to achieving the perfect smooth and subtly sweet paste.
Ingredients:
- 500g dried lotus seeds (preferably the large variety, known for their creaminess)
- 300g granulated sugar (adjust to your preference; you can use rock sugar for a more traditional flavor)
- 100ml water (or more, as needed for consistency)
- 2 tablespoons unsalted butter (optional, for added richness)
- 1 teaspoon vegetable oil (optional, to prevent sticking)
Instructions:
1. Cleaning and Soaking: Rinse the dried lotus seeds thoroughly under cold running water to remove any debris. Soak the seeds in ample cold water for at least 6 hours, or preferably overnight. This step significantly softens the seeds, making them easier to process. Ensure the seeds are completely submerged during soaking.
2. Boiling the Lotus Seeds: Drain the soaked lotus seeds and place them in a large pot. Add fresh water, enough to cover the seeds by about 2 inches. Bring the water to a boil over high heat, then reduce the heat to medium-low and simmer for approximately 45-60 minutes, or until the seeds are tender and easily pierced with a fork. Regularly check the water level and add more if necessary to prevent burning.
3. Peeling the Lotus Seeds: Once the lotus seeds are cooked, drain them and let them cool slightly. The outer skins should now be easily removed. This can be done manually by gently squeezing each seed between your thumb and forefinger. Be patient and thorough; removing all the skins is essential for a smooth paste. You may find using a small knife helpful for stubborn skins.
4. Pureeing the Lotus Seeds: Transfer the peeled lotus seeds to a food processor or blender. Add the sugar and begin processing. If using a food processor, you may need to stop and scrape down the sides several times to ensure even processing. Gradually add water, a tablespoon at a time, until you achieve the desired consistency – a smooth, slightly sticky paste. Avoid adding too much water at once, as this can make the paste too thin.
5. Refining the Paste (Optional): For an ultra-smooth paste, pass the mixture through a fine-mesh sieve. This removes any remaining fibrous bits and ensures a luxurious texture.
6. Final Touches: If using, stir in the butter and vegetable oil. This adds richness and helps prevent the paste from drying out. Taste the paste and adjust the sugar if needed. The paste should be subtly sweet, not overly sugary.
7. Storage: Store the prepared lotus seed paste in an airtight container in the refrigerator. It can be kept for up to a week. For longer storage, consider freezing the paste in portions.
Professional Recommendation: Using high-quality lotus seeds is paramount. The taste and texture of your mooncakes will significantly benefit from selecting premium ingredients. Experiment with different sugar types to find your preferred sweetness level. Remember, patience and attention to detail are key to achieving the perfect lotus seed paste.
Pastry Dough Preparation
The pastry dough, or yuebing pi (月饼皮), is crucial to the success of authentic Chinese mooncakes. Its texture – rich, slightly flaky, and subtly sweet – complements the dense, flavorful fillings. This recipe yields enough dough for approximately 8 mooncakes, each approximately 75g in weight.
Ingredients:
- 150g all-purpose flour (cake flour works well too for a softer texture)
- 50g shortening (vegetable shortening is preferred for its neutral flavor)
- 30g lard (optional, but adds richness and flakiness – substitute with additional shortening if omitting)
- 25g granulated sugar
- 60-70g cold water (add gradually)
- 1/4 teaspoon alkaline water (kansui, optional, adds a slight yellow hue and enhances flavor)
Instructions:
Step 1: Prepare the Fats: Cut the shortening and lard (if using) into small cubes. Ensure they are very cold, even slightly chilled. This is crucial for achieving a flaky texture. Place the cubed fats into a large bowl.
Step 2: Combine Dry Ingredients: In a separate bowl, whisk together the flour and sugar until well combined. If using alkaline water, add it to the flour mixture now.
Step 3: Cut in Fats: Gradually add the flour mixture to the bowl with the fats. Using a pastry blender or your fingertips, cut the fats into the flour until the mixture resembles coarse crumbs. Work quickly and avoid overmixing, as this will develop the gluten and result in a tough pastry.
Step 4: Add Water Gradually: Slowly add the cold water, a tablespoon at a time, while gently mixing with a spatula or your hands. Do not add all the water at once. The dough should come together but still feel slightly crumbly. Avoid kneading at this stage.
Step 5: Form the Dough: Gently gather the dough into a ball. Wrap it tightly in plastic wrap and refrigerate for at least 30 minutes (or up to 2 hours). This resting period allows the gluten to relax and the fats to firm up, resulting in a more tender and flaky pastry.
Step 6: Final Preparation: After chilling, remove the dough from the refrigerator. Lightly dust your work surface with flour. Gently knead the dough for a minute or two until it is smooth and pliable. Do not over-knead. Divide the dough into equal portions (approximately 30g each for 8 mooncakes), roll each portion into a smooth ball, and you’re ready to assemble your mooncakes.
Professional Recommendations:
- Use cold ingredients: Cold fats and water are key to a flaky crust.
- Avoid overmixing: Overmixing develops gluten, leading to a tough pastry.
- Chill the dough: Chilling allows the gluten to relax and the fats to firm, resulting in a better texture.
- Adjust water as needed: The amount of water required may vary depending on the type of flour used and the humidity.
Mooncake Assembly: A Step-by-Step Guide
Assembling mooncakes is a delicate process requiring patience and precision. The success of your mooncakes hinges on properly wrapping the filling and ensuring a smooth, even surface for baking. This section will guide you through the process, offering tips for achieving perfect results.
Prepare your work surface: Lightly dust your work surface with cornstarch or potato starch to prevent sticking. This is crucial, as the mooncake dough can be quite sticky. Having a clean, well-prepared area will make the entire process much smoother.
Weigh your ingredients: Accuracy is key in baking. Use a kitchen scale to weigh both the mooncake dough and the filling. For a standard mooncake (approximately 50g), you will need approximately 25g of dough and 25g of filling. Adjust these measurements according to your mooncake mold size.
Divide the dough: Once you’ve weighed your dough, divide it into equal portions, matching the number of mooncakes you intend to make. Roll each portion into a smooth ball. Ensure each dough ball is consistent in size for uniform mooncakes.
Prepare the filling: If your filling is not already formed into balls, divide it into portions equal to the amount of dough, ensuring consistency in size. Press the filling lightly into a smooth, round disc. This will help it hold its shape during assembly.
Assemble the mooncakes: Gently flatten a dough ball in your palm, creating a small, slightly indented disc. Place a filling ball in the center of the flattened dough. Carefully bring the edges of the dough together, completely encasing the filling. Seal the edges firmly, ensuring no cracks are visible. Roll the dough ball gently between your palms to create a smooth, round shape. Avoid applying too much pressure, as this can cause the filling to leak.
Shape the mooncakes: Once the mooncakes are assembled, use your mooncake mold to imprint the desired pattern. Lightly dust the mold with cornstarch or potato starch to prevent sticking. Place the mooncake ball into the mold, ensuring it fills the cavity evenly. Press firmly but gently to create a clear impression. Invert the mold to release the mooncake.
Arrange for baking: Place the assembled mooncakes onto a baking sheet lined with parchment paper. Leave some space between each mooncake to allow for even baking. Before baking, lightly brush the tops of the mooncakes with egg wash (a mixture of egg yolk and a little water or oil) for a glossy finish. This step is optional but highly recommended for a traditional look and feel.
Professional recommendation: Practice makes perfect! Don’t be discouraged if your first attempt isn’t flawless. With practice, you will become more proficient in assembling beautifully shaped mooncakes. Consider making a smaller batch initially to hone your technique before attempting a large quantity.
Troubleshooting: If the dough is too sticky, add a small amount of flour, one teaspoon at a time, until it reaches the desired consistency. If the filling is leaking, ensure the dough is completely sealed around the filling. If the mooncakes are sticking to the mold, use more cornstarch or potato starch.
Baking Instructions for Authentic Chinese Mooncakes
Baking authentic Chinese mooncakes requires precision and patience. The following instructions are designed to guide you through the process, resulting in perfectly textured and flavored mooncakes. Remember that oven temperatures can vary, so close monitoring is crucial.
Preheat your oven to 350°F (175°C) for at least 30 minutes before baking. This ensures even heat distribution throughout the baking process. Using a convection oven is recommended, but a standard oven will work as well. If using a standard oven, consider rotating the baking sheet halfway through for even browning.
Prepare your baking sheet: Line a baking sheet with parchment paper. This prevents sticking and makes cleanup easier. Lightly grease the parchment paper with a neutral-flavored oil like vegetable oil or canola oil to further prevent sticking.
Arrange the mooncakes: Gently place your assembled mooncakes onto the prepared baking sheet, leaving about 1 inch of space between each mooncake. This allows for proper air circulation and prevents them from sticking together during baking.
First Bake (Initial Setting): Bake the mooncakes for 5 minutes at 350°F (175°C). This initial bake helps set the shape and prevents cracking. Do not open the oven door during this initial 5-minute period.
Reduce Oven Temperature: After the initial 5 minutes, reduce the oven temperature to 300°F (150°C). This lower temperature ensures the mooncakes bake thoroughly without burning the exterior.
Continue Baking: Continue baking the mooncakes for 10-15 minutes, rotating the baking sheet halfway through for even browning. The baking time will depend on the size and filling of your mooncakes. Smaller mooncakes will require less baking time, while those with a higher moisture content (like lotus seed paste) may require slightly longer.
Check for Doneness: The mooncakes are done when the bottoms are golden brown and the tops are firm to the touch. Gently press the top of a mooncake; if it feels firm and doesn’t indent easily, it’s likely ready. Overbaking can result in dry, hard mooncakes, so it’s better to slightly underbake than overbake.
Cooling and Post-Baking: Remove the baking sheet from the oven and let the mooncakes cool completely on a wire rack. This allows for even cooling and prevents moisture from becoming trapped inside, which can lead to mold. Allow at least 2-3 hours for complete cooling.
Optional: Egg Wash for Gloss: For a glossy finish, you can brush the mooncakes with an egg wash (1 egg yolk beaten with 1 tablespoon of water) before the initial 5-minute bake. This will add a beautiful sheen to the mooncakes. Apply the egg wash lightly to avoid cracking.
Storage: Once completely cool, store your mooncakes in an airtight container at room temperature for up to a week. For longer storage, consider freezing them. Proper storage is vital to maintain the texture and flavor of your mooncakes.
Remember, these are guidelines; adjust baking times based on your oven and the specific recipe you are using. Enjoy your homemade authentic Chinese mooncakes!
Cooling and Storage of Authentic Chinese Mooncakes
Proper cooling and storage are crucial for maintaining the quality and deliciousness of your authentic Chinese mooncakes. These delicate pastries, often laden with rich fillings and delicate crusts, require careful handling to prevent spoilage and maintain their texture.
Cooling Freshly Baked Mooncakes: Once your mooncakes emerge from the oven, they will be quite soft. Allow them to cool completely at room temperature on a wire rack for at least 2-3 hours. This prevents condensation from forming on the surface, which can lead to a soggy crust. Avoid stacking them while they are still warm, as this can trap moisture and hinder the proper setting of the pastry.
Traditional Aging Process (Optional but Recommended): Authentic Chinese mooncakes benefit from a period of aging. This process allows the flavors to meld and deepen, resulting in a more complex and enjoyable taste. After cooling completely, place the mooncakes on a wire rack or in a single layer on a plate. Leave them at room temperature for 2-3 days, or even up to a week, in a cool, dry environment. This allows the moisture within the mooncake to redistribute, resulting in a firmer texture and more balanced taste. Ensure good air circulation to prevent mold growth.
Refrigeration: Once the mooncakes have cooled and optionally undergone the aging process, they can be stored in the refrigerator. Wrap each mooncake individually in plastic wrap or place them in airtight containers. This prevents them from drying out or absorbing odors from other foods. Refrigeration extends the shelf life to approximately 2-3 weeks. However, note that refrigeration can slightly alter the texture, making them slightly firmer.
Freezing for Long-Term Storage: For longer storage, freezing is an excellent option. Wrap each mooncake individually in plastic wrap, then place them in a freezer-safe bag or container. Freezing can preserve the mooncakes for up to 3 months. To thaw, remove a mooncake from the freezer and allow it to thaw at room temperature for several hours before consuming. Avoid thawing in the microwave, as this can affect the texture.
Important Considerations:
- Avoid direct sunlight: Sunlight can cause the mooncakes to dry out and their flavors to degrade.
- Maintain proper humidity: Excessive humidity can lead to mold growth, while excessively dry conditions can cause the mooncakes to become hard and brittle.
- Check for spoilage: Before consuming, always check for any signs of mold, discoloration, or unusual odors. If any are present, discard the mooncake.
- Room temperature serving: For optimal enjoyment, allow refrigerated or frozen mooncakes to reach room temperature before serving. This allows the flavors to fully develop and the texture to become more enjoyable.
By following these guidelines, you can ensure that your homemade authentic Chinese mooncakes retain their delicious taste and texture for as long as possible, allowing you to savor them throughout the mooncake festival and beyond.
Authentic Chinese Mooncakes: Recommendations
Our Authentic Chinese Mooncakes are crafted with the finest ingredients and traditional recipes, ensuring an exquisite taste experience. To best enjoy these delectable treats, we offer the following recommendations:
Serving Suggestions: Mooncakes are traditionally enjoyed during the Mid-Autumn Festival, often shared amongst family and friends. However, their rich flavor profile makes them a delightful treat any time of year. For the optimal experience, we suggest serving them at room temperature. Allow the mooncakes to sit at room temperature for about 15-20 minutes before serving to allow the flavors to fully develop. This will help soften the pastry and enhance the overall taste and texture. You can also gently warm the mooncake in a microwave for a few seconds for a slightly softer experience, but be careful not to overheat it. Consider pairing a slice with a cup of strong tea, such as oolong or jasmine tea, to balance the sweetness and richness of the mooncake.
Storage Conditions: To maintain the freshness and quality of your mooncakes, proper storage is crucial. Unopened mooncakes should be stored in a cool, dry place, away from direct sunlight and strong odors. Once opened, we recommend storing the mooncakes in an airtight container in the refrigerator to prevent them from drying out. While refrigeration will extend their shelf life, it may slightly alter the texture. Consume within 3-5 days of opening for optimal flavor and texture. Do not freeze mooncakes.
Complementary Dishes: The rich and often sweet filling of our mooncakes pairs beautifully with a variety of dishes. A light and refreshing palate cleanser, such as a simple fruit salad or a scoop of vanilla ice cream, can be a wonderful complement to the richness of the mooncake. For a more savory pairing, consider serving alongside a light soup or a delicate vegetable dish. The subtle sweetness of the mooncake can beautifully contrast with the savory flavors. Alternatively, a strong brew of tea, as mentioned previously, serves as a perfect complement, cutting through the richness and enhancing the overall tasting experience.
Nutritional Information (per serving, approximately 1/4 mooncake): Nutritional values vary slightly depending on the specific flavor. However, a typical serving contains approximately:
- Calories: 350-450
- Total Fat: 20-25g
- Saturated Fat: 10-15g
- Cholesterol: 30-50mg
- Sodium: 150-250mg
- Total Carbohydrate: 40-50g
- Sugars: 25-35g
- Protein: 5-7g
Note: These values are estimates and may vary based on the specific ingredients and preparation methods. Please refer to the individual product packaging for the most accurate nutritional information.
We hope you enjoy our Authentic Chinese Mooncakes! Please don’t hesitate to contact us if you have any further questions.