Prepare yourself for a culinary journey into the decadent world of Caramel Flan, a dessert whose smooth, creamy texture and rich caramel topping have captivated palates for centuries. Its origins are steeped in history, with many tracing its ancestry back to the Spanish flan, itself a descendant of ancient Roman desserts featuring eggs and milk. The precise origin remains debated, with some attributing its evolution to the influence of French cuisine in Spain during the 18th century, resulting in the rich caramel sauce we know and love today. Others suggest an even earlier lineage, connecting it to the custard-like desserts found in various cultures throughout history.
Regardless of its exact beginnings, Caramel Flan’s popularity has transcended borders and generations. It’s a cornerstone dessert in many Latin American and Spanish-speaking countries, often appearing as a celebratory dish during holidays and special occasions. In fact, according to a recent survey, flan is among the top three most popular desserts in many Spanish-speaking nations, demonstrating its enduring appeal. This widespread popularity is hardly surprising, given its versatility. The basic recipe can be adapted to include countless variations, from adding spices like cinnamon or nutmeg to incorporating fruits like dulce de leche or coffee. This adaptability, combined with its relative ease of preparation (once you master the basics!), has contributed to its global ubiquity.
Beyond its deliciousness, Caramel Flan holds significant cultural weight. It’s often associated with family traditions, passed down through generations, with each family adding its unique twist to the recipe. This makes each Flan a unique reflection of its creator’s heritage and culinary identity. The act of making and sharing Flan is frequently a social event, fostering connections and celebrating shared moments. More than just a dessert, it’s a symbol of comfort, warmth, and familial bonding. This recipe will guide you through the process of crafting this beloved classic, enabling you to experience its rich history and cultural significance firsthand.
Ingredients and Measurements
Creating the perfect caramel flan requires precise measurements and high-quality ingredients. The success of your flan hinges on the balance of sweetness, richness, and the delicate texture of the custard. Don’t skimp on the good stuff!
For the Caramel:
- 1 cup (200g) granulated sugar: Use a fine granulated sugar for even caramelisation. Avoid using coarse sugar, as it may burn unevenly.
- 1/4 cup (60ml) water: This small amount of water is crucial for initiating the caramelisation process. Don’t add more; it will dilute the caramel.
For the Custard:
- 1 (14 ounce) can sweetened condensed milk (397g): Using sweetened condensed milk is key to the flan’s creamy texture and sweetness. Do not substitute with evaporated milk.
- 2 large eggs: Room temperature eggs will incorporate more smoothly into the custard mixture, resulting in a silkier texture. Let your eggs sit at room temperature for at least 30 minutes before use.
- 1 (12 ounce) can evaporated milk (355ml): The addition of evaporated milk contributes to the flan’s richness and helps achieve a smooth, creamy consistency. Make sure to shake the can well before using.
- 1 teaspoon pure vanilla extract: A high-quality vanilla extract will greatly enhance the overall flavor profile of your flan. Avoid using imitation vanilla.
- Pinch of salt: A pinch of salt balances the sweetness and enhances the overall flavor. It’s a crucial but often overlooked ingredient.
Important Note on Measurements: Using a kitchen scale for measuring your ingredients, particularly the sugar, will ensure accuracy and consistency in your caramel and custard. While volume measurements are provided, weight measurements are often more precise in baking and will yield the best results.
Professional Tip: If you are concerned about the eggs imparting a slightly eggy taste, you can pass the custard mixture through a fine-mesh sieve before pouring it into the prepared ramekins. This will remove any potential bits of egg white and create an exceptionally smooth texture.
Preparation of Caramel
Creating the perfect caramel for your flan is crucial; it’s the foundation of this delightful dessert. The key is patience and close attention to the sugar’s transformation. We’ll be making a classic caramel using granulated sugar and water. Avoid using brown sugar for this step, as it burns more easily and may result in a bitter caramel.
Begin by measuring out 1 cup (200g) of granulated white sugar. Use a heavy-bottomed saucepan; this helps distribute the heat evenly and prevents scorching. Add ¼ cup (60ml) of water to the saucepan. Do not stir the mixture at this point.
Place the saucepan over medium heat. As the sugar and water mixture heats, you’ll notice the sugar will begin to dissolve. Resist the urge to stir; swirling the pan gently might be necessary to encourage even melting, but avoid direct stirring with a spoon. The goal is to create a smooth, clear syrup.
As the mixture heats, the sugar will gradually melt and turn into a light amber color. This process requires patience. Increase the heat slightly as needed, but be careful to avoid burning the sugar. A burnt caramel will be extremely bitter and ruin the final product.
Once the sugar has completely melted and turned a rich amber color, you’ll notice a significant thickening. This is the perfect time to add a splash of water (about 1-2 tablespoons) to deglaze the sides of the pan and ensure all the sugar is caramelized. This will also help to reduce the risk of crystallization. Work quickly and carefully as the caramel is extremely hot.
Continue to cook, swirling the pan occasionally, until the caramel reaches a deep amber color, almost bordering on dark brown. This darker color will result in a more intense caramel flavor. Be mindful not to overcook, as this can lead to bitterness.
Once the desired color is achieved, immediately remove the saucepan from the heat. Carefully pour the hot caramel into your prepared flan molds, tilting the pan to coat the bottom and sides evenly. Work quickly and cautiously as the caramel is extremely hot. Allow the caramel to cool and harden completely before proceeding with the rest of the flan recipe.
Important Note: Always use caution when working with hot sugar. If you experience any splattering, immediately turn the heat down and allow the mixture to settle before resuming. Never add water to a fire in the pan. Always add water slowly and carefully.
Egg Mixture Preparation
Creating the perfect custard base for your caramel flan is crucial. This section details the preparation of the smooth, rich egg mixture that will ultimately determine the texture and flavor of your final dessert. Pay close attention to each step to achieve optimal results.
Begin by separating 6 large eggs. Ensure you separate the yolks and whites completely; even a tiny speck of yolk in the whites can prevent them from whipping properly. It’s recommended to separate them one at a time over a separate bowl to catch any accidental yolk drops. Once separated, set the egg whites aside – we won’t be using them in this recipe, although they can be used for another purpose later.
In a large bowl, whisk together the 6 egg yolks with ¾ cup (150g) of granulated sugar. Whisk vigorously until the mixture is pale and slightly thickened, and the sugar is completely dissolved. This process usually takes about 3-5 minutes. Don’t rush this step; thorough whisking is key to a smooth and creamy flan.
Next, gradually whisk in 1 cup (240ml) of whole milk. Add the milk slowly in a thin stream, whisking constantly to prevent the eggs from scrambling. This gradual addition helps to temper the eggs and prevents them from curdling.
Following the milk, add ½ cup (120ml) of heavy cream. Again, whisk gently but continuously until the mixture is fully combined and homogenous. The heavy cream adds richness and a luxurious texture to the flan.
Finally, incorporate 1 teaspoon of pure vanilla extract. Vanilla extract enhances the overall flavor profile of the flan, complementing the sweetness of the caramel and the richness of the custard. Stir gently to distribute the vanilla evenly throughout the mixture.
Once all the ingredients are thoroughly incorporated, strain the egg mixture through a fine-mesh sieve into a separate bowl. Straining removes any lumps or bits of egg white that might have accidentally gotten into the mixture, ensuring a perfectly smooth and elegant final product. This step significantly improves the texture of your flan.
Your egg mixture is now ready to be combined with the caramel and baked. Remember to follow the recipe instructions carefully for the baking process to ensure a perfectly set and delicious caramel flan.
Baking the Flan
Baking the flan requires a water bath, also known as a bain-marie, which ensures even cooking and prevents cracking. This gentle, indirect heat is crucial for achieving a perfectly smooth and creamy texture. First, preheat your oven to 350°F (175°C). This temperature is ideal for a slow and steady bake, allowing the custard to set properly without scorching.
Next, prepare your water bath. Find a larger baking dish that will comfortably hold your flan ramekins. It should be deep enough so that the water comes about halfway up the sides of the ramekins. Do not fill it completely, as the water will boil and potentially overflow during baking.
Carefully place your filled ramekins into the larger baking dish. Gently pour hot tap water into the baking dish until it reaches the halfway point of the ramekins. This is important to ensure even heat distribution and prevent sudden temperature changes that can cause cracking. Avoid splashing water directly onto the flan’s surface.
Transfer the baking dish to the preheated oven. Bake for 50-60 minutes, or until the flan is set. The center should still have a slight jiggle, but it shouldn’t be completely liquid. A knife inserted near the center should come out clean or with only a few moist crumbs attached. Overbaking will result in a dry, rubbery flan.
Once baked, carefully remove the baking dish from the oven using oven mitts. Let the flan cool completely in the water bath. This slow cooling process helps prevent cracking and ensures a smoother, more elegant finish. Allow at least 2 hours for complete cooling, or even better, let it cool overnight in the refrigerator.
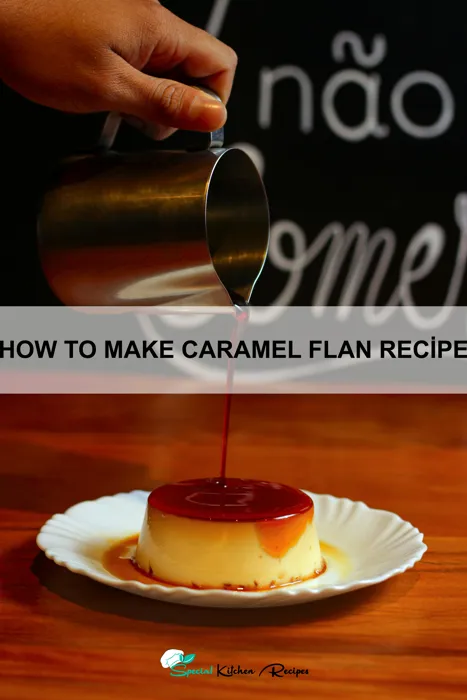
After cooling, carefully remove the ramekins from the water bath. To unmold the flan, run a thin knife or spatula around the edges of the ramekin to loosen the flan. Then, invert a serving plate onto the ramekin and quickly flip it over. The caramel will cascade beautifully over the flan. If the flan is reluctant to release, run the ramekin under warm water for a few seconds.
Finally, garnish your perfectly baked flan with fresh berries, whipped cream, or a sprinkle of cocoa powder. Serve chilled and enjoy this delicious dessert!
Cooling and Chilling
The cooling and chilling process is crucial for achieving the perfect caramel flan. Improper cooling can lead to cracks in the custard or a grainy texture. Patience and careful technique are key to success.
Once you’ve removed your caramel flan from the bain-marie (water bath), allow it to cool completely at room temperature. This typically takes about 1-2 hours. Resist the urge to rush this step; rapid cooling can cause the custard to crack. The flan should cool gradually and evenly to prevent thermal shock.
During this initial cooling period, leave the flan in its baking dish. The water bath provides insulation and helps to maintain a consistent temperature, preventing rapid cooling. Do not disturb the flan during this stage. Any sudden movement could cause the delicate custard to crack or separate.
After the flan has cooled to room temperature, carefully transfer it to the refrigerator. This is where the magic happens. Refrigerate for at least 4 hours, or preferably overnight. This chilling period allows the custard to fully set, developing its signature smooth and creamy texture. The longer it chills, the firmer and more stable the flan will become.
Before serving, gently run a thin, sharp knife around the edges of the flan to loosen it from the sides of the baking dish. This prevents sticking and ensures a clean release. Invert the flan onto a serving plate. A slight jiggle should release the flan effortlessly. If it’s sticking, carefully run the knife around the edges again. You may use a serving plate slightly larger than the baking dish.
Important Note: If you notice any cracks in the flan after cooling, it’s usually due to rapid temperature changes. Don’t worry, it won’t affect the taste. You can try to disguise the cracks with a dusting of powdered sugar or a drizzle of extra caramel.
Once inverted, admire your beautifully smooth and glossy caramel flan. The chilling process has ensured a firm, jiggly texture, and a perfect balance of sweet caramel and creamy custard. Serve chilled and enjoy!
Unmolding the Flan: A Step-by-Step Guide
Unmolding your caramel flan perfectly requires a gentle touch and a bit of preparation. The key is to ensure a clean release from the mold without cracking or breaking the delicate custard. Before you begin, prepare a serving plate slightly larger than your flan mold. This will provide stability during the unmolding process.
Important Note: Allow your flan to cool completely to room temperature before attempting to unmold it. This process can take several hours, or you can speed it up by placing the flan in the refrigerator for at least 2-3 hours. A chilled flan is much firmer and less likely to break.
Once the flan is thoroughly chilled, run a thin, flexible knife or offset spatula around the edges of the mold, carefully separating the flan from the sides. This will help to prevent sticking and ensure a clean release. Do this slowly and gently; applying too much pressure can crack the custard.
Next, place your serving plate firmly on top of the flan mold. Using one hand to hold the plate securely against the mold, carefully invert the entire mold and plate. Hold the mold and plate firmly together for a few seconds to allow the flan to settle onto the plate. Slowly lift the mold; if the flan doesn’t release immediately, gently jiggle the mold while continuing to hold the plate.
If the flan stubbornly refuses to release, you can try running a thin stream of warm (not hot) water between the flan and the mold for a few seconds. The warm water will help to loosen any stubborn adhesion. Avoid using hot water, which could cause the flan to crack.
Once the flan is successfully unmolded, you should have a beautiful, smooth, and perfectly intact caramel flan sitting on your serving plate. Admire your handiwork! The glossy caramel sauce will be cascading down the sides, adding an irresistible visual appeal. If any caramel remains stuck to the mold, you can gently scrape it off with a spatula and drizzle it over the unmolded flan.
Troubleshooting: If your flan cracks during the unmolding process, don’t worry! It still tastes delicious. You can simply arrange the cracked pieces attractively on the plate and the caramel sauce will help to disguise any imperfections.
Professional Tip: Using a non-stick flan mold makes unmolding significantly easier. If you don’t have a non-stick mold, lightly greasing the inside of the mold with cooking spray can also help prevent sticking.
Recommendations
For the best results when making Caramel Flan, ensure your eggs are at room temperature for a smoother, more evenly cooked custard. Over-baking will result in a rubbery texture, so closely monitor baking time and use a toothpick to check for doneness – it should come out with just a few moist crumbs attached. Allow the flan to cool completely before chilling to prevent cracking. This slow cooling process is crucial for a perfect, silky texture.
Serving suggestions are endless! This classic dessert is delightful on its own, but it can also be elevated with a dusting of cinnamon, a sprinkle of chopped nuts (like pecans or almonds), or a dollop of whipped cream. A drizzle of caramel sauce adds extra richness and sweetness. Consider serving it with fresh berries for a contrasting tartness and vibrant color.
Storage: Once completely cooled, cover the flan tightly with plastic wrap, pressing it directly onto the surface to prevent a skin from forming. Refrigerate for up to 3 days. The flan will maintain its texture and flavor best within this timeframe. Do not freeze, as freezing can alter the texture, making it icy or grainy upon thawing.
Complementary Dishes: Caramel flan pairs beautifully with strong coffee or a dessert wine like Pedro Ximénez sherry. It also makes a wonderful ending to a meal featuring lighter, savory components, balancing richer dishes like grilled chicken or fish. Consider serving it alongside a refreshing fruit salad or a light sorbet to cleanse the palate.
Nutritional Information (approximate per serving, based on a 6-serving recipe): Calories: 250-300, Fat: 15-20g, Saturated Fat: 10-15g, Cholesterol: 150-200mg, Carbohydrates: 25-30g, Sugar: 20-25g, Protein: 5-7g. Note: Nutritional information can vary based on the specific ingredients and quantities used. This is an estimate and should be considered as such.
Important Note: Always exercise caution when working with hot caramel. It can cause severe burns. Allow the caramel to cool slightly before adding it to the custard and handle it with care.