The humble chicken breast, a staple in kitchens worldwide, boasts a surprisingly rich history and cultural significance, far exceeding its simple appearance. While pinpointing the exact origin of grilling chicken is difficult, evidence suggests that humans have been cooking poultry over open flames for millennia. Archaeological findings indicate that early civilizations, including those in ancient Greece and Rome, enjoyed roasted or grilled birds as part of their diets. The technique of grilling, itself, transcends specific cultures; it’s a primal method of cooking, utilizing readily available heat sources to tenderize and flavor meat. This fundamental approach has been adapted and refined across countless communities, resulting in the vast array of grilled chicken preparations we see today.
In modern times, the popularity of grilled chicken breasts has skyrocketed. Statistics show that chicken is the most consumed meat in the United States, with per capita consumption exceeding 90 pounds annually. This surge in popularity is partly attributed to its versatility, affordability, and perceived health benefits compared to other meats. It’s a lean protein source, relatively low in fat, and easily incorporated into various cuisines. The simplicity of grilling chicken breasts further contributes to its widespread appeal; it’s a quick cooking method, perfect for busy weeknights. However, achieving that ‘perfectly’ grilled breast – juicy, tender, and with beautifully browned skin – remains a challenge for many home cooks.
Culturally, grilled chicken transcends geographical boundaries. From the classic American BBQ to the Peruvian pollo a la brasa (rotisserie chicken), grilled chicken appears in countless regional variations, each showcasing unique marinades, seasonings, and cooking techniques. In many cultures, grilled chicken is associated with social gatherings and celebrations. Family barbecues, summer picnics, and outdoor feasts often center around this versatile protein. The smoky aroma and satisfying char of grilled chicken evoke feelings of warmth, togetherness, and carefree enjoyment. This recipe aims to provide a foundation for creating your own perfect grilled chicken breasts, allowing you to explore the endless possibilities of flavors and techniques, and build your own culinary traditions around this timeless dish.
This recipe focuses on achieving the perfect balance of flavor and texture. We will explore the importance of proper preparation, including selecting the right chicken breasts, utilizing effective marinades, and mastering the art of grilling over different heat sources. Understanding the principles of heat control and knowing when to adjust the cooking time based on thickness are crucial to avoiding dry or undercooked chicken. Ultimately, this recipe strives to empower you to confidently grill delicious, juicy chicken breasts every time, no matter your experience level.
Ingredients and Measurements
The success of perfectly grilled chicken breasts hinges on using high-quality ingredients and precise measurements. This recipe calls for simple, readily available items, but the attention to detail in measuring will make all the difference in the final product’s tenderness and flavor.
Chicken Breasts: We’ll start with 4 boneless, skinless chicken breasts. Aim for breasts that are roughly the same size and thickness for even cooking. Approximately 6 ounces each is ideal. If you have larger breasts, consider butterflying them (slicing them horizontally almost all the way through to create thinner pieces) to ensure they cook through without drying out. Smaller breasts will cook faster, so keep a close eye on them during grilling.
Marinade (Optional, but Highly Recommended): A marinade not only adds incredible flavor but also helps to keep the chicken incredibly moist. This recipe uses a simple yet effective marinade. You will need:
- 1/4 cup Olive Oil: Use a high-quality extra virgin olive oil for the best flavor. Avoid using overly-flavored oils that might overpower the chicken’s taste.
- 2 tablespoons Lemon Juice: Freshly squeezed lemon juice is best, providing a brighter, more vibrant flavor than bottled juice. About one medium-sized lemon should suffice.
- 1 tablespoon Dijon Mustard: The tang of Dijon mustard adds a nice complexity to the marinade.
- 1 teaspoon Garlic Powder: Use freshly ground garlic powder for maximum impact. Avoid using garlic salt, as the added sodium can affect the overall seasoning.
- 1 teaspoon Dried Oregano: Dried oregano is readily available and provides a lovely Mediterranean touch. Fresh oregano can be substituted, using about 2 tablespoons.
- 1/2 teaspoon Black Pepper: Freshly cracked black pepper is always best. Adjust to your taste preference.
- 1/2 teaspoon Salt: Use kosher salt or sea salt for even distribution and better flavor. Avoid using iodized salt, as it can sometimes impart a metallic taste.
Seasoning (for after grilling – optional): While the marinade adds flavor, a final sprinkle of seasoning after grilling enhances the taste further. Consider:
- Paprika: A dash of smoked paprika adds a smoky depth.
- Garlic Powder: A small pinch for extra garlic flavor.
- Freshly chopped Parsley:
Important Note: These measurements are guidelines. Feel free to adjust the marinade ingredients to your liking. For example, if you prefer a spicier marinade, add a pinch of red pepper flakes. Similarly, you can substitute herbs according to your preference. Always taste the marinade before adding it to the chicken to ensure the flavors are balanced to your liking.
Accurate measuring is key: Using measuring spoons and cups will ensure consistent results. Weighing the chicken breasts can also help achieve consistent cooking times. For best results, ensure your ingredients are at room temperature before starting the marinade process. This will allow for better absorption of the flavors.
Equipment List
Grilling perfectly juicy chicken breasts requires the right tools. This equipment list details everything you’ll need, from preparation to serving, ensuring a smooth and successful grilling experience. Don’t be afraid to substitute items where necessary, but the recommendations below are designed for optimal results.
1. Grill: The foundation of this recipe. You can use a gas grill, charcoal grill, or even a grill pan on your stovetop. Gas grills offer consistent heat control, making them ideal for beginners. Charcoal grills impart a smoky flavor, but require more experience to manage temperature effectively. A grill pan is a great option for smaller spaces or if you prefer not to use an outdoor grill; ensure it’s well-seasoned for optimal non-stick performance.
2. Grill Tongs: Essential for safely flipping and maneuvering the chicken breasts on the grill. Choose tongs that are at least 12 inches long for ample reach and sturdy enough to handle the weight of the chicken without bending. Locking tongs are preferable to prevent accidental opening during use.
3. Meat Thermometer: This is arguably the most important piece of equipment. A reliable instant-read meat thermometer is crucial for ensuring the chicken reaches a safe internal temperature of 165°F (74°C) without overcooking. Avoid relying solely on visual cues; chicken can appear cooked before it actually is. A digital thermometer with a clear, easy-to-read display is recommended.
4. Basting Brush: A silicone basting brush is ideal for applying marinade or oil to the chicken during grilling, ensuring even browning and moisture retention. Avoid using natural bristle brushes as bristles can break off and contaminate the food. A brush with a long handle provides a safe distance from the hot grill grates.
5. Grill Gloves (Optional but Recommended): Protecting your hands from heat is paramount. Heat-resistant gloves offer a significant safety advantage, especially when handling hot grill grates or removing the chicken. Choose gloves that are long enough to cover your forearms, and always test their heat resistance before using them on a hot grill.
6. Cutting Board and Sharp Knife: For preparing the chicken breasts before grilling. A large cutting board provides ample space to work, and a sharp knife ensures clean, even cuts. A dull knife is more dangerous than a sharp one, as it requires more force and increases the risk of accidents.
7. Marinating Dish: A large, sealable container (e.g., a gallon-sized zip-top bag or a glass dish with a lid) is necessary for marinating the chicken for optimal flavor and tenderness. Ensure the container is large enough to hold the chicken comfortably, allowing the marinade to coat the entire surface area.
8. Serving Platter: A visually appealing platter to present your perfectly grilled chicken breasts. Choose a platter that is appropriately sized for the number of servings. Consider using a heat-resistant platter if serving the chicken directly from the grill.
Having all these items readily available will streamline your grilling process and contribute to a delicious and safe cooking experience. Remember to always prioritize safety when working with hot grills and sharp knives.
Preparation of Chicken Breasts
Proper preparation is key to achieving perfectly grilled chicken breasts. This section details the steps to ensure your chicken is juicy, flavorful, and cooks evenly.
Begin with four boneless, skinless chicken breasts. Aim for breasts that are roughly the same size; this ensures even cooking. If your breasts vary significantly in size, consider butterflying the larger ones (see below) to achieve a more uniform thickness. Approximately 1.5 pounds of chicken breasts should suffice for four servings.
Removing Excess Moisture: Pat the chicken breasts thoroughly dry with paper towels. This is incredibly important! Excess moisture will prevent proper browning and lead to steamed, rather than grilled, chicken. Take your time with this step; ensure all surfaces are completely dry.
Tenderizing (Optional but Recommended): For extra tender chicken, consider tenderizing the breasts. You can achieve this in a few ways. Firstly, you can use a meat mallet to gently pound the chicken to an even thickness of about ½ inch. Be careful not to pound them too thin, as this can make them dry. Alternatively, you can use a marinade (recipe to follow) for at least 30 minutes, which will tenderize the meat naturally. Marinades also add fantastic flavor.
Butterflying (for Uneven Breasts): If your chicken breasts are significantly different in size, butterflying the larger ones is crucial for even cooking. Place a chicken breast between two sheets of plastic wrap. Using a sharp knife, carefully slice horizontally almost all the way through, creating a pocket. Open the breast like a book and gently pound it to an even thickness, similar to the smaller breasts. This ensures consistent cooking times across all pieces.
Seasoning: Seasoning is where you truly bring the flavor to your grilled chicken. For this recipe, we recommend a simple yet effective blend. Generously season both sides of each chicken breast with 1 teaspoon of salt, ½ teaspoon of black pepper, and ½ teaspoon of garlic powder. Feel free to experiment with other herbs and spices, such as paprika, oregano, or cayenne pepper, to suit your taste. Remember to season generously, as the seasoning will enhance the flavor of the chicken while grilling.
Marinating (Optional but Highly Recommended): Marinating your chicken will dramatically improve its flavor and tenderness. A simple marinade can be made with olive oil, lemon juice, garlic, and your favorite herbs. Allow the chicken to marinate in the refrigerator for at least 30 minutes, or preferably, for several hours or even overnight for maximum flavor penetration. Ensure the chicken is completely submerged in the marinade.
Once your chicken breasts are prepped, you’re ready to move on to the grilling process. Remember, proper preparation is half the battle towards perfectly grilled chicken breasts. By following these steps diligently, you’ll be well on your way to a delicious and tender meal!
Marinade (if using)
Marinating your chicken breasts before grilling is highly recommended, as it significantly enhances both the flavor and the tenderness of the final product. A good marinade will infuse the chicken with deliciousness, keeping it moist and juicy even after grilling at high heat. While you can certainly grill chicken without a marinade, taking the extra time to marinate will elevate your dish to a whole new level.
Choosing your marinade base: The foundation of any great marinade is a balance of acidity, oil, and flavor. Acidity, usually from citrus juices (lemon, lime, orange) or vinegar (red wine, apple cider), helps to tenderize the chicken by breaking down its proteins. Oil, such as olive oil or avocado oil, adds richness and helps prevent the chicken from drying out during grilling. Finally, your choice of herbs, spices, and aromatics will determine the overall flavor profile.
Here’s a recipe for a classic lemon-herb marinade, perfect for chicken breasts:
- 1/4 cup olive oil
- 1/4 cup lemon juice (about 1 large lemon)
- 2 cloves garlic, minced
- 1 tablespoon Dijon mustard
- 1 teaspoon dried oregano
- 1 teaspoon dried thyme
- 1/2 teaspoon salt
- 1/4 teaspoon black pepper
Instructions for marinating: Combine all marinade ingredients in a bowl or resealable bag. Ensure all ingredients are well mixed. Add your chicken breasts to the marinade, making sure they are fully coated. For optimal flavor penetration, marinate for at least 30 minutes, but ideally 2-4 hours in the refrigerator. Marinating overnight is also a great option for incredibly flavorful chicken.
Important considerations: Don’t marinate your chicken at room temperature; always marinate in the refrigerator to prevent bacterial growth. If marinating overnight, ensure you transfer the chicken to a fresh container or bag after removing it from the marinade to avoid cross-contamination. Discard any leftover marinade after using it; do not reuse the marinade that has been in contact with raw chicken.
Variations and alternatives: Feel free to experiment with different flavor profiles! Try substituting lime juice for lemon juice for a brighter, more zesty flavor. Add a touch of honey or maple syrup for sweetness. Experiment with different herbs and spices, such as rosemary, paprika, chili powder, or cumin, to create unique flavor combinations. For a spicier kick, add a pinch of red pepper flakes. You could also incorporate soy sauce or teriyaki sauce for an Asian-inspired marinade.
Beyond the basics: For an even more flavorful marinade, consider adding finely chopped fresh herbs like parsley, cilantro, or chives. A splash of white wine or dry sherry can also add depth and complexity to your marinade. Remember to adjust the seasoning to your taste preferences.
No matter which marinade you choose, remember that the key is to allow sufficient time for the flavors to penetrate the chicken. A well-marinated chicken breast will be incredibly juicy, flavorful, and tender, making it a truly delicious grilled dish.
Grilling Techniques for Perfectly Grilled Chicken Breasts
Grilling chicken breasts to juicy perfection requires more than just tossing them on the grill and hoping for the best. This section details the techniques for achieving consistently delicious results, every time. We’ll cover everything from preparation to achieving those beautiful grill marks and ensuring the chicken is cooked through safely.
Preparation is Key: Before even thinking about the grill, properly prepare your chicken breasts. Start with about 1.5 to 2 pounds of boneless, skinless chicken breasts. Aim for breasts of relatively uniform thickness; if some are significantly thicker than others, consider slicing them in half horizontally to ensure even cooking. Pat them completely dry with paper towels. This is crucial for achieving a good sear and preventing steaming, which can lead to tough chicken. Next, season generously. A simple mixture of 1 teaspoon salt, ½ teaspoon black pepper, and ½ teaspoon paprika per breast works wonders. You can also experiment with garlic powder, onion powder, or your favorite herbs and spices.
Marinades (Optional but Recommended): Marinades not only add flavor but also help keep the chicken moist. A simple marinade can be made with ¼ cup olive oil, 2 tablespoons lemon juice, 1 clove minced garlic, and your favorite herbs. Marinate the chicken for at least 30 minutes, or ideally, for several hours in the refrigerator. Do not marinate at room temperature.
Achieving the Perfect Grill Temperature: For chicken breasts, aim for medium-high heat. This usually translates to around 375-400°F (190-205°C). You should be able to hold your hand about 4-6 inches above the grill grates for 4-5 seconds without discomfort. If it’s too hot, you’ll burn the chicken; too cool, and it will cook too slowly and become dry. Use a meat thermometer to verify your grill temperature.
Grilling the Chicken: Once your grill is preheated, lightly oil the grates to prevent sticking. Place the chicken breasts on the hot grill, ensuring they are not overcrowded. Overcrowding lowers the grill temperature and leads to uneven cooking. Grill for about 4-5 minutes per side to develop nice grill marks. Then, reduce the heat to medium (around 350°F/175°C) and continue grilling, checking the internal temperature frequently with a meat thermometer. The chicken is done when the internal temperature reaches 165°F (74°C). This usually takes another 8-10 minutes, depending on the thickness of the breasts and the grill temperature.
Resting is Crucial: Once the chicken reaches the safe internal temperature, remove it from the grill and let it rest for 5-10 minutes before slicing or serving. Resting allows the juices to redistribute throughout the meat, resulting in a more tender and flavorful chicken breast. Cover loosely with foil to keep it warm during this time.
Troubleshooting: If your chicken breasts are burning before they’re cooked through, reduce the heat. If they’re cooking too slowly, increase the heat. Remember that variations in grill temperature and chicken thickness will affect cooking times. Always use a meat thermometer to ensure food safety and perfect doneness. Never rely solely on visual cues.
Checking for Doneness
Achieving perfectly grilled chicken breasts requires precision, and the most crucial step is accurately determining doneness. Overcooked chicken is dry and tough, while undercooked chicken is unsafe to eat. There are several methods to ensure your chicken breasts are cooked to a safe internal temperature of 165°F (74°C).
The Meat Thermometer: The Gold Standard This is the most reliable method. A digital instant-read thermometer provides an immediate and accurate reading. Insert the thermometer into the thickest part of the chicken breast, avoiding the bone if present. Do not let the probe touch the grill grates; this can skew the reading. The thermometer should be inserted horizontally, ensuring it reaches the center of the breast. Once the reading reaches 165°F (74°C), your chicken is perfectly cooked.
The Touch Test: A Less Reliable Method While a meat thermometer is the most accurate, you can also use the touch test as a supplementary check. Press gently on the chicken breast with your finger. If it feels firm and springy, it’s likely cooked through. If it feels soft or jiggly, it needs more time on the grill. However, this method is subjective and should not be relied upon solely, especially for larger or thicker breasts.
The Visual Cue: A Secondary Indicator While not as reliable as a thermometer, the appearance of the chicken can provide clues. Cooked chicken will have a noticeably opaque appearance throughout, unlike raw chicken which is translucent. The juices should run clear, not pink. However, relying solely on visual cues can lead to undercooked chicken, so always use a thermometer as your primary method.
Addressing Uneven Thickness: Chicken breasts often vary in thickness. To ensure even cooking, you may need to adjust grilling time. For thicker breasts, you might need to add a few minutes to the total grilling time. Consider using a meat thermometer to check the doneness in multiple areas of the breast, especially if it’s significantly thicker in one area. If one part is cooked while another isn’t, you can tent the cooked area with foil and continue grilling the thinner areas.
Resting: Crucial for Juiciness Once the chicken reaches 165°F (74°C), remove it from the grill and let it rest for 5-10 minutes before slicing. This resting period allows the juices to redistribute throughout the meat, resulting in a more tender and flavorful chicken breast. Cover the chicken loosely with foil to prevent it from drying out during resting. Ignoring the resting period will result in dry, tough chicken.
Important Note: Always prioritize food safety. Using a meat thermometer is the only way to guarantee that your chicken has reached a safe internal temperature. Do not rely solely on visual cues or the touch test. If you are unsure about the doneness of your chicken, err on the side of caution and cook it for a longer period.
Recommendations for Perfectly Grilled Chicken Breasts
To achieve truly perfect grilled chicken breasts, follow these recommendations carefully. Proper preparation is key to ensuring juicy, flavorful results. Before grilling, pat the chicken breasts dry with paper towels. This helps achieve a beautiful sear and prevents steaming, which can lead to tough meat. Brining or marinating the chicken for at least 30 minutes (or even overnight) is highly recommended. This adds moisture and enhances flavor, resulting in a more tender and flavorful final product. Experiment with different marinades to find your favorite; lemon-herb, garlic-soy, or even a simple olive oil and salt mixture work wonders.
Grilling temperature is crucial. Aim for medium-high heat (around 375-400°F). This allows for a good sear on the outside while ensuring the chicken cooks through evenly without drying out. Use a meat thermometer to check for doneness; the internal temperature should reach 165°F (74°C). Avoid overcooking, as this will result in dry, tough chicken. Once cooked, allow the chicken to rest for 5-10 minutes before slicing or serving. This allows the juices to redistribute, resulting in a more tender and flavorful chicken breast.
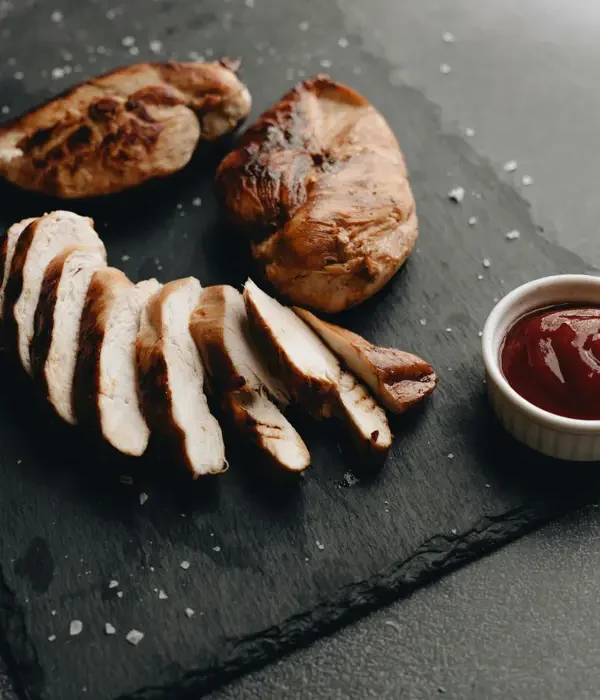
Serving Suggestions: Perfectly grilled chicken breasts are incredibly versatile. They can be served on their own, sliced and added to salads, used in sandwiches or wraps, or incorporated into pasta dishes. Consider serving them with a side of grilled vegetables (such as zucchini, bell peppers, and onions) for a complete and healthy meal. A vibrant summer salad with fresh herbs and a light vinaigrette also pairs beautifully.
Complementary Dishes: The possibilities are endless! Consider serving your grilled chicken with creamy mashed potatoes, roasted root vegetables, quinoa or brown rice, or a fresh pasta salad. For a more adventurous approach, try pairing it with a flavorful couscous salad or a vibrant mango salsa. A simple pan sauce made with the chicken drippings, some white wine, and herbs can elevate the dish to a whole new level.
Storage: Leftover grilled chicken breasts can be stored in an airtight container in the refrigerator for up to 3-4 days. To freeze, wrap the chicken tightly in plastic wrap, then place it in a freezer-safe bag or container. Frozen chicken breasts can be stored for up to 3 months. Always ensure the chicken is thoroughly cooked before refrigerating or freezing to prevent bacterial growth.
Nutritional Information (per 100g of cooked, unseasoned chicken breast): This information is approximate and may vary depending on the specific cut and preparation method. Calories: Approximately 165 kcal; Protein: Approximately 31g; Fat: Approximately 3g; Carbohydrates: Approximately 0g.
Important Note: Nutritional information can vary greatly depending on added ingredients like marinades or sauces. Always check the nutritional information of any added ingredients to get a more accurate estimate of the total nutritional value of your complete dish. Enjoy your perfectly grilled chicken breasts!