The humble wrap, a culinary chameleon adapting to global tastes, boasts a surprisingly rich history. While the precise origins are difficult to pinpoint, the concept of using flatbreads to encase fillings dates back millennia. Ancient civilizations across the Middle East and Mediterranean, from the Egyptians crafting their egyptian flatbreads to the Mesopotamians using variations of what we might recognize as pita bread, understood the practicality and deliciousness of this simple yet versatile method. These early wraps weren’t necessarily filled with grilled vegetables and hummus as we know them today, but they laid the groundwork for the countless variations we enjoy now. The evolution of the wrap reflects the movement of people and cultures, with influences from across the globe contributing to its modern form.
The rise of the modern wrap, particularly in Western cuisine, is closely linked to the increasing popularity of healthy eating and convenient meal options. Statistics show that the global wrap market is booming, expected to reach [insert relevant statistic if available, e.g., XX billion dollars by 2025]. This surge in popularity is driven by factors such as the demand for quick, portable lunches and dinners, the increasing awareness of health-conscious food choices, and the versatility of the wrap itself. It can accommodate a wide array of fillings, making it a canvas for culinary creativity. The grilled veggie and hummus wrap perfectly encapsulates this trend, offering a nutritious and flavorful meal that’s both satisfying and simple to prepare.
Hummus, a cornerstone of Mediterranean cuisine, particularly in the Levant region (encompassing modern-day Lebanon, Syria, Palestine, Jordan, and Israel), boasts a history stretching back thousands of years. While its precise origins are debated, evidence suggests chickpeas have been cultivated in the region for at least 8,000 years. The creamy, savory dip, made from blended chickpeas, tahini, lemon juice, and garlic, has become a global phenomenon, a testament to its deliciousness and versatility. Similarly, the inclusion of grilled vegetables adds a vibrant, fresh element, reflecting the Mediterranean diet’s emphasis on seasonal produce. This combination – hummus and grilled vegetables – represents a fusion of ancient culinary traditions with modern health-conscious eating habits, showcasing the enduring appeal of simple yet flavorful food. The grilled veggie and hummus wrap therefore isn’t just a meal; it’s a culinary journey through time and across cultures.
Ingredients and Measurements
This recipe yields two generously sized grilled veggie and hummus wraps. Adjust quantities as needed for more servings. The beauty of this recipe lies in its flexibility; feel free to substitute vegetables based on your preferences and seasonal availability. However, maintaining a balance of textures and flavors is key for the best result.
Vegetables: The success of this wrap hinges on the quality and preparation of your vegetables. Choose firm, vibrant vegetables that are free from blemishes. Overripe vegetables can become mushy during grilling. We recommend the following quantities:
- 1 medium zucchini: Approximately 8 ounces. Wash thoroughly and slice into 1/4-inch thick rounds. Larger zucchini can be halved lengthwise before slicing.
- 1 red bell pepper: Approximately 150 grams. Remove the stem, seeds, and membranes. Slice into 1/4-inch thick strips.
- 1 yellow bell pepper: Approximately 150 grams. Follow the same preparation method as the red bell pepper. Using two different colored bell peppers adds visual appeal to the finished wrap.
- 1 red onion: Approximately 100 grams. Peel and thinly slice. Soaking the sliced onion in cold water for 10-15 minutes before grilling will help reduce its harshness.
- 1 cup cherry tomatoes: Halve or quarter larger tomatoes for even grilling. Cherry tomatoes add a burst of sweetness and acidity.
- 1 cup cremini mushrooms: About 8 ounces. Clean with a damp cloth or brush; do not wash them unless absolutely necessary as they can become waterlogged. Slice into 1/4-inch thick slices.
Other Ingredients:
- 2 large whole wheat tortillas (10-inch): Choose tortillas that are sturdy enough to hold the fillings without tearing. Flour tortillas can be used as a substitute.
- 1/2 cup hummus: Opt for a high-quality hummus with a smooth and creamy texture. Experiment with different flavors! Roasted red pepper hummus or cilantro-jalapeno hummus would also be delicious options.
- 2 tablespoons olive oil: Use a high-quality extra virgin olive oil for the best flavor. Divide evenly amongst the vegetables.
- 1 teaspoon salt: Adjust to taste. Add a pinch of salt to the vegetables before grilling to enhance their flavor.
- 1/2 teaspoon black pepper: Freshly ground black pepper is always preferred. Add to vegetables before grilling.
- Optional additions: Consider adding feta cheese, crumbled goat cheese, or a sprinkle of your favorite herbs such as parsley or oregano for extra flavor and texture. A squeeze of lemon juice just before serving brightens up the flavors beautifully.
Important Note: Precise measurements for some ingredients, like vegetables, can vary based on size and shape. The quantities listed above are approximations and should be adjusted based on your preference. Always taste and adjust seasoning as needed.
Vegetable Preparation
The success of your Grilled Veggie and Hummus Wrap hinges on perfectly prepared vegetables. We’ll focus on achieving optimal texture and flavor through careful selection and preparation techniques. This recipe uses a vibrant mix of vegetables, but feel free to substitute your favorites, keeping in mind similar grilling times and textures.
Choosing your vegetables: Select firm, fresh vegetables that are free from bruises and blemishes. Overripe vegetables will become mushy on the grill. For this recipe, we’ll use the following quantities:
- 1 medium red bell pepper (about 150g)
- 1 medium yellow bell pepper (about 150g)
- 1 zucchini (about 200g)
- 1 red onion (about 150g)
- 1 cup cherry tomatoes (about 150g)
Preparing the bell peppers: Wash the bell peppers thoroughly and remove the stems and seeds. Cut each pepper into roughly 1-inch wide strips. Avoid making them too thin, as they’ll burn easily on the grill.
Preparing the zucchini: Wash the zucchini and trim the ends. Slice it lengthwise into 1/4-inch thick slices. If your zucchini is particularly large, consider halving the slices lengthwise again for even cooking.
Preparing the red onion: Peel the red onion and slice it into 1/4-inch thick slices. Soaking the sliced onion in cold water for 10-15 minutes before grilling will help to mellow its sharpness and reduce bitterness. Drain well before grilling.
Preparing the cherry tomatoes: Wash the cherry tomatoes and leave them whole. They’ll burst beautifully on the grill, adding a sweet and juicy element to the wrap.
Professional Tip: For consistent grilling, try to cut all your vegetables to a relatively similar size and thickness. This ensures even cooking and prevents some vegetables from burning while others remain undercooked. Use a sharp knife for clean cuts to maintain the vegetables’ integrity.
Optional additions: Feel free to add other vegetables such as eggplant (sliced similarly to zucchini), asparagus (trimmed and kept whole), or mushrooms (sliced). Remember to adjust grilling times accordingly, depending on the vegetable’s density and size. If adding eggplant, consider salting it for 20 minutes to draw out excess moisture before grilling to prevent sogginess.
Important Note: Before grilling, lightly brush your vegetables with olive oil and season generously with salt and freshly ground black pepper. This will enhance their flavor and help them to char beautifully on the grill. Herbs like oregano, thyme, or rosemary can also be added for an extra layer of flavor.
Hummus Preparation (if homemade)
Making your own hummus elevates the wrap to a whole new level of flavor and freshness. It’s surprisingly easy, and the results are far superior to store-bought versions. This recipe yields approximately 2 cups of hummus.
Ingredients:
- 1 (15-ounce) can chickpeas, rinsed and drained thoroughly. Thorough rinsing is crucial for removing excess starch, which can affect the hummus’s texture.
- 1/2 cup tahini. Use high-quality tahini for the best flavor. Look for tahini that is smooth and doesn’t separate significantly.
- 1/4 cup fresh lemon juice. Freshly squeezed lemon juice provides the brightest, most vibrant flavor. Bottled juice often lacks the necessary acidity.
- 2 cloves garlic, minced. Start with less garlic if you are sensitive to its strong flavor. You can always add more later.
- 1/2 teaspoon ground cumin. Cumin is essential for authentic hummus flavor. Toasting the cumin seeds before grinding enhances their aroma.
- 1/4 teaspoon salt, or to taste. Adjust salt according to your preference and the saltiness of your tahini.
- 1/4 cup ice water, or more as needed. Ice water helps to create a smooth, creamy texture.
- 2 tablespoons olive oil, for drizzling (optional). A high-quality extra virgin olive oil will significantly improve the flavor.
- Paprika, for garnish (optional).
Instructions:
1. Combine ingredients: In a food processor, combine the chickpeas, tahini, lemon juice, garlic, cumin, and salt. Process until completely smooth, scraping down the sides of the bowl as needed. This initial processing may take a minute or two.
2. Adjust consistency: With the food processor running, slowly add the ice water, one tablespoon at a time, until the hummus reaches your desired consistency. Too thick? Add more ice water. Too thin? Add a tablespoon or two of chickpeas.
3. Taste and adjust: Taste the hummus and adjust the seasoning as needed. You may want to add more lemon juice for acidity, salt for saltiness, or garlic for a stronger flavor. Don’t be afraid to experiment to find your perfect balance!
4. Finish and serve: Transfer the hummus to a serving bowl. Drizzle with olive oil and sprinkle with paprika, if desired. Serve immediately or store in an airtight container in the refrigerator for up to 5 days. The flavor will actually improve slightly after a day or two.
Tips for the best hummus:
- Use high-quality ingredients: The better the ingredients, the better the hummus will taste.
- Don’t over-process: Over-processing can make the hummus too airy and less creamy.
- Taste and adjust frequently: This is key to achieving the perfect balance of flavors.
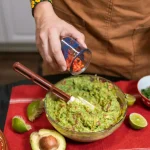
Wrap Assembly: Building Your Perfect Veggie & Hummus Wrap
With your grilled vegetables perfectly cooked and your hummus prepared, it’s time for the most satisfying part: assembling your delicious wrap! This section will guide you through creating a wrap that’s both visually appealing and structurally sound, ensuring a delightful eating experience.
Layering is Key: The order in which you add your ingredients significantly impacts the wrap’s stability and flavor profile. Begin by laying your chosen large tortilla (around 10-12 inches in diameter) flat on a clean, dry surface. A slightly warmed tortilla is easier to work with and less prone to tearing. You can gently heat it in a microwave for 10-15 seconds or briefly on a dry skillet.
Hummus Base: Spread a generous layer of hummus evenly across the tortilla, leaving about a half-inch border at the edge furthest from you. This border will act as a seal, preventing fillings from spilling out. Aim for approximately 2-3 tablespoons of hummus, depending on your preference and the size of your tortilla. Don’t overload! Too much hummus can make the wrap soggy.
Strategic Vegetable Placement: Now comes the artistry! Arrange your grilled vegetables strategically across the hummus layer. Consider both visual appeal and structural integrity. Start with your larger vegetables, such as bell peppers or zucchini slices, placing them towards the center of the tortilla. This provides a strong foundation for the other ingredients. Next, add smaller vegetables like mushrooms or onions, filling in any gaps.
Adding Texture and Flavor: To enhance the textural contrast and boost the flavor profile, consider adding other elements. A sprinkle of feta cheese or a drizzle of your favorite vinaigrette can add a delightful tang. A handful of fresh spinach or arugula can also add a vibrant green color and a peppery kick. Remember to keep the quantity moderate to avoid overwhelming the other flavors or making the wrap too bulky.
The Roll: This is where practice makes perfect! Begin by gently lifting the edge of the tortilla closest to you. Fold it over the filling, tucking in the sides as you go. Tightly rolling the wrap is crucial for preventing spills. Imagine you’re rolling a burrito, using a firm but gentle hand. Continue rolling until you have a neat, cylindrical wrap.
Securing the Wrap: Once rolled, you might want to secure the wrap to prevent it from unrolling. You can use toothpicks, small skewers, or even wrap it briefly in parchment paper. This is especially helpful if you plan to transport your wrap or serve it later. Avoid using overly large or sharp skewers, as they can puncture the tortilla.
Finishing Touches: Before serving, you can slice your wrap in half diagonally for easier handling and a more aesthetically pleasing presentation. You can also add a final flourish, like a sprinkle of fresh herbs or a drizzle of olive oil. Your perfectly assembled grilled veggie and hummus wrap is now ready to enjoy!
Grilling Techniques for Perfect Veggie Wraps
Grilling vegetables for your hummus wrap elevates the flavor and adds a delightful char. Mastering a few key techniques ensures perfectly cooked, flavorful veggies every time. This section will guide you through the process, from preparation to achieving that ideal grill mark.
Preparation is Key: Before you even think about firing up the grill, proper preparation is crucial. Start by washing and thoroughly drying your vegetables. Excess moisture on the grill surface can lead to steaming instead of grilling, resulting in soggy, less flavorful vegetables. For larger vegetables like zucchini or bell peppers, cut them into roughly ½-inch thick slices or planks. Smaller vegetables like cherry tomatoes or mushrooms can be grilled whole. Consider the grilling time: thicker cuts will require longer cooking times.
Oil and Seasoning: Don’t underestimate the power of oil and seasoning. Lightly coat your vegetables with a high-heat oil like olive oil or avocado oil. This prevents sticking to the grill grates and helps achieve those beautiful grill marks. Season generously with salt and pepper. Feel free to experiment with other seasonings such as garlic powder, onion powder, paprika, or your favorite herbs. About 1 tablespoon of oil per pound of vegetables is a good starting point.
Grilling Temperature: The ideal grilling temperature for vegetables is medium-high heat (around 375-400°F). This provides enough heat for quick cooking and nice grill marks without burning the vegetables. Use a grill thermometer to maintain consistent temperature. If you’re using a charcoal grill, arrange the coals for even heat distribution. For gas grills, preheat all burners for about 10-15 minutes.
Grilling Time and Technique: Grilling time will vary depending on the type and thickness of your vegetables. Smaller vegetables like mushrooms and cherry tomatoes may only need 2-3 minutes per side, while thicker slices of zucchini or bell peppers might require 4-5 minutes per side. Use tongs to gently turn the vegetables, avoiding piercing them. Look for nice grill marks and a slightly softened texture as indicators of doneness. Avoid overcooking, as this can lead to mushy vegetables. For even cooking, consider rotating the vegetables to different areas of the grill if necessary.
Removing from the Grill: Once the vegetables are cooked to your liking, remove them from the grill using tongs and place them on a plate to cool slightly. Allowing them to cool slightly before assembling your wraps prevents them from wilting the tortilla.
Professional Tip: For a smoky flavor, consider grilling the vegetables over indirect heat for a portion of the cooking time. This technique involves cooking the vegetables over a cooler part of the grill, allowing them to cook more slowly and absorb the smoky flavors from the burning charcoal or gas.
By following these techniques, you’ll be able to grill your vegetables to perfection, creating a delicious and visually appealing addition to your hummus wraps. Remember to always prioritize safety when using a grill, and enjoy the process!
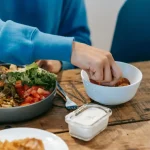
Serving Suggestions
Your delicious Grilled Veggie and Hummus Wrap is ready! But how you serve it can elevate the experience from good to great. Here are a few suggestions to make your wrap the star of the show, whether it’s a quick lunch, a picnic treat, or a light dinner.
For the Perfect Presentation: To prevent sogginess, avoid assembling the wraps too far in advance. Prepare all the components separately and assemble just before serving. Consider cutting the wraps in half diagonally for easier handling and a more visually appealing presentation. You can arrange the halves on a platter garnished with fresh herbs like cilantro or parsley for a pop of color and freshness. A small bowl of extra hummus on the side allows guests to customize their wrap’s creaminess.
Sides that Complement: The Grilled Veggie and Hummus Wrap is naturally versatile. Consider serving it alongside a simple side salad for added freshness and nutrients. A small, mixed green salad with a light vinaigrette dressing (about 2 tablespoons per serving) provides a lovely contrast in texture and flavor. Alternatively, a bright and zesty cucumber and tomato salad (about 1 cup per serving) adds a refreshing crunch. For a heartier side, a small portion of roasted sweet potato fries (approximately 1/2 cup per serving) offers a satisfying sweetness that balances the savory wrap.
Drinks that Pair Well: The flavors of the wrap lend themselves to a variety of beverages. A refreshing glass of iced tea, either unsweetened or lightly sweetened with honey (about 1 tablespoon per glass), will cut through the richness of the hummus. A crisp, dry white wine like Sauvignon Blanc (about 6 ounces per serving) complements the grilled vegetables beautifully. For a non-alcoholic option, sparkling water with a squeeze of lemon or lime (about 12 ounces per serving) provides a light and refreshing contrast.
Make it a Meal: For a more substantial meal, consider adding a side of protein. A small portion of grilled chicken or fish (approximately 4 ounces per serving) would pair well with the vegetables and hummus. Alternatively, a simple lentil soup (about 1 cup per serving) provides a hearty and nutritious addition. Remember to adjust portion sizes based on individual preferences and appetites.
For Special Occasions: Elevate your wrap for a party or gathering. Use colorful and interesting vegetables like bell peppers, zucchini, and red onion. You can even add feta cheese or a sprinkle of toasted pine nuts for extra flavor and texture. Presentation is key; arrange the wraps attractively on a platter, perhaps with a small flag or label indicating the ingredients. Consider providing individual serving containers for guests to take home leftovers.
Don’t Forget the Extras: To customize the experience, offer a small selection of additional toppings. A bowl of chopped fresh tomatoes, a sprinkle of red pepper flakes for a little heat, or a drizzle of olive oil can all add individual flair. Remember to clearly label any allergens present in the toppings or the wrap itself.
Storage Suggestions: Leftover wraps can be stored in the refrigerator for up to 2 days. To prevent them from drying out, wrap them tightly in plastic wrap or place them in an airtight container. They can be reheated gently in a microwave or oven, but be mindful not to overcook them, as this can make the vegetables soggy.
Recommendations for Your Grilled Veggie and Hummus Wrap
This Grilled Veggie and Hummus Wrap recipe is a delicious and healthy meal option, perfect for a quick lunch or a light dinner. To elevate your culinary experience and ensure optimal enjoyment, consider the following recommendations:
Serving Suggestions: For a complete and satisfying meal, consider serving your Grilled Veggie and Hummus Wrap with a side of fresh, crisp salad. A simple green salad with a light vinaigrette or a Mediterranean-style salad with feta cheese, olives, and tomatoes would complement the wrap perfectly. Alternatively, a side of roasted sweet potato fries or a small bowl of fruit salad would provide a contrasting texture and sweetness to balance the savory flavors of the wrap. For a heartier meal, serve the wrap alongside a soup, such as a tomato soup or lentil soup.
Storage and Reheating: For optimal freshness, consume your Grilled Veggie and Hummus Wrap immediately after preparation. However, if you have leftovers, store them properly to maintain quality. Wrap the remaining wraps tightly in plastic wrap or place them in an airtight container and refrigerate them for up to 2 days. To reheat, you can either microwave the wrap for 30-60 seconds, or gently heat it in a pan over medium heat. Be cautious when reheating, as the wrap may become dry if overheated. Avoid freezing the wraps, as this can affect the texture and taste.
Complementary Dishes: The versatility of this recipe allows for a wide array of complementary dishes. A vibrant salsa or a spicy chipotle sauce would add an extra layer of flavor and heat. A dollop of plain yogurt or a sprinkle of fresh herbs, such as cilantro or parsley, can enhance the overall taste. Consider adding a sprinkle of feta cheese or a drizzle of balsamic glaze for an extra touch of richness. If you’re looking for a beverage pairing, a refreshing iced tea or a light-bodied white wine would be excellent choices.
Nutritional Information (Approximate per wrap, based on average ingredient quantities): The nutritional content will vary depending on the specific ingredients used and their quantities. However, a typical Grilled Veggie and Hummus Wrap provides approximately 350-450 calories. This includes a good source of fiber from the vegetables, protein from the hummus and potentially added protein sources (like grilled chicken or chickpeas), and healthy fats from the hummus and avocado (if included). The exact breakdown of carbohydrates, proteins, and fats will depend on the ingredients used. This makes it a relatively nutritious and balanced meal option.
Important Note: This nutritional information is an estimate and may not be entirely accurate. For precise nutritional details, use a nutrition calculator and input the exact ingredients and quantities used in your recipe. Individuals with specific dietary needs or restrictions should adjust the ingredients accordingly to meet their requirements. Always check ingredient labels for allergens and potential dietary concerns.
Customization: Feel free to customize your wrap to your liking! Add your favorite grilled vegetables, experiment with different types of hummus, or incorporate other healthy ingredients like sprouts or roasted red peppers. The possibilities are endless!