The humble beef taco, a culinary cornerstone of Mexican cuisine, boasts a history as rich and flavorful as its fillings. While pinpointing the exact origin is difficult, the story begins long before the modern taco we know and love. The word taco itself likely derives from the Mexican Spanish word for a small, folded piece of paper or explosive, referring to the way miners in northern Mexico would fold their food in paper or small, makeshift containers. These early tacos were far simpler than today’s creations, often consisting of basic ingredients like seasoned meats and simple tortillas. The evolution of the taco is a testament to cultural exchange and adaptation, evolving from its humble beginnings into the globally recognized dish it is today.
The arrival of the Spanish in Mexico in the 16th century significantly influenced the development of Mexican cuisine, including tacos. The introduction of cattle brought about new possibilities for food preparation, and beef quickly became a staple ingredient. However, the modern-style beef taco, particularly the ground beef variety popular in the United States, is a relatively recent development, largely influenced by American culinary trends. This adaptation resulted in a fusion of Mexican traditions and American tastes, leading to the creation of numerous variations found throughout the country. It’s estimated that over 4 billion tacos are consumed annually in the United States alone, solidifying its place as a beloved national food. This staggering statistic highlights the widespread popularity of tacos across various demographics and regions.
Beyond its commercial success, the beef taco holds significant cultural importance. It’s a dish deeply rooted in family traditions, often passed down through generations. Family gatherings, celebrations, and everyday meals frequently feature tacos, reflecting their importance in Mexican culture and the broader Hispanic community. The preparation and sharing of tacos often serve as a communal experience, strengthening social bonds and fostering a sense of togetherness. Moreover, street taco vendors, a ubiquitous presence across Mexico and the Southwest United States, play a vital role in the cultural landscape, offering affordable and delicious tacos to the masses. These vendors represent a vibrant part of the culinary heritage, preserving and sharing traditional recipes and techniques.
The recipe we’ll explore today aims to capture the essence of a truly exceptional beef taco, balancing traditional flavors with modern techniques to achieve the perfect blend of tenderness, spice, and satisfying texture. We’ll move beyond the standard ground beef approach, focusing on creating a flavorful and juicy filling that will elevate your taco experience. Get ready to embark on a culinary journey that will redefine your understanding of the humble, yet magnificent, beef taco.
Ingredients and Measurements
Creating the perfect beef tacos hinges on using high-quality ingredients and precise measurements. This recipe yields approximately 12 tacos.
For the Beef Filling:
- 1.5 lbs (680g) Beef Chuck Roast: Choose a chuck roast with good marbling for maximum flavor and tenderness. A well-marbled chuck roast will break down beautifully during the slow cooking process, resulting in a succulent and flavorful filling. Avoid leaner cuts, as they tend to become dry during cooking.
- 1 large Onion (about 1 cup chopped): Yellow onion is traditional, but white or red onion can also be used. Finely chopping the onion ensures even cooking and prevents large chunks from dominating the texture of the filling.
- 2 cloves Garlic (minced): Fresh garlic is always preferable. Mincing the garlic allows for even distribution of flavor throughout the beef. If using pre-minced garlic from a jar, use a slightly smaller amount, as it tends to be more potent.
- 1 (15-ounce) can Diced Tomatoes, undrained: The juice from the canned tomatoes adds moisture and helps create a rich sauce. Using fire-roasted diced tomatoes will give a slightly smoky flavor.
- 1 (15-ounce) can Kidney Beans, rinsed and drained: Kidney beans add texture and a hearty element to the filling. Rinsing them removes excess sodium. Black beans or pinto beans can be substituted, but kidney beans are the classic choice.
- 1 (10-ounce) can diced green chilies: These add a welcome spiciness and a vibrant green color to the taco filling. Adjust the amount according to your preferred spice level. You can also use fresh green chilies, but adjust the cooking time accordingly.
- 2 tablespoons Chili Powder: Use a high-quality chili powder for the best flavor. Adjust the amount to your preference. A blend of chili powders, such as ancho, chipotle, and New Mexico, can add complexity.
- 1 tablespoon Ground Cumin: Cumin is essential for authentic taco flavor. Toasted cumin seeds, ground just before use, will offer a more intense flavor.
- 1 teaspoon Oregano: Dried oregano is commonly used in taco seasoning. Fresh oregano can be substituted, but use about twice the amount.
- 1/2 teaspoon Cayenne Pepper (optional): This adds heat. Start with a smaller amount and add more to taste if desired. Caution: Cayenne pepper is very potent.
- 1 teaspoon Salt: Adjust to taste. Remember that the canned goods already contain some sodium.
- 1/2 teaspoon Black Pepper: Freshly ground black pepper enhances the overall flavor.
- 1 cup Beef Broth: This helps create a flavorful sauce and prevents the beef from drying out. You can use low-sodium broth to control the salt content.
For the Tacos:
- 12 Corn or Flour Tortillas: Choose your preferred type of tortilla. Warming them slightly on a griddle or in a dry skillet before filling will enhance their texture and flavor.
- Toppings of your choice: This could include shredded lettuce, diced tomatoes, shredded cheese, sour cream, guacamole, salsa, etc. The possibilities are endless!
Important Note: These measurements are guidelines. Feel free to adjust the seasoning to your personal preferences. Taste the beef filling as it simmers and adjust the spices accordingly. Enjoy!
Equipment List
Making the best beef tacos requires the right tools to ensure efficiency and achieve optimal results. This equipment list covers everything from preparation to serving, allowing you to create a truly delicious and professional-quality meal.
For Meat Preparation: You’ll need a large, heavy-bottomed skillet (at least 12 inches in diameter) for even browning and cooking of the beef. Cast iron is ideal for its heat retention, but a good quality stainless steel skillet will work as well. A sturdy wooden spoon or spatula is essential for stirring and scraping up browned bits from the bottom of the pan – these bits contribute significantly to the flavor of your taco meat. Don’t skimp on this; a flimsy spatula will break easily under pressure.
For Cutting and Chopping: A sharp chef’s knife (8-10 inches) is paramount for efficient and safe chopping of onions, peppers, and garlic. A dull knife is dangerous and makes the task more difficult. A cutting board, preferably large and made of wood or durable plastic, provides a stable surface for cutting. Always use a separate cutting board for raw meat to prevent cross-contamination. Consider using a smaller cutting board for herbs and vegetables, keeping them separate from the meat preparation area. Measuring cups and spoons are essential for accurate ingredient measurements. A meat thermometer is crucial for ensuring the beef is cooked to a safe internal temperature of 160°F (71°C).
For Serving and Assembly: You’ll need a serving platter or bowl for the cooked beef. Small plates or bowls are required to hold toppings such as salsa, guacamole, sour cream, and shredded cheese. Warm tortillas are essential for the best taco experience; consider using a large skillet or griddle to warm them gently. You may also want a tortilla warmer to keep them soft and pliable while serving. Avoid microwaving tortillas, as this will make them tough and rubbery.
Optional but Recommended Equipment: An immersion blender or food processor can be used to create a smoother texture for your taco meat if desired. A fine-mesh sieve can help remove excess fat from the cooked beef, resulting in a leaner and healthier dish. If you’re making your own tortillas, you’ll need a tortilla press. Investing in quality equipment will greatly enhance your cooking experience and the final product.
Cleaning Up: Finally, don’t forget about the cleaning supplies. Have plenty of paper towels on hand for spills and wiping down surfaces. A good quality dish soap and scrub brushes will make cleaning your equipment easier after cooking. A garbage disposal can help greatly with removing food waste.
By using this comprehensive equipment list, you’ll be well-prepared to make the best beef tacos, ensuring a smooth and enjoyable cooking process. Remember, quality equipment makes a significant difference in the final outcome, so invest in durable and reliable tools for the best results.
Preparation of the Beef
The success of your beef tacos hinges significantly on the preparation of the beef. We’ll be focusing on a classic slow-cooked approach that yields incredibly tender and flavorful meat. This recipe uses 2 lbs of beef chuck, but you can adjust the quantity based on your needs. Remember to buy a high-quality cut of beef; the better the starting point, the better the final product.
Begin by trimming any excess fat from your 2 lbs of beef chuck. You don’t need to remove all the fat, as some fat contributes to flavor and tenderness, but excessive fat can render the tacos greasy. Aim for a balance – about 1/4 inch of fat should remain on the meat. Cut the chuck into roughly 1-inch cubes. Consistent sizing is key for even cooking.
In a large bowl, toss the cubed beef with 2 tablespoons of olive oil. This helps to coat the meat and prevent sticking. Then, generously season the beef with 2 teaspoons of ground cumin, 1 teaspoon of smoked paprika, 1 teaspoon of chili powder, 1/2 teaspoon of garlic powder, 1/2 teaspoon of onion powder, 1/2 teaspoon of oregano, 1/4 teaspoon of cayenne pepper (optional, for added heat), and 1 teaspoon of salt and 1/2 teaspoon of black pepper. Don’t be shy with the seasoning! The spices will meld beautifully with the beef during the slow cooking process.
Heat a large Dutch oven or heavy-bottomed pot over medium-high heat. Sear the beef cubes in batches, ensuring not to overcrowd the pot. Sear for about 2-3 minutes per side, until nicely browned. This step is crucial for developing a deep, rich flavor. Avoid overcrowding the pot, as this will steam the beef instead of searing it. Once all the beef is seared, set it aside.
Now, it’s time to build the flavor base. Add 1 large chopped onion (about 1 cup) and 2 cloves of minced garlic to the pot. Sauté for about 5 minutes, until softened and fragrant. Then, add 1 (28 ounce) can of crushed tomatoes, 1 cup of beef broth, and 1 teaspoon of brown sugar. Stir well to combine.
Return the seared beef to the pot. Bring the mixture to a simmer, then reduce the heat to low, cover the pot, and let it simmer gently for at least 2-3 hours, or until the beef is incredibly tender and easily shreds with a fork. The longer it simmers, the more tender the beef will become. If the liquid reduces too much during cooking, add a little more beef broth to maintain a moist environment.
Once the beef is cooked through, remove it from the pot and shred it using two forks. You can also use a meat shredder for faster and more efficient results. Return the shredded beef to the pot and stir to combine with the sauce. Taste and adjust seasoning as needed. You might want to add more salt, pepper, or a touch of lime juice for brightness.
Professional Tip: For an even richer flavor, consider adding a bay leaf during the simmering process. Remove it before shredding the beef.
Cooking the Beef (including browning, simmering, shredding)
The key to amazing beef tacos lies in perfectly cooked, flavorful beef. We’ll be using approximately 2 lbs of chuck roast, a cut known for its delicious flavor and ability to become incredibly tender when slow-cooked. You can substitute with other cuts like brisket or even a stew beef, but adjust cooking times accordingly.
Browning the Beef: Begin by trimming any excess fat from the chuck roast. Cut the roast into roughly 2-inch cubes. This helps ensure even cooking and browning. Season generously with 2 tablespoons of chili powder, 1 tablespoon of cumin, 1 teaspoon of smoked paprika, 1 teaspoon of garlic powder, 1 teaspoon of onion powder, 1 teaspoon of dried oregano, 1/2 teaspoon of cayenne pepper (optional, for heat), and 1 teaspoon of salt. Don’t be shy with the seasoning!
Heat 2 tablespoons of vegetable oil in a large, heavy-bottomed pot or Dutch oven over medium-high heat. Once the oil shimmers, add the beef cubes in batches, ensuring not to overcrowd the pot. Brown the beef on all sides, about 3-4 minutes per batch. This browning step is crucial for developing deep flavor. Remove the browned beef and set aside.
Simmering the Beef: Once all the beef is browned, add 1 large onion, chopped, and 2 cloves of garlic, minced, to the pot. Cook until softened, about 5 minutes. Then, pour in 2 cups of beef broth and 1 cup of your favorite beer (optional, but adds a nice depth of flavor). Return the browned beef to the pot. Bring the mixture to a simmer, then reduce the heat to low, cover, and let it simmer gently for at least 2-3 hours, or until the beef is incredibly tender and easily shreds with a fork. The longer it simmers, the more tender the beef will become. For a richer flavor, consider adding a bay leaf during simmering, removing it before shredding.
Shredding the Beef: Once the beef is cooked through, remove it from the pot and let it cool slightly. Using two forks, shred the beef into small, manageable pieces. Be careful not to over-shred, as you want to retain some texture. You can then return the shredded beef to the simmering liquid to keep it moist and flavorful. Taste the liquid and adjust seasoning as needed, adding more salt, pepper, or chili powder to your preference.
Important Note: If you find the liquid is too thin after simmering, you can easily thicken it by whisking together 1-2 tablespoons of cornstarch with 2 tablespoons of cold water and stirring it into the simmering liquid. Cook for a few minutes until thickened to your desired consistency. This creates a delicious sauce for your tacos.
Now that your beef is perfectly cooked and shredded, it’s ready to be the star of your incredible beef tacos! Enjoy!
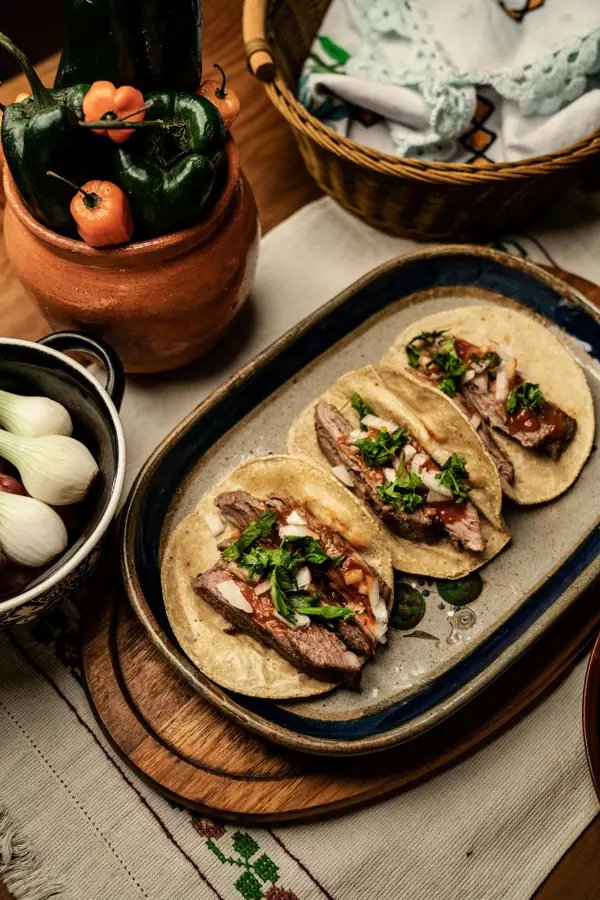
Preparing the Toppings (Onions, Cilantro, etc.)
The magic of a great taco lies not just in the seasoned beef, but also in the vibrant and contrasting flavors of its toppings. Proper preparation of these elements is crucial to achieving a truly exceptional taco experience. We’ll focus on onions and cilantro, two staples, but feel free to expand with your favorites!
Onions: For the best texture and flavor, we recommend using a combination of white and red onions. White onions offer a sharper, more pungent bite, while red onions provide a sweeter, milder counterpoint. Use approximately one medium white onion and half a medium red onion for a recipe yielding about 8 tacos. Begin by peeling the onions and then thinly slicing them. Avoid using a food processor, as this can result in mushy onions that lack the desired crispness. Instead, use a sharp knife and aim for uniformly thin slices. If you prefer a less pungent onion flavor, you can soak the sliced onions in cold water for about 10-15 minutes. This will help to remove some of the strong sulfur compounds responsible for the sharp taste. Drain well before using.
Cilantro: Fresh cilantro is essential for authentic flavor. For 8 tacos, you’ll need about 1/2 cup of packed fresh cilantro leaves. Wash the cilantro thoroughly under cold running water to remove any dirt or debris. Then, roughly chop the cilantro. Avoid over-chopping, as this can bruise the leaves and release unwanted bitterness. A slightly coarse chop will provide a better textural contrast to the other ingredients. Don’t be afraid to be generous with the cilantro; its bright, herbaceous flavor is a key component of a delicious taco.
Beyond the Basics: While onions and cilantro are staples, consider expanding your topping game. A simple diced jalapeño pepper (remove seeds for less heat) adds a pleasant kick. A handful of shredded lettuce provides a refreshing crunch. Finely diced tomatoes add a juicy sweetness and vibrant color. Consider using a mix of different tomatoes, such as Roma and cherry tomatoes, for a complex flavor profile. Remember to remove the cores and seeds from the tomatoes to avoid excessive moisture in your tacos.
Preparation Tips for Optimal Flavor and Texture: Prepare your toppings just before serving. This ensures that they remain crisp and fresh. If preparing ahead, store the chopped onions and cilantro separately in airtight containers in the refrigerator, but avoid longer than a few hours to prevent wilting. Season your toppings lightly with salt and perhaps a squeeze of lime juice to enhance their individual flavors. A pinch of salt on the onions will further draw out moisture, enhancing their crispness. Experiment with different combinations to find your perfect topping blend!
Presentation Matters: Arrange your prepared toppings in separate bowls for easy access when assembling your tacos. This allows each diner to customize their tacos to their preference, maximizing enjoyment. The visual appeal of a colorful array of toppings adds to the overall dining experience, making your tacos even more enticing.
Warming the Tortillas: The Key to Taco Perfection
Warming tortillas is a crucial, often overlooked, step in crafting truly exceptional beef tacos. Cold, stiff tortillas detract significantly from the overall eating experience, leading to cracking, crumbling, and a less-than-satisfying texture. Properly warmed tortillas, however, become pliable, soft, and perfectly capable of holding your delicious taco filling without falling apart.
There are several methods for warming tortillas, each with its own advantages and disadvantages. The best method often depends on the type of tortilla (corn or flour), the number of tortillas you’re warming, and the equipment available to you. Let’s explore the most common and effective techniques.
The Dry Heat Method (Skillet or Comal): This is arguably the most traditional and arguably the best method for warming corn tortillas, though it works well for flour tortillas too. Place a large, dry skillet (cast iron is ideal) or comal over medium heat. Heat the skillet for about 2-3 minutes until it’s hot but not smoking. Place 6-8 tortillas directly onto the hot surface. Do not overcrowd the pan; work in batches if necessary. Warm each tortilla for about 30-45 seconds per side, or until they are pliable and slightly softened. Use tongs to flip them gently to avoid tearing. As you warm them, stack the tortillas on a plate covered with a clean kitchen towel to keep them warm and soft.
The Moist Heat Method (Microwave): This method is quicker and more convenient for smaller quantities, especially for flour tortillas. Wrap 2-3 tortillas in a damp paper towel. Microwave on high for 30-45 seconds. Be careful not to overcook; over-microwaving can lead to tough, rubbery tortillas. Check for doneness and adjust the cooking time as needed. This method is less ideal for corn tortillas, as they can become dry and brittle.
The Oven Method: For larger quantities, preheating your oven to 350°F (175°C) is a great option. Wrap the tortillas in foil and place them in the preheated oven for 5-7 minutes. This method is effective for both corn and flour tortillas, ensuring even heating. Monitor closely to avoid burning. This method is particularly useful for parties or large gatherings.
Important Considerations: Regardless of your chosen method, remember to handle the tortillas gently to prevent tearing. A clean kitchen towel is your best friend in keeping them warm and pliable while you prepare the rest of your tacos. If you’re using corn tortillas, a slightly longer warming time will yield the best results. Experiment with different methods to find your preferred technique for achieving perfectly warm and delicious tortillas.
Professional Tip: For an extra layer of flavor, brush the warmed tortillas with a little melted butter or oil before serving. This adds a subtle richness and helps prevent them from drying out.
Recommendations for the Best Beef Tacos
To elevate your beef taco experience, consider these recommendations. First and foremost, the quality of your ingredients significantly impacts the final product. Use high-quality ground beef, preferably 80/20 for optimal flavor and juiciness. Don’t skimp on the spices; experiment with different blends to find your perfect combination. Freshly chopped cilantro and onions add vibrant freshness, while a squeeze of lime juice brightens the overall taste.
Regarding the cooking process, achieving perfectly seasoned and tender beef is crucial. Avoid overcooking the meat, as this can make it dry and tough. Properly browning the beef before adding your seasonings helps to develop a rich flavor. Consider using a combination of cooking methods – browning on the stovetop and then simmering in a flavorful sauce can result in exceptionally tender beef. Allow the beef to rest for a few minutes after cooking to retain its juices before assembling your tacos.
For the perfect taco shell, choose your preference wisely. Corn tortillas offer a more traditional, slightly rustic texture, while flour tortillas provide a softer, more pliable option. Warming the tortillas either on a griddle, in a dry skillet, or even in the microwave ensures they are pliable and prevent cracking. For an added touch, lightly brush them with oil or melted butter before warming for enhanced flavor and texture.
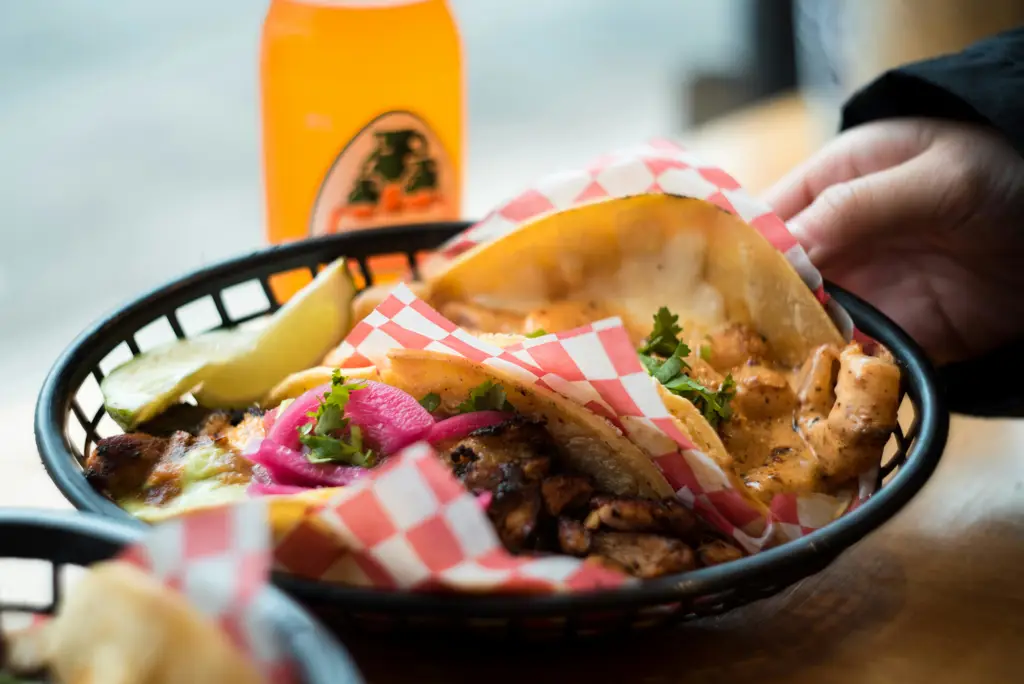
Serving suggestions are key to a complete taco experience. Offer a variety of toppings to cater to individual preferences. Consider shredded lettuce, diced tomatoes, shredded cheese (Monterey Jack, cheddar, or a Mexican blend), sour cream or Mexican crema, guacamole, and pickled jalapeños or onions. A side of your favorite salsa, ranging from mild to extra spicy, is essential. Remember to present your tacos attractively – arranging them neatly on a platter with the toppings in separate bowls enhances the visual appeal.
Storage is important for maximizing freshness. Leftover beef can be stored in an airtight container in the refrigerator for up to 3-4 days. Reheat gently in a skillet or microwave before using. Do not store cooked tacos assembled with toppings; assemble them fresh right before serving to maintain crispness and prevent sogginess. Tortillas can be stored in a sealed bag or container at room temperature for a few days or frozen for longer storage.
Complementary dishes enhance the overall meal. Consider serving your tacos with a side of Mexican rice, refried beans, or a simple salad. These dishes add balance to the meal, providing different textures and flavors. A refreshing beverage, such as horchata or a Mexican beer, complements the richness of the tacos perfectly.
Nutritional Information (per serving, approximate values, will vary based on ingredients): Calories: 350-450; Protein: 25-30g; Fat: 20-25g; Carbohydrates: 30-40g; Fiber: 5-7g. Note: These are estimates and can vary significantly depending on the specific ingredients and portion sizes used. For accurate nutritional information, use a nutrition calculator with your specific recipe details.