Pizza, a culinary icon enjoyed globally, boasts a history as rich and diverse as its toppings. While its modern form is largely attributed to Naples, Italy, the concept of flatbreads topped with various ingredients dates back millennia. Archaeological evidence suggests that ancient civilizations, from the Egyptians to the Greeks, consumed flatbreads with toppings, laying the groundwork for what we know today as pizza. The word pizza itself likely derives from the longobard word bizzo, meaning bite or small piece. This perfectly encapsulates the pizza’s inherent nature: a dish meant for sharing and savoring in individual portions.
The evolution of pizza from simple flatbread to the globally recognized dish it is today took centuries. In Naples, during the 16th century, pizza became a staple food for the working class, often featuring simple toppings like tomatoes, garlic, and basil. It wasn’t until the late 19th century that pizza gained popularity among the Neapolitan aristocracy, eventually gaining international recognition thanks to Italian immigrants who brought their culinary traditions to the United States. The opening of pizzerias in New York City during the early 20th century marked a pivotal moment, catapulting pizza into the mainstream American diet.
Today, pizza’s cultural significance is undeniable. It’s estimated that Americans alone consume over 3 billion pizzas annually, representing a staggering portion of the global pizza market. The dish transcends cultural boundaries, adapting to local tastes and preferences in every corner of the world. From the thin-crust pizzas of Naples to the deep-dish creations of Chicago, the variations are endless, reflecting a global culinary tapestry woven from shared traditions and individual innovation. Pizza isn’t just food; it’s a symbol of community, celebration, and comfort, a versatile canvas for culinary creativity enjoyed by millions across the globe. Beyond its commercial success, pizza holds a special place in popular culture, featuring prominently in films, television shows, and literature. This enduring appeal speaks to its universal appeal and its ability to bring people together.
This guide will delve into the art of crafting the perfect homemade pizza, exploring techniques to achieve that Neapolitan-style crust, mastering the sauce, and selecting the freshest toppings. We’ll uncover the secrets to replicating the authentic taste and texture of a pizzeria-quality pizza in the comfort of your own kitchen, empowering you to create your own culinary masterpiece. Get ready to embark on a delicious journey into the world of homemade pizza making!
Ingredients and Measurements
Making the best homemade pizza starts with sourcing high-quality ingredients. The measurements below are for a 12-inch pizza, but can be easily scaled up or down depending on your needs. Remember, precision is key to achieving optimal texture and flavor.
For the Pizza Dough:
- 1 cup (240ml) warm water (105-115°F): The temperature is crucial. Too cold and the yeast won’t activate; too hot and you’ll kill it. Use a thermometer for accuracy.
- 1 teaspoon (4g) granulated sugar: Provides food for the yeast, aiding in fermentation and rise.
- 2 teaspoons (4g) active dry yeast: Check the expiration date! Fresh yeast is essential for a light and airy crust.
- 2 1/2 cups (300g) all-purpose flour, plus more for dusting: Start with the measured amount and add more gradually, as needed, to achieve the correct dough consistency. Using a kitchen scale for accuracy is highly recommended.
- 1 teaspoon (5g) salt: Enhances the flavors and controls yeast activity.
- 2 tablespoons (30ml) olive oil: Adds flavor and helps create a tender crust. Use a good quality extra virgin olive oil for the best results.
For the Pizza Sauce:
- 1 (28 ounce) can crushed tomatoes: Choose high-quality canned tomatoes for the best flavor. Look for brands with minimal added ingredients.
- 2 cloves garlic, minced: Fresh garlic adds a pungent aroma and flavor. You can adjust the amount to your preference.
- 1 teaspoon (5g) dried oregano: A classic pizza herb. Fresh oregano is even better if you have it on hand.
- 1/2 teaspoon (3g) dried basil: Adds another layer of herbaceous flavor. Again, fresh is preferable if available.
- 1/4 teaspoon (1g) salt: Balances the sweetness of the tomatoes.
- 1/4 teaspoon (0.5g) black pepper: Adds a subtle spice.
- 1 tablespoon (15ml) olive oil: Helps to sauté the garlic and adds richness to the sauce.
For the Toppings: (Amounts are suggestions, adjust to your liking)
- 8 ounces (225g) shredded mozzarella cheese: Use a good quality low-moisture mozzarella for optimal melting and stretch.
- 1/2 cup (70g) sliced pepperoni or other preferred toppings: Your options are endless! Consider adding mushrooms, onions, peppers, sausage, etc.
Important Note: Always measure ingredients accurately, especially when working with yeast. Using a kitchen scale will provide the most consistent results. Adjusting ingredient quantities may be necessary depending on your specific flour and other factors. Don’t be afraid to experiment and find what works best for you!
Dough Preparation
Making pizza dough from scratch is a rewarding experience, resulting in a superior crust compared to store-bought options. This section details the process of creating a delicious and pliable pizza dough perfect for your homemade masterpiece. We’ll be making enough dough for two 12-inch pizzas.
Ingredients:
- 1 cup (240ml) warm water (105-115°F). Too hot will kill the yeast, too cold will prevent activation.
- 1 teaspoon (4g) granulated sugar
- 2 1/4 teaspoons (7g) active dry yeast (or 1 packet)
- 2 1/2 cups (300g) all-purpose flour, plus more for dusting
- 1 teaspoon (6g) salt
- 2 tablespoons (30ml) olive oil
Instructions:
1. Activate the yeast: In a large bowl, combine the warm water, sugar, and yeast. Let stand for 5-10 minutes until foamy. If the yeast doesn’t foam, it’s likely dead and you’ll need to start again with fresh yeast.
2. Combine wet and dry ingredients: Add the olive oil to the yeast mixture. In a separate bowl, whisk together the flour and salt. Gradually add the dry ingredients to the wet ingredients, mixing with a wooden spoon or spatula until a shaggy dough forms.
3. Knead the dough: Turn the dough out onto a lightly floured surface and knead for 8-10 minutes, or until the dough is smooth and elastic. Kneading develops the gluten, resulting in a chewier, more flavorful crust. If the dough is too sticky, add a tablespoon of flour at a time until it becomes manageable. If it’s too dry, add a teaspoon of water at a time.
4. First rise (bulk fermentation): Place the dough in a lightly oiled bowl, turning to coat. Cover the bowl with plastic wrap and let rise in a warm place for 1-1.5 hours, or until doubled in size. A warm oven (with the light on) is an ideal place for rising.
5. Shape the dough: Once the dough has risen, gently punch it down to release the air. Divide the dough in half for two pizzas. Shape each half into a ball.
6. Second rise (proofing): Lightly flour a pizza pan or baking sheet. Place the dough balls on the prepared surface, cover with plastic wrap, and let rise for another 30-45 minutes. This allows the dough to relax and become easier to stretch. Avoid over-proofing, as this can lead to a flat crust.
Professional Tip: For an even better crust, let the dough rest in the refrigerator overnight after the first rise. This slow fermentation enhances the flavor and texture. Just remember to take it out and let it come to room temperature before shaping and proofing.
Now that your dough is prepared, you’re ready to assemble your delicious homemade pizza! Proceed to the next section on sauce preparation.
Sauce Preparation
The sauce is arguably the most important component of a great pizza, second only to the dough itself. A well-made sauce elevates the entire pizza experience, complementing the cheese and toppings without overpowering them. This section details how to make a classic Neapolitan-style pizza sauce, but feel free to adjust seasonings to your preference.
Start with high-quality ingredients. The flavor of your sauce is directly dependent on the quality of your tomatoes. Use ripe, flavorful tomatoes, preferably San Marzano tomatoes, known for their low acidity and sweetness. Canned San Marzano tomatoes are a convenient and reliable option, ensuring consistency throughout the year. Avoid using overly acidic tomatoes, as they can overpower the other flavors in your pizza.
For this recipe, you will need:
- 28 ounces (794g) canned San Marzano tomatoes, crushed or whole peeled
- 2 cloves garlic, minced
- 1 tablespoon extra virgin olive oil
- 1 teaspoon dried oregano
- 1/2 teaspoon dried basil
- 1/4 teaspoon red pepper flakes (optional, for a touch of heat)
- 1/2 teaspoon salt
- 1/4 teaspoon black pepper
- 1 tablespoon sugar (optional, to balance acidity)
Instructions:
- In a medium saucepan, heat the olive oil over medium heat. Add the minced garlic and cook for about 1 minute, or until fragrant. Be careful not to burn the garlic, as this will impart a bitter taste.
- Add the crushed or whole peeled tomatoes to the saucepan. If using whole peeled tomatoes, gently crush them with the back of a spoon or your hands.
- Stir in the oregano, basil, red pepper flakes (if using), salt, pepper, and sugar (if using).
- Bring the sauce to a simmer, then reduce the heat to low. Let the sauce simmer gently for at least 30 minutes, or up to an hour. The longer it simmers, the more the flavors will meld and deepen. Stir occasionally to prevent sticking.
- Taste and adjust seasonings as needed. You may want to add more salt, pepper, sugar, or herbs depending on your preference and the acidity of your tomatoes.
- Once the sauce has reached your desired consistency and flavor, remove it from the heat and let it cool completely before using. You can also blend the sauce with an immersion blender for a smoother texture, although some prefer the rustic texture of a chunky sauce.
Professional Tip: For an even richer flavor, consider adding a tablespoon of tomato paste along with the garlic. This adds depth and umami to the sauce. Also, remember that less is often more when it comes to seasoning. Start with smaller amounts and adjust to taste.
Storage: Once cooled, store the sauce in an airtight container in the refrigerator for up to 5 days. You can also freeze the sauce for longer storage. Allow it to thaw completely before using.
Topping Preparation
The success of your homemade pizza hinges not just on the dough and sauce, but equally on the quality and preparation of your toppings. Properly prepping your toppings ensures even cooking, prevents sogginess, and maximizes flavor. Don’t rush this step; take your time to get it right!
Vegetables: Start with your vegetables. The key here is to ensure they’re uniformly sized and not overly watery. For instance, if using onions, thinly slice them, aiming for roughly 1/8th inch thickness. This allows them to cook evenly without becoming raw in the center. Similarly, bell peppers should be thinly sliced or diced into 1/4-inch pieces. Mushrooms should be cleaned and sliced, removing any excess moisture with a paper towel. Aim for about 1 cup of sliced onions and 1 cup of sliced bell peppers per 12-inch pizza. Avoid over-loading your pizza with vegetables, as this can lead to a soggy crust.
Meats: Pre-cooked meats like pepperoni, sausage, or ham require minimal preparation. Simply slice them thinly to ensure even cooking and distribution. For about a 12-inch pizza, use approximately 1/2 cup of sliced pepperoni or 3/4 cup of crumbled cooked sausage. If using raw meats, such as ground beef or Italian sausage, it’s crucial to pre-cook them thoroughly before adding them to the pizza. This prevents undercooked meat and ensures food safety. Drain any excess grease after cooking to avoid a greasy pizza.
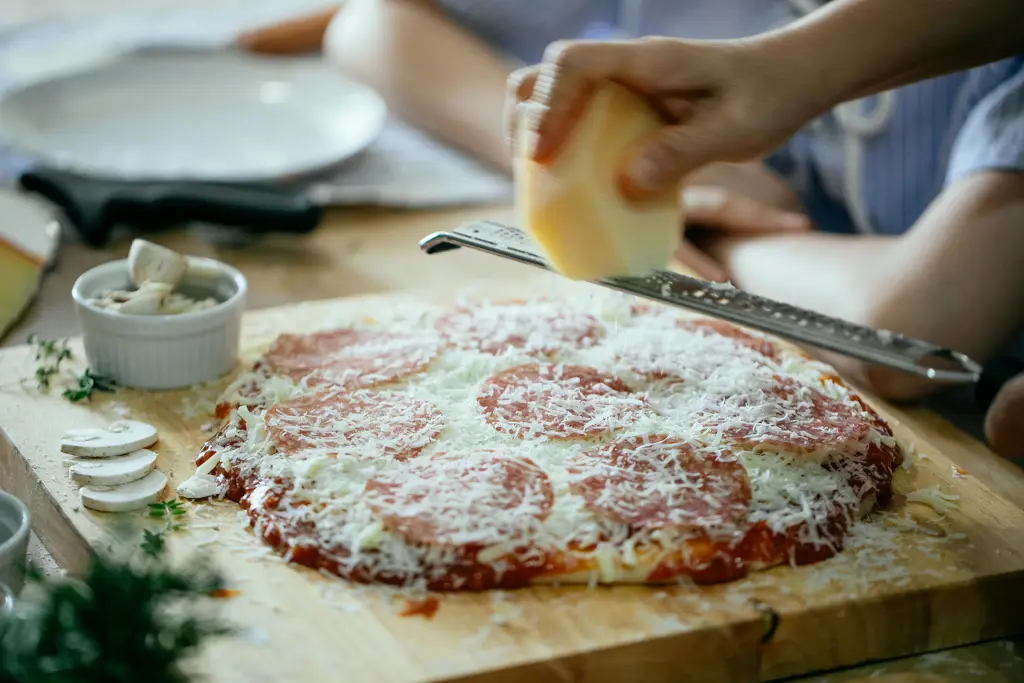
Cheese: Cheese is the star of many pizzas! Use a mix of cheeses for optimal flavor and texture. A classic combination is mozzarella and parmesan. Shred your mozzarella coarsely – finely shredded mozzarella tends to melt too quickly and become stringy. Use approximately 1 1/2 cups of shredded mozzarella for a 12-inch pizza. Grate your parmesan cheese freshly; pre-grated parmesan often contains cellulose which can affect the melt. Add about 2 tablespoons of grated parmesan per pizza for a nice sharpness.
Fresh Herbs: Fresh herbs like basil, oregano, or rosemary add a burst of freshness and aroma. Chop them finely just before adding them to the pizza. Avoid adding herbs too early, as they will wilt and lose their flavor and vibrant color. A tablespoon or two of chopped fresh basil is perfect for a 12-inch pizza.
Oil and Seasoning: A light drizzle of olive oil on your vegetables before adding them to the pizza can help prevent sticking and enhance their flavor. Season your vegetables and meats lightly with salt and pepper. Avoid over-seasoning, as the sauce and cheese will also contribute to the overall flavor profile. Remember to taste your toppings before adding them to your pizza to ensure they are well seasoned.
Organization is Key: Before you start assembling your pizza, have all your prepared toppings ready in separate bowls. This will streamline the pizza-making process and prevent your toppings from getting soggy while you’re assembling the pizza.
Assembly
With your perfectly prepared dough and flavorful sauce ready, it’s time for the most satisfying part: assembling your masterpiece. This stage requires precision and a light touch to ensure a balanced and delicious pizza.
Begin by lightly dusting a clean work surface with flour – about 2 tablespoons should suffice. This prevents the dough from sticking. Gently transfer your prepared pizza dough to the floured surface. Avoid excessive handling, as this can toughen the dough.
Using your fingertips, carefully stretch and gently press the dough outwards, working from the center to create a roughly 12-inch circle. Don’t worry about perfect roundness; a slightly irregular shape adds character. Aim for a relatively even thickness, around 1/4 inch. If the dough springs back quickly, let it rest for 5-10 minutes before continuing. Covering it with a damp cloth helps prevent it from drying out.
Once you’ve achieved your desired shape and size, carefully transfer the dough to your pizza stone or baking sheet. If using parchment paper, place the paper on the stone first and then transfer the dough onto the paper. This makes it easier to move the pizza later.
Now comes the sauce. Using the back of a spoon, spread a thin and even layer of your homemade pizza sauce over the dough, leaving about a half-inch border. Too much sauce will make the crust soggy. Aim for approximately 1/2 cup to 3/4 cup of sauce, depending on the size of your pizza and your preference.
Next, add your cheese. Start with a layer of mozzarella cheese—approximately 1 1/2 cups, shredded. Distribute it evenly across the sauce, covering the entire surface except for the crust border. This helps ensure even melting and browning.
Now for the toppings! This is where your creativity shines. Remember to consider the weight of your toppings; heavier toppings should go on the bottom. Arrange your chosen toppings in an aesthetically pleasing manner, avoiding overcrowding. A good rule of thumb is to leave a little space between each topping for even cooking and to prevent them from sliding off during baking.
For a 12-inch pizza, a good guideline for topping quantity is: 1/2 cup of sliced mushrooms, 1/2 cup of sliced peppers, 1/2 cup of pepperoni slices, etc. Adjust quantities according to your preferences and the size of your pizza. Don’t overload the pizza with toppings; it could hinder proper baking and create a soggy crust.
Finally, if desired, you can sprinkle a little extra Parmesan cheese over the toppings for added flavor and visual appeal. Once assembled, your pizza is ready for the oven! Remember to preheat your oven to the recommended temperature before placing your pizza inside for optimal results.
Baking Your Pizza to Perfection
Baking the pizza is the culmination of your hard work, and getting it right will make all the difference between a good pizza and a truly great one. The key lies in achieving a perfectly crisp crust and evenly melted cheese, without burning the toppings or leaving the bottom doughy.
Preheat your oven to its maximum temperature. This is crucial for achieving that characteristically crisp crust. Most home ovens will reach a maximum of around 500°F (260°C), but even hotter is better if your oven allows it. A pizza stone or steel will greatly help retain this heat and facilitate even baking. Preheat your pizza stone or steel for at least 30 minutes, ideally an hour, before baking. This allows it to absorb and radiate heat efficiently.
Using a pizza peel is highly recommended. A pizza peel, a long, flat paddle, allows you to easily transfer your pizza from your prep surface to the hot pizza stone or baking sheet. If you don’t have one, a rimless baking sheet will work, but transferring the pizza might be trickier. Lightly dust your peel or baking sheet with cornmeal or semolina flour to prevent sticking. This is especially important for thinner crusts.
Transferring the pizza to the hot surface is quick and decisive. Once your oven is preheated and the stone is scorching hot, carefully slide your pizza onto the preheated pizza stone or baking sheet. This should be a smooth, swift movement. Hesitation can lead to sticking. Use a quick, confident motion to avoid tearing the crust or sticking the pizza to the peel.
Baking time depends on several factors: your oven’s heat, the thickness of the crust, and the amount of toppings. A thin crust pizza will bake much faster than a thick one. For a 12-inch pizza with a thin crust and moderate toppings, expect a baking time of 8-12 minutes. Start checking for doneness around the 8-minute mark. The crust should be golden brown and crispy, and the cheese should be melted and bubbly. A simple visual inspection is sufficient.
Rotate the pizza halfway through baking. This ensures even cooking. Use your pizza peel to gently lift and rotate the pizza 180 degrees. This helps prevent one side from burning while the other remains pale. Observe the pizza closely during the final minutes of baking to prevent burning.
Remove the pizza from the oven using your pizza peel. Once baked, carefully slide the pizza off the hot stone using your pizza peel. Transfer it to a wire rack to cool slightly before slicing and serving. Allowing it to cool slightly will help the cheese set and make it easier to slice cleanly.
Experiment with different baking times and temperatures. Every oven is slightly different, so don’t be afraid to experiment to find the perfect baking time and temperature for your oven and pizza recipe. Keep notes on what works best for you. Enjoy your delicious homemade pizza!
Recommendations for the Best Homemade Pizza
To achieve truly exceptional homemade pizza, meticulous attention to detail is key. Start with high-quality ingredients; the better your flour, cheese, and toppings, the better your pizza will taste. Don’t skimp on the olive oil – a good quality extra virgin olive oil will elevate the flavor profile significantly. Experiment with different types of flour to find your perfect dough consistency. Consider using a pizza stone or steel for optimal crust crispness; preheating it thoroughly is crucial for a satisfyingly crunchy base.
Proper dough handling is paramount. Allow the dough sufficient time to rise, ensuring a light and airy texture. Don’t rush the kneading process; well-kneaded dough creates a more elastic and flavorful crust. For a more authentic Neapolitan style, consider using a high-hydration dough. Practice tossing the dough if you’re feeling adventurous, but a simple roll-out method works perfectly well too.
Sauce selection significantly impacts the overall taste. While a classic tomato sauce is always a winner, don’t be afraid to experiment! Try a creamy pesto base, a white garlic sauce, or even a spicy arrabbiata sauce. Remember to season your sauce generously with salt, pepper, garlic, and herbs. Consider adding a touch of sugar to balance the acidity of the tomatoes.
Cheese is the star of the show. Use a blend of cheeses for a more complex flavor profile. Mozzarella is a classic choice, but adding parmesan, provolone, or ricotta can add depth and texture. Ensure your cheese is evenly distributed across the pizza to avoid uneven browning and flavor imbalances. Remember to grate your cheese rather than shredding it pre-packaged, as this will melt more evenly.
Serving Suggestions: Serve your homemade pizza immediately after baking for the best crust and cheese texture. Consider offering various toppings on the side for guests to customize their slices. A simple arugula salad with a balsamic vinaigrette makes a refreshing accompaniment. For a heartier side, try a Caprese salad or a side of roasted vegetables.
Storage: Leftover pizza can be stored in an airtight container in the refrigerator for up to 3 days. Reheat slices in a skillet over medium heat for a crispier crust, or in the oven at a moderate temperature to avoid drying it out. Freezing is also an option; wrap individual slices tightly in plastic wrap, then place them in a freezer bag for up to 3 months.
Complementary Dishes: Homemade pizza pairs wonderfully with a crisp, light-bodied white wine like Pinot Grigio or Sauvignon Blanc. For a more robust pairing, consider a Chianti or a light-bodied red. A simple garlic bread or bruschetta can also be a welcome addition to your pizza meal.
Nutritional Information (per slice, approximate, varies based on ingredients): Calories: 250-400; Fat: 10-20g; Saturated Fat: 5-10g; Cholesterol: 20-40mg; Sodium: 300-600mg; Carbohydrates: 30-40g; Fiber: 2-4g; Sugar: 2-5g; Protein: 10-15g. Note: This is an estimate, and the actual nutritional content will vary depending on the specific ingredients used and the size of the pizza.
Enjoy your delicious homemade pizza!