The moist chocolate cake, a seemingly simple yet deeply satisfying dessert, boasts a surprisingly rich and complex history. While pinpointing its exact origin is impossible, its story is interwoven with the evolution of chocolate itself. The earliest forms of chocolate, consumed by the Olmec civilization centuries before the common era, were far removed from the sweet treat we know today. These bitter, spicy drinks, however, laid the groundwork for the eventual development of cocoa-based confections. The widespread adoption of sugar in Europe during the Age of Exploration played a crucial role, allowing for the creation of sweeter chocolate-based desserts. The precise moment the “moist chocolate cake” as we recognize it emerged is lost to time, but its popularity exploded alongside the rise of readily available baking ingredients and home ovens in the 19th and 20th centuries.
The cultural significance of chocolate cake, and moist chocolate cake specifically, is undeniable. It’s a mainstay at celebrations worldwide, from birthdays and anniversaries to graduations and holidays. Its prevalence in popular culture is equally significant; from countless films and television shows featuring the decadent dessert to its omnipresence in baking competitions and home kitchens, it holds a prominent position in our collective culinary consciousness. In the United States alone, it is estimated that over 200 million chocolate cakes are baked and consumed annually, a testament to its enduring appeal. This statistic, while difficult to verify precisely, demonstrates the truly massive scale of its consumption.
The “moist” aspect of the cake is key to its appeal. Unlike dry, crumbly alternatives, a properly made moist chocolate cake boasts a tender crumb structure and a rich, intensely flavorful chocolate taste. This texture is achieved through careful attention to ingredients and baking techniques. The use of oil, buttermilk, or sour cream, for example, contributes significantly to moisture retention, while proper baking time prevents over-drying. The quest for the ultimate moist chocolate cake has spawned countless recipes, each with subtle variations aimed at optimizing texture and flavor. This ongoing culinary exploration underscores the cake’s enduring fascination and its ability to inspire creativity and innovation among bakers of all skill levels. Indeed, the seemingly simple moist chocolate cake represents a rich tapestry of history, culture, and culinary artistry.
Ingredients and Measurements
Creating a truly moist and delicious chocolate cake hinges on the precise measurement and quality of your ingredients. This recipe calls for specific ingredients for optimal results, so please ensure you have everything on hand before you begin.
Butter: We’ll be using 1 cup (2 sticks) of unsalted butter, softened to room temperature. This is crucial! Using cold butter will result in a lumpy batter that won’t incorporate properly. Room temperature butter allows for even distribution and maximum creaming with the sugar, leading to a tender crumb. Make sure your butter is truly soft, almost spreadable, but not melted. If you accidentally melt some, allow it to cool slightly before proceeding.
Sugar: The recipe uses 1 ¾ cups (350g) of granulated sugar. This amount contributes to the cake’s moistness and sweetness. Do not substitute with other sugars like brown sugar or powdered sugar without adjusting the recipe accordingly, as they have different moisture content and will alter the final texture. Accurate measurement is essential here; use a kitchen scale for the most precise results.
Eggs: We need 4 large eggs at room temperature. Room temperature eggs emulsify better with the other wet ingredients, creating a smoother batter and a more even rise. If your eggs are cold, let them sit at room temperature for about 30 minutes before starting.
Cocoa Powder: Use 1 ½ cups (180g) of unsweetened cocoa powder. The quality of your cocoa powder significantly impacts the flavor and richness of the cake. Dutch-processed cocoa powder will give a deeper, slightly less acidic flavor, while natural cocoa powder will be slightly more tart. Choose your preferred type, but be consistent with the amount.
Flour: This recipe requires 2 cups (250g) of all-purpose flour. Spoon the flour into your measuring cup and level it off with a straight edge. Do not scoop the flour directly from the bag, as this will pack it down and result in an inaccurate measurement, leading to a dry cake. Using a kitchen scale provides the most accurate way to measure flour.
Baking Powder: 2 teaspoons of baking powder is used as a leavening agent. Ensure your baking powder is fresh; old baking powder can lose its effectiveness, leading to a cake that doesn’t rise properly. Check the expiration date on the container.
Baking Soda: 1 teaspoon of baking soda works in conjunction with the baking powder to ensure a light and airy texture. Like baking powder, ensure your baking soda is fresh and potent.
Salt: ½ teaspoon of salt enhances the other flavors in the cake and balances the sweetness. Don’t skip the salt! It’s a crucial ingredient for a well-balanced flavor profile.
Milk: 1 cup (240ml) of milk (whole milk is recommended) adds moisture to the batter. You can substitute with buttermilk for a tangier flavor, but adjust accordingly. Use room temperature milk for consistent batter consistency.
Vanilla Extract: 1 teaspoon of pure vanilla extract adds a delightful aroma and flavor to the cake. Avoid using imitation vanilla, as it won’t provide the same depth of flavor.
Boiling Water: 1 cup (240ml) of freshly boiled water is added to the batter to create a wonderfully moist and rich chocolate flavor. Add the boiling water slowly and carefully, whisking constantly to prevent lumps.
Equipment List: Moist Chocolate Cake
Baking a truly moist and delicious chocolate cake requires not only the right ingredients but also the right tools. This equipment list details everything you’ll need, from essential baking pans to helpful but optional gadgets. Accurate measurements are crucial for consistent results, so having the right measuring tools is paramount.
Measuring Cups and Spoons: You’ll need a set of both dry and liquid measuring cups. Dry measuring cups (1 cup, ½ cup, ⅓ cup, ¼ cup) are essential for accurately measuring flour, sugar, and cocoa powder. Use the spoon and level method for dry ingredients to avoid packing them down. Liquid measuring cups (at least a 2-cup capacity) are crucial for measuring liquids like milk, oil, and melted butter. Accurate measuring spoons (1 tbsp, 1 tsp, ½ tsp, ¼ tsp) are also vital for smaller ingredients like baking powder and baking soda. Invest in a good quality set for precise measurements.
Mixing Bowls: At least three mixing bowls of varying sizes are recommended. A large bowl (at least 4-quart capacity) is needed for creaming together butter and sugar. A medium-sized bowl is perfect for whisking together dry ingredients, and a smaller bowl is useful for melting chocolate or preparing other ingredients separately. Stainless steel or glass bowls are preferred as they are durable and non-reactive.
Baking Pans: The choice of baking pan depends on your desired cake shape and size. For a classic layer cake, two 9-inch round cake pans are ideal. Alternatively, you could use a single 9×13 inch rectangular pan, which results in a thinner, sheet-style cake. Ensure your pans are well-greased and floured or lined with parchment paper to prevent sticking. Using parchment paper circles at the bottom of round pans is especially helpful for easy removal.
Rubber Spatula or Wooden Spoon: A sturdy rubber spatula or wooden spoon is essential for scraping down the sides of the bowl during mixing, ensuring all ingredients are incorporated properly. A flexible spatula is particularly useful for getting into the corners of the bowl and ensuring a smooth batter.
Whisk: A whisk is needed for thoroughly combining dry ingredients and for creating a smooth batter. A balloon whisk is ideal for its efficiency in incorporating air.
Electric Mixer (Optional but Highly Recommended): While you can make a chocolate cake by hand, an electric mixer (handheld or stand mixer) makes the process significantly easier and faster, especially when creaming butter and sugar. A stand mixer offers more power and convenience, but a handheld mixer works perfectly well for smaller batches.
Oven: A properly functioning oven is crucial for even baking. Ensure your oven is preheated to the correct temperature before placing the cake batter inside. An oven thermometer is a useful tool to verify the accuracy of your oven’s temperature setting.
Cooling Rack: A wire cooling rack allows for proper air circulation around the cake, preventing it from becoming soggy. Allowing the cake to cool completely on a rack before frosting is crucial for preventing a melted frosting disaster.
Cake Server (Optional): While not strictly necessary for baking, a cake server is a handy tool for cleanly slicing and serving your delicious creation.
Preparation of Ingredients (Mise en Place)
Before you begin baking your moist chocolate cake, meticulously preparing your ingredients – a process known as mise en place – is crucial for a smooth and efficient baking experience. This ensures consistent baking and prevents last-minute rushes that can lead to errors.
Measuring Dry Ingredients: Accuracy is paramount when it comes to baking. Use a kitchen scale for the most precise measurements, especially for flour, cocoa powder, and sugar. If using measuring cups, spoon the dry ingredients into the cups and level them off with a straight edge, avoiding scooping directly from the bag, which can lead to packed measurements and an inaccurate final product. For a standard 9-inch round cake, you’ll typically need approximately 2 cups of all-purpose flour, ¾ cup unsweetened cocoa powder, and 1 ¾ cups granulated sugar. Ensure all dry ingredients are fresh; stale flour or cocoa can negatively impact the texture and taste of your cake.
Preparing the Wet Ingredients: The wet ingredients require equal attention. Begin by measuring out the liquids precisely. For this recipe, you’ll need 1 cup of buttermilk (or substitute with 1 cup milk + 1 tbsp lemon juice or white vinegar), ½ cup vegetable oil, and 2 large eggs. Use room temperature ingredients whenever possible. Cold ingredients can lead to uneven mixing and a less-than-ideal texture. Let the eggs sit at room temperature for at least 30 minutes before use. Similarly, allow the buttermilk to come to room temperature for optimal emulsification with the other wet ingredients. Measure the oil accurately using a liquid measuring cup, ensuring you read the measurement at eye level.
Preparing the Chocolate: The quality of your chocolate significantly impacts the flavor profile of your cake. For a rich, intense chocolate flavor, use high-quality unsweetened chocolate. You’ll typically need 4 ounces (113g) of unsweetened chocolate, finely chopped or grated. Smaller pieces will melt more evenly. If using chocolate chips, be aware that they might contain added stabilizers that can slightly impact the texture. If using a chocolate bar, break it into small pieces for quicker melting.
Preparing the Other Ingredients: Don’t forget the leavening agents and other crucial components. You will need 1 teaspoon of baking soda and 1 ½ teaspoons of baking powder. Ensure these are fresh as their effectiveness diminishes over time. You might also need a teaspoon of salt to balance the sweetness and enhance the overall flavor. Finally, prepare your vanilla extract; 1 teaspoon is usually sufficient. Keep all ingredients within easy reach near your mixing bowls to streamline the baking process.
Organizing Your Workspace: Once all ingredients are measured and prepared, organize them in a logical manner. This will significantly reduce the time spent searching for ingredients during the mixing process. Have your dry ingredients in separate bowls, your wet ingredients in another set of bowls, and your chocolate readily available for melting. This mise en place approach will make the baking process more efficient and less stressful, allowing you to focus on the techniques and enjoy the baking experience.
Mixing the Batter (Wet and Dry Ingredients)
Creating a perfectly moist chocolate cake hinges on the proper combination of wet and dry ingredients. This section details the crucial steps to ensure a smooth, lump-free batter that will yield a delicious result. We’ll be using the following recipe as a base, but the techniques are adaptable to other recipes.
Recipe Base (adjust as needed for your specific recipe):
- 2 cups (250g) all-purpose flour
- 2 cups (400g) granulated sugar
- ¾ cup (60g) unsweetened cocoa powder
- 1 ½ teaspoons baking powder
- 1 ½ teaspoons baking soda
- 1 teaspoon salt
- 1 cup (240ml) buttermilk
- ½ cup (120ml) vegetable oil
- 2 large eggs
- 2 teaspoons vanilla extract
- 1 cup (240ml) freshly brewed hot coffee
Step 1: Whisking the Dry Ingredients: Begin by whisking together the dry ingredients in a large bowl. This includes the flour, sugar, cocoa powder, baking powder, baking soda, and salt. Ensure you thoroughly whisk these ingredients to eliminate any lumps and distribute the leavening agents evenly. This step is crucial for a uniform texture in your final cake.
Step 2: Combining the Wet Ingredients: In a separate bowl, whisk together the wet ingredients: buttermilk, oil, eggs, and vanilla extract. Don’t overmix the wet ingredients; a quick whisk to combine is sufficient. Overmixing can incorporate too much air, leading to a tough cake.
Step 3: Gradually Adding Wet to Dry: This is where careful technique is key. Gradually add the wet ingredients to the dry ingredients, mixing on low speed with an electric mixer (or vigorously by hand) until just combined. Avoid overmixing at this stage. Overmixing develops the gluten in the flour, resulting in a dense, chewy cake rather than a light and moist one. The batter should be smooth but not overly mixed. A few small lumps are acceptable; don’t strive for absolute perfection here.
Step 4: Incorporating the Hot Coffee: Slowly pour in the hot brewed coffee while mixing on low speed. The hot coffee helps to activate the cocoa powder, creating a richer chocolate flavor and a more moist cake. Be careful when adding the hot liquid to prevent splattering. Mix until the batter is completely smooth and homogenous.
Step 5: Checking for Consistency: The final batter should be smooth, with a pourable consistency. If it seems too thick, you may need to add a tablespoon or two of additional buttermilk. If it’s too thin, add a tablespoon or two of flour. Always test the batter before pouring it into the prepared pans.
Professional Recommendations: Using room temperature ingredients helps ensure even mixing and baking. Sifting the dry ingredients prior to combining can also help prevent lumps. Lastly, remember that patience and attention to detail are crucial for baking a perfect moist chocolate cake. Don’t rush the process, and enjoy the journey!
Baking the Cake
Preheat your oven to 350°F (175°C). This is crucial for even baking. A thermometer is recommended to ensure accuracy; variations in oven temperature can significantly impact the outcome.
Grease and flour two 9-inch round cake pans. This prevents sticking and ensures easy removal of the baked cakes. Don’t skip this step! Use a neutral-flavored oil like vegetable or canola oil, and lightly dust with all-purpose flour. You can also line the bottoms of the pans with parchment paper for extra insurance.
In a large bowl, whisk together 2 cups (250g) all-purpose flour, 2 cups (400g) granulated sugar, ¾ cup (60g) unsweetened cocoa powder, 1 ½ teaspoons baking powder, 1 ½ teaspoons baking soda, and 1 teaspoon salt. Ensure all dry ingredients are thoroughly combined to prevent pockets of baking powder or soda from creating uneven rising.
In a separate bowl, whisk together 1 cup (240ml) buttermilk, ½ cup (120ml) vegetable oil, 2 large eggs, 2 teaspoons vanilla extract, and 1 cup (240ml) freshly brewed hot coffee. The hot coffee adds intense chocolate flavor and moisture. Let the coffee cool slightly before adding it to the wet ingredients to prevent the eggs from scrambling.
Gradually add the wet ingredients to the dry ingredients, mixing on low speed with an electric mixer until just combined. Overmixing will develop the gluten in the flour, resulting in a tough cake. Mix only until no streaks of dry ingredients remain. A few lumps are okay.
Divide the batter evenly between the prepared cake pans. Use a kitchen scale for precise measurement to ensure even baking. Unevenly filled pans will result in unevenly baked cakes. Gently smooth the tops of the batter with a spatula.
Bake for 30-35 minutes, or until a wooden skewer inserted into the center comes out clean. Start checking for doneness around the 30-minute mark to avoid overbaking. Overbaked cakes will be dry.
Let the cakes cool in the pans for 10 minutes before inverting them onto a wire rack to cool completely. Cooling completely is essential before frosting. If you frost warm cakes, the frosting will melt.
Once the cakes are completely cool, you can frost them with your favorite chocolate frosting. Enjoy your delicious, moist chocolate cake!
Professional Tip: For an extra moist cake, consider adding a tablespoon of apple cider vinegar to the wet ingredients. The acid in the vinegar reacts with the baking soda, creating extra lift and moisture.
Cooling the Cake
Cooling your chocolate cake properly is just as crucial as baking it perfectly. Improper cooling can lead to a dense, crumbly cake, or even cracking on the surface. This section details the best methods to ensure your moist chocolate cake cools evenly and retains its optimal texture.
The first step is to let the cake cool in the pan for 10-15 minutes after removing it from the oven. This allows the internal structure to set slightly, preventing it from collapsing when you invert it. Resist the urge to rush this process; patience is key here. Leaving it in the pan for too long, however, can lead to excessive moisture retention and a soggy bottom.
After the initial 10-15 minutes, you’ll need to invert the cake onto a wire rack. This is where having the right tools makes a difference. Use a wire rack that’s slightly larger than your cake pan to provide ample support and prevent the cake from bending or cracking. To invert safely, place the wire rack over the cake pan. Then, carefully flip the pan and cake together, ensuring the cake lands gently on the rack. If you’re using a springform pan, gently release the sides before inverting.
Never place a hot cake directly onto a flat surface such as a countertop or cutting board. This will trap the heat and steam, leading to uneven cooling and a potentially soggy bottom. The wire rack allows for air circulation around the cake, promoting even cooling from all sides.
Once inverted, allow the cake to cool completely at room temperature. This typically takes about 1-2 hours for a standard 9-inch round cake. Larger cakes or those baked in deeper pans will require longer cooling times. You can test if the cake is completely cool by gently touching the top; it should be at room temperature.
During the cooling process, resist the temptation to cover the cake immediately. Covering a warm cake traps moisture, potentially leading to condensation and a soggy surface. Once the cake is completely cool, you can then wrap it tightly in plastic wrap or place it in an airtight container to prevent it from drying out. This is especially important if you’re not frosting or serving the cake immediately.
Proper cooling is essential for achieving a moist, delicious chocolate cake. By following these steps carefully, you’ll ensure your cake is perfectly cooled and ready for frosting or serving. Remember, patience and the right tools are key to success.
Professional Tip: For extra even cooling, consider placing the wire rack over a baking sheet. This will catch any drips or crumbs that might fall during the cooling process, making cleanup easier.
Moist Chocolate Cake: Recommendations
This decadent moist chocolate cake is best enjoyed at room temperature for optimal flavor and texture. Allow the cake to sit for at least 30 minutes after baking before frosting and slicing to prevent crumbling. For the richest chocolate experience, serve the cake within 2-3 days of baking. After that, the moisture content may begin to diminish, though it will still be delicious!
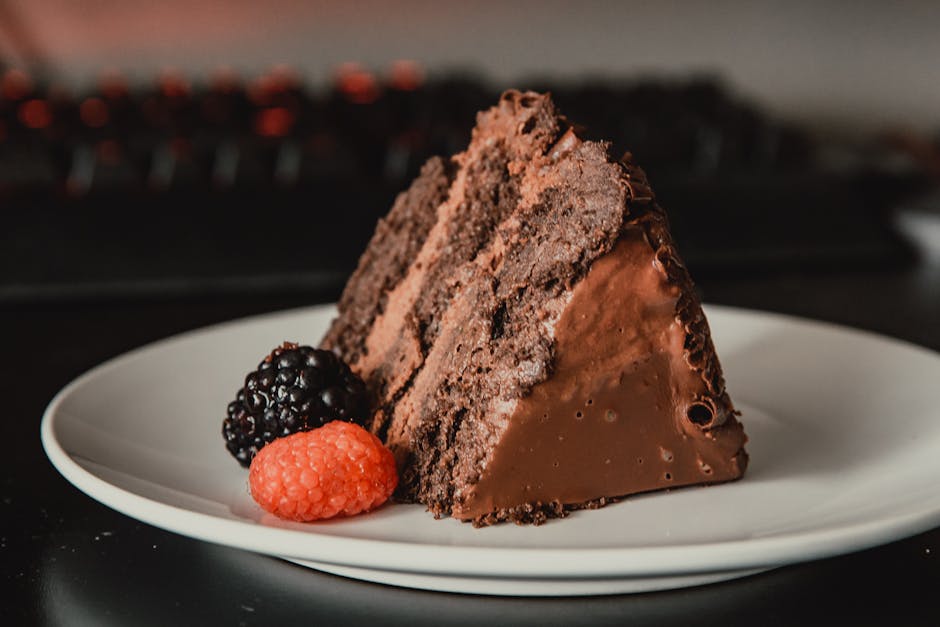
Serving Suggestions: This moist chocolate cake is incredibly versatile. A classic serving is a simple slice, dusted with powdered sugar, accompanied by a scoop of vanilla ice cream or a dollop of whipped cream. For a more sophisticated presentation, consider serving individual slices garnished with fresh berries (strawberries, raspberries, blueberries), chocolate shavings, or a drizzle of chocolate ganache. A sprinkle of sea salt on top can enhance the chocolate flavor surprisingly well.
Storage: To maintain its freshness and moistness, store leftover cake in an airtight container at room temperature for up to 3 days. For longer storage (up to a week), wrap the cake tightly in plastic wrap and then aluminum foil, and refrigerate. Remember to bring the cake to room temperature before serving if it has been refrigerated. Freezing is also an option for longer storage – wrap the cake tightly and freeze for up to 2 months. Thaw overnight in the refrigerator before serving.
Complementary Dishes: The rich chocolate flavor of this cake pairs beautifully with a variety of beverages and desserts. A strong cup of coffee or a glass of cold milk are classic accompaniments. For a more decadent experience, consider serving it with a rich hot chocolate or a glass of port wine. As for other dishes, a light and refreshing fruit salad or a scoop of tangy sorbet can provide a delightful contrast to the richness of the cake. For a truly indulgent meal, serve the cake alongside a scoop of coffee ice cream or a chocolate mousse.
Nutritional Information (per serving, approximate values may vary based on recipe and serving size):
- Calories: Approximately 350-450 kcal
- Fat: 18-25g
- Saturated Fat: 10-15g
- Cholesterol: 50-75mg
- Sodium: 150-250mg
- Carbohydrates: 50-60g
- Sugar: 30-40g
- Protein: 4-6g
Note: This nutritional information is an estimate and may vary depending on the specific ingredients used and the size of the serving. For precise nutritional information, use a nutrition calculator with your specific recipe ingredients.