Prepare to embark on a culinary journey to Thailand with our recipe for Easy Thai Mango Sticky Rice, a dessert that transcends mere sweetness to become a symbol of Thai culture and hospitality. This iconic dish, beloved both domestically and internationally, boasts a history as rich and layered as its flavors. While pinpointing the exact origin is difficult, its components – sticky rice and mangoes – have been staples in Southeast Asian cuisine for centuries. Sticky rice, or khao niao, holds a particularly significant place in Thai culture, often associated with celebrations, festivals, and offerings to deities. Its chewy texture and ability to absorb flavors make it the perfect base for this delightful dessert.
The combination of sweet, ripe mango and subtly sweet sticky rice, often drizzled with a creamy coconut milk sauce, is a testament to the Thai philosophy of balancing sweet and savory, a principle found throughout their culinary traditions. Mangoes themselves are widely cultivated in Thailand, with the country being a major global exporter; in fact, Thailand is one of the world’s top three mango producers, contributing significantly to its global economy. The exact time this specific combination of sticky rice and mango emerged as a popular dessert is uncertain, but its popularity exploded in the latter half of the 20th century, becoming a national favorite and a must-try for tourists. Its widespread appeal has contributed to its global recognition as a quintessential Thai dessert.
Beyond its deliciousness, Mango Sticky Rice carries significant cultural weight. It’s frequently served at celebrations, weddings, and other important occasions, symbolizing prosperity, sweetness, and good fortune. The vibrant yellow of the mango and the pearly white of the sticky rice evoke a sense of visual harmony, reflecting the aesthetic appreciation found within Thai art and design. Furthermore, the preparation and sharing of this dessert often involves family and community, strengthening bonds and creating memorable experiences. It’s estimated that over 80% of Thai households prepare this dessert at least once a year, highlighting its deep integration into everyday life and special celebrations alike. This recipe aims to bring the authentic taste and cultural significance of this beloved dessert right into your kitchen.
Ingredients and Measurements
This recipe for Easy Thai Mango Sticky Rice yields approximately 4 servings. Accurate measurements are crucial for achieving the perfect texture and balance of flavors. We’ll be utilizing both metric and imperial measurements for your convenience. Always use a kitchen scale for the most accurate results, especially when measuring rice and sugar.
For the Sticky Rice:
- 1 cup (200g) glutinous rice (also known as sweet rice or sticky rice). Ensure you use glutinous rice, as regular rice won’t achieve the desired sticky texture. Look for it in Asian grocery stores or the international aisle of larger supermarkets. Rinse the rice thoroughly under cold water until the water runs clear. This removes excess starch and prevents clumping.
- 1 ¼ cups (300ml) coconut milk (full-fat is recommended for richness). Using full-fat coconut milk is essential for creating a creamy and flavorful sauce. Light coconut milk will result in a thinner, less flavorful sauce.
- ½ cup (100g) granulated sugar. Adjust to your preference, but start with this amount and taste before adding more. The sweetness of the mangoes will also impact the overall sweetness of the dish.
- ¼ cup (60ml) water.
- 1 teaspoon salt. A pinch of salt enhances the sweetness and balances the flavors.
For the Mango:
- 2 ripe mangoes (about 1 pound/450g total). Choose ripe mangoes that are fragrant and slightly soft to the touch. The sweetness of the mango will greatly influence the overall taste of the dessert. Ataulfo mangoes (honey mangoes) are particularly good, but any ripe mango will work.
Optional Garnishes (for an extra touch of elegance):
- Toasted sesame seeds (about 1 tablespoon).
- Fresh mint leaves (a few sprigs).
- A drizzle of extra coconut milk.
Important Considerations:
- Soaking the rice: Soaking the glutinous rice for at least 4 hours, or preferably overnight, is crucial. This allows the rice to absorb moisture and cook evenly, resulting in a perfectly sticky texture.
- Cooking the rice: Steam the rice rather than boiling it. Steaming ensures that the rice retains its moisture and remains perfectly sticky. Follow the steaming instructions carefully.
- Adjusting sweetness: Taste the coconut milk mixture before adding it to the cooked rice. Adjust the sugar according to your preference. It’s always easier to add more sugar than to take it away.
By following these measurements and recommendations, you’ll be well on your way to creating a delicious and authentic Easy Thai Mango Sticky Rice.
Equipment List
Making delicious Thai Mango Sticky Rice requires the right tools to ensure a smooth and successful cooking process. While some items might seem optional, using the recommended equipment will significantly improve the outcome and your overall experience in the kitchen. Below is a detailed list of equipment, categorized for clarity.
Measuring Tools: Accuracy is key in baking and cooking, especially when dealing with delicate recipes like sticky rice. You’ll need a set of measuring cups (1-cup, ½-cup, ¼-cup, and ⅛-cup) for dry ingredients such as rice flour and sugar. A set of measuring spoons (1 tbsp, 1 tsp, ½ tsp) is essential for precise measurements of smaller ingredients like salt and coconut milk powder. A kitchen scale (preferably one that measures in grams and ounces) is highly recommended for more accurate measurements of sticky rice and other ingredients, providing consistent results. Investing in a good quality set of measuring tools will significantly improve the consistency of your recipes.
Cooking Vessels: A medium-sized saucepan (approximately 2-quart capacity) is needed for cooking the sticky rice. The size is crucial for ensuring even cooking and preventing the rice from sticking to the bottom. A separate small saucepan (approximately 1-quart capacity) is useful for preparing the coconut milk mixture. A steamer basket that fits comfortably inside a larger pot is essential for steaming the sticky rice. Ensure the steamer basket is made of high-quality, heat-resistant material and has adequate ventilation to allow steam to circulate freely. Avoid using non-stick pans for cooking sticky rice as the starch can damage the coating over time.
Serving & Preparation Utensils: A sturdy wooden spoon or spatula is ideal for stirring the sticky rice and coconut milk mixture. Wooden utensils are less likely to scratch your cookware and are better suited for handling sticky substances. A large mixing bowl (at least 3-quart capacity) is needed for combining ingredients and mixing the sticky rice. A sharp knife is necessary for cutting the mango into attractive slices. A serving bowl or individual ramekins are essential for presenting your finished dish. Consider using a beautiful bowl to enhance the visual appeal of the dessert.
Optional but Recommended Equipment: While not strictly necessary, a rice cooker can simplify the cooking process, especially for beginners. A food processor can be used to quickly and efficiently grind coconut flakes into coconut milk powder, though store-bought powder is readily available. A thermometer is helpful for monitoring the temperature of the coconut milk mixture, ensuring it doesn’t become too hot. Using a thermometer can refine your control over the cooking process, resulting in a more refined final product.
Cleaning Supplies: Having the appropriate cleaning supplies readily available is crucial for a smooth and efficient cooking process. This includes a sponge, dish soap, and potentially a kitchen degreaser to tackle any sticky residue left behind from the sticky rice. Having these on hand minimizes disruption during cooking and ensures a quick and easy cleanup afterward. Proper cleaning is essential to maintain the longevity of your kitchen equipment.
Instructions: Preparing the Mango
Selecting the perfect mango is crucial for the success of your Thai Mango Sticky Rice. Look for mangoes that are firm yet slightly yielding to gentle pressure. Avoid mangoes that are overly hard or have bruises or soft spots. The best mangoes for this recipe are ripe but not overripe; they should be fragrant and have a vibrant yellow-orange or reddish hue, depending on the variety.
Once you’ve chosen your mangoes, the next step is washing them thoroughly. Rinse the mangoes under cold running water, scrubbing gently to remove any dirt or residue from the skin. Thorough washing is essential for food safety.
Now, it’s time to peel the mango. Using a sharp paring knife, carefully slice the skin away from the mango, following the curve of the fruit. Be careful not to cut into the flesh; a thin layer of skin left behind is perfectly acceptable. Some people prefer to use a vegetable peeler for this step, but a sharp knife offers more control and prevents waste.
After peeling, you’ll need to remove the large, flat pit from the center of the mango. The easiest way to do this is to stand the mango upright on one of its ends, and then carefully slice down each side of the pit, following its natural curve. You should end up with two large, roughly C-shaped pieces of mango. Avoid cutting too deeply and accidentally removing too much mango flesh.
Finally, prepare the mango for serving. You have several options depending on your preference. You can slice the mango into thin, elegant slices, creating a visually appealing presentation. Alternatively, you can dice the mango into smaller, bite-sized cubes, which are perfect for mixing with the sticky rice. For a visually stunning dish, consider using a combination of both slices and cubes. Aim for approximately 1-1.5 pounds (450-680 grams) of ripe mango for a serving of 2-4 people.
If you’re preparing the mangoes ahead of time, it’s best to store them in an airtight container in the refrigerator. Avoid storing the cut mango for more than 24 hours to maintain its optimal flavor and texture. The mango will oxidize and brown over time, but this doesn’t affect the taste significantly.
Remember that the preparation time for the mangoes is relatively quick, but choosing the right mangoes and taking your time with the peeling and slicing will ensure a beautiful and delicious final dish. Enjoy the process and the delightful taste of freshly prepared mango!
Instructions: Cooking the Rice
Cooking perfect Thai sticky rice is key to a delicious Mango Sticky Rice dessert. This seemingly simple process requires attention to detail to achieve that wonderfully chewy texture. We’ll be using 1 cup of glutinous rice (also known as sweet rice), which is essential for the signature stickiness. Before you begin, rinse the rice thoroughly under cold water. This removes excess starch and helps prevent clumping. Continue rinsing until the water runs almost clear, about 5-7 times.
Next, soak the rinsed rice in plenty of cold water for at least 4-6 hours, or ideally overnight. Soaking is crucial; it allows the rice to fully hydrate, resulting in a softer, more evenly cooked texture. If you’re short on time, a minimum of 4 hours is necessary, but overnight soaking yields the best results. After soaking, drain the rice completely in a fine-mesh sieve. Don’t skip this step; excess water will lead to mushy rice.
Now, you’ll need a rice cooker (highly recommended for ease and consistency) or a heavy-bottomed saucepan with a tight-fitting lid. For rice cookers, simply add the drained rice to the cooker, along with 1 ¼ cups of water. The water-to-rice ratio is vital. Using too little water will result in dry, hard rice, while too much will produce mushy rice. The 1 ¼ cup measurement is a guideline; you might need to slightly adjust it depending on your rice cooker and the type of rice.
If using a saucepan, add the drained rice and water to the pan. Bring the mixture to a boil over high heat, uncovered. Once boiling, immediately reduce the heat to the lowest setting, cover the pan tightly, and simmer for 20 minutes. Do not lift the lid during this time, as this will cause steam to escape and the rice will not cook evenly. After 20 minutes, turn off the heat and let the rice steam, covered, for another 10-15 minutes. This allows the rice to fully absorb the remaining moisture and become perfectly sticky.
Once the steaming time is complete, carefully fluff the rice with a fork or rice paddle. Be gentle to avoid breaking the grains. The rice should be soft, sticky, and slightly translucent. If it’s too dry, add a tablespoon or two of water and gently mix. If it’s too wet, let it sit uncovered for a few minutes to allow excess moisture to evaporate. Taste-test a grain to ensure it’s cooked through and to your liking. If necessary, adjust the cooking time or water amount for future batches.
Finally, to prevent the sticky rice from sticking to the surface, lightly grease a container or bowl with a neutral-flavored oil, such as coconut oil or vegetable oil. Transfer the cooked rice to the prepared container and allow it to cool slightly before using it in your Mango Sticky Rice recipe. The slightly cooled rice will be easier to handle and less likely to stick. Enjoy your perfectly cooked sticky rice!
Instructions: Making the Coconut Milk Sauce
The coconut milk sauce is the heart and soul of Thai Mango Sticky Rice, lending its rich, creamy sweetness to the overall dish. Making it properly ensures a perfect balance of flavors and textures. This recipe yields approximately 1 ½ cups of sauce, enough for a generous serving of sticky rice and mango.
Begin by gathering your ingredients: You’ll need 1 (13.5 ounce) can of full-fat coconut milk, ½ cup of granulated sugar, ¼ cup of water, 1 tablespoon of cornstarch, and a pinch of salt. Using full-fat coconut milk is crucial for achieving the desired creamy consistency. Lighter versions will result in a thinner, less satisfying sauce.
Prepare the cornstarch slurry: In a small bowl, whisk together the cornstarch and water until completely smooth and lump-free. This step is vital to prevent the sauce from becoming clumpy. Ensure there are no visible cornstarch granules; otherwise, you’ll end up with a grainy texture in your final sauce.
Combine the ingredients: In a medium saucepan over medium heat, combine the coconut milk, sugar, and salt. Stir gently until the sugar dissolves completely. Avoid high heat, as this can cause the coconut milk to scorch and separate, ruining the sauce’s smooth texture and delicate flavor.
Simmer the sauce: Once the sugar has dissolved, bring the mixture to a gentle simmer, stirring occasionally. This process will thicken the sauce and meld the flavors. The simmer should be gentle enough that the sauce doesn’t boil vigorously. Vigorous boiling will cause the sauce to splatter and might lead to an uneven consistency.
Incorporate the cornstarch slurry: Slowly drizzle the cornstarch slurry into the simmering coconut milk mixture, whisking continuously to prevent lumps from forming. Add the slurry gradually, allowing the sauce to thicken slightly between additions. This prevents the sauce from becoming too thick or too thin.
Cook until thickened: Continue to simmer and whisk the sauce for 2-3 minutes, or until it has reached your desired thickness. The sauce should coat the back of a spoon. Don’t overcook the sauce, as this can make it too thick and gummy.
Remove from heat and cool: Once thickened, remove the saucepan from the heat and let the coconut milk sauce cool slightly. This allows the sauce to further thicken and the flavors to fully develop. Allowing the sauce to cool completely before serving is recommended for the best texture and eating experience.
Important Note: If the sauce becomes too thick, you can always add a tablespoon or two of water to thin it out. Conversely, if it’s too thin, you can gently simmer it for a few more minutes to thicken it further. Taste and adjust the sweetness to your preference by adding more sugar if needed.
Instructions: Combining and Serving
This section details the crucial final steps in creating your Easy Thai Mango Sticky Rice: combining the perfectly cooked sticky rice with the coconut milk mixture, and then presenting this delicious dessert in a visually appealing and flavourful way.
Step 1: Preparing the Coconut Milk Mixture: Before combining with the rice, ensure your coconut milk mixture is warm but not hot. If it’s too hot, it will melt the sticky rice and create a mushy texture. Ideally, remove it from the heat and let it sit for about 5-10 minutes to cool slightly. This allows the flavors to meld and prevents the rice from becoming overly soft.
Step 2: Gently Combining Rice and Coconut Milk: Add the cooked sticky rice to a large bowl. Pour the warm coconut milk mixture over the rice, ensuring it’s evenly distributed. Use a spatula or large spoon to gently fold the mixture together. Avoid vigorously stirring, as this can break the rice grains and result in a less appealing texture. The goal is to coat each grain of rice evenly with the creamy coconut milk.
Step 3: Achieving the Perfect Consistency: The ideal consistency is one where the rice is coated and slightly glossy, but not swimming in excess coconut milk. If it seems too dry, add a tablespoon or two more of coconut milk at a time, gently folding until the desired consistency is reached. If it’s too wet, you can let it sit for a few minutes to allow the rice to absorb some of the liquid. Remember, it’s better to err on the side of slightly drier rice, as it’s easier to adjust than to fix overly wet rice.
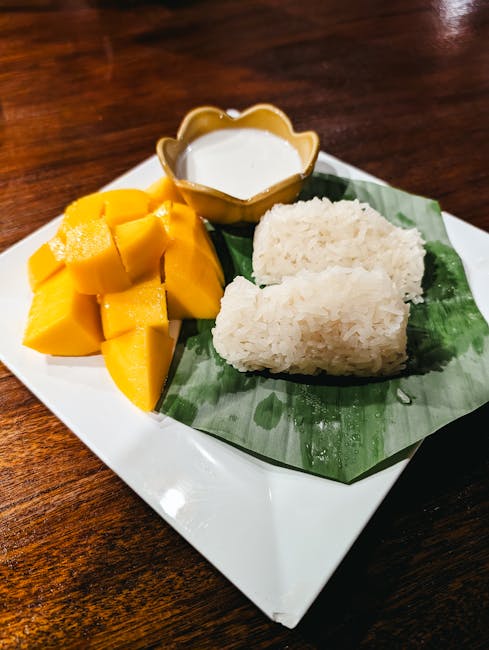
Step 4: Serving Suggestions: Once the rice and coconut milk are perfectly combined, you’re ready to serve! Traditionally, Thai Mango Sticky Rice is served warm. A beautiful presentation is key. You can use individual small bowls, or a larger platter for sharing. Arrange a generous portion of the sticky rice in the center of your serving dish.
Step 5: Adding the Mango: Arrange slices of fresh ripe mango on top of the sticky rice. Use a variety of mango slices—some thicker, some thinner—for visual appeal. Approximately 1-2 medium-sized ripe mangoes are ideal for a serving of 2-3 people. You can also arrange the mango around the rice, or even create a decorative pattern with the slices.
Step 6: Garnishing (Optional): A sprinkle of toasted sesame seeds adds a delightful crunch and nutty flavor, enhancing the overall sensory experience. Similarly, a few fresh mint leaves add a touch of freshness and visual appeal. Consider a drizzle of extra coconut milk or a light dusting of powdered sugar for an added touch of sweetness. However, remember that the natural sweetness of the mango and coconut milk should be the star of this dessert.
Step 7: Serving Immediately: For the best taste and texture, serve your Easy Thai Mango Sticky Rice immediately after combining the ingredients and arranging the mango. The warm rice and cool mango create a delightful contrast in temperature, while the flavors are at their peak freshness. Enjoy!
Easy Thai Mango Sticky Rice: Recommendations
This Easy Thai Mango Sticky Rice recipe is designed for deliciousness and convenience. To maximize your enjoyment and ensure the best possible outcome, consider these recommendations:
Serving Suggestions: This delightful dessert is best served immediately after preparation, while the sticky rice is warm and the mango is perfectly ripe. For an extra touch of elegance, garnish each serving with a sprinkle of toasted sesame seeds or a few fresh mint leaves. Individual portions are ideal, presented in small bowls or even on elegant dessert spoons. Consider serving it slightly chilled for a refreshing twist, especially on a warm day. A scoop of coconut ice cream is a fantastic addition, enhancing the creamy texture and tropical flavors.
Storage Conditions: Leftovers, if any, should be stored in an airtight container in the refrigerator. However, it’s important to note that the texture of the sticky rice may change slightly after refrigeration. The rice may become firmer, so it’s best to reheat it gently in the microwave or on the stovetop before serving. Do not store for more than 2 days. Avoid freezing this dessert, as the texture will be significantly altered upon thawing.
Complementary Dishes: This dessert pairs wonderfully with various other Thai-inspired dishes. It complements the richness of savory curries, providing a sweet and refreshing counterpoint. Consider serving it alongside a light and flavorful Thai green curry or a milder red curry. A palate cleanser between spicy dishes, this dessert helps to balance the meal perfectly. It also works well with dishes featuring coconut milk, creating a cohesive and thematic dining experience.
Nutritional Information (Approximate per serving, based on a recipe yielding 4 servings): The precise nutritional content will vary slightly depending on the specific ingredients used. However, a typical serving of Easy Thai Mango Sticky Rice contains approximately 350-400 calories. This includes a moderate amount of carbohydrates from the sticky rice, natural sugars from the mango, and healthy fats from the coconut milk. The exact breakdown of carbohydrates, fats, protein, and micronutrients will depend on the specific recipe and ingredients. For a more precise nutritional analysis, it’s recommended to use a nutritional calculator with your specific ingredient quantities.
Important Considerations: The success of this recipe hinges on using high-quality ingredients. Choose ripe, sweet mangoes for the best flavor. Using good quality coconut milk is crucial for achieving the creamy texture and rich flavor. Don’t overcook the sticky rice, as this can lead to a mushy texture. Adjust the sweetness to your preference by adding more or less sugar to the coconut milk mixture. Finally, remember to always practice safe food handling techniques to prevent foodborne illnesses.