Prepare to embark on a culinary journey to the heart of Italy with this authentic Homemade Margherita Pizza recipe. Pizza, a dish synonymous with Italian cuisine, boasts a surprisingly rich and complex history. While its exact origins are debated, many trace its roots back to ancient flatbreads enjoyed in various cultures throughout the Mediterranean. The pizza as we know it, however, emerged in Naples, Italy, evolving from simple flatbreads topped with various ingredients to the culinary masterpiece we celebrate today. Naples is officially recognized as the birthplace of pizza, and in 2017, the art of Neapolitan pizza-making was even inscribed on UNESCO’s Representative List of the Intangible Cultural Heritage of Humanity, highlighting its global cultural impact.
The Margherita pizza, specifically, holds a unique place in pizza history. Its creation is often linked to the unification of Italy in the late 19th century. Legend suggests that this classic pizza, with its simple yet elegant combination of tomato, mozzarella, basil, and olive oil, was created in honor of Queen Margherita of Savoy. The colors of the ingredients – red (tomato), white (mozzarella), and green (basil) – were said to represent the Italian flag, further cementing its patriotic significance. While the exact details of its creation remain somewhat shrouded in myth, the Margherita pizza quickly gained popularity, becoming a symbol of Italian national identity and a beloved dish enjoyed worldwide.
Today, pizza’s global popularity is undeniable. Statistics show that the global pizza market is valued in the hundreds of billions of dollars annually, with billions of pizzas consumed each year. It’s a dish that transcends cultural boundaries, adapted and enjoyed in countless variations across the globe. However, despite the countless toppings and regional variations, the Margherita pizza remains a timeless classic, a testament to the simplicity and perfection of fresh, high-quality ingredients. Its enduring appeal lies in its ability to evoke a sense of place, a connection to Italian culinary traditions, and a simple pleasure that satisfies both the palate and the soul. This recipe aims to bring that authentic Neapolitan experience to your kitchen, allowing you to create a Margherita pizza that rivals those served in the pizzerias of Naples itself. Get ready to experience the magic of a truly authentic Margherita pizza!
Ingredients and Measurements
Creating the perfect Margherita pizza hinges on using high-quality ingredients and precise measurements. This section details each component, offering tips for selection and substitution where applicable.
For the Pizza Dough:
We’ll start with the foundation – the pizza dough. The success of your pizza relies heavily on this. Using the right flour is crucial. We recommend using 00 flour (also known as double zero flour), an Italian flour known for its fine texture and ability to create a light and airy crust. If you can’t find 00 flour, bread flour is a suitable substitute, although it may result in a slightly chewier crust.
- 1 cup (240ml) warm water (105-115°F): The temperature is critical. Too cold, and the yeast won’t activate; too hot, and it will kill the yeast. Use a thermometer for accuracy.
- 1 teaspoon (4g) active dry yeast: Make sure your yeast is fresh. Check the expiration date. If it’s old, it might not rise properly.
- 1 teaspoon (5g) granulated sugar: This feeds the yeast and helps it to activate quickly.
- 1 teaspoon (5g) salt: Salt controls the yeast activity and adds flavor. Don’t skip this!
- 2 1/2 cups (300g) 00 flour (or bread flour): Start with 2 cups and add the remaining 1/2 cup gradually. The amount of flour might need slight adjustment depending on the humidity level.
- 2 tablespoons (30ml) olive oil: Adds flavor and helps create a tender crust. Use extra virgin olive oil for the best taste.
For the Pizza Sauce:
A simple, flavorful sauce is key to a great Margherita. We’ll be making a fresh tomato sauce from scratch, but you can substitute with high-quality store-bought passata if you’re short on time. Avoid using jarred tomato sauces with added herbs or spices, as they can overpower the delicate flavors of the cheese and basil.
- 1 (28 ounce) can of crushed San Marzano tomatoes: San Marzano tomatoes are known for their low acidity and sweet flavor. If unavailable, use high-quality canned crushed tomatoes.
- 1 clove garlic, minced: Adds a subtle garlic flavor without being overpowering. Use fresh garlic for the best taste.
- 1/2 teaspoon dried oregano: A classic pizza herb. Fresh oregano is preferable if you have it.
- 1/4 teaspoon salt: Adjust to taste.
- Pinch of black pepper: Enhances the flavor of the sauce.
- 1 tablespoon olive oil: Helps to sauté the garlic and prevent sticking.
For the Toppings:
Keep it simple and classic for a true Margherita. Quality ingredients make all the difference.
- 8 ounces (225g) fresh mozzarella cheese: Use fresh mozzarella, not the low-moisture kind. It melts beautifully and provides the signature creamy texture.
- Fresh basil leaves: Use about 10-12 fresh basil leaves, torn into smaller pieces. Avoid using dried basil, as it lacks the fresh, vibrant flavor.
- Extra virgin olive oil: Drizzle over the finished pizza for extra flavor and richness.
Important Note: These measurements are guidelines. Feel free to adjust them slightly to your preference. Remember to always taste and adjust seasonings as you go.
Dough Preparation (including kneading and proofing)
Making pizza dough from scratch is a rewarding experience, resulting in a pizza with superior flavor and texture compared to store-bought options. This section details the process of creating a delicious and pliable dough for your Margherita pizza.
Ingredients:
- 1 cup (240ml) warm water (around 105-115°F/40-46°C)
- 1 teaspoon sugar
- 2 teaspoons active dry yeast
- 2 1/2 cups (300g) all-purpose flour, plus more for dusting
- 1 teaspoon salt
- 2 tablespoons olive oil
Instructions:
1. Activating the Yeast: In a large bowl, combine the warm water, sugar, and yeast. Let stand for 5-10 minutes until the mixture becomes foamy. This indicates the yeast is active and ready to work its magic. If it doesn’t foam, your yeast may be dead, and you’ll need a fresh batch.
2. Combining Ingredients: Add the flour and salt to the yeast mixture. Stir with a wooden spoon or spatula until a shaggy dough forms. This initial mixing incorporates the dry ingredients.
3. Kneading the Dough: Turn the dough out onto a lightly floured surface. Knead the dough for 8-10 minutes, adding a little more flour if it becomes too sticky. Kneading develops the gluten in the flour, resulting in a chewier, more elastic crust. The dough should be smooth and elastic, not sticky. A good test is to stretch a small piece of the dough – it should be slightly translucent without tearing easily.
4. First Rise (Bulk Fermentation): Place the kneaded dough in a lightly oiled bowl, turning to coat. Cover the bowl with plastic wrap and let it rise in a warm place for 1-1.5 hours, or until doubled in size. The warm environment encourages yeast activity and dough expansion.
5. Shaping and Second Rise (Proofing): Once the dough has doubled, gently punch it down to release the air. Divide the dough into two equal portions (for two pizzas) or one large portion (for one large pizza). Shape each portion into a round or oblong ball, depending on your preferred pizza shape. Place the shaped dough on a lightly floured baking sheet or pizza stone, cover with plastic wrap, and let it rise for another 30-45 minutes. This final proofing allows the dough to relax and develop its final flavor and texture. Avoid over-proofing, as this can lead to a flat pizza.
Professional Recommendations:
- Use a kitchen thermometer to ensure your water is the correct temperature for yeast activation.
- Don’t be afraid to get your hands dirty during kneading! It’s the best way to feel the dough’s consistency.
- If your kitchen is particularly cool, you may need to increase the proofing time. Conversely, in a very warm environment, the dough may rise faster.
- For a crispier crust, preheat your pizza stone or baking sheet in the oven for at least 30 minutes before baking.
Following these steps carefully will ensure you have a perfectly prepared pizza dough, ready for your delicious Margherita topping.
Sauce Preparation (including tomato selection and seasoning)
The foundation of a great Margherita pizza lies in its simple yet flavorful sauce. We’ll be making a classic San Marzano tomato sauce, known for its sweetness and low acidity. Choosing the right tomatoes is paramount. San Marzano tomatoes, with their elongated shape and deep red color, are ideal, but if unavailable, high-quality canned San Marzano tomatoes are an excellent substitute. Avoid using Roma tomatoes, as they can be too acidic for this recipe.
For this recipe, we’ll use 28 ounces (794g) of canned San Marzano tomatoes. If using fresh tomatoes, you’ll need approximately 2 pounds (907g), ripe and blemish-free. If using fresh tomatoes, start by blanching them in boiling water for 30 seconds, then immediately plunging them into ice water to stop the cooking process. This makes peeling them significantly easier. Once peeled, roughly chop the tomatoes.
Regardless of whether you’re using canned or fresh tomatoes, the next step is to finely chop or crush them. Using a food mill or immersion blender is ideal for achieving a smooth consistency without overly pureeing the sauce. Avoid using a regular blender, as it can create a overly smooth and almost paste-like texture. We want a slightly chunky sauce that retains some of the tomato’s texture.
Now, let’s move on to seasoning. In a medium saucepan, combine the crushed tomatoes with 2 cloves of minced garlic. Fresh garlic is always preferred for its superior flavor, but you can use 1 teaspoon of minced garlic from a jar if necessary. Add a generous pinch of sea salt (approximately 1 teaspoon), freshly ground black pepper (about ½ teaspoon), and a pinch of dried oregano (about ¼ teaspoon). Don’t be afraid to taste and adjust the seasoning to your preference.
Bring the sauce to a gentle simmer over medium-low heat. Reduce the heat to the lowest setting and let it simmer uncovered for at least 30 minutes, or up to an hour. This allows the flavors to meld and the excess liquid to evaporate, resulting in a richer, more concentrated sauce. Stir occasionally to prevent sticking and burning. As the sauce simmers, you’ll notice it thickens slightly. If you prefer a thicker sauce, you can simmer it for a longer period or add a teaspoon of tomato paste towards the end of the cooking time.
Once the sauce has reached your desired consistency and flavor, remove it from the heat and let it cool completely before using it on your pizza. Taste it one last time and adjust the seasoning if needed. Remember, a well-seasoned sauce is the cornerstone of a delicious Margherita pizza. You can even add a tiny pinch of sugar to balance the acidity if your tomatoes are particularly tart.
Important Note: For a truly authentic Margherita, avoid adding any other herbs or spices beyond the garlic, oregano, salt, and pepper. The simplicity of the ingredients allows the quality of the tomatoes to shine through.
Topping Preparation (including cheese selection and slicing)
The success of a Margherita pizza hinges not just on the dough, but equally on the quality and preparation of its toppings. We’ll focus on achieving the perfect balance of flavors and textures with our cheese and basil.
Cheese Selection: For an authentic Margherita, fior di latte mozzarella is the undisputed champion. Its delicate, milky flavor and soft, creamy texture are essential. Avoid using low-moisture mozzarella, as it’s too firm and lacks the necessary melt. If fior di latte is unavailable, a high-quality fresh mozzarella is an acceptable substitute, but be aware it may have a slightly more pronounced tang.
Quantity: Aim for approximately 8 ounces (225g) of fresh mozzarella for a 12-inch pizza. This amount will provide a generous, yet not overwhelming, layer of cheese.
Cheese Slicing: The method of slicing the mozzarella dramatically impacts the final result. Avoid grating the mozzarella; the resulting dryness will inhibit proper melting and create a less enjoyable texture. Instead, we’ll employ a technique that ensures even melting and distribution.
First, gently drain any excess whey from the mozzarella ball. Then, carefully slice the mozzarella into thin, even slices, approximately 1/8 inch (3mm) thick. This thickness guarantees optimal melting without becoming overly stringy or creating large, uneven pools of melted cheese. If using a ball of mozzarella, it’s easiest to cut it in half horizontally, then slice each half into thin slices. You can also tear the mozzarella into smaller, irregular pieces for a more rustic look if you prefer, but consistency in size is key for even cooking.
Basil Preparation: Fresh basil is another crucial element. Use only high-quality, fragrant basil leaves. The quantity depends on your preference, but a generous handful (approximately 1/4 cup, loosely packed) will suffice for a 12-inch pizza. Wash the basil leaves thoroughly and gently pat them dry with paper towels. Avoid over-drying them, as this can affect their flavor and texture. Do not chop the basil before placing it on the pizza. Instead, leave the leaves whole or tear them into larger pieces; this preserves their aromatic oils and prevents them from becoming mushy during baking.
Tomato Sauce Preparation (brief mention): While this section focuses on toppings, it’s important to remember that the sauce should be prepared and ready to go before you begin assembling the pizza. Ensure your sauce is evenly spread, leaving a small border for the crust. This will prevent the sauce from running over the edges and burning during baking.
Arrangement on the Pizza: Once your pizza dough is ready, spread the tomato sauce evenly. Then, carefully arrange the mozzarella slices over the sauce, slightly overlapping them to ensure complete coverage. Finally, add the fresh basil leaves. Avoid overcrowding the pizza with toppings; this can impede proper baking and lead to a soggy crust.
Important Note: Prepare your toppings just before assembling the pizza. This prevents the mozzarella from sweating and losing its delicate texture. Having all your ingredients prepped and ready will make the pizza assembly process quick and efficient, ensuring a consistently delicious result.
Pizza Assembly
With your perfectly prepared dough and vibrant sauce ready, it’s time for the most enjoyable part: assembling your Margherita pizza! This stage requires precision and a light touch to ensure a beautiful and delicious final product. We’ll be aiming for a balanced distribution of ingredients for optimal flavor in every bite.
Begin by lightly dusting your clean work surface with flour. This prevents the dough from sticking and makes handling much easier. Gently transfer your pizza dough to the floured surface. Avoid excessive flour; too much will make the crust tough.
Using your fingers or a rolling pin, gently stretch and shape the dough into a 12-inch circle. Don’t worry about perfection; a slightly rustic, irregular shape adds character. If using a rolling pin, work from the center outwards, applying gentle pressure to avoid tearing the dough. If stretching by hand, gently pull and rotate the dough, allowing its own elasticity to do the work.
Once shaped, carefully transfer the dough to a lightly oiled pizza peel or baking sheet. Using a peel is highly recommended as it allows for easy transfer to the hot oven. If using a baking sheet, ensure it’s lined with parchment paper for easy removal later.
Now, for the sauce! Using the back of a spoon or a small offset spatula, spread a thin and even layer of your homemade tomato sauce over the dough, leaving about a half-inch border. Avoid overloading the crust with sauce; this will lead to a soggy bottom. Aim for a consistent layer, ensuring no part of the dough is left bare.
Next comes the mozzarella. Tear approximately 8 ounces of fresh mozzarella into small, uneven pieces. Avoid using pre-shredded mozzarella as it contains cellulose which can affect the texture. Distribute the mozzarella evenly over the sauce, slightly overlapping the pieces. Don’t be shy with the cheese; it’s a key component of the Margherita experience.
Finally, add fresh basil leaves. Scatter about 10-12 large basil leaves across the pizza. Use fresh basil for the best flavor and aroma. Avoid overcrowding the pizza with basil; allow the other ingredients to shine through.
Before sliding your pizza into the oven, take a moment to admire your creation. A well-assembled pizza is a thing of beauty! If using a pizza peel, gently slide the pizza onto your preheated pizza stone or baking sheet. If using a baking sheet, simply place it directly into the oven.
Now you’re ready to bake your masterpiece! Follow the baking instructions in the next section for a perfectly cooked Margherita pizza.
Baking Techniques (including oven temperature and baking time)
Achieving a perfectly baked Margherita pizza hinges on mastering a few key baking techniques. The goal is a crisp, yet slightly chewy crust with a beautifully browned base and melted, bubbly cheese. This requires careful attention to oven temperature and baking time, as well as understanding the interplay between the dough and the heat.
Preheat your oven to its maximum temperature. For most home ovens, this will be between 475°F (246°C) and 500°F (260°C). A hotter oven is crucial for achieving that signature crisp crust. Allow at least 30 minutes for the oven to reach this temperature; using an oven thermometer is highly recommended to ensure accuracy. Don’t open the oven door during preheating, as this will significantly reduce the temperature and affect baking time.
Using a pizza stone (highly recommended): A pizza stone absorbs and radiates heat evenly, resulting in a crispier crust. If you’re using a pizza stone, place it in the oven while it preheats. This allows the stone to reach its maximum temperature, contributing to a better bake. If you don’t have a pizza stone, a baking sheet will work, but the crust will likely be less crisp.
Transferring the pizza to the hot oven: Carefully slide the pizza onto the preheated pizza stone or baking sheet using a pizza peel (a long, flat wooden or metal paddle). If you don’t have a pizza peel, a large, flat baking sheet can be used to transfer the pizza. Work quickly to minimize the time the pizza spends out of the hot oven.
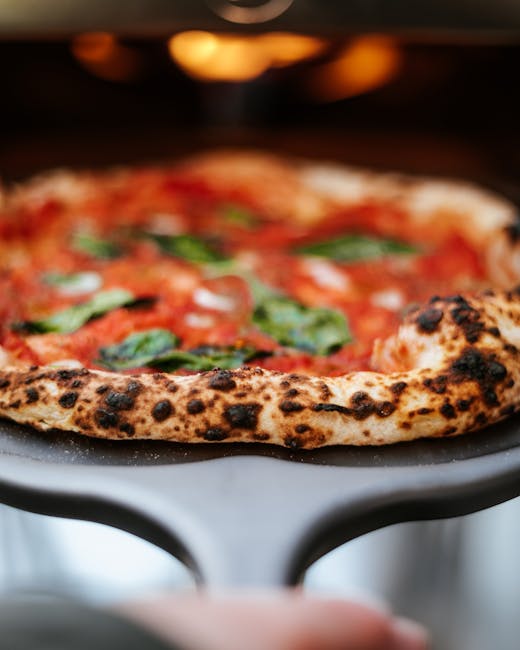
Baking time: The baking time will vary depending on your oven, the thickness of your crust, and the amount of toppings. Generally, it will take between 8-12 minutes. Start checking for doneness at 8 minutes. The crust should be golden brown and crispy, and the cheese should be melted and bubbly. Use a spatula to gently lift an edge of the pizza to check for browning and crispness. If the crust is still pale or doughy, bake for another 1-2 minutes and check again. Overbaking can result in a dry crust and burnt cheese.
Monitoring for doneness: Look for several signs of doneness. The crust should be a deep golden brown, almost slightly charred in spots. The cheese should be completely melted and slightly browned in places. The toppings should be heated through. If the crust is browning too quickly but the cheese isn’t fully melted, you may need to slightly lower the oven temperature. If the crust is browning too quickly while the cheese is still undercooked, lower the oven rack slightly.
Cooling and serving: Once baked, carefully remove the pizza from the oven using the pizza peel or baking sheet. Let it cool for a few minutes before slicing and serving. This allows the cheese to set slightly and makes slicing easier. Enjoy your homemade Margherita pizza!
Troubleshooting: If your crust is too soft, try preheating the oven longer or using a hotter oven temperature. If the crust is too hard or burnt, try reducing the oven temperature or reducing the baking time. Experimentation is key to finding the perfect bake for your oven and preferences.
Recommendations for Your Homemade Margherita Pizza
Your homemade Margherita pizza is best enjoyed immediately after baking while the cheese is still bubbly and the crust is delightfully crisp. However, if you have leftovers, proper storage is key to maintaining its quality. Store leftover pizza in an airtight container in the refrigerator for up to 3 days. To reheat, place slices on a baking sheet and bake in a preheated oven at 350°F (175°C) for 5-7 minutes, or until heated through and the cheese is melted again. Avoid microwaving, as this can make the crust soggy.
To elevate your Margherita pizza experience, consider these serving suggestions. A simple yet elegant approach is to serve it with a fresh arugula salad dressed with a light balsamic vinaigrette. The peppery arugula cuts through the richness of the pizza, providing a refreshing contrast. Alternatively, a classic Caprese salad, featuring fresh mozzarella, tomatoes, and basil, complements the pizza’s flavors beautifully. For a heartier side, a simple Italian green bean salad or a small portion of minestrone soup would be perfect.
For a truly indulgent experience, consider adding a drizzle of high-quality olive oil after baking. A sprinkle of fresh basil leaves adds a burst of aromatic freshness, while a grating of Parmesan cheese provides a salty, umami counterpoint to the sweetness of the tomatoes and mozzarella. Experiment with different types of olive oil to find your preference. A fruity olive oil will enhance the tomato flavor, while a peppery one adds a spicy kick.
Nutritional Information (per serving, approximate values will vary based on ingredients used): Calories: Approximately 350-450; Fat: 15-20g; Saturated Fat: 5-8g; Cholesterol: 20-30mg; Sodium: 500-700mg; Carbohydrates: 40-50g; Fiber: 3-5g; Sugar: 5-7g; Protein: 12-15g. These are estimates and may vary based on the specific ingredients used and portion size. For a more precise nutritional breakdown, use a nutrition calculator with your exact ingredient quantities.
Remember to adjust the recipe to your liking. Feel free to experiment with different types of tomatoes, mozzarella, or even add other toppings like fresh mushrooms or roasted peppers to create your own unique variation. The beauty of a homemade Margherita pizza lies in its adaptability. Enjoy the process of making it and savor the delicious results.
Important Note: Always ensure that your ingredients are fresh and of high quality for the best possible flavor and texture. Proper hygiene practices in the kitchen are crucial to avoid foodborne illnesses.