Prepare your taste buds for a culinary journey to the Levant, where we explore the rich history and irresistible flavor of delicious Lebanese hummus. This creamy, dreamy dip, a staple across the Middle East and beyond, boasts a history as captivating as its taste. While pinpointing the exact origin is difficult, the earliest documented mention of hummus dates back to 13th-century Egypt, appearing in a cookbook titled Kitab al-Tabikh. However, its roots likely extend much further, with variations of chickpea-based purées existing in the region for centuries before. The name itself, derived from the Arabic word hummus, meaning chickpea, speaks to its fundamental ingredient.
Lebanon, however, holds a particularly strong claim to hummus’s cultural identity. It’s deeply ingrained in Lebanese cuisine, serving as a cornerstone of mezze, the traditional array of small dishes shared amongst friends and family. More than just a dip, hummus represents a vital part of Lebanese social fabric; it’s a dish shared during celebrations, family gatherings, and everyday meals. Its ubiquity is reflected in its consumption: Lebanese people consume an estimated 2 kg of hummus per person annually, highlighting its integral role in their diet and culinary heritage.
The preparation of hummus is an art form in itself, with subtle variations in recipes passed down through generations. The key lies in the quality of the ingredients: perfectly ripe chickpeas, tahini (sesame seed paste), fresh lemon juice, and a generous drizzle of high-quality olive oil. The process itself involves painstakingly grinding the chickpeas to achieve that signature smooth and creamy texture. Garlic, a touch of salt, and sometimes a sprinkle of paprika add depth and complexity to the flavor profile. Interestingly, the precise ratio of ingredients and the technique employed can significantly influence the final taste and consistency, showcasing the intricate skill involved in creating exceptional hummus.
Beyond Lebanon, hummus’s popularity has exploded globally. It has become a ubiquitous dish in restaurants and homes worldwide, leading to a multi-billion dollar industry. The global hummus market is projected to reach significant growth in the coming years, a testament to its enduring appeal and versatility. While countless variations exist, from roasted red pepper hummus to cilantro-lime hummus, the original Lebanese recipe remains the gold standard, a testament to the enduring power of simple, yet perfectly executed, flavors. And so, let us delve into the delightful world of Lebanese hummus, celebrating its rich history and exquisite taste.
Ingredients and Measurements for Delicious Lebanese Hummus
Creating authentic Lebanese hummus hinges on the quality and precise measurement of your ingredients. Don’t be tempted to skimp on any component; each plays a vital role in achieving that creamy, flavorful texture and vibrant taste.
Dried Chickpeas (Garbanzo Beans): We’ll start with 1 ½ cups (200g) of dried chickpeas. Avoid canned chickpeas for the best results. Canned chickpeas often have a mushy texture and lack the robust flavor of properly cooked dried beans. Soaking the chickpeas overnight is crucial. This significantly reduces cooking time and improves their digestibility. Soak the chickpeas in at least 4 cups of cold water for a minimum of 8 hours, or preferably overnight. Drain and rinse thoroughly before cooking.
Water for Cooking: You’ll need approximately 6 cups (1.4 liters) of fresh water for cooking the chickpeas. The exact amount might vary slightly depending on the chickpeas you use and your cooking method. Ensure the chickpeas are fully submerged during cooking. Add more water as needed during the process to prevent the pot from boiling dry.
Tahini: Use 1 cup (240ml) of high-quality tahini. Tahini is the cornerstone of hummus, so don’t compromise on its quality. Look for a tahini that is smooth, not gritty, and has a rich, nutty aroma. If your tahini is particularly thick, you may need to thin it slightly with a tablespoon or two of water before adding it to the hummus.
Lemon Juice: The acidity of fresh lemon juice is essential for balancing the richness of the tahini and enhancing the overall flavor profile. Use the juice of 2 large lemons (approximately ¼ cup or 60ml). Freshly squeezed juice is always best, providing a superior taste and brighter flavor compared to bottled lemon juice.
Garlic: Use 4-6 cloves of garlic, depending on your preference for garlic flavor. Start with 4 cloves and add more to taste. Too much garlic can overpower the other flavors. For a milder garlic taste, you can roast the garlic cloves before adding them to the hummus. This will mellow their sharpness.
Olive Oil: Use ½ cup (120ml) of high-quality extra virgin olive oil. A good quality olive oil is essential for a truly delicious hummus. Reserve a few tablespoons for drizzling on top of the finished hummus for an extra touch of richness and visual appeal.
Salt: Add 1 ½ teaspoons (9g) of salt or to taste. Start with the suggested amount and adjust according to your preference. Remember that the salt will enhance the overall flavor of the hummus.
Ground Cumin: Add ½ teaspoon (2g) of ground cumin. This spice adds warmth and depth to the hummus. Adjust to your liking; some prefer a more pronounced cumin flavor.
Optional Garnishes: Paprika, a drizzle of olive oil, a sprinkle of chopped parsley, and a few whole chickpeas are classic garnishes to enhance the visual appeal and add texture to your hummus. Feel free to experiment with other garnishes to create your unique presentation.
Equipment List: Delicious Lebanese Hummus
Making delicious Lebanese hummus requires the right tools to achieve the perfect creamy texture and smooth consistency. While some items might seem optional, using the correct equipment significantly impacts the final product’s quality. This list details the essential and recommended equipment, including alternatives where applicable.
Food Processor: This is arguably the most crucial piece of equipment. A powerful food processor with a large capacity (at least 7 cups) is highly recommended. A smaller processor might struggle with the volume of chickpeas and risk overheating the motor. Look for a model with a strong motor (at least 1000 watts) and a robust blade assembly capable of handling tough ingredients. Avoid using a blender as it tends to create a less smooth, potentially pasty hummus.
Measuring Cups and Spoons: Accurate measurements are key to achieving consistent results. Having a set of both dry and liquid measuring cups (metric or imperial, depending on your preference) is essential. Similarly, a set of measuring spoons will ensure precise additions of spices and other ingredients. Invest in high-quality measuring tools for better accuracy. A kitchen scale is also highly recommended for even more precise measurements, especially for the chickpeas and tahini.
Large Bowl: You’ll need a sizable bowl (at least 5-quart capacity) for soaking the chickpeas overnight. Choosing a bowl made of stainless steel or ceramic is ideal as they are non-reactive and easy to clean. A smaller bowl is also useful for preparing the garlic and lemon juice mixture separately.
Fine-Mesh Sieve or Strainer: This is crucial for removing the skins from the soaked chickpeas, resulting in a smoother hummus. A fine-mesh sieve will effectively separate the skins from the chickpeas without losing any of the precious legume. Using a sieve is highly recommended, even though some recipes omit this step, as it significantly improves the texture.
Rubber Spatula or Scraper: A sturdy rubber spatula or scraper is invaluable for scraping down the sides of the food processor bowl during processing, ensuring all ingredients are thoroughly incorporated. This prevents lumps from forming and ensures an even consistency. A high-quality spatula that can withstand the forces of a powerful food processor will prove to be a worthwhile investment.
Small or Medium-Sized Saucepan: A small or medium-sized saucepan is needed for heating the water or broth used to cook the chickpeas if you are not using canned chickpeas. This allows you to achieve the perfect level of doneness. Using a saucepan with a heavy bottom will ensure even heat distribution and prevent burning.
Serving Bowl: Finally, you’ll need an attractive bowl to serve your delicious hummus. A shallow, wide bowl is ideal for showcasing the beautiful color and texture of the hummus. You might choose a traditional bowl or a more modern design, depending on your preference. Consider the size of your serving bowl based on the quantity of hummus you are making.
Optional Equipment: While not strictly necessary, a citrus juicer can make extracting lemon juice easier and more efficient. A mortar and pestle can be used to finely crush the garlic for a more intense flavor (though the food processor can handle this as well). A food processor attachment for making a smoother tahini can also be beneficial.
Preparation of Chickpeas (Soaking & Boiling/Canning)
The foundation of exceptional hummus lies in perfectly prepared chickpeas. While using canned chickpeas is convenient, achieving the creamy texture and rich flavor of homemade hummus requires careful attention to soaking and cooking (or using high-quality canned chickpeas). This section details both methods.
Method 1: Soaking and Boiling Dried Chickpeas
This method yields the creamiest, most flavorful hummus. Start with 1 pound (approximately 450g) of dried chickpeas. Thoroughly rinse the chickpeas under cold water to remove any debris or impurities. Place the rinsed chickpeas in a large bowl and cover them with at least 4 cups (950ml) of cold water. Add 1 teaspoon of baking soda; this helps to soften the skins and reduce cooking time. Soak the chickpeas for at least 8-12 hours, or preferably overnight. The chickpeas will significantly increase in size.
After soaking, drain the chickpeas and rinse them again. Transfer them to a large pot and cover them with fresh water, ensuring the water level is at least 2 inches (5cm) above the chickpeas. Bring the water to a rolling boil, then reduce the heat to low, cover the pot, and simmer gently for 60-90 minutes, or until the chickpeas are very tender and easily mashed between your fingers. Check the chickpeas periodically and add more water if necessary to keep them submerged. The cooking time can vary depending on the age and type of chickpeas; older chickpeas may require longer cooking times.
Once cooked, drain the chickpeas and set them aside to cool slightly. For the smoothest hummus, you can peel the skins off the chickpeas. This is optional but highly recommended for a truly luxurious texture. This process can be time-consuming but yields a noticeably smoother final product.
Method 2: Using Canned Chickpeas
Using canned chickpeas is a time-saving alternative. Choose high-quality chickpeas packed in water, not brine. Avoid chickpeas packed in oil, as this will affect the flavor of your hummus. Drain and rinse one (15-ounce/425g) can of chickpeas thoroughly under cold water before using them in your hummus recipe. While canned chickpeas are convenient, they might not achieve the same level of creaminess as those cooked from dried.
Important Considerations for Both Methods:
Quality of Chickpeas: The quality of your chickpeas significantly impacts the final product. Opt for high-quality, organically grown chickpeas whenever possible.
Salt Addition: Avoid adding salt to the cooking water, as this can toughen the chickpeas. Add salt only after the chickpeas are cooked and pureed.
Storage: Cooked chickpeas can be stored in an airtight container in the refrigerator for up to 3 days. For longer storage, consider freezing them.
By following these instructions carefully, you’ll ensure your hummus has the perfect chickpea base, guaranteeing a delicious and authentic Lebanese culinary experience.
Tahini Preparation (Toasting & Grinding Optional)
While you can certainly purchase pre-made tahini, making your own offers a rewarding experience and allows for greater control over the final flavor and texture of your hummus. This section details how to prepare tahini, including optional toasting and grinding steps for a truly exceptional result.
Choosing your sesame seeds: Start with high-quality hulled sesame seeds. These are easier to work with and produce a smoother tahini. Look for seeds that are fresh and fragrant, avoiding any that are stale or have a bitter smell. Approximately 1 cup of sesame seeds will yield roughly 1 cup of tahini.
Optional: Toasting the Sesame Seeds: Toasting the sesame seeds before grinding significantly enhances their flavor, bringing out a richer, nuttier aroma. Spread 1 cup of hulled sesame seeds in a single layer on a large, dry skillet over medium heat. Constantly stir the seeds to prevent burning. Toast for 5-7 minutes, or until they are fragrant and a light golden brown color. Be vigilant, as they can burn quickly. Remove the seeds from the heat and let them cool completely before proceeding.
Grinding the Sesame Seeds (Optional if using pre-ground tahini): For the creamiest tahini, use a high-powered blender or food processor. If using a food processor, work in batches to avoid overloading the motor. Add the toasted (or untoasted) sesame seeds to your chosen appliance. Begin processing on a low speed, gradually increasing to high. Scrape down the sides of the bowl frequently to ensure even grinding. This process will take approximately 5-10 minutes, depending on your equipment’s power. The tahini is ready when it becomes a smooth, creamy paste. You may notice some separation of oil, this is normal.
Important Note on Oil Separation: Tahini naturally separates, with the oil rising to the top. This is perfectly fine and doesn’t affect the quality. Simply stir the tahini vigorously before using it in your hummus recipe to re-emulsify it. For a smoother, less oily tahini, you can add a tablespoon or two of water or lemon juice while blending, but this might slightly impact the flavor.
Troubleshooting: If your tahini is too thick, add a small amount of water or oil, a teaspoon at a time, while blending until you reach your desired consistency. If it’s too thin, simply let it sit for a while; the oil will naturally separate, resulting in a thicker consistency. If your tahini is gritty, it may need more processing time. Ensure the seeds are completely dry before grinding as moisture can hinder the grinding process.
Storage: Store your homemade tahini in an airtight container in the refrigerator. It will keep for several weeks. Remember to stir well before each use to redistribute the oil.
By following these steps, you’ll be well on your way to crafting a delicious and flavorful tahini, the perfect foundation for your homemade Lebanese hummus.
Making the Hummus (Blending & Mixing)
Now that we have our prepped ingredients, it’s time to bring them together to create creamy, delicious hummus! This section details the blending and mixing process, crucial for achieving the perfect texture and flavor.
Begin by adding one (1) 15-ounce can of chickpeas (garbanzo beans), thoroughly drained and rinsed, to a food processor. Rinsing the chickpeas is vital; it removes excess starch that can make the hummus gummy. Make sure to drain them well, as any remaining liquid will thin the final product.
Next, add 1/2 cup of tahini to the food processor. Tahini is the heart of hummus, contributing its rich, nutty flavor and creamy texture. Use good quality tahini for the best results. If your tahini is thick, you might need to add a tablespoon or two of water to help it blend smoothly.
Now, incorporate the liquids. Add 1/4 cup of freshly squeezed lemon juice. This provides the essential acidity that balances the richness of the tahini and chickpeas. Freshly squeezed lemon juice is always preferable to bottled, as it offers a brighter, more vibrant flavor.
Next, add 1/2 teaspoon of ground cumin. Cumin is a classic hummus spice that adds warmth and depth. Don’t be afraid to adjust the amount of cumin to your personal preference; some prefer a more pronounced cumin flavor.
Finally, add 1/4 teaspoon of salt and 2-3 cloves of garlic, minced. The salt enhances the flavors, while the garlic contributes a pungent, savory note. Start with less salt and add more to taste at the end. If you prefer a milder garlic flavor, start with just one or two cloves.
With all ingredients in the food processor, secure the lid and begin blending. Start on a low speed, gradually increasing to high as the mixture begins to combine. Blend for at least 2-3 minutes, scraping down the sides of the bowl as needed. The longer you blend, the smoother and creamier your hummus will become.
Once the hummus is completely smooth and creamy, you can adjust the consistency and flavor. If it’s too thick, add 1-2 tablespoons of ice water at a time, blending until you reach your desired consistency. If it needs more lemon juice or salt, add it gradually, tasting as you go. Taste and adjust seasonings to your liking – this is the most important step to ensuring delicious hummus.
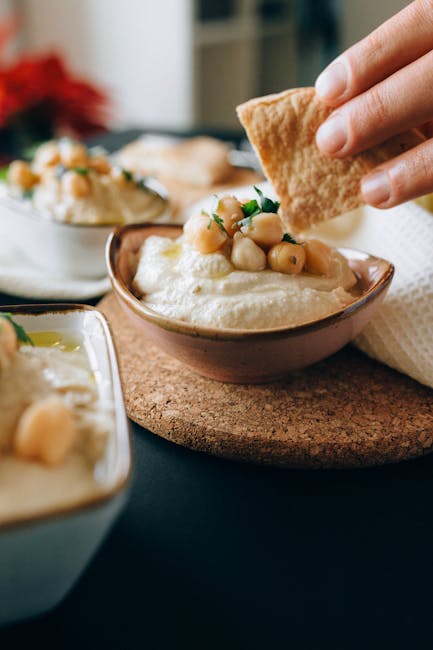
Finally, transfer your homemade hummus to a serving bowl. Drizzle with extra virgin olive oil, and sprinkle with paprika or a few whole chickpeas for garnish. Serve immediately or chill for later. Enjoy your delicious homemade Lebanese hummus!
Seasoning and Flavor Adjustments
Achieving the perfect balance of flavors in your Lebanese hummus is crucial to its success. While the basic recipe provides a delicious foundation, adjusting seasonings to your personal preference is key. This section will guide you through fine-tuning your hummus to reach peak deliciousness.
Salt: Start with 1 teaspoon of salt per cup of cooked chickpeas. This is a general guideline; taste your hummus as you go. The saltiness should be subtle, enhancing the other flavors rather than overpowering them. Remember that the saltiness will intensify as the hummus sits, so it’s better to under-salt initially and add more later. Use kosher salt or sea salt for the best flavor; table salt can be overly strong.
Lemon Juice: The acidity of lemon juice is vital for balancing the richness of the tahini and chickpeas. Start with 2 tablespoons of fresh lemon juice per cup of chickpeas. Freshly squeezed lemon juice is always preferred for its superior flavor and brightness. Taste and adjust accordingly; you may need more or less depending on the tartness of your lemons and your personal preference. A squeeze of lime juice can also add a delightful twist.
Garlic: The pungent bite of garlic is a hallmark of many hummus recipes. We recommend starting with 2-3 cloves of garlic per cup of chickpeas. Use a garlic press for the smoothest texture, avoiding chunky bits. If you prefer a milder garlic flavor, reduce the amount. For a more intense garlic punch, add more, but be mindful not to overpower the other flavors.
Tahini: The quality of your tahini significantly impacts the final flavor of your hummus. Use a good quality tahini with a rich, nutty flavor. Adjust the amount to achieve your desired consistency and intensity. Start with 1/2 cup of tahini per cup of chickpeas, and add more if you prefer a stronger tahini flavor or a thicker hummus. If the hummus is too thick, add a tablespoon or two of ice water at a time to thin it out.
Spice: While not traditional in all Lebanese hummus recipes, a pinch of spices can elevate the flavor profile. A dash of ground cumin (1/4 teaspoon per cup of chickpeas) adds warmth and earthiness, while a pinch of smoked paprika (1/8 teaspoon per cup of chickpeas) introduces a smoky depth. Experiment with other spices cautiously, such as a tiny pinch of cayenne pepper for a subtle heat, or a few finely ground coriander seeds for a slightly citrusy note. Remember that spices can be powerful, so start with small amounts and taste as you go.
Olive Oil: A generous drizzle of high-quality extra virgin olive oil is crucial for both flavor and texture. Use a good quality olive oil, and don’t be shy! Drizzle a tablespoon or two over the finished hummus, and then add more for serving. The olive oil adds richness, smoothness, and a beautiful sheen.
Other Flavor Enhancers: Consider adding a teaspoon of roasted red pepper paste for a sweet and smoky flavor or a tablespoon of finely chopped fresh parsley or cilantro for a vibrant pop of freshness. Experiment with different flavor combinations to discover your perfect hummus profile. Remember to always taste and adjust as you go, ensuring a harmonious blend of flavors that satisfies your palate.
Delicious Lebanese Hummus: Recommendations
Our Delicious Lebanese Hummus is crafted with the finest chickpeas, tahini, lemon juice, and garlic, resulting in a creamy and flavorful dip perfect for any occasion. To ensure you get the most out of your purchase, we offer the following recommendations:
Serving Suggestions: The versatility of our hummus is truly remarkable. It’s a classic with pita bread, but why stop there? Try it as a dip with crudités like carrots, celery, and cucumber. Use it as a spread on sandwiches or wraps, adding a layer of creamy texture and delicious flavor to your favorite fillings. It also makes a fantastic topping for grilled meats, falafel, or even baked potatoes. For a truly elevated experience, drizzle a generous amount of extra virgin olive oil and a sprinkle of paprika over the top before serving. Consider adding a garnish of fresh parsley or a drizzle of harissa paste for an extra kick.
Complementary Dishes: Our Lebanese Hummus pairs beautifully with a wide range of Mediterranean flavors. Serve it alongside a mezze platter featuring baba ghanoush, tabbouleh, falafel, and dolmades for a truly authentic experience. It also complements grilled kebabs, shawarma, and other Middle Eastern specialties wonderfully. Consider serving it with warm pita bread, freshly baked flatbreads, or even toasted baguette slices for dipping. For a lighter option, serve it with a selection of fresh vegetables and some toasted pine nuts for added crunch and flavor.
Storage Conditions: For optimal freshness and flavor, store your Delicious Lebanese Hummus in an airtight container in the refrigerator. Consume within 5 days of opening for the best quality. To prevent the hummus from drying out, ensure the container is tightly sealed. You can also pour a thin layer of olive oil on top before storing to create a barrier against air exposure.
Nutritional Information (per 100g serving): Approximate values may vary slightly depending on the batch. Calories: Approximately 250kcal; Fat: 15g (including saturated fat: 3g); Carbohydrates: 25g (including sugars: 5g); Protein: 8g; Fiber: 6g; Sodium: 300mg.
Important Note: While our hummus is delicious and naturally gluten-free, please be aware of potential cross-contamination during manufacturing and handling. Always check the ingredient list for any allergen information. If you have any specific dietary requirements or allergies, please contact us before consuming.
We hope you enjoy our Delicious Lebanese Hummus! We are confident that its rich flavor and versatility will make it a staple in your kitchen.