Easy Honey Garlic Chicken, a dish beloved for its sweet and savory profile, boasts a surprisingly complex history, despite its seemingly simple preparation. While pinning down a precise origin is difficult, the dish’s core components – honey and garlic – have rich and ancient histories across various cultures. Honey’s significance stretches back millennia, with evidence of its use as a sweetener and preservative dating back to the Neolithic period. Ancient Egyptians revered honey, using it in religious ceremonies and medicine, while its importance in various Asian cultures, including China and Korea, is equally profound. Similarly, garlic, a staple in Mediterranean and Asian cuisines for thousands of years, has been valued not only for its culinary uses but also for its purported health benefits. Ancient texts from Greece and Rome mention garlic’s medicinal properties, solidifying its place in both culinary and cultural traditions.
The fusion of honey and garlic into a single sauce, as seen in Honey Garlic Chicken, likely evolved over time through culinary experimentation and cultural exchange. The dish’s popularity may have been propelled by the growing global interest in Asian-inspired cuisine during the latter half of the 20th century. The accessibility of ingredients, coupled with its relatively simple preparation, contributed to its wide adoption. While precise statistics on its consumption are unavailable, its frequent appearance on restaurant menus and online recipe databases suggests its significant popularity. The dish’s adaptability also contributes to its wide appeal; it can be served with various sides, such as rice, noodles, or vegetables, making it a versatile and satisfying meal.
In terms of cultural significance, Honey Garlic Chicken doesn’t represent a single, unified cultural tradition, but rather reflects a fascinating blend of influences. It showcases the global exchange of culinary ideas, demonstrating how seemingly simple dishes can embody a complex history of food migration and adaptation. The combination of sweet and savory flavors, a hallmark of many Asian cuisines, has found widespread acceptance globally, further highlighting the dish’s ability to transcend geographical and cultural boundaries. Its presence in countless home kitchens and restaurants worldwide underscores its enduring appeal and its role as a testament to the power of culinary fusion and global food culture.
Furthermore, the dish’s ease of preparation contributes to its cultural significance. In a fast-paced world, convenience is a key factor in food choices, and Honey Garlic Chicken perfectly caters to this demand. Its simple recipe makes it readily accessible to home cooks of all skill levels, promoting culinary exploration and creativity within families and communities. This accessibility allows the dish to participate in everyday life, becoming more than just a meal, but a shared experience and a comfort food for many. The readily available ingredients and uncomplicated recipe make it a popular choice for both novice and experienced cooks, cementing its place as a beloved dish in modern culinary culture.
Ingredients and Measurements
This recipe for Easy Honey Garlic Chicken relies on readily available ingredients, making it perfect for a weeknight meal. Accurate measurements are crucial for achieving the perfect balance of sweet, savory, and tangy flavors. Below, we detail each ingredient with precise measurements and helpful tips for substitution and quality selection.
Chicken: We recommend using 1.5 lbs (approximately 680g) of boneless, skinless chicken thighs. Chicken thighs are more forgiving than breasts, remaining juicy and tender even with slightly longer cooking times. You can substitute with boneless, skinless chicken breasts, but be mindful of cooking time to prevent dryness. Ensure your chicken is completely thawed before cooking for even cooking and optimal results. Cut the chicken into 1-inch pieces for even and quicker cooking.
Soy Sauce: Use 1/4 cup (60ml) of low-sodium soy sauce. Low-sodium soy sauce allows you to control the saltiness of the dish, preventing it from becoming overly salty. If you only have regular soy sauce, reduce the amount slightly and adjust to taste. Consider using tamari for a gluten-free option.
Honey: 1/4 cup (60ml) of honey provides the sweetness and adds a lovely glossy finish to the chicken. Choose a honey with a mild flavor to avoid overpowering the other ingredients. You can experiment with different types of honey, such as wildflower or acacia, for variations in flavor. If you don’t have honey, you can substitute with an equal amount of maple syrup, but be aware that the flavor profile will change slightly.
Garlic: Use 2-3 cloves of fresh garlic, minced. Fresh garlic provides the best flavor, but you can substitute with 1 teaspoon of garlic powder if necessary. For a stronger garlic flavor, use 3 cloves. For a milder flavor, use 2. Remember to mince the garlic finely for even distribution throughout the sauce.
Ginger: 1 inch piece of fresh ginger, grated, adds a subtle warmth and depth of flavor. If you don’t have fresh ginger, you can substitute with 1/2 teaspoon of ground ginger. However, fresh ginger is strongly recommended for the best flavor. Ensure you grate the ginger finely for even distribution in the sauce.
Cornstarch: 1 tablespoon cornstarch is used to thicken the sauce, creating a beautiful glaze that clings to the chicken. Ensure you whisk the cornstarch with a small amount of cold water before adding it to the sauce to prevent lumps from forming. You can also use arrowroot powder as a gluten-free alternative.
Sesame Oil: 1 teaspoon of sesame oil adds a nutty aroma and flavor to the dish. Toasted sesame oil is preferred for its richer flavor, but regular sesame oil works well too.
Optional additions: For extra flavor and depth, consider adding a pinch of red pepper flakes for a touch of heat or a tablespoon of rice vinegar for a brighter, more tangy taste. Fresh green onions, chopped, can be sprinkled on top as a garnish before serving.
Accurate measurements are essential for achieving the desired flavor balance. Using a kitchen scale for weighing ingredients, especially the chicken, is recommended for consistent results.
Equipment List
Preparing delicious and easy honey garlic chicken requires the right tools to ensure a smooth and efficient cooking process. This equipment list details everything you’ll need, from basic kitchen essentials to specialized items that can enhance your cooking experience. While some substitutions are possible, using the recommended equipment will yield the best results.
Measuring Tools: Accuracy is key in cooking, especially when dealing with precise ingredient ratios. You’ll need a set of dry measuring cups (1 cup, ½ cup, ⅓ cup, ¼ cup, and 1 tablespoon) for accurately measuring flour, spices, and other dry ingredients. For liquids, a liquid measuring cup (at least 2 cup capacity) with clear markings is essential for measuring liquids like soy sauce, honey, and chicken broth. A set of measuring spoons (1 tablespoon, 1 teaspoon, ½ teaspoon, ¼ teaspoon) is also crucial for smaller quantities of spices and flavourings. Investing in a good quality set of measuring tools will significantly improve the consistency of your recipe.
Mixing and Cooking Utensils: A large mixing bowl (at least 3-quart capacity) is necessary for marinating the chicken and combining the sauce ingredients. A whisk is ideal for thoroughly blending the sauce components, ensuring a smooth and lump-free consistency. A pair of tongs will be useful for turning the chicken while cooking to ensure even browning and cooking. A sturdy spatula or turner is also recommended for flipping the chicken and scraping up any delicious caramelized bits from the pan.
Cooking Vessels: A large skillet or frying pan (12-inch diameter or larger) is the ideal cooking vessel for this recipe. Choose a pan with a heavy bottom and even heat distribution to prevent hot spots and ensure even cooking. Non-stick surfaces are preferable for easy cleanup, but a well-seasoned cast iron skillet will work wonderfully as well. If you prefer baking your chicken, a baking dish (9×13 inch or similar size) will also work, though you may need to adjust the cooking time accordingly. A small saucepan is also useful for preparing the honey garlic sauce separately if you prefer to control the thickness.
Other Essential Tools: A cutting board (preferably made of wood or plastic) is needed for safely preparing the chicken. A sharp knife will ensure clean cuts and efficient preparation. Paper towels will be useful for patting the chicken dry before cooking. A meat thermometer is highly recommended for ensuring the chicken is cooked to a safe internal temperature of 165°F (74°C). Using a meat thermometer is crucial for food safety and ensures your chicken is cooked perfectly without being overcooked.
Optional Equipment: While not strictly necessary, a silicone basting brush can be helpful for applying the honey garlic sauce evenly during cooking. A cooling rack will allow the chicken to cool more quickly and evenly after cooking, preventing excess moisture build-up. Aluminum foil is useful for covering the baking dish if you are baking the chicken, or for covering leftovers for storage.
Preparation Phase: Marinating the Chicken
Marinating the chicken is crucial for achieving that tender, juicy, and flavorful honey garlic chicken we all crave. A good marinade not only infuses the chicken with deliciousness but also helps to keep it moist during cooking, preventing dryness which is a common issue with chicken breasts.
For this recipe, we’ll be using a simple yet effective honey garlic marinade. The precise measurements are designed to yield optimal results, but feel free to adjust slightly to your preference. Always ensure you’re using high-quality ingredients for the best flavor profile.
Ingredients for the Marinade:
- 1/2 cup soy sauce (low sodium preferred for better control of saltiness)
- 1/4 cup honey (adjust to your desired sweetness level)
- 2 tablespoons rice vinegar (adds a touch of acidity to balance the sweetness)
- 2 cloves garlic, minced (or 1 teaspoon garlic powder)
- 1 tablespoon grated fresh ginger (or 1 teaspoon ground ginger)
- 1 tablespoon sesame oil (adds a nutty aroma and helps tenderize the chicken)
- 1 teaspoon cornstarch (helps to thicken the sauce slightly)
Instructions for Marinating:
- Prepare the Chicken: Begin by cutting 1.5 lbs boneless, skinless chicken breasts into 1-inch thick slices or bite-sized pieces. This ensures even cooking and faster marinating. Using consistent-sized pieces is critical for uniform cooking.
- Combine Marinade Ingredients: In a medium-sized bowl, whisk together the soy sauce, honey, rice vinegar, minced garlic, grated ginger, sesame oil, and cornstarch until the cornstarch is fully dissolved. Make sure there are no lumps of cornstarch, as this can affect the sauce consistency.
- Marinate the Chicken: Add the chicken pieces to the bowl and gently toss to ensure they’re evenly coated in the marinade. Avoid over-mixing, which can toughen the chicken.
- Refrigerate: Cover the bowl with plastic wrap and refrigerate for at least 30 minutes, or preferably for 2-4 hours. The longer the chicken marinates, the more flavorful it will become, up to a maximum of overnight. However, marinating for longer than 24 hours isn’t recommended.
- Optional: For an even more intense flavor, you can use a resealable bag to marinate the chicken, ensuring all pieces are completely submerged in the marinade.
Important Note: Always ensure the chicken is thoroughly refrigerated during the marinating process to prevent bacterial growth. Do not let the marinated chicken sit at room temperature for extended periods.
Once the marinating time is complete, your chicken is ready for the next stage of cooking. You’ll notice the chicken has already absorbed a significant amount of flavor, promising a delicious and tender final dish.
Cooking Techniques: Pan-Searing/Baking the Chicken
This section details the crucial pan-searing and baking process for achieving perfectly cooked, flavorful honey garlic chicken. We’ll combine the best of both worlds – the crispy sear from the pan and the juicy tenderness from the oven – for an exceptional result.
Preparation is key. Before you begin, ensure your chicken is completely dry. Pat it down thoroughly with paper towels. This is crucial for achieving a good sear; excess moisture will prevent browning and result in steaming instead of searing. Season generously with salt and freshly ground black pepper on both sides. This simple step significantly enhances the flavor profile.
Pan-Searing: Heat 1 tablespoon of high-smoke-point oil (such as canola, vegetable, or avocado oil) in a large oven-safe skillet (cast iron is ideal) over medium-high heat. Avoid overcrowding the pan; work in batches if necessary to ensure proper searing. Once the oil is shimmering hot, carefully place the chicken pieces skin-side down in the hot skillet. Do not move the chicken for at least 3-4 minutes. This allows the skin to crisp up and develop a beautiful golden-brown color. After this initial sear, carefully flip the chicken and sear the other side for another 2-3 minutes. You should see a nice brown crust forming.
Important Note: The cooking time for searing will vary depending on the thickness of your chicken pieces. Thicker pieces will require slightly longer searing times. Avoid constantly moving or poking the chicken during the searing process, as this disrupts the browning and can make the chicken tough.
Baking: Once the chicken is seared on both sides, transfer the skillet to a preheated oven set to 375°F (190°C). This is where the magic happens. Baking ensures the chicken cooks through evenly while maintaining its juicy texture. Bake for 20-25 minutes, or until the internal temperature of the thickest part of the chicken reaches 165°F (74°C). Use a meat thermometer to check for doneness; this is the most accurate method to prevent undercooked chicken.
Adding the Honey Garlic Sauce: During the last 5-7 minutes of baking, pour your prepared honey garlic sauce (recipe should be detailed elsewhere in the instructions) over the chicken in the skillet. This allows the sauce to gently simmer and glaze the chicken, adding an incredible depth of flavor and a beautiful glossy finish. Basting the chicken with the sauce halfway through the baking process is also recommended for even distribution.
Resting the Chicken: Once the chicken is cooked through, remove the skillet from the oven and let the chicken rest for 5-10 minutes before serving. This allows the juices to redistribute throughout the meat, resulting in a more tender and flavorful final product. Never skip the resting period!
Professional Recommendation: For extra crispy skin, you can pat the chicken dry with paper towels *again* after searing and before transferring it to the oven. This will help to remove any excess moisture that may have accumulated during the searing process.
Sauce Preparation
The honey garlic sauce is the star of this Easy Honey Garlic Chicken recipe, and getting it right is key to a truly delicious dish. This section will guide you through creating a perfectly balanced, glossy, and flavorful sauce that will coat your chicken beautifully.
We’ll start with the foundation: a harmonious blend of honey and soy sauce. Use high-quality honey for the best flavor; a darker honey, like buckwheat or wildflower, will add a richer depth. Similarly, choose a soy sauce that you enjoy the taste of – a low-sodium option might be preferred if you’re watching your salt intake. For this recipe, we’ll be using:
- 1/2 cup honey (adjust to your sweetness preference)
- 1/4 cup soy sauce (low sodium preferred)
Next, we introduce the garlic, the heart of the garlic in honey garlic. Freshly minced garlic provides the most intense flavor; pre-minced garlic from a jar will work in a pinch, but the taste will be slightly less vibrant. For a robust garlic flavor, we recommend using:
- 4-6 cloves garlic, minced (or 2 tablespoons pre-minced garlic)
Now for the magic touch: a touch of acidity to balance the sweetness and saltiness. Rice vinegar provides a subtle tang that cuts through the richness of the honey without being overpowering. Apple cider vinegar can also be used, but it will impart a slightly sweeter and fruitier note. We’ll use:
- 2 tablespoons rice vinegar (or apple cider vinegar)
To add a touch of warmth and complexity, we’ll incorporate a small amount of ginger. Fresh ginger is ideal, but ground ginger can be substituted in a pinch. If using fresh ginger, grate approximately 1 tablespoon. If using ground ginger, start with 1/2 teaspoon and adjust to taste.
Finally, a dash of cornstarch will thicken the sauce to a luscious, clinging consistency. Do not skip this step; it’s crucial for achieving the signature glossy honey garlic coating. We’ll use:
- 1 tablespoon cornstarch
- 2 tablespoons water (to create a slurry)
To prepare the sauce: In a small saucepan, whisk together the honey, soy sauce, minced garlic, rice vinegar, and ginger (fresh or ground). Bring the mixture to a simmer over medium heat, stirring constantly to prevent burning. In a separate small bowl, whisk together the cornstarch and water to create a smooth slurry. Once the sauce is simmering, slowly whisk in the cornstarch slurry, continuing to stir until the sauce thickens to your desired consistency. This should take about 1-2 minutes. Remove from heat and set aside until ready to use. Taste and adjust seasonings as needed, adding more honey for sweetness, soy sauce for saltiness, or vinegar for acidity.
Your delicious honey garlic sauce is now ready to be poured over your perfectly cooked chicken! Enjoy!
Combining Chicken and Sauce
This section details the crucial step of marrying your perfectly cooked chicken with the luscious honey garlic sauce. Getting this right ensures a flavourful, evenly coated, and visually appealing final dish. We’ll be using approximately 1.5 cups of the prepared honey garlic sauce (recipe provided separately) and 1.5 lbs of cooked chicken, cut into bite-sized pieces. Adjust quantities based on your recipe yield.
Preparation is key. Before you even think about combining the chicken and sauce, ensure your chicken is completely cooked and has cooled slightly. Hot chicken added to hot sauce will likely result in a steamy mess and uneven coating. Aim for a chicken temperature of around 140°F (60°C). If you’re using leftover chicken, make sure it’s thoroughly reheated to a safe internal temperature before proceeding. This prevents any potential bacterial growth.
Now, let’s get to the combining process. The best approach is to use a large, non-stick skillet or wok. This allows for even heating and prevents sticking. Start by heating the skillet over medium heat. You don’t need to add any oil, as the sauce itself contains enough fat to prevent sticking. If your sauce seems too thick, you can add a tablespoon or two of water or chicken broth to thin it slightly before adding the chicken.
Gently add the cooked chicken pieces to the skillet. Avoid overcrowding the pan; work in batches if necessary to ensure even cooking. This prevents steaming and maintains a nice sear on the chicken. Once the chicken is in the pan, use tongs to gently toss and turn the pieces, ensuring they are evenly coated with the sauce. This takes around 2-3 minutes per batch.
The cooking time is crucial. Since the chicken is already cooked, we’re not aiming to cook it further but rather to heat it through and coat it completely. Overcooking at this stage will dry out the chicken. Keep a close eye on the sauce; you want it to thicken slightly and become glossy, clinging beautifully to each piece of chicken. If the sauce becomes too thick, add a splash of water or chicken broth to adjust the consistency.
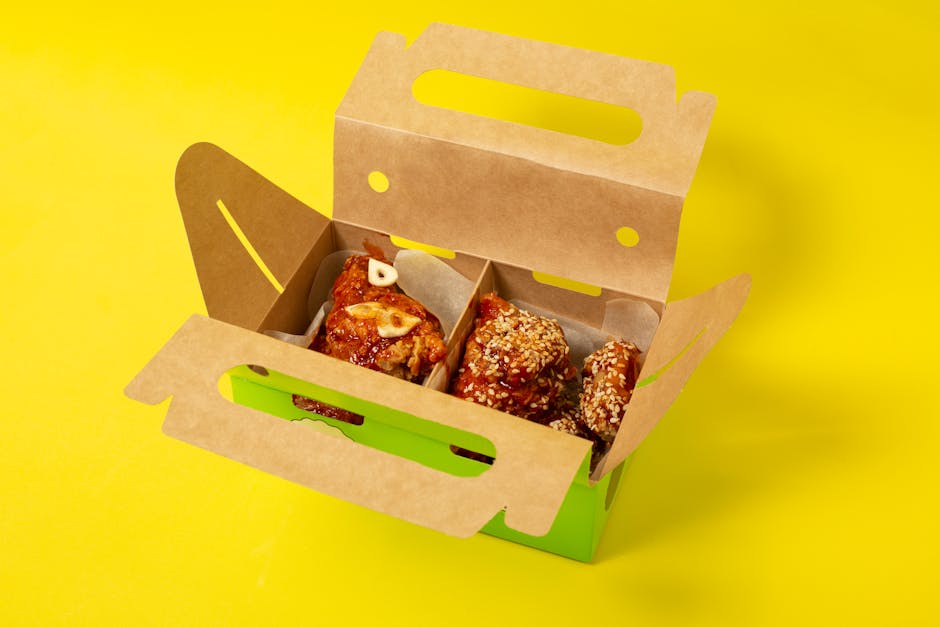
Seasoning and finishing touches. Once the chicken is heated through and evenly coated, give it a final taste test. Adjust the seasoning if needed, perhaps adding a pinch more salt, pepper, or garlic powder. Some cooks like to add a sprinkle of sesame seeds for extra texture and visual appeal at this point. Remove the chicken from the heat and transfer it to a serving dish. Allow the chicken to rest for a few minutes before serving to allow the flavours to meld and the sauce to set slightly.
Professional Tip: For an extra layer of flavour, consider glazing the chicken with a small amount of extra honey or a light soy sauce reduction at the very end. This adds a touch of sweetness and umami, enhancing the overall taste profile. Remember, always prioritize food safety. Ensure your chicken is cooked to a safe internal temperature and that all surfaces and utensils are clean.
Recommendations for Easy Honey Garlic Chicken
This Easy Honey Garlic Chicken recipe is incredibly versatile and delicious! To ensure you get the most out of your culinary creation, here are some recommendations for serving, storage, and enhancing your dining experience.
Serving Suggestions: This dish is wonderfully adaptable to various preferences. For a complete meal, serve the chicken with a side of steamed rice. The sticky honey garlic sauce clings beautifully to the rice grains, creating a harmonious flavor profile. Alternatively, serve it with fluffy mashed potatoes or roasted vegetables like broccoli, asparagus, or carrots. The sweetness of the honey garlic complements the earthiness of roasted vegetables perfectly. Consider serving it over a bed of noodles for a more Asian-inspired twist. For a lighter option, try a quinoa salad or a mixed green salad with a light vinaigrette.
Storage Conditions: Leftover Easy Honey Garlic Chicken should be stored in an airtight container in the refrigerator. It will generally stay fresh for 3-4 days. To maintain the quality of the sauce and prevent the chicken from drying out, ensure the container is tightly sealed. Reheating can be done in a microwave, oven, or skillet. When reheating in the microwave, add a tablespoon or two of water to prevent the chicken from becoming dry. For oven reheating, cover the dish with foil to retain moisture.
Complementary Dishes: To elevate your meal, consider adding some complementary dishes to your Easy Honey Garlic Chicken. A simple side of steamed or stir-fried greens will add a refreshing contrast to the richness of the sauce. A vibrant coleslaw or Asian-inspired slaw adds a crunchy texture and a tangy element that cuts through the sweetness. For a spicier kick, serve it with a side of kimchi or gochujang (Korean chili paste). If you’re looking for something more substantial, consider a side of egg fried rice or spring rolls. The possibilities are endless!
Nutritional Information (per serving, approximate): Please note that the exact nutritional information will vary depending on the specific ingredients used and portion sizes. This is an estimate based on a 4-serving recipe using boneless, skinless chicken breasts.
Calories: Approximately 350-400 calories per serving.
Protein: Approximately 30-35 grams per serving.
Fat: Approximately 15-20 grams per serving (depending on the amount of oil used).
Carbohydrates: Approximately 20-25 grams per serving (depending on the amount of honey and any added starches like rice).
Sodium: Will vary depending on the amount of soy sauce used. Consider using low-sodium soy sauce to reduce sodium intake.
Important Note: These nutritional values are estimates and may vary based on the specific ingredients and portion sizes used. For accurate nutritional information, it is recommended to use a nutrition calculator with your specific recipe details.
Enjoy your delicious and easy Honey Garlic Chicken!