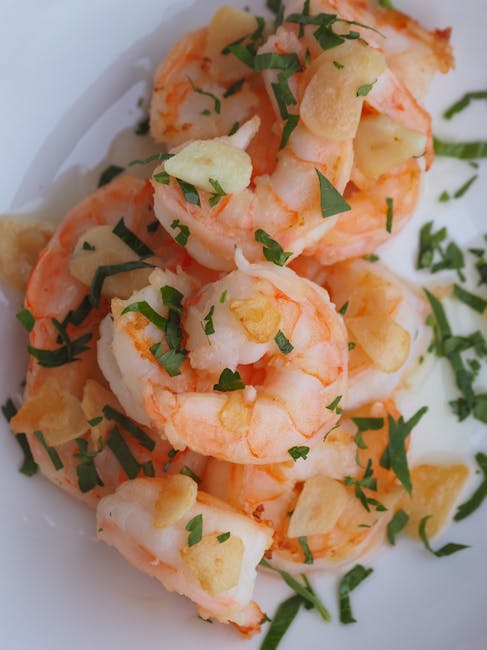
Easy Garlic Butter Shrimp, a dish seemingly simple in its execution, boasts a surprisingly rich and complex history interwoven with various culinary traditions. While pinpointing an exact origin is difficult, its core components—shrimp, garlic, and butter—have graced tables across the globe for centuries. Shrimp, a staple protein source in coastal communities worldwide, has been consumed since prehistoric times, with evidence suggesting its presence in ancient Mesopotamian and Roman diets. Garlic, revered for its pungent aroma and purported health benefits, played a significant role in ancient Greek and Roman medicine and cuisine, its cultivation spreading across the Mediterranean and beyond. Butter, a dairy product symbolizing wealth and indulgence in many cultures, has been a culinary cornerstone for millennia, its use varying from simple seasoning to elaborate sauces.
The specific combination of these ingredients into the dish we recognize today likely emerged gradually, influenced by various culinary evolutions. The widespread adoption of garlic butter as a versatile sauce is largely credited to the French culinary tradition, where its use in various preparations, from shellfish to vegetables, became prominent. The simplicity and speed of preparation of Easy Garlic Butter Shrimp likely contributed to its popularity in modern times, aligning with the current emphasis on quick and flavorful meals. Statistics show that shrimp is one of the most consumed seafood globally, with annual production exceeding millions of metric tons. This high demand, coupled with the dish’s ease of preparation, has cemented its place in both professional and home kitchens.
Culturally, Easy Garlic Butter Shrimp reflects a global culinary exchange. Its ingredients, originating from diverse regions, are now readily available worldwide, showcasing the interconnectedness of modern food systems. The dish’s versatility is also a key factor in its cultural significance. It can be adapted to suit various palates and dietary needs; it can be served as a standalone dish, an appetizer, or a component of a larger meal. Furthermore, its accessibility transcends socioeconomic boundaries, making it a popular choice for both casual and formal settings. Interestingly, variations of this dish can be found in numerous cuisines, highlighting its adaptability and global appeal. Each culture might incorporate unique spices or herbs, resulting in a delightful array of flavor profiles, all stemming from the same fundamental principle: the delightful marriage of shrimp, garlic, and butter.
In conclusion, Easy Garlic Butter Shrimp, while seemingly straightforward, represents a confluence of culinary history and global exchange. Its simple ingredients, readily available worldwide, have been combined to create a dish that is both delicious and deeply rooted in diverse culinary traditions, reflecting the evolution of food and its cultural significance across the globe. The dish’s continued popularity speaks to its timeless appeal and its ability to satisfy a wide range of tastes and preferences.
Ingredients and Measurements
This recipe for Easy Garlic Butter Shrimp relies on fresh, high-quality ingredients to deliver maximum flavor. Precise measurements are key to achieving the perfect balance of garlic, butter, and shrimp. Don’t be tempted to skimp on the garlic – it’s the star of the show! We’ll be using both fresh garlic and garlic powder for a more complex, nuanced garlic flavor profile.
Shrimp: You’ll need 1 pound (450g) of large shrimp, peeled and deveined. It’s crucial to buy shrimp that are already peeled and deveined to save time and effort. Look for shrimp that are firm to the touch and have a translucent, almost pearly appearance. Avoid shrimp that are mushy or have a strong fishy odor. If you opt for frozen shrimp, ensure they are completely thawed and patted dry before cooking to prevent excess moisture from steaming the shrimp instead of pan-frying them.
Butter: We’ll be using 6 tablespoons (85g) of unsalted butter. Using unsalted butter allows you to control the salt level in the dish. You can substitute with salted butter, but reduce the amount of salt added later in the recipe accordingly. For the best results, use high-quality butter, as the flavor will significantly impact the overall taste of the dish. Consider using European-style butter for a richer, more nuanced flavor.
Garlic: The garlic component is crucial. We’ll use a combination of fresh and powdered garlic for a layered flavor. Start with 4 large cloves of fresh garlic, minced finely. Mincing the garlic finely ensures even cooking and prevents large chunks from overpowering the dish. A garlic press can be incredibly helpful here. In addition to fresh garlic, we’ll incorporate 1 teaspoon of garlic powder. This adds another dimension of garlicky goodness.
Lemon Juice: A squeeze of fresh lemon juice brightens the dish and cuts through the richness of the butter. You’ll need the juice of 1/2 a medium-sized lemon. Freshly squeezed lemon juice is best; bottled lemon juice often lacks the vibrancy of fresh juice.
Olive Oil: A tablespoon (15ml) of extra virgin olive oil is used to prevent the butter from burning and to add a subtle fruity note. Using high-quality olive oil is recommended, as its flavor will be noticeable in the final dish.
Seasoning: Salt and black pepper are essential for seasoning. Start with 1/2 teaspoon of salt and 1/4 teaspoon of freshly ground black pepper. Adjust the seasoning to your taste preference. Taste the shrimp before serving and add more salt and pepper as needed. Consider adding a pinch of red pepper flakes for a touch of heat.
Fresh Parsley (Optional): For garnish, you can use 2 tablespoons of chopped fresh parsley. This adds a pop of color and freshness to the dish. Other fresh herbs like chives or dill can be substituted if preferred.
Note: All measurements are approximate. Feel free to adjust the quantities of ingredients to your liking. Remember to always taste and adjust the seasoning as needed throughout the cooking process.
Equipment List
Preparing Easy Garlic Butter Shrimp requires a relatively modest collection of kitchen tools, but the right equipment will ensure a smoother and more efficient cooking process. This list details the essential items, along with recommendations for optimal results and alternatives where applicable.
1. Large Skillet (10-12 inch): A large skillet, preferably non-stick, is crucial for evenly cooking the shrimp. A 10-12 inch diameter is ideal to prevent overcrowding, which can lead to steaming instead of browning. Avoid using a skillet smaller than 10 inches, as this will necessitate cooking the shrimp in batches, increasing the overall cooking time and potentially leading to uneven results. Cast iron skillets are excellent choices for even heat distribution, but require more care in preheating and handling. Non-stick skillets offer easier cleanup and are a good option for beginners.
2. Measuring Cups and Spoons: Accurate measurements are key to achieving the perfect balance of flavors in this recipe. Invest in a set of measuring cups (1 cup, ½ cup, ⅓ cup, ¼ cup) and measuring spoons (1 tablespoon, 1 teaspoon, ½ teaspoon, ¼ teaspoon) for precise ingredient proportions. Using the correct measuring tools is vital, especially for the butter and garlic, to avoid an overly buttery or garlicky dish. Digital kitchen scales can also be beneficial for weighing ingredients, offering even greater precision.
3. Wooden Spoon or Spatula: A wooden spoon or spatula is recommended for stirring the garlic butter sauce and gently tossing the shrimp. Avoid using metal utensils in non-stick skillets, as they can scratch the surface. Silicone spatulas are a good alternative, being both heat-resistant and gentle on non-stick surfaces. Choose a sturdy spoon or spatula that can handle the heat without warping or melting.
4. Tongs: Tongs are essential for safely and efficiently flipping and removing the shrimp from the skillet. They provide better control and prevent accidental burns compared to using a fork or spoon. Look for tongs with a comfortable grip and sufficient length to keep your hands safely away from the hot skillet.
5. Garlic Press (Optional but Recommended): While you can finely mince garlic with a knife, a garlic press significantly simplifies this task and ensures consistent size and texture of the garlic pieces. A garlic press produces finely minced garlic, which infuses the butter more effectively and creates a smoother sauce. If you don’t own a garlic press, ensure you mince the garlic very finely to prevent large chunks in the finished dish.
6. Paper Towels: Paper towels are necessary for patting the shrimp dry before cooking. Removing excess moisture from the shrimp aids browning and prevents steaming. Use absorbent paper towels to effectively remove moisture.
7. Serving Dish: A warm serving dish is ideal for presenting the finished Garlic Butter Shrimp. This helps to keep the dish warm while serving. Choose a dish that complements the presentation of the dish.
Optional Equipment: While not essential, a thermometer for monitoring the oil temperature can ensure even cooking, especially when using a cast iron skillet.
Preparation Phase: Cleaning and Prepping Shrimp
Before you begin the delightful process of cooking garlic butter shrimp, proper preparation of the shrimp is crucial for achieving optimal flavor and texture. This section will guide you through cleaning and prepping 1 pound (approximately 450 grams) of raw shrimp, ensuring your final dish is both delicious and visually appealing.
Choosing Your Shrimp: Start by selecting high-quality, fresh shrimp. Look for shrimp that are firm to the touch, with a translucent, slightly pearly appearance. Avoid shrimp that are slimy, discolored, or have a strong fishy odor. Ideally, choose shrimp that are already deveined, but if not, be prepared to do it yourself.
Thawing (If Frozen): If using frozen shrimp, ensure they are completely thawed before cleaning. The safest method is to thaw them overnight in the refrigerator. Never thaw shrimp at room temperature, as this can create a breeding ground for bacteria. Another safe method is to submerge the frozen shrimp in a sealed bag in cold water, changing the water every 30 minutes until thawed. This process usually takes 1-2 hours depending on the quantity and size of the shrimp.
Deveining the Shrimp: If your shrimp are not already deveined, this is the next step. Using a small, sharp paring knife, make a shallow cut along the back of each shrimp, exposing the dark vein (the digestive tract). Gently remove the vein with the tip of your knife or a small toothpick. Don’t cut too deep; you want to remove the vein without compromising the integrity of the shrimp.
Removing the Shell (Optional): Whether you leave the shells on or off is a matter of personal preference. Leaving the shells on adds a slightly more intense shrimp flavor to the dish and provides a nice visual appeal. However, removing the shells makes the shrimp easier to eat. If removing the shells, use your knife or your fingers to gently peel them off.
Rinse and Pat Dry: Once the shrimp are cleaned and deveined (and shelled, if desired), rinse them thoroughly under cold running water. This removes any remaining debris or impurities. After rinsing, pat the shrimp dry with paper towels. Excess moisture can hinder the browning process during cooking, resulting in a less appealing finished product.
Optional: Butterfly the Shrimp (for even cooking): For larger shrimp, consider butterflying them to ensure even cooking. To butterfly a shrimp, make a shallow lengthwise cut almost all the way through the shrimp, leaving the tail intact. This allows the shrimp to cook more quickly and evenly, preventing overcooking.
Final Preparation: Once the shrimp are cleaned and prepared according to your preference, you’re ready to move on to the next stage of the recipe. Remember, properly cleaned and prepped shrimp will make all the difference in the final taste and texture of your Easy Garlic Butter Shrimp.
Cooking Techniques: Sautéing the Shrimp
Sautéing shrimp is a quick and easy cooking method that yields perfectly cooked, succulent shrimp with a delightful sear. The key to success lies in using the right technique and understanding how quickly shrimp cook. Overcooked shrimp become rubbery and tough, while undercooked shrimp are unsafe to eat. This section will guide you through the process of flawlessly sautéing shrimp for your Easy Garlic Butter Shrimp recipe.
Preparation is key. Before you even begin sautéing, ensure your shrimp are properly thawed and patted completely dry with paper towels. Excess moisture will prevent a good sear and lead to steaming instead of sautéing. This will result in less flavorful shrimp. For this recipe, we’ll assume you’re using 1 pound (approximately 450g) of peeled and deveined shrimp. If your shrimp are still frozen, allow them to thaw completely in the refrigerator overnight, or use the defrost setting on your microwave. Never thaw shrimp at room temperature.
Selecting the right pan is crucial. A heavy-bottomed pan, such as a cast iron skillet or stainless steel pan, is ideal for even heat distribution. This prevents hot spots that can burn the shrimp before they’re cooked through. A 10-12 inch pan is perfect for 1 pound of shrimp. Avoid overcrowding the pan; work in batches if necessary to ensure each shrimp receives adequate contact with the hot surface.
Heating the oil is paramount. Add 2 tablespoons of butter and 1 tablespoon of olive oil to your preheated pan over medium-high heat. The combination of butter and oil provides flavor and prevents the butter from burning. Once the butter is melted and shimmering—but not browned—it’s ready for the shrimp. Do not overheat the oil, as this will lead to burning and a bitter taste.
Adding the shrimp and cooking time. Carefully add the shrimp to the hot pan in a single layer, ensuring they aren’t overlapping. Avoid moving the shrimp for at least 2-3 minutes to allow them to develop a nice sear on one side. Once the bottom is nicely browned and opaque (about 2-3 minutes), gently flip them over with tongs and cook the other side for another 2-3 minutes, or until they are pink and opaque throughout. The internal temperature should reach 145°F (63°C).
Recognizing doneness. Shrimp cook remarkably fast. Overcooked shrimp will become tough and rubbery. Look for an opaque colour throughout the shrimp, and a slight curl in their shape. If you’re unsure, cut one open to check for doneness. Once cooked, immediately remove the shrimp from the pan to prevent overcooking. It’s perfectly fine if the shrimp aren’t perfectly browned on both sides; the priority is to ensure they’re cooked through and tender.
Important Note: Cooking times may vary slightly depending on the size of your shrimp. Smaller shrimp will cook faster than larger ones. Always monitor the shrimp closely to prevent overcooking. Always use a food thermometer for accuracy if you are unsure of doneness. This ensures food safety and optimal texture.
Sauce Preparation: Garlic Butter Sauce
The magic behind Easy Garlic Butter Shrimp lies in its incredibly flavorful garlic butter sauce. This section details how to create a rich, decadent sauce that perfectly complements the succulent shrimp. Follow these steps carefully for optimal results.
Ingredients: You’ll need the following ingredients to make the garlic butter sauce. Accurate measurements are crucial for achieving the desired balance of flavors:
- 1/2 cup (1 stick) unsalted butter
- 6 cloves garlic, minced (or about 2 tablespoons of pre-minced garlic)
- 1/4 cup dry white wine (optional, but adds depth of flavor. Substitute with chicken broth for a non-alcoholic version)
- 2 tablespoons lemon juice (freshly squeezed is best)
- 1 tablespoon chopped fresh parsley (or 1 teaspoon dried parsley)
- 1/2 teaspoon salt
- 1/4 teaspoon black pepper
- Pinch of red pepper flakes (optional, for a touch of heat)
Instructions: Begin by preparing your ingredients. Mince the garlic finely; larger pieces will result in unevenly distributed flavor and potentially a slightly bitter taste. If using fresh parsley, chop it finely. Measure out all other ingredients accurately for consistent results.
Melting the Butter: In a medium saucepan over medium heat, melt the unsalted butter. Do not let the butter brown; this will impart a burnt flavor to the sauce. Maintain a gentle melt, stirring occasionally to prevent scorching.
Sautéing the Garlic: Once the butter is completely melted, add the minced garlic to the saucepan. Cook for about 1-2 minutes, stirring constantly, until fragrant. Do not overcook the garlic, as this will result in a bitter and harsh flavor. The garlic should be softened and fragrant, not browned.
Adding the Liquid and Seasonings: Carefully pour in the white wine (or chicken broth) and lemon juice. Bring the mixture to a gentle simmer, stirring occasionally. Allow the sauce to reduce slightly, for about 2-3 minutes, allowing the alcohol to cook off (if using wine) and the flavors to meld. Then, stir in the salt, pepper, and red pepper flakes (if using).
Finishing Touches: Remove the sauce from the heat and stir in the fresh parsley. This step should be done at the end to preserve the vibrant green color and fresh flavor of the parsley. Taste the sauce and adjust the seasoning as needed. You may want to add a bit more salt, pepper, lemon juice, or red pepper flakes to suit your preference.
Professional Recommendation: For a smoother sauce, you can whisk the sauce vigorously before adding the parsley. This will emulsify the butter and create a creamier texture. Consider using high-quality ingredients, especially the butter, garlic, and lemon juice, as these will significantly impact the final flavor of the sauce.
Serving Suggestion: Once prepared, the garlic butter sauce is ready to be poured over your cooked shrimp. Serve immediately for the best flavor and texture. The sauce can also be used as a dipping sauce for crusty bread.
Combining Shrimp and Sauce
Once your garlic butter sauce is bubbling beautifully and your shrimp are prepped, it’s time for the magic to happen! This is where the flavors truly meld and your shrimp achieve that perfect balance of tender succulence and garlicky richness. The key here is gentle, even cooking to prevent overcooking the delicate shrimp.
Begin by adding your shrimp to the hot garlic butter sauce. For a pound of shrimp (approximately 16-20 large shrimp, peeled and deveined), you’ll want to ensure your skillet is large enough to accommodate them in a single layer, without overcrowding. Overcrowding will lower the temperature of the pan, resulting in steaming instead of sautéing, and leading to tough, rubbery shrimp. If you have a large batch, consider cooking in two batches to maintain optimal cooking conditions.
Use tongs to gently distribute the shrimp in the skillet, ensuring they’re not clumped together. This allows for even heat distribution and prevents some shrimp from cooking faster than others. Aim for a single layer, if possible. If you’re working with a smaller skillet, cook the shrimp in two or more batches.
Cook the shrimp for 2-3 minutes per side. You’ll know they’re done when they turn pink and opaque throughout. Avoid overcooking; overcooked shrimp will be tough and dry. The internal temperature should reach 145°F (63°C). Use a food thermometer to ensure accuracy, especially if you have larger shrimp.
While the shrimp cooks, gently tilt the pan and spoon the sauce over the top of the shrimp. This helps to coat them evenly and infuse them with the delicious garlic butter flavor. Don’t stir excessively; you want to avoid breaking the shrimp. Gentle movements are key.
Once the shrimp are cooked through, remove them from the heat immediately. Continuing to cook them after they’re done will result in overcooked, rubbery shrimp. Transfer the shrimp and sauce to a serving dish. Resist the urge to let them sit in the hot pan; the residual heat will continue to cook them, compromising the texture.
Garnish and serve immediately. Fresh parsley, a squeeze of lemon juice, or a sprinkle of red pepper flakes can elevate the dish. Serve over pasta, rice, or with crusty bread for dipping in the luscious garlic butter sauce. The shrimp should be tender, juicy, and brimming with garlicky flavor. Enjoy!
Professional Tip: For best results, use high-quality, fresh shrimp. Frozen shrimp will work, but ensure they are fully thawed and patted dry before cooking to prevent excess moisture from impacting the cooking process and creating a watery sauce. Also, don’t overcrowd the pan. It’s better to cook in batches and ensure even cooking than to rush the process and end up with subpar shrimp.
Recommendations for Easy Garlic Butter Shrimp
This Easy Garlic Butter Shrimp recipe is a delightful and quick meal perfect for a weeknight dinner or a casual get-together. To elevate your culinary experience and ensure optimal enjoyment, consider these recommendations:
Serving Suggestions: The versatility of this dish allows for numerous serving options. For a classic presentation, serve the shrimp over a bed of perfectly cooked pasta, such as linguine or spaghetti. The garlic butter sauce clings beautifully to the pasta, creating a rich and flavorful combination. Alternatively, serve the shrimp with a side of steamed rice, which soaks up the delicious sauce, or alongside a simple salad with a light vinaigrette to balance the richness of the dish. Consider adding some crusty bread for dipping into the remaining garlic butter sauce – a delightful way to savor every last drop. For a more elegant touch, garnish with fresh parsley or lemon wedges before serving.
Complementary Dishes: To create a well-rounded and satisfying meal, consider pairing your Easy Garlic Butter Shrimp with complementary dishes. A simple side salad with a lemon vinaigrette provides a refreshing contrast to the richness of the shrimp. Roasted asparagus or broccoli add a healthy and flavorful element, complementing the garlic butter perfectly. For a heartier meal, a side of garlic bread or a simple green bean casserole adds extra texture and flavor. If you’re looking for a more substantial meal, consider serving the shrimp over a bed of creamy polenta or risotto.
Storage Conditions: For optimal freshness and flavor, it’s recommended to consume your Easy Garlic Butter Shrimp immediately after cooking. However, leftovers can be stored in an airtight container in the refrigerator for up to 2 days. When reheating, gently warm the shrimp in a skillet over low heat or in the microwave, avoiding overcooking, which can make the shrimp tough. Do not freeze this dish, as the texture and flavor may be compromised upon thawing.
Calorie and Nutritional Information (per serving, approximate): The exact nutritional information will vary depending on the specific ingredients and portion sizes used. However, a typical serving of Easy Garlic Butter Shrimp (approximately 4-5 large shrimp) will contain roughly 250-350 calories. The nutritional breakdown will include a significant amount of protein from the shrimp, along with fats from the butter and some carbohydrates depending on the accompanying sides. The dish will also provide a good source of vitamin B12 and selenium. Please note: this is an estimate, and using different types of butter or adding additional ingredients will affect the final nutritional values. For a more precise analysis, it is recommended to use a nutrition calculator based on your specific recipe and ingredients.
Important Considerations: Always ensure your shrimp is cooked thoroughly to an internal temperature of 145°F (63°C) to prevent foodborne illness. Feel free to adjust the amount of garlic and butter to your preference. For a spicier kick, add a pinch of red pepper flakes to the garlic butter sauce. Experiment with different herbs and spices to customize the flavor profile to your liking. Enjoy!