The intoxicating aroma of hickory smoke, the tender pull of succulent meat from the bone, the sweet and tangy glaze glistening under the light – this is the experience of truly great American BBQ ribs. More than just a meal, BBQ ribs represent a rich tapestry of culinary history, cultural identity, and regional pride. Its origins are deeply rooted in the traditions of indigenous peoples who smoked meats over open fires, a method perfected and adapted by generations of settlers and enslaved Africans. These early techniques laid the groundwork for the diverse styles of BBQ we know today, each with its unique regional variations and fiercely loyal following.
While pinpointing a single origin is impossible, the development of BBQ in the American South, particularly in the Carolinas and Texas, is central to the story. Slave communities, possessing intimate knowledge of smoking and curing meats, played a crucial role in the evolution of BBQ techniques. They often used readily available wood sources like hickory and oak, imparting distinctive flavors. The post-Civil War era saw the rise of BBQ joints, often family-run businesses that became community hubs, solidifying the cultural significance of this cuisine. These establishments weren’t just serving food; they were shaping social interactions and preserving cultural heritage.
The popularity of BBQ ribs has exploded in recent decades. The National Barbecue Association estimates that the barbecue industry generates billions of dollars annually in revenue, a testament to the enduring appeal of this American classic. Interestingly, pork ribs consistently outsell beef ribs, holding a dominant market share of around 70%. This preference reflects the versatility of pork ribs, which respond beautifully to various smoking and cooking methods, resulting in a wide range of flavors and textures. The variations are endless: from the vinegar-based sauces of the Carolinas to the dry rubs and mesquite smoke of Texas, each region boasts its own unique approach, fueling a friendly competition and a constant evolution of techniques.
Beyond the economic impact, American BBQ ribs hold a powerful cultural position, representing a fusion of diverse culinary traditions and a symbol of Southern hospitality. It’s a food that brings people together, fostering a sense of community and shared experience around the table. The competitive BBQ circuit, with its rigorous judging and passionate participants, further underscores the cultural importance of this dish. From backyard cookouts to high-stakes competitions, BBQ ribs remain a central part of the American culinary landscape, a testament to its enduring appeal and rich history.
Ingredients and Measurements
The quality of your ingredients directly impacts the final flavor of your Best American BBQ Ribs. We’ve carefully selected ingredients to balance sweetness, smokiness, and savory notes, creating a truly unforgettable experience. Don’t skimp on quality – it shows!
For the Ribs:
- 3-4 lbs St. Louis style pork ribs (approximately 3 racks). St. Louis style ribs offer a consistent thickness and meat-to-bone ratio ideal for even cooking. Baby back ribs are also a viable option, but cooking times may vary.
- 1 tbsp kosher salt (adjust to your taste). Kosher salt is preferred for its larger crystals, which distribute more evenly and prevent over-salting.
- 1 tsp freshly ground black pepper (adjust to your taste). Freshly ground pepper offers a superior aroma and flavor compared to pre-ground.
- 1 tsp garlic powder (use high-quality garlic powder). Look for brands that emphasize flavor and aroma.
- 1 tsp paprika (smoked paprika is recommended for an enhanced smoky flavor). Sweet paprika is also acceptable if smoked is unavailable.
For the Dry Rub (adjust quantities to your preference):
- 1/4 cup brown sugar (light or dark brown sugar works well). Brown sugar adds a subtle sweetness that balances the savory notes.
- 2 tbsp smoked paprika (for that deep smoky flavor). This is a key component of the rub.
- 2 tbsp chili powder (adjust heat level to your preference). Choose a chili powder with a flavor profile you enjoy.
- 1 tbsp garlic powder (freshly ground is best if possible).
- 1 tbsp onion powder (adds depth of flavor).
- 1 tbsp ground cumin (earthy and warm).
- 1 tsp cayenne pepper (optional, for extra heat). Add cautiously and taste as you go.
- 1 tsp black pepper (freshly ground is preferred).
- 1 tsp salt (adjust to taste). This is in addition to the salt used on the ribs themselves.
For the BBQ Sauce (recipe follows separately, but consider quantities based on your preference):
- Note: The BBQ sauce recipe will yield approximately 2 cups. Adjust quantities as needed based on the number of ribs you are cooking and how much sauce you prefer.
Important Considerations:
- Weigh your ribs: For the most accurate cooking time, weigh your ribs instead of relying solely on the number of racks. Adjust cooking times accordingly.
- Adjust seasoning: Taste as you go! The ingredient quantities provided are guidelines; adjust to your personal preferences.
- Freshness matters: Use high-quality ingredients for the best results. Freshly ground spices offer a significant improvement in flavor.
- Prepare in advance: The dry rub can be prepared several days in advance, allowing the flavors to meld. This step enhances the overall flavor profile of the ribs.
Preparation of the Ribs (Trimming, Cleaning)
Before you even think about firing up the smoker, proper preparation of your ribs is crucial for achieving that melt-in-your-mouth tenderness and incredible BBQ flavor. This involves careful trimming and cleaning to ensure even cooking and a beautiful final product. We’ll be focusing on St. Louis-style ribs in this guide, but the principles apply to other cuts as well.
Selecting Your Ribs: Start by selecting a rack of ribs that’s relatively uniform in thickness. Avoid racks with excessive fat or overly thin areas, as these can lead to uneven cooking. Look for a good balance of meat and fat – a little fat is your friend in the low-and-slow cooking process.
Trimming the Membrane: This is arguably the most important step. The tough, paper-like membrane on the back of the ribs (the bone side) prevents the smoke and moisture from penetrating the meat properly, resulting in dry, tough ribs. To remove it, use a butter knife or a specialized rib membrane remover to carefully loosen one corner of the membrane. Then, grab the loosened corner with a paper towel and peel it back, working your way across the entire rack. Don’t worry if it tears; just keep peeling. A completely removed membrane is key.
Trimming Excess Fat: Next, examine the ribs for excess fat. While some fat is essential for flavor and moisture, excessive fat can render during cooking, leading to a greasy mess and potentially affecting the overall taste. Using kitchen shears or a sharp knife, trim away any large chunks of fat. Aim for a consistent layer of fat, approximately ¼ inch thick. This will ensure even cooking and prevent overly fatty areas.
Cleaning the Ribs: After trimming, give the ribs a thorough rinse under cold running water. This removes any lingering debris or blood. Pat the ribs completely dry with paper towels. Thoroughly drying the ribs is important for good smoke adhesion and preventing unwanted moisture during the cooking process.
Optional: Frencing the Ribs (for even cooking): For particularly thick racks of ribs, consider frencing them. This involves trimming away the excess meat and fat from the ends of the ribs, creating a more uniform thickness. This will help ensure that the ends cook at the same rate as the rest of the rack. This step isn’t strictly necessary, but it does help with even cooking, especially for beginners.
Important Considerations: Sharp tools are essential for efficient and safe trimming. Use a well-sharpened knife or kitchen shears to avoid tearing the meat. Remember, a little fat is beneficial; don’t over-trim. Finally, take your time with this process; careful preparation is the foundation of delicious BBQ ribs.
Once your ribs are trimmed and cleaned, you’re ready to move on to the next crucial step: applying your chosen rub and preparing for the smoking process. Remember, patience and attention to detail during this preparation phase will significantly impact the final result, ensuring you achieve those perfect, fall-off-the-bone BBQ ribs.
Dry Rub Preparation and Application
The dry rub is the cornerstone of great BBQ ribs, imparting flavor and a beautiful bark. A well-crafted rub balances sweet, savory, spicy, and smoky notes to complement the rich, meaty flavor of the ribs. This recipe yields enough rub for approximately 6 racks of ribs (adjust as needed).
Ingredients:
- 1/4 cup brown sugar (packed)
- 1/4 cup paprika (sweet or smoked)
- 2 tablespoons garlic powder
- 2 tablespoons onion powder
- 1 tablespoon black pepper (coarsely ground)
- 1 tablespoon chili powder
- 1 tablespoon cayenne pepper (or less, to taste)
- 1 tablespoon ground cumin
- 1 tablespoon kosher salt
- 1 teaspoon dried oregano
- 1 teaspoon smoked paprika (optional, for extra smoky flavor)
Preparation: In a medium bowl, thoroughly combine all dry rub ingredients. Ensure that the spices are evenly distributed to prevent pockets of intense flavor or blandness. Use a whisk or your fingers to break up any clumps and ensure a consistent texture. Store the dry rub in an airtight container in a cool, dark place. It will keep for several months.
Application: The application of the dry rub is just as crucial as the recipe itself. Start with clean, patted-dry ribs. Excess moisture will prevent the rub from adhering properly and developing a good bark. Using your hands (or clean gloves), generously apply the rub to all surfaces of the ribs, ensuring complete coverage. Don’t be shy with the rub! A thicker layer will result in a more intense flavor and a better bark.
Professional Tip: For even distribution, some pitmasters prefer to apply the rub in stages. First, apply a light layer, then gently pat it into the meat. Allow this initial layer to sit for about 30 minutes before applying a second, heavier coat. This method ensures the rub adheres well and the flavors penetrate the meat.
Important Consideration: The amount of salt in the rub is crucial. Don’t be afraid of the salt! While it might seem like a lot, the salt helps to draw out moisture, creating a flavorful crust and enhancing the overall taste. However, if you prefer a less salty rub, you can reduce the amount of salt by a teaspoon or two. Adjust to your taste, but remember that salt plays a significant role in the final product.
Post-Application: After applying the rub, let the ribs rest, uncovered, in the refrigerator for at least 2 hours, or preferably overnight. This allows the rub to penetrate the meat and develop its flavors. This step is crucial for achieving that signature BBQ flavor and tender, juicy ribs. Refrigeration helps prevent the rub from becoming soggy.
Following these steps will ensure your ribs are infused with delicious flavor and develop a beautiful, flavorful bark – a key element to achieving the perfect American BBQ ribs.
Smoking/Cooking Method (Temperature, Time, Wood Type)
Achieving truly exceptional American BBQ ribs requires a meticulous approach to smoking. The process involves a delicate balance of temperature, time, and wood type, all working in harmony to render the meat fall-off-the-bone tender while developing a deep, smoky flavor profile. This section details the optimal method for achieving that perfect result.
Temperature Control is King: The ideal smoking temperature for ribs sits between 225°F and 250°F (107°C and 121°C). Maintaining this consistent temperature throughout the entire cook is crucial. Fluctuations will lead to uneven cooking and potentially dry ribs. Invest in a reliable meat thermometer with a probe that can remain in the smoker to monitor the internal temperature accurately. Adjust your smoker’s vents as needed to maintain the target range. Never exceed 275°F (135°C), as this will result in tough, overcooked meat.
Time Commitment: The Low and Slow Approach: The total cooking time for a full rack of ribs will generally fall between 6-8 hours, depending on the size and thickness of the ribs. Don’t rush the process! Low and slow cooking allows the collagen in the ribs to break down completely, resulting in that coveted melt-in-your-mouth texture. Remember to check the internal temperature regularly. The ribs are done when the meat pulls away easily from the bone, and the internal temperature reaches at least 200°F (93°C).
Wood Selection: Enhancing the Flavor Profile: The type of wood you use will significantly impact the flavor of your ribs. Hickory is a classic choice, delivering a strong, smoky flavor that complements pork beautifully. Oak, both red and white, offers a slightly milder, more nuanced smoke. Mesquite provides a more assertive, almost peppery smoke and should be used sparingly, particularly for beginners. Applewood imparts a sweeter, fruitier note, which can be a great counterpoint to the richness of the pork. Avoid woods like pine or cedar, as they can impart undesirable flavors and are potentially harmful.
Practical Tips for Success: Always use high-quality lump charcoal or wood chunks, avoiding briquettes as much as possible. Prepare your smoker properly before adding the ribs, ensuring even heat distribution. Wrap your ribs in butcher paper or aluminum foil during the last 2-3 hours of cooking to help retain moisture and speed up the tenderizing process. This is often referred to as the Texas Crutch. Finally, always use a meat thermometer to ensure the ribs reach the proper internal temperature. Don’t rely solely on visual cues or feel.
Troubleshooting: If your ribs are cooking too quickly, increase the distance between the heat source and the ribs or close the vents slightly. If they are cooking too slowly, reduce the distance or open the vents further. If the ribs appear to be drying out, increase the amount of moisture in the smoker (e.g., by adding a pan of water) or wrap them earlier.
By following these guidelines carefully, you’ll be well on your way to crafting a rack of ribs that are both tender and bursting with smoky flavor. Remember, practice makes perfect! Experiment with different wood types and techniques to find your perfect BBQ rib recipe.
Monitoring and Managing the Cooking Process (Internal Temperature, Moisture)
Achieving perfectly tender, juicy, and flavorful BBQ ribs requires meticulous monitoring and management of the cooking process. This primarily involves carefully tracking internal temperature and controlling moisture loss. Ignoring either will result in dry, tough ribs, a culinary tragedy for any BBQ enthusiast.
Internal Temperature: The Key to Tenderness. The most crucial aspect is monitoring the internal temperature of the ribs. Unlike many other meats, ribs don’t rely solely on reaching a specific final temperature. Instead, the goal is to achieve a tender, easily-pulled texture. Use a reliable instant-read thermometer to check the internal temperature in several locations throughout the cooking process. Target an internal temperature of 190-205°F (88-96°C) for optimal tenderness. This temperature range ensures the collagen in the connective tissue has fully broken down, resulting in that melt-in-your-mouth experience.
The Importance of a Meat Thermometer: Don’t rely on visual cues alone. Ribs can appear done before they actually are, leading to dry and tough results. A reliable meat thermometer is your best friend. Insert the probe into the thickest part of the meat, avoiding the bone. Take multiple readings from different sections of the rack to ensure consistent cooking. Invest in a good quality, accurate thermometer – it’s worth the investment.
Managing Moisture: The Battle Against Dry Ribs. While achieving the right internal temperature is critical, maintaining moisture is equally important. Dry ribs are a common pitfall, and several techniques can help prevent this. Firstly, start with high-quality ribs, properly trimmed of excess fat and membrane. The membrane on the back of the ribs can act as a barrier, preventing moisture from penetrating the meat. Removing it before cooking allows for better smoke penetration and moisture retention. This is easily done with a paper towel and your fingers.
The Wrap Method: A Moisture Savior. Many BBQ aficionados utilize the wrap method to enhance moisture and speed up the cooking process. Once the ribs have reached an internal temperature of around 160°F (71°C), you can wrap them tightly in aluminum foil with a splash of your favorite BBQ sauce or apple juice. This creates a steamy environment that helps tenderize the meat and prevents further moisture loss. Unwrap the ribs during the last 30-45 minutes of cooking to allow for a good bark development and further smoke infusion.
Spraying: A Moisture Boost. Throughout the cooking process, consider spritzing your ribs with a mixture of apple cider vinegar and water (approximately 50/50). This helps maintain moisture and adds a subtle tangy flavor. Avoid over-spritzing, as this can hinder bark development. Spray every 30-45 minutes, adjusting based on your smoker’s temperature and humidity.
Monitoring and adjusting: Remember that every smoker and every rack of ribs is different. Continuously monitor the internal temperature and adjust your cooking time and techniques as needed. Don’t be afraid to experiment and find what works best for your equipment and your preferred taste.
Making the BBQ Sauce (Ingredients and Method)
This recipe delivers a tangy, smoky, and slightly sweet BBQ sauce that perfectly complements the rich flavor of American-style BBQ ribs. It’s easily adaptable to your personal taste preferences – feel free to adjust the sweetness or heat levels to your liking.
Ingredients:
- 1 large onion, finely chopped (approximately 1 cup)
- 2 cloves garlic, minced
- 1 cup ketchup (high-quality is recommended for best flavor)
- 1/2 cup apple cider vinegar
- 1/4 cup brown sugar (packed)
- 1/4 cup Worcestershire sauce
- 2 tablespoons molasses (adds depth and richness)
- 1 tablespoon smoked paprika (for that authentic smoky flavor)
- 1 tablespoon Dijon mustard (adds a subtle tang)
- 1 teaspoon ground cumin
- 1 teaspoon chili powder (adjust to your preferred heat level)
- 1/2 teaspoon cayenne pepper (optional, for extra heat)
- 1/4 teaspoon black pepper
- 2 tablespoons olive oil
- Salt to taste
Method:
1. Sauté the Aromatics: Begin by heating the olive oil in a medium-sized saucepan over medium heat. Add the chopped onion and cook until softened and translucent, about 5-7 minutes. Stir occasionally to prevent burning. Then, add the minced garlic and cook for another minute until fragrant. This step builds a flavorful base for your sauce.
2. Combine the Ingredients: Stir in the ketchup, apple cider vinegar, brown sugar, Worcestershire sauce, molasses, smoked paprika, Dijon mustard, cumin, chili powder, cayenne pepper (if using), and black pepper. Make sure to mix thoroughly to combine all the ingredients evenly.
3. Simmer the Sauce: Bring the mixture to a gentle simmer, then reduce the heat to low. Allow the sauce to simmer uncovered for at least 20-30 minutes, stirring occasionally. This simmering process allows the flavors to meld and deepen. The longer it simmers, the richer the flavor will become. Don’t let it boil vigorously, as this can cause the sauce to become too thick and potentially burn.
4. Adjust the Consistency and Seasoning: After 20-30 minutes, taste the sauce and adjust the seasoning as needed. Add more brown sugar for extra sweetness, apple cider vinegar for more tang, or chili powder/cayenne pepper for more heat. If you prefer a thicker sauce, simmer it for a longer period, or you can briefly whisk in a teaspoon of cornstarch mixed with a tablespoon of cold water. Taste and adjust until you achieve your desired flavor profile.
5. Cool and Store: Once the sauce has reached your desired consistency and flavor, remove it from the heat and let it cool completely. Store the BBQ sauce in an airtight container in the refrigerator for up to a week. It can also be frozen for longer storage.
Professional Recommendation: For an even richer, smokier flavor, consider adding a splash of your favorite liquid smoke towards the end of the simmering process. Start with a small amount (1/2 teaspoon) and adjust to your liking. Remember to always taste and adjust as needed to achieve your perfect BBQ sauce!
Best American BBQ Ribs: Recommendations
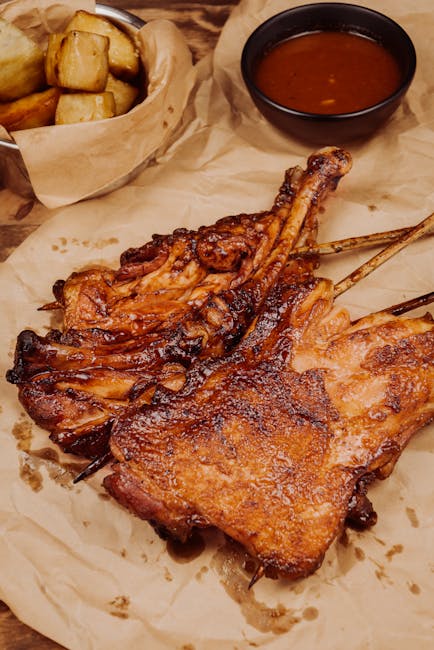
Our Best American BBQ Ribs are crafted using a time-honored recipe, slow-cooked to perfection for maximum tenderness and flavor. We use only the finest quality pork ribs, seasoned with our signature blend of spices and smoked low and slow for that authentic BBQ taste. Enjoy them as a centerpiece of your next meal or as a satisfying standalone dish.
Serving Suggestions: These ribs are incredibly versatile. For a classic BBQ experience, serve them directly off the bone, allowing guests to enjoy the succulent meat. Alternatively, you can easily cut the ribs into individual portions for easier handling. Consider offering a variety of sauces on the side, ranging from tangy vinegar-based options to rich and smoky tomato-based sauces. Let your guests customize their experience!
Complementary Dishes: To enhance your BBQ experience, consider pairing these ribs with classic Southern sides. Coleslaw provides a refreshing counterpoint to the richness of the ribs, while creamy potato salad adds a comforting element. Baked beans, seasoned with smoky flavors, complement the ribs beautifully. For a lighter option, a simple side salad with a vinaigrette dressing works well. Cornbread, either sweet or savory, is a must-have to soak up the delicious BBQ sauce.
Storage Conditions: For optimal freshness, consume your Best American BBQ Ribs within 2 days of purchase. If you need to store them, refrigerate them in an airtight container. To reheat, you can use a grill, oven, or microwave. For best results when reheating in the oven, wrap the ribs in foil and bake at 350°F (175°C) for 15-20 minutes, or until heated through. Avoid overcooking, as this can dry out the meat. Freezing is also an option; wrap the ribs tightly in plastic wrap and then foil before placing them in a freezer-safe bag. They will keep for up to 3 months in the freezer.
Nutritional Information (per serving, approximately 6 oz): Please note that nutritional information may vary slightly depending on preparation methods and specific ingredients. This information is an estimate.
Calories: Approximately 450-500 calories
Protein: Approximately 40-45 grams
Fat: Approximately 25-30 grams
Carbohydrates: Approximately 15-20 grams
Sodium: Varies depending on sauce used; check specific sauce labels for accurate sodium content.
Disclaimer: This nutritional information is an approximation and may vary based on preparation and specific ingredients used. For precise nutritional information, consult a registered dietitian or nutritionist.