Healthy Peanut Butter Banana Toast: a seemingly simple combination, yet one steeped in a rich history and surprisingly diverse cultural significance. While pinning down the exact origin of this breakfast staple is impossible, its components boast long and separate journeys. Bananas, cultivated for millennia, trace their widespread popularity to the early 20th century’s banana boom, fueled by the United Fruit Company’s dominance in Central America. This led to the fruit’s global accessibility, making it a readily available ingredient in countless dishes, including the ubiquitous banana toast. Similarly, peanuts, cultivated for over 7,000 years in South America, found their way into global cuisines through trade routes and colonization, eventually becoming a key ingredient in various spreads and butters around the world.
The peanut butter itself has a fascinating history. Although peanut butter’s exact invention is debated, it emerged in the late 19th and early 20th centuries as a convenient, nutritious, and relatively inexpensive food source. Early versions were often gritty and difficult to spread, but technological advancements led to the smoother, creamier texture we know today. In the United States, peanut butter’s popularity soared, becoming a dietary staple, particularly during the Great Depression, thanks to its affordability and nutritional value. Its association with childhood and simple pleasures is deeply ingrained in American culture, often featured in nostalgic depictions of simpler times.
The combination of peanut butter and banana on toast, however, is less easily traced to a specific origin story. It’s likely an organic evolution, a natural pairing of two readily available, affordable, and delicious ingredients. The creamy texture of peanut butter complements the soft sweetness of the banana, creating a balanced and satisfying taste profile. This simplicity and nutritional value have made it a popular breakfast choice across numerous cultures, although its prevalence may vary. For example, while peanut butter’s popularity in the United States is undeniable, its adoption in other parts of the world might be more recent, reflecting evolving global food trends.
Today, healthy peanut butter banana toast remains a beloved breakfast choice, praised for its nutritional benefits. A single slice can provide a significant source of potassium (from the banana), healthy fats (from the peanut butter), and fiber, contributing to sustained energy and overall well-being. While the precise statistics vary depending on the ingredients used, the combination is often lauded as a quick, easy, and nutritious way to start the day, highlighting its enduring appeal and cultural relevance across generations and geographical locations. The humble peanut butter banana toast stands as a testament to the power of simple ingredients, combined to create a delicious and nutritionally rich food.
Ingredients and Measurements
This recipe for Healthy Peanut Butter Banana Toast focuses on using wholesome ingredients and precise measurements to ensure optimal flavor and nutritional value. The quantities listed below are designed for one serving, but can easily be scaled up to accommodate more people. Remember to always adjust portion sizes based on individual dietary needs and calorie goals.
1. Bread: We recommend using two slices of whole-wheat bread. Whole-wheat bread offers more fiber than white bread, promoting better digestion and contributing to a feeling of fullness. Look for bread with at least 3 grams of fiber per slice. The type of bread you choose can significantly impact the overall nutritional profile of your toast. Consider alternatives like sourdough or multigrain bread for added flavor and texture. Avoid overly processed breads with high sugar content.
2. Peanut Butter: Use 2 tablespoons of natural peanut butter. Natural peanut butter contains only peanuts and possibly salt. Avoid brands with added sugar, hydrogenated oils, or other artificial ingredients. Choosing natural peanut butter ensures you’re getting the most nutritional benefit, including healthy fats and protein. If you’re watching your sodium intake, opt for a low-sodium or unsalted variety. The creamy or crunchy texture is a matter of personal preference.
3. Banana: Select one medium-sized ripe banana. Ripe bananas offer a sweeter flavor and a softer texture, ideal for spreading easily on toast. The ripeness also impacts the nutritional content, with riper bananas containing more antioxidants. Avoid using overly green bananas, as they will be less sweet and more difficult to spread. A perfectly ripe banana will have yellow skin with some brown spots.
4. Optional additions: To enhance the flavor and nutritional profile of your toast, consider adding these optional ingredients: A sprinkle of cinnamon (approximately 1/4 teaspoon) adds warmth and a touch of sweetness. A drizzle of honey (1 teaspoon maximum) can further enhance sweetness, but use sparingly to maintain the health benefits. A handful of berries (approximately 1/4 cup) provides extra vitamins and antioxidants. Chia seeds or flax seeds (1 teaspoon) can be sprinkled on for added fiber and omega-3 fatty acids. Remember to adjust the quantities according to your preference and dietary needs.
Important Note: Always check the nutritional information on the packaging of your chosen ingredients, as values can vary between brands. Accurate measurements are crucial for maintaining the intended balance of flavor and nutrients in this recipe. Using a kitchen scale for weighing ingredients can further enhance accuracy.
Equipment List: Healthy Peanut Butter Banana Toast
Creating the perfect slice of healthy peanut butter banana toast requires the right tools. While the recipe itself is simple, having the appropriate equipment ensures efficiency, precision, and a superior final product. This list details the necessary equipment, along with recommendations for optimal performance and alternatives where applicable.
1. Knife: A sharp knife is crucial for achieving clean cuts of both the banana and the bread. A serrated knife, with its saw-like edge, is particularly well-suited for slicing bread evenly without tearing or squashing it. A bread knife, specifically designed for this purpose, with its long, serrated blade, is highly recommended. Aim for a blade length of at least 8 inches for easy maneuvering. A dull knife will result in uneven slices and make the entire process more difficult. Avoid using a butter knife as it is generally too short and not designed for clean slicing of bread.
2. Spreading Knife or Spatula: A butter knife or a small, flexible spatula is ideal for spreading the peanut butter evenly across the toast. A flexible spatula offers better control and allows for a thinner, more even spread, preventing excess peanut butter from accumulating in certain areas. The size should be proportionate to the size of your toast; a smaller spatula is better for smaller pieces of bread for more precise spreading.
3. Measuring Spoons and/or Cup: While this recipe is relatively forgiving, using measuring tools ensures consistency. If you’re using a specific brand of peanut butter with varying thicknesses, using a measuring spoon (1-2 tablespoons, depending on your preference) helps you maintain the desired amount of peanut butter per slice. A measuring cup can be useful if you’re making several slices at once. Accuracy in measuring is important if you are tracking your daily caloric intake.
4. Toaster (Optional but Recommended): A toaster is the most efficient way to toast bread to the desired level of crispness. A two-slice toaster is perfectly adequate. However, if you prefer a crispier toast, consider a toaster oven, which provides more even heat distribution and allows for toasting larger slices of bread or even toasting the bread directly on a baking sheet. Ensure your toaster is clean to prevent any burnt residue affecting the taste of your toast.
5. Cutting Board (Optional but Recommended): While not strictly necessary, using a cutting board protects your countertop and provides a stable surface for slicing the banana and bread. Choose a cutting board made of a material that is easy to clean, such as plastic or wood. Avoid using glass cutting boards as they can dull your knife more quickly. A sturdy, non-slip cutting board is preferable.
6. Plate or Serving Dish: A plate or serving dish is essential for presenting your finished healthy peanut butter banana toast. Choose a plate that complements the aesthetic appeal of your breakfast. The size of the plate should be appropriate for the size of your toast. Consider using a smaller plate for a more visually appealing presentation.
7. Fork (Optional): While not essential for eating the toast, a fork can be helpful for cutting larger slices into smaller, more manageable pieces, especially for children or individuals who prefer smaller bites. A regular dinner fork is sufficient.
Preparation Phase: Toasting the Bread
The seemingly simple act of toasting bread for your healthy peanut butter banana toast significantly impacts the final product’s texture and overall enjoyment. A perfectly toasted slice provides the ideal crispness to contrast with the creamy peanut butter and soft banana, preventing a soggy bottom and enhancing the overall eating experience. Let’s delve into the specifics of achieving toast perfection.
First, select your bread. The type of bread you choose directly influences the toasting process. Thicker slices, such as artisan breads or sourdough, will require longer toasting times than thinner slices of white bread or whole wheat. Consider your preference for texture – a hearty sourdough offers a more substantial chew, while a thinner slice provides a lighter, crispier outcome. For this recipe, we recommend using two slices of your favorite whole-wheat bread (approximately 1.5 ounces each) for a balanced nutritional profile.
Next, consider your toasting method. While a toaster is the most common appliance, you can achieve excellent results with a skillet or even a grill pan. A toaster offers even and consistent toasting, making it the preferred method for achieving the optimal level of crispness without burning. If using a toaster, ensure it’s clean and free of crumbs to prevent uneven heating and potential fire hazards. Before inserting the bread, check the toaster’s settings. Most toasters are equipped with different levels of browning, usually ranging from 1 to 10. Start with a setting of 4-5 for whole wheat bread, as this level generally yields a lightly golden-brown toast without burning. Keep a close eye on the toasting process, as toasting times can vary based on your toaster’s wattage and the thickness of the bread.
For those without a toaster, a skillet offers a viable alternative. Heat a non-stick skillet over medium-low heat. Place your bread slices in the skillet and cook for approximately 1-2 minutes per side, or until lightly golden brown. Constantly monitor the bread to prevent burning, as this method requires more attention than using a toaster. Using a little butter or oil in the skillet can help to enhance the flavor and prevent the bread from sticking, although this is optional for a healthier approach.
Regardless of your chosen method, the ideal toast should be golden brown in color, with a slight crispness to the exterior and a soft, yet slightly firm, interior. Avoid over-toasting, as this can lead to a dry, hard texture that detracts from the overall enjoyment of the sandwich. Once the bread is toasted to your liking, remove it from the toaster or skillet and allow it to cool slightly before spreading your peanut butter and adding your banana slices. This cooling period prevents the heat from melting the peanut butter too quickly and ensures a more manageable assembly process.
Properly toasted bread is the foundation of a delicious and satisfying healthy peanut butter banana toast. By paying attention to these details, you can elevate this simple breakfast or snack to a whole new level of enjoyment.
Preparation Phase: Preparing the Banana
The seemingly simple task of preparing a banana for your healthy peanut butter banana toast can significantly impact the final taste and texture. Proper preparation ensures optimal ripeness, prevents browning, and contributes to a more enjoyable eating experience. We’ll cover the best methods for selecting, handling, and slicing your banana to achieve the perfect toast.
Choosing the Right Banana: Selecting a ripe banana is crucial. Avoid bananas that are overly green, as they will be hard and lack sweetness. Conversely, avoid bananas that are excessively brown and mushy, as they may be overripe and have an unpleasant texture. The ideal banana is yellow with just a few brown spots. These brown spots indicate the sugars have started to develop, resulting in a sweeter and more flavorful banana.
Quantity Considerations: The number of bananas you need depends on the number of servings you are preparing. For a single serving of healthy peanut butter banana toast, one medium-sized banana (approximately 7-8 inches long) is generally sufficient. If you are making multiple servings, adjust the quantity accordingly. For example, two medium-sized bananas would be ideal for two servings.
Washing and Peeling: Before handling your banana, it’s good practice to wash it under cold running water to remove any pesticides or dirt that may be present on the peel. Thoroughly rinse the banana under the tap, paying attention to the crevices of the peel. After washing, gently peel the banana from the stem end to the opposite end. Avoid tearing the banana flesh while peeling. A gentle, deliberate peel will maintain the integrity of the fruit.
Slicing Techniques for Optimal Texture: The way you slice your banana directly affects the final product. For even distribution of peanut butter and optimal bite-size pieces, slice your banana into rounds that are approximately ½ inch thick. Use a sharp knife to ensure clean cuts and prevent bruising. If you prefer a less structured approach, you can slice the banana lengthwise into halves or quarters before slicing into smaller pieces. However, ensure that the slices are not too thin, as they may become overly soft and mushy.
Preventing Browning: Bananas naturally oxidize and brown when exposed to air. To minimize browning, try to slice the bananas just before adding them to your toast. If you need to prepare the bananas ahead of time, you can place them in an airtight container or cover them with a damp paper towel to slow down the oxidation process. However, keep in mind that some browning is inevitable, and it doesn’t significantly affect the taste or nutritional value.
Professional Recommendation: For the most visually appealing and consistently textured toast, invest in a good quality chef’s knife. A sharp knife will make the slicing process easier and more precise, resulting in uniformly sized banana slices that will distribute the peanut butter evenly across your toast.
Preparation Phase: Preparing the Peanut Butter
This section details how to prepare your peanut butter for the perfect Healthy Peanut Butter Banana Toast. While you can certainly use store-bought peanut butter, making your own offers unparalleled control over ingredients and ensures a fresher, potentially healthier product. This recipe focuses on creating a smooth peanut butter, but you can easily adjust the process for a chunkier consistency.
Ingredients:
- 1 cup (140g) raw unsalted peanuts
- 1-2 tablespoons (15-30ml) olive oil or other high-quality oil (optional, for smoother consistency)
- 1/2 teaspoon sea salt (or to taste)
- Optional: 1 tablespoon honey or maple syrup (for sweetness, adjust to preference)
Equipment:
- Food processor or high-powered blender
- Measuring cups and spoons
- Airtight container for storage
Instructions:
Step 1: Roasting the Peanuts (Optional but Recommended): Roasting the peanuts enhances their flavor significantly. Preheat your oven to 350°F (175°C). Spread the peanuts in a single layer on a baking sheet and roast for 8-10 minutes, or until fragrant and lightly browned. Be careful not to burn them! Let them cool completely before proceeding.
Step 2: Processing the Peanuts: Add the cooled roasted peanuts (or raw peanuts if skipping the roasting step) to your food processor. Process on high speed for several minutes, scraping down the sides as needed. Initially, the peanuts will break down into smaller pieces. As you continue processing, the peanuts will release their oils and begin to form a paste.
Step 3: Adding Oil (Optional): If you prefer a smoother, less dense peanut butter, add 1-2 tablespoons of olive oil (or your preferred oil). Start with 1 tablespoon and add more if needed to achieve your desired consistency. High-quality oils enhance the flavor and nutritional profile of your peanut butter. Continue processing until the peanut butter is completely smooth and creamy.
Step 4: Seasoning: Add the salt and any optional sweetener (honey or maple syrup). Process for another minute to ensure everything is well combined. Taste and adjust the seasoning as needed.
Step 5: Storage: Transfer the freshly made peanut butter to an airtight container. Store it in the refrigerator to maintain freshness and prevent oil separation. Homemade peanut butter usually lasts for about 2-3 weeks in the refrigerator.
Professional Recommendations: Using raw, unsalted peanuts gives you complete control over the sodium and added sugar content. If using raw peanuts, be mindful of potential contaminants and ensure they are sourced from a reputable supplier. For a truly authentic taste, consider using a variety of peanut types for a more complex flavor profile. Finally, don’t be afraid to experiment! Adding spices like cinnamon or chili flakes can create unique and delicious variations.
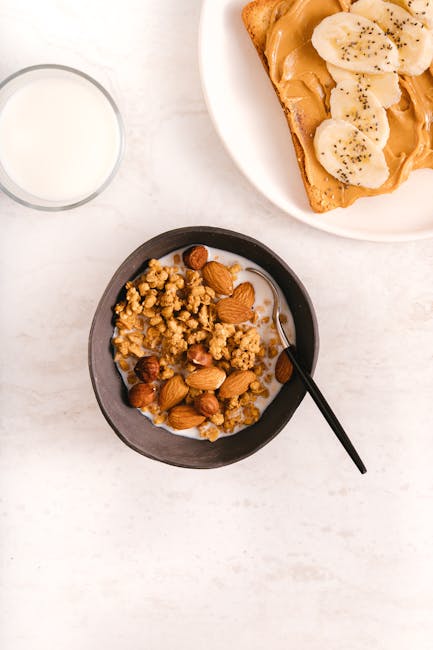
Assembly Instructions
Crafting the perfect Healthy Peanut Butter Banana Toast is a surprisingly nuanced process, demanding attention to detail for optimal flavor and texture. This section will guide you through each step, ensuring a delicious and satisfying result every time. We’ll cover toast preparation, peanut butter application, banana slicing, and final assembly, providing practical tips and professional recommendations along the way.
Step 1: Toasting the Bread: Begin by selecting your bread. For the healthiest option, choose whole-wheat bread, which offers higher fiber content and sustained energy. Use two slices of your chosen bread. Place the slices in a toaster and toast to your preferred level of crispness. Avoid burning the bread, as this can negatively impact the overall taste and texture. A light golden brown is ideal. For a crispier toast, consider using a toaster oven which offers more even toasting.
Step 2: Preparing the Peanut Butter: Use approximately 2 tablespoons of your favorite natural peanut butter per slice of toast. Natural peanut butter, with minimal added ingredients, is recommended for its superior nutritional value. If your peanut butter is particularly thick, you may need to gently warm the jar in a bowl of warm water for a few minutes to make it easier to spread. This prevents excessive pressure on the bread, which can lead to tearing.
Step 3: Spreading the Peanut Butter: Once the toast is ready, carefully remove it from the toaster and allow it to cool slightly before spreading the peanut butter. Using a butter knife or a spreader, apply the peanut butter evenly across the surface of each slice. Avoid overspreading, as this can result in an overly dense and less enjoyable texture. Aim for a smooth, even layer that covers the entire surface of the toast.
Step 4: Slicing the Banana: Select a ripe, but firm banana. Ripe bananas offer a sweeter, more flavorful experience. Peel the banana and slice it into approximately 1/4-inch thick rounds. The thickness of the slices is a matter of personal preference, but thinner slices tend to integrate better with the peanut butter and toast. Avoid overly thick slices, as they may be difficult to manage and may overwhelm the other flavors.
Step 5: Assembling the Toast: Gently arrange the banana slices evenly over the peanut butter on one slice of toast. Avoid overcrowding the banana slices, as this can cause the toast to become soggy. Once the banana is arranged to your liking, carefully top with the second slice of toast, completing your Healthy Peanut Butter Banana Toast. You can now enjoy your creation immediately.
Optional additions: For an enhanced flavor profile, consider adding a sprinkle of cinnamon, a drizzle of honey, or a few chia seeds. These additions offer a boost of flavor and additional nutritional benefits. Remember to adjust quantities according to your preference.
Professional Recommendation: For a more visually appealing presentation, consider using a slightly smaller amount of peanut butter and carefully arranging the banana slices in a decorative pattern. This will elevate your healthy snack to a gourmet experience.
Recommendations for Healthy Peanut Butter Banana Toast
This recipe for Healthy Peanut Butter Banana Toast offers a delicious and nutritious way to start your day or enjoy a satisfying snack. To maximize its benefits and enjoyment, consider the following recommendations.
Serving Suggestions: For a complete and balanced meal, consider adding elements to your peanut butter banana toast. A sprinkle of chia seeds or flax seeds will boost the omega-3 fatty acid content and add a pleasant texture. A drizzle of honey or maple syrup can add a touch of natural sweetness, but use sparingly to maintain a healthy balance. Consider adding a side of fresh berries for extra vitamins and antioxidants. For a heartier meal, pair your toast with a side of scrambled eggs or a small serving of Greek yogurt.
Storage Conditions: To maintain freshness and prevent spoilage, it’s crucial to store your ingredients properly. Store your peanut butter in a cool, dark place, ideally in the refrigerator after opening, to prevent oil separation and maintain its flavor and quality. Bananas should be kept at room temperature until slightly ripe, then refrigerated to slow down the ripening process. Bread should be stored in an airtight container at room temperature or in the freezer to preserve its freshness. Assemble your toast just before eating for optimal texture and flavor.
Complementary Dishes: Healthy Peanut Butter Banana Toast pairs well with a variety of dishes. A light salad with a vinaigrette dressing provides a refreshing contrast to the richness of the peanut butter. A cup of herbal tea or black coffee complements the flavors beautifully. For a more substantial meal, consider serving it alongside a side of fruit salad or a small portion of oatmeal. A smoothie incorporating banana and peanut butter would also make a nutritious and delicious accompaniment.
Nutritional Information (per serving, approximate values may vary based on ingredients used): Calories: Approximately 250-350 (depending on bread type, amount of peanut butter, and banana size). Protein: 8-10g. Fat: 12-15g (mostly healthy unsaturated fats). Carbohydrates: 30-40g. Fiber: 4-6g. Potassium: High due to banana content. Note: These are estimates and will vary depending on the specific ingredients and portion sizes used. Consult nutritional labels on your specific products for accurate information.
Important Considerations: Portion control is key to enjoying this treat as part of a balanced diet. Be mindful of the amount of peanut butter you use, as it is calorie-dense. Choose whole-wheat bread for added fiber and nutrients. Allergies: Be aware of potential allergies to peanuts or other ingredients. If you have any allergies, carefully check ingredient lists before consuming. Adjust to your liking: Feel free to experiment with different types of bread, peanut butter (e.g., crunchy vs. smooth), and add-ins to create your perfect version of this healthy and delicious treat.