Roasted chickpeas, a seemingly simple snack, boast a surprisingly rich and diverse history, far exceeding their current popularity as a crunchy, healthy alternative. While pinpointing the exact origin is difficult, evidence suggests that chickpeas, Cicer arietinum, were cultivated in the Near East as far back as 7500 BC, making them one of the oldest cultivated legumes. Archaeological digs in the Fertile Crescent have unearthed evidence of their presence in ancient Mesopotamian and Egyptian civilizations, where they formed a significant part of the daily diet, showcasing their enduring role as a staple food source.
Their journey across continents is a testament to their adaptability and nutritional value. From ancient empires to modern kitchens, chickpeas have maintained their relevance. Ancient Greeks and Romans incorporated them into their cuisine, and their presence continued through the Middle Ages in Europe and beyond. Interestingly, the methods of preparation evolved alongside cultural shifts. While boiling and incorporating into stews were common early practices, the art of roasting chickpeas, likely born out of a need to preserve the crop and enhance its flavor, emerged gradually. Today, various cultures have their unique versions, from the spicy roasted chickpeas of India to the flavorful, herb-infused variations found in Mediterranean cuisine.
The global popularity of roasted chickpeas continues to rise, fueled by increasing awareness of health-conscious eating habits. Globally, chickpea production exceeds 14 million tonnes annually, highlighting the significant impact of this humble legume on global food security. Their nutritional profile is impressive: they are a fantastic source of plant-based protein, fiber, and various essential minerals like iron and folate. One cup of roasted chickpeas contains approximately 14 grams of protein and 12 grams of fiber, contributing significantly to daily recommended values. This, coupled with their versatility – they can be seasoned countless ways to suit different palates – has propelled them into the spotlight as a healthy and delicious snack option, a guilt-free indulgence, and a versatile ingredient in countless dishes.
Beyond their nutritional benefits, roasted chickpeas hold cultural significance in many regions. They often feature prominently in festive meals and traditional recipes, reflecting their deep-rooted connection to culinary heritage. In some cultures, they symbolize prosperity and abundance, while in others, they are integral to specific religious or celebratory observances. This enduring cultural significance underscores their importance not just as a food, but as a symbol of tradition, community, and shared culinary experiences across diverse societies. The seemingly simple act of roasting chickpeas thus unlocks a world of history, culture, and culinary delight.
Ingredients and Measurements
The beauty of roasted chickpeas lies in their simplicity. However, even with simple ingredients, precision matters for achieving that perfect crispy, crunchy texture and delightful flavor. This recipe focuses on maximizing flavor and texture using readily available ingredients. We’ll be detailing the quantities needed for a standard batch, easily scalable for larger or smaller quantities.
Chickpeas (Garbanzo Beans): You’ll need 1 (15-ounce) can of chickpeas, or approximately 400 grams. Using canned chickpeas saves significant time compared to using dried chickpeas, which require soaking and cooking. Make sure to thoroughly rinse the chickpeas under cold water to remove any excess starch or canning liquid. This rinsing step is crucial for achieving that perfectly crispy exterior. Don’t skip it!
Olive Oil: We recommend using 2 tablespoons (30ml) of extra virgin olive oil. Olive oil provides both flavor and helps the chickpeas achieve that desirable crispiness. Avoid using too much oil, as this can lead to soggy chickpeas. The amount specified is ideal for even coating and optimal roasting. You can experiment with other oils, such as avocado oil, but olive oil provides the best flavor profile for this recipe.
Spices: The spice blend is where you can truly personalize your roasted chickpeas. This recipe uses a classic combination, but feel free to adjust to your taste. We’ll be using: 1 teaspoon of paprika (smoked paprika adds a deeper flavor), 1/2 teaspoon of garlic powder, 1/2 teaspoon of onion powder, 1/4 teaspoon of cumin, and 1/4 teaspoon of cayenne pepper (optional, for a little heat). Adjust the amount of cayenne pepper according to your spice preference. If you’re sensitive to spice, omit it entirely or use a pinch.
Salt: 1/2 teaspoon of kosher salt is essential for enhancing the flavor of the chickpeas and balancing the spices. Kosher salt has a larger grain size than table salt, allowing for more even seasoning. If using table salt, reduce the amount to about 1/4 teaspoon to avoid over-salting. Taste and adjust the salt towards the end of the roasting process, as needed. Remember, you can always add more salt, but you can’t take it away.
Optional additions: To elevate the flavor profile further, consider adding other ingredients. 1 tablespoon of lemon juice added at the end brightens the flavor, while a sprinkle of fresh herbs like parsley or cilantro adds a fresh, vibrant touch. A drizzle of balsamic glaze after roasting provides a sweet and tangy contrast. Experiment and find your perfect combination!
Important Note: Accurate measurements are key to achieving the desired results. Using a kitchen scale for weighing ingredients is highly recommended, especially for spices, to ensure consistency. However, if you only have measuring spoons, ensure you are using level measurements. Over-measuring spices can easily overpower the delicate flavor of the chickpeas.
Equipment List
Roasting chickpeas to perfection requires the right tools. While you might be able to improvise with some items, having the correct equipment will significantly improve the outcome and make the process easier and more efficient. This list details the essential and recommended equipment, along with explanations to help you make informed choices.
1. Baking Sheet(s): You’ll need at least one large baking sheet (approximately 18 x 13 inches or larger) for roasting your chickpeas. The size depends on the quantity you’re making; for larger batches, consider using two or even three sheets to ensure even roasting and prevent overcrowding. Avoid using non-stick baking sheets as they can sometimes react with high heat and affect the flavor. Heavy-duty aluminum baking sheets are a good, affordable option. If you have rimmed baking sheets, that’s even better as it helps contain any stray chickpeas during shaking.
2. Large Mixing Bowls: You’ll need at least two large mixing bowls. One for soaking the chickpeas and another for tossing them with oil and seasonings. A 5-quart or larger bowl will be sufficient for most batches. Stainless steel or glass bowls are ideal as they are durable and easy to clean. Avoid using reactive bowls like those made of copper or galvanized metal.
3. Colander or Fine-Mesh Sieve: This is crucial for rinsing the chickpeas thoroughly after soaking. A colander with relatively large holes will allow for efficient draining, while a fine-mesh sieve is better for catching smaller debris. Choose one that’s large enough to comfortably hold the soaked chickpeas without overcrowding.
4. Measuring Cups and Spoons: Accurate measurements are key to achieving consistent results. Invest in a set of reliable measuring cups and spoons for accurately measuring the chickpeas, oil, and seasonings. Using a kitchen scale for measuring the chickpeas is recommended for the most precise results. Measure the chickpeas by weight (grams or ounces) rather than volume for optimal consistency.
5. Whisk or Fork: You’ll need a utensil to thoroughly mix the chickpeas with the oil and seasonings. A whisk is ideal for ensuring even coating, but a fork will also work. Choose a utensil that’s comfortable for you to handle.
6. Oven Thermometer (Recommended): While most ovens have built-in thermometers, an oven thermometer provides a more accurate reading of the internal oven temperature. This is especially important for roasting, as consistent temperature is vital for achieving perfectly crispy chickpeas. An oven thermometer ensures your oven is accurately calibrated to the temperature you’ve set.
7. Parchment Paper (Optional but Recommended): While not strictly necessary, lining your baking sheets with parchment paper can prevent sticking and makes cleanup a breeze. It also allows for easier removal of the roasted chickpeas. Cut parchment paper to fit your baking sheets, leaving a little overhang for easy lifting.
8. Tongs or Spatula: These are helpful for removing the roasted chickpeas from the baking sheets and transferring them to a cooling rack. A spatula is useful for scraping up any stray chickpeas. Avoid using metal utensils while the chickpeas are still hot to prevent scratching your baking sheets.
By having these items prepared, you’ll be well-equipped to make perfectly roasted chickpeas every time. Remember, proper tools contribute to a smooth and successful cooking process.
Preparation Phase: Washing and Drying
Before embarking on the journey to perfectly roasted chickpeas, meticulous preparation is key. This crucial first step, washing and drying, directly impacts the final texture and flavor of your roasted chickpeas. Neglecting this stage can lead to uneven roasting and a less-than-ideal crispy result.
Begin by thoroughly rinsing one pound (approximately 450 grams) of dried chickpeas under cold running water. Use a fine-mesh sieve or colander to facilitate this process. This initial rinse removes any surface debris, dust, or small stones that may be present. Take your time; you should see the water running clear after a couple of rinses.
After rinsing, inspect the chickpeas closely. Remove any noticeably damaged or discolored chickpeas. While a few imperfections won’t ruin the batch, removing significantly damaged ones will improve the overall appearance and consistency of your finished product. Discard any chickpeas that are shriveled, cracked, or show signs of mold. Quality control at this stage is vital.
Now comes the crucial drying phase. Thoroughly dried chickpeas are essential for even roasting. If the chickpeas are still damp, they will steam instead of roast, resulting in soggy, rather than crispy, chickpeas. Do not skip this step. The best method is to spread the rinsed chickpeas in a single layer on a clean kitchen towel or several layers of paper towels. Ensure they are not overcrowded; this will prevent proper air circulation and hinder drying.
Allow the chickpeas to air dry completely. This typically takes at least 2-4 hours, depending on the humidity and temperature of your environment. You can speed up the process slightly by placing them in a well-ventilated area, away from direct sunlight which could potentially cause them to dry out unevenly. To check if they are completely dry, gently rub a few chickpeas between your fingers. If there’s any noticeable dampness, continue drying.
For a quicker drying method, you can use a clean kitchen towel to pat the chickpeas dry after the initial air drying. This absorbs any remaining surface moisture. However, avoid using excessive pressure, as this could damage the chickpeas. Remember, the goal is to remove surface moisture, not to crush the chickpeas.
Once completely dry, your chickpeas are ready for the next stage of preparation – soaking. Properly washed and dried chickpeas will soak more evenly, resulting in a more consistent and enjoyable final product. Don’t underestimate the importance of this seemingly simple step; it’s a foundation for achieving perfectly roasted chickpeas.
Preparation Phase: Spreading on Baking Sheet
Once your chickpeas are thoroughly rinsed and dried, the next crucial step is spreading them evenly on the baking sheet. This seemingly simple action significantly impacts the final result, ensuring even roasting and preventing sticking or burning. Proper spreading guarantees crispy chickpeas with minimal effort.
Begin by selecting the right baking sheet. A large, rimmed baking sheet (approximately 18×26 inches) is ideal for a single batch of chickpeas, allowing for sufficient air circulation. Avoid overcrowding the pan; this will lead to steaming rather than roasting, resulting in soggy chickpeas. Overcrowding is the single biggest mistake home cooks make when roasting chickpeas.
For a standard recipe using 1 (15-ounce) can of chickpeas, aim for a single layer, ensuring no chickpeas are stacked on top of each other. If you’re working with a larger quantity, use multiple baking sheets to maintain this single-layer distribution. A good rule of thumb is to leave at least ½ inch of space between each chickpea. This might seem excessive, but it’s essential for achieving optimal crispiness.
To achieve even spreading, consider using a spatula or spoon to gently distribute the chickpeas across the baking sheet. Don’t just dump them from the bowl; this will lead to uneven distribution and clumping. Work methodically, ensuring that the chickpeas are spread out consistently across the entire surface. Pay particular attention to the edges of the baking sheet, ensuring no chickpeas are piled up there.
If using parchment paper or a silicone baking mat, ensure it’s properly placed on the baking sheet before spreading the chickpeas. This not only prevents sticking but also makes cleanup significantly easier. However, note that parchment paper can sometimes burn at very high temperatures, so keep an eye on it. Silicone mats are a more temperature-resistant option.
Before placing the baking sheet in the oven, take a moment to visually inspect the distribution. Are there any areas with denser concentrations of chickpeas? Are there any gaps? Gently adjust the chickpeas to ensure an even, single layer. This careful preparation is key to achieving perfectly roasted, consistently crispy chickpeas. A few extra minutes spent on this step will be well worth the effort in the end.
Finally, remember to lightly oil the baking sheet (even if using parchment paper or a silicone mat). This will prevent sticking and contribute to a slightly crispier texture. A simple spray of cooking oil is sufficient; avoid over-oiling, as this will lead to greasy chickpeas. A light coating is all you need.
Cooking Techniques: Roasting in the Oven
Roasting chickpeas in the oven is a simple yet transformative technique that yields crispy, flavorful results perfect for snacks, salads, or as a crunchy topping. This method brings out the natural sweetness of the chickpeas and allows for easy customization with various spices and seasonings. Mastering the roasting process ensures perfectly crunchy chickpeas every time.
Preparation is key. Start with 1 pound (about 2 cups) of dried chickpeas. Thoroughly rinse them under cold water to remove any debris. Then, soak the chickpeas in ample cold water for at least 8-12 hours, or preferably overnight. This soaking time significantly reduces cooking time and improves texture. After soaking, drain the chickpeas completely.
Boiling before roasting is crucial for achieving optimal crispiness. Place the soaked chickpeas in a large pot and cover with fresh water. Bring to a boil, then reduce heat and simmer for about 45-60 minutes, or until the chickpeas are tender but not mushy. They should be easily pierced with a fork. Drain the chickpeas well and pat them completely dry with a clean kitchen towel. This step is essential; excess moisture will prevent proper browning and crispness during roasting.
Seasoning is where you can get creative. Once dry, toss the chickpeas with 1-2 tablespoons of olive oil. This helps them brown evenly and prevents sticking. Then, add your desired seasonings. A simple combination of 1 teaspoon of salt and ½ teaspoon of black pepper is a great starting point. For more complex flavors, experiment with paprika, garlic powder, onion powder, cumin, chili powder, or your favorite spice blends. Don’t be afraid to experiment!
Roasting for perfection. Preheat your oven to 400°F (200°C). Spread the seasoned chickpeas in a single layer on a large baking sheet. Avoid overcrowding; this will result in steaming instead of roasting. Ensure even spacing for optimal browning. Roast for 30-40 minutes, stirring halfway through, until the chickpeas are golden brown and crispy. Keep a close eye on them during the last 10 minutes, as they can burn quickly.
Cooling and storage. Once roasted, remove the chickpeas from the oven and let them cool completely on the baking sheet. This allows them to crisp up further. Once cooled, store them in an airtight container at room temperature for up to a week. They’ll maintain their crispness for several days. For longer storage, consider freezing them in an airtight container or freezer bag.
Troubleshooting: If your chickpeas are not crispy enough, they may have been overcrowded on the baking sheet or not dried sufficiently before roasting. If they’re burning too quickly, reduce the oven temperature slightly or increase the distance from the heating element. Remember, practice makes perfect! Don’t be discouraged if your first batch isn’t perfect; each time you roast chickpeas, you’ll refine your technique and discover your preferred level of crispiness and seasoning.
Cooking Techniques: Checking for Doneness
Achieving perfectly roasted chickpeas requires careful monitoring of their doneness. Over-roasting leads to burnt, brittle chickpeas, while under-roasting results in soft, unappealing snacks. This section will guide you through several methods to ensure your chickpeas reach that ideal crispy, crunchy texture.
The most reliable method is the visual inspection. After the initial 20-25 minutes of roasting at 400°F (200°C), begin checking your chickpeas every 5-7 minutes. Look for a deep golden brown color on the majority of the chickpeas. Avoid focusing solely on the color of a few chickpeas; ensure a consistent browning across the batch. The surface should appear dry, and the chickpeas should have shrunk slightly in size, indicating moisture loss and crispness.
The touch test is a valuable secondary method. Carefully remove a small handful of chickpeas from the baking sheet. Let them cool slightly (beware, they’ll be hot!), then gently press one between your thumb and forefinger. Perfectly roasted chickpeas should offer a satisfying crunch; they shouldn’t be soft or easily crushed. If they’re still soft, return them to the oven for another 5 minutes and repeat the test.
While the visual and touch tests are the most practical, you can also use a thermometer for a more precise measurement. While not as critical for chickpeas as it is for meats, a thermometer can be helpful, especially if you’re experimenting with different roasting times or oven temperatures. The internal temperature isn’t as crucial as the texture, but a roasted chickpea should register around 200-210°F (93-99°C) when tested with an instant-read thermometer. However, rely on the visual and touch tests as your primary indicators of doneness, as the thermometer may not always accurately reflect the crispy texture.
Avoid over-crowding the baking sheet. This can lead to uneven roasting and steaming rather than crisping. Ensure your chickpeas are spread in a single layer for optimal airflow and even browning. If you’re roasting a large batch, consider using two baking sheets. This will help maintain a consistent temperature and prevent uneven cooking.
Remember to stir your chickpeas halfway through the roasting process. This ensures that all sides are exposed to the heat and prevents sticking to the baking sheet. Using a spatula or spoon, gently toss the chickpeas, ensuring even distribution across the baking sheet.
Finally, practice makes perfect. The ideal roasting time can vary slightly depending on your oven, the size of your chickpeas, and your desired level of crispness. Don’t be afraid to experiment and adjust the roasting time based on your observations. With a little practice, you’ll become an expert at roasting perfectly crunchy chickpeas every time.
Recommendations for Perfect Roasted Chickpeas
These perfectly roasted chickpeas are a delicious and versatile snack or addition to meals. To maximize their flavor and enjoyment, consider the following recommendations:
Serving Suggestions: Their crispy texture and savory flavor make them incredibly adaptable. Enjoy them as a standalone snack, sprinkled over salads for added crunch and protein, or incorporated into grain bowls for a boost of flavor and texture. They also make a fantastic addition to soups and stews, adding a delightful textural contrast. Try adding them to your favorite trail mix for a healthy and satisfying snack. For a truly elevated experience, toss them with a sprinkle of your favorite spices, such as smoked paprika, cumin, or chili powder, after roasting for an extra layer of flavor. They also pair wonderfully with dips like hummus or tzatziki.
Storage Conditions: For optimal freshness and crispness, store your roasted chickpeas in an airtight container at room temperature for up to 3-4 days. For longer storage (up to 2 weeks), transfer them to an airtight container in the refrigerator. Avoid storing them in a humid environment, as this can cause them to become soggy. Freezing is also an option; simply place them in a freezer-safe bag and freeze for up to 3 months. Before enjoying frozen chickpeas, allow them to thaw completely at room temperature or briefly in the microwave.
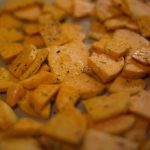
Complementary Dishes: The versatility of roasted chickpeas extends to countless dishes. They complement a wide array of flavors and cuisines. Consider serving them alongside Mediterranean-inspired dishes like falafel, tabbouleh, or Greek salad. Their earthy notes pair beautifully with roasted vegetables, such as sweet potatoes, Brussels sprouts, or butternut squash. They also make a delightful addition to hearty bowls featuring grains like quinoa or brown rice, alongside proteins such as grilled chicken or fish. For a flavorful twist, incorporate them into your favorite curry or tagine. The possibilities are truly endless!
Nutritional Information (per 100g serving, approximate values may vary based on preparation): Calories: Approximately 350-400 calories. Protein: 10-15g. Fiber: 10-15g. Fat: 5-10g (depending on the amount of oil used). Carbohydrates: 50-60g. Note: These are estimates and the exact nutritional content will vary depending on the ingredients used and the cooking method. For precise nutritional information, consult a nutrition calculator using your specific recipe details.
Important Note: While these roasted chickpeas are a healthy snack, moderation is key. Due to their high fiber content, consuming large quantities may cause digestive discomfort in some individuals. Listen to your body and enjoy them as part of a balanced diet.